background image

7


Cautions for installing the scale 

Consider the following conditions to get the most out of your scale. 


?

  Install  the scale  where  the temperature and relative humidity is stable. There is no 

draft and a stable power source is available. 

?

 Install the scale on a solid and level surface. 

?

 Do not install the scale in direct sunlight. 

?

 Do not install the scale near heaters or air conditioners. 

?

 Do not install the scale where there is flammable or corrosive gas present. 

?

 Do not install the scale near equipment which produces magnetic fields. 

?

  Do not install the scale where there is apt to be static electricity,  in  a place where 

the  relative humidity is lower than 45% RH.  Plastic and isolators  are apt to  be 
charged with static electricity. 

?

 Do not use an unstable power source. 

?

 When the scale is installed for the first time, or the scale has been moved, carry out 

calibration as described in “8. CALIBRATION”. 


4-3. Power source 

For the power source, the AC adapter or C size dry cells can be used. 


When using the AC adapter 

Use a stable power source. To use the AC adapter, insert the AC adapter plug into the 
AC adapter jack on the rear side of display pod. 

?

 Confirm the AC adapter type is correct for your local voltage. 


When using the batteries 


Prepare 4 x C size (R14P/LR14) dry batteries. The batteries are not included in the 
product.  The scale  can  be  used  continuously for about 150  hours  using  the alkaline 
batteries. 
 
1. Turn of the scale and disconnect the AC adapter if used. 
2. Slide the battery cover off 
3. Push the battery case inside the display pod and take it out. 
4. Insert four new dry cells into the battery case. 
5. Push the battery case into the display pod as before. 
6. Attach the battery cover. 
 

?

 Take great care of the polarity of batteries. The polarity marks are 

shown in the battery case. 

?

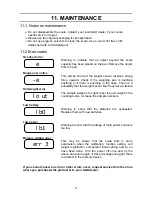
 Replace used batteries with four new ones when 

lb0

 is displayed. 

?

 Do not mix used and new batteries. It may cause damage to the 

battery or product, if used. 

?

 Do not mix the battery type. It may cause damage to the battery or 

product. 

?

 The battery life depends on the ambient temperature. 

?

 Remove batteries from display pod when the scale is not to be used 

for a long time. They may leak and cause damage.   

?

 Damage due to battery leakage is not covered by the warranty. 


Содержание FG-60KAL

Страница 1: ...F FG G S Se er ri ie es s D Di ig gi it ta al l P Pl la at tf fo or rm m S Sc ca al le es s FG 60KAL FG 150KAL FG 30KAM FG 60KAM FG 150KAM FG 30KBM FG 60KBM FG 150KBM WM PD4000966...

Страница 2: ...h if not avoided could result in death or serious injury CAUTION A potentially hazardous situation which if not avoided may result in minor or moderate injury This is a hazard alert mark This mark inf...

Страница 3: ...on 9 6 COUNTING MODE 10 7 COMPARATOR 11 8 CALIBRATION 12 8 1 Calibration using a weight 12 8 2 Gravity acceleration correction 13 9 FUNCTIONS 14 9 1 The procedure for setting parameters 14 9 2 Functio...

Страница 4: ...ation As power source you can use an AC adapter or C size dry batteries The counting function easily counts the number of articles of the same weight The comparator function compares the display value...

Страница 5: ...HI OK LO indicator PRINT switch ON OFF switch MODE switch RE ZERO switch Spirit level FG KBM series Display column Column support foot FG KAM only Spirit level Weighing pan Display pod Leveling foot F...

Страница 6: ...pcs for U S A models Switches PRINT Switch Outputs the weight value to printer In the setting mode this switch is used to increment the value of the selected digit blinking ON OFF Switch Used to turn...

Страница 7: ...turn on The TARE switch will tare the scale when the weight is plus value In this case the ZERO and NET indicators turn on The ZERO operation clears tare operation previously done and NET indicator t...

Страница 8: ...column feeding all of slack of the cable on the base into the display column Take care not scratch the cable 6 Put the bundle of cable back into the display column 7 Make sure the cable is fitted to t...

Страница 9: ...power source To use the AC adapter insert the AC adapter plug into the AC adapter jack on the rear side of display pod Confirm the AC adapter type is correct for your local voltage When using the bat...

Страница 10: ...the power will be switched OFF Auto power off function It is possible to have the power automatically switched OFF if zero is displayed for approximately 5 minutes See 9 2 Function list and set the f...

Страница 11: ...ring a value Do not press switches with a sharp implement such as a pencil Do not apply a shock load to the scale Do not place a load onto the pan that exceeds the capacity Keep the scale free from fo...

Страница 12: ...pan or in the container 6 Press the MODE switch to calculate and store the unit weight Remove the sample The scale is set to count objects with this unit weight The total weight of sample pieces shoul...

Страница 13: ...esolution kg 1 000 kg 30 000 kg x 0 005 kg HIGHER resolution kg 1 000 kg 30 000 kg x 0 002 kg NORMAL resolution lb 10 00 lb 60 00 kg x 0 02 lb HIGH resolution lb 10 00 lb 60 00 kg x 0 01 lb HIGHER res...

Страница 14: ...lace something on the pan to disable the auto power off function 2 Press and hold the calibration CAL switch until Cal 0 appears and release the switch The weighing unit must be kg or lb to enter cali...

Страница 15: ...he scale Change the gravity acceleration value of the scale to the value of area where the scale will be used Refer to the gravity acceleration map appended to the end of this manual Note It is not ne...

Страница 16: ...u do not need to change the parameter go to next step without setting 4 Press the MODE switch Then the display goes to the next function item In this stage the new parameter is not stored in the scale...

Страница 17: ...only f 4 0 2400 bps f 4 1 4800 bps RS 232C Baud rate f 4 2 9600 bps f 5 0 Stream mode f 5 1 Command mode f 5 2 Print switch mode f 5 3 Auto print mode data RS 232C Data output mode f 5 4 Auto print mo...

Страница 18: ...lation prepare an interface cable using attached DIN connector Or there is a way to use the optional RS 232C cable see 10 2 OP 23 RS 232C serial interface 1 Disconnect the AC adapter from the scale 2...

Страница 19: ...nd data output mode F4 F5 and F8 A DIN 8 pin connector JA TCP0586 is provided with the OP 23 for wiring There are optional cables to connect with a personal computer AX KO577A 200 FG to D Sub 25 pin c...

Страница 20: ...There are 4 types of units _ k g Weighing data gram _ P C Counting data pcs _ l b Weighing data decimal pound _ o z Weighing data decimal ounce The terminator is always CRLF Example of output data Wei...

Страница 21: ...the display returns to between 4d and 4d Auto print mode data Function setting F5 4 The scale transmits the weighing data when the display is stable STABLE indicator is on and the data is more than 4...

Страница 22: ...p Reply CR LF When F8 1 is selected there is no reply except the Q command 10 3 OP 24 RS 232C serial interface and Comparator relay output The OP 24 has an RS 232C series interface and relay output fo...

Страница 23: ...that the weight sensor itself may have a failure Unit weight error The sample weight is too light to set the unit weight in the counting mode Increase the sample numbers Low battery Warning to show t...

Страница 24: ...Std deviation 0 005 kg 0 01 kg 0 02 kg 0 01 kg 0 02 kg Linearity error 0 01 kg 0 02 kg 0 05 kg 0 02 kg 0 05 kg Sensitivity drift 20 ppm C 10 C 30 C 50 F 86 F Display 7 segment LCD display Character h...

Страница 25: ...23 12 2 Dimensions FG 60KAL FG 150KAL FG 30KAM FG 60KAM FG 150KAM FG 30KBM FG 60KBM FG 150KBM 530 390 289 300 440 99 128 781 380 220 82 300 300 202 118 781 89 230 380 300 300 220 145 89 118 mm...

Страница 26: ...m s2 Cape Town 9 796 m s2 Rio de Janeiro 9 788 m s2 Chicago 9 803 m s2 Rome 9 803 m s2 Copenhagen 9 815 m s2 San Francisco 9 800 m s2 Cyprus 9 797 m s2 Singapore 9 781 m s2 Djakarta 9 781 m s2 Stockho...

Страница 27: ...25 World map...

Страница 28: ...26 MEMO...

Страница 29: ...27 MEMO...

Страница 30: ...28 MEMO...

Страница 31: ...ngdon Business Park Abingdon Oxon OX14 1DY United Kingdom Telephone 44 1235 550420 Fax 44 1235 550485 German Sales Office Gro e Stra e 13 b 22926 Ahrensburg GERMANY Telephone 49 0 4102 459230 Fax 49 0...

Отзывы: