Managing the LTE | 165
Aprisa LTE User Manual 2.1
Security > VPN
Secure VPN to data center and multipoint (peer to peer) VPNs
Setting up a secure connection to the customer data center or to other multiple Aprisa LTE (peer to peer)
requires setting up a VPN connection to the required end point/s. The Aprisa LTE allows a few VPN
connection options, non-secure and secure PTP VPNs and Multi-Point (MP) VPNs, which are listed list below:
1. Setup unsecure GRE PTP VPN connections.
2. Setup secure GRE-over-IPsec connections.
3. Setup secure Multipoint (peer to peer) GRE-over-IPsec VPN connections.
4. Checking and monitoring the VPN connections.
The VPN menu allows configuration of the above list of VPN options while monitoring the VPNs is under the
Maintenance menu.
Setup unsecure GRE PTP VPN connections
The user can use a regular unsecure IPv4/v6 connection or unsecure GRE VPN tunnel. The Aprisa LTE can
act as a GRE tunnel endpoint. The benefit of GRE tunnel is that it provides a tunnelling connection to
multiple protocols between two endpoints (or two private networks) over another network like they were
locally connected. It allows the user to reconfigure its local device IP addressing without worrying about
connectivity. It allows transport of L2/L3/L4 unicast and multicast protocols between two endpoints.
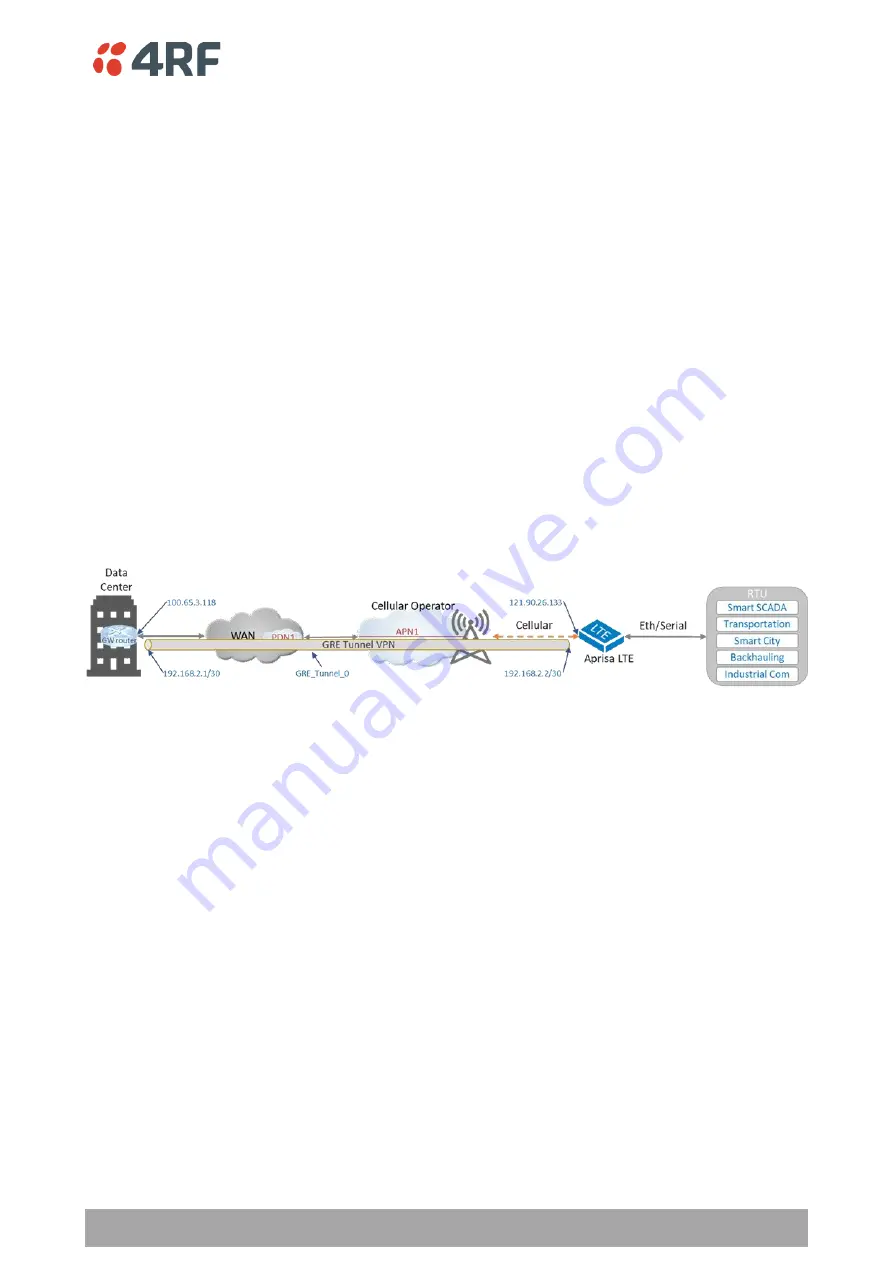
Figure 19 describes the unsecure GRE VPN tunnel connection to the corporate data center.
Figure 19 Setup unsecure GRE PTP VPN connections
To setup the GRE tunnel VPN connection per the above figure, perform the following steps on Aprisa LTE:
1. Navigate to SuperVisor
’ and on the GRE tab cli
ck the Add button.
2.
Set ‘Mode = IP over GRE’ (or ‘IP over GREv6’ in case of IPv6 GRE tunnel).
3.
Set ‘Tunnel Name = GRE_Tunnel_0’. This sets the tunnel ID. This ID is
recommended to be used on
both ends of the tunnel configuration.
4.
Set ‘Tunnel IPv4 ad
dress/Netmask = 192.168.2.2 /
255.255.255.252 (/30)’ (or Tunnel IPv6
Address/Prefix in case of IPv6). This is the IP address of the virtual tunnel interface. This is the GRE
tunnel “glue” IP address to the transport IP address (or per standard notation the
delivery IP). Note:
those IP addresses must be unique and without subnet overlapping at both ends of the GRE tunnel.
5.
Set ‘
Tunnel Key = 42
’. This is the
GRE tunnel key number and is required in DMVPN setup.
6.
Set ‘Source Public Address (SPA) = 121.90.26.133’. This is the source transport IP address (or the
outer IP source address of the GRE tunnel across the cellular and wan networks) which is “glue” to
the virtual tunnel IP address. On the data
center endpoint set ‘Source Public Address =
100.65.3.
118’. The SPA can be public port or local port, and in this example, it is a public port.
Alternatively, the SPA can be set to 0.0.0.0 if the source interface is selected. In this example it can
be wwan.
7.
Set ‘Destination Public Address = 100.65.3.118’.
This is the destination transport IP address (or the
outer IP destination address of the GRE tunnel across the cellular and wan networks) which is “glue”
to the virtual tunnel IP address. On the data
center endpoint set ‘Destination Public Address =
121.90
.26.133’.
Alternatively, the SPA can be set to 0.0.0.0 if the source interface is selected. In
this example it can be wwan.
Содержание Aprisa LTE
Страница 1: ...User Manual February 2021 Version 2 1 released with software build 2 1 00811003 ...
Страница 2: ......
Страница 6: ...6 Aprisa LTE User Manual 2 1 Compliance Canada ISED future compliance ...
Страница 10: ......
Страница 110: ...110 Aprisa LTE User Manual ...
Страница 130: ...130 Aprisa LTE User Manual ...
Страница 149: ...Managing the LTE 149 Aprisa LTE User Manual 2 1 Services Services Summary ...
Страница 154: ...154 Aprisa LTE User Manual Controls Synchronize Now This Synchronize Now button provides manual Synchronization ...


