3scort TD-BLE Скачать руководство пользователя страница 56

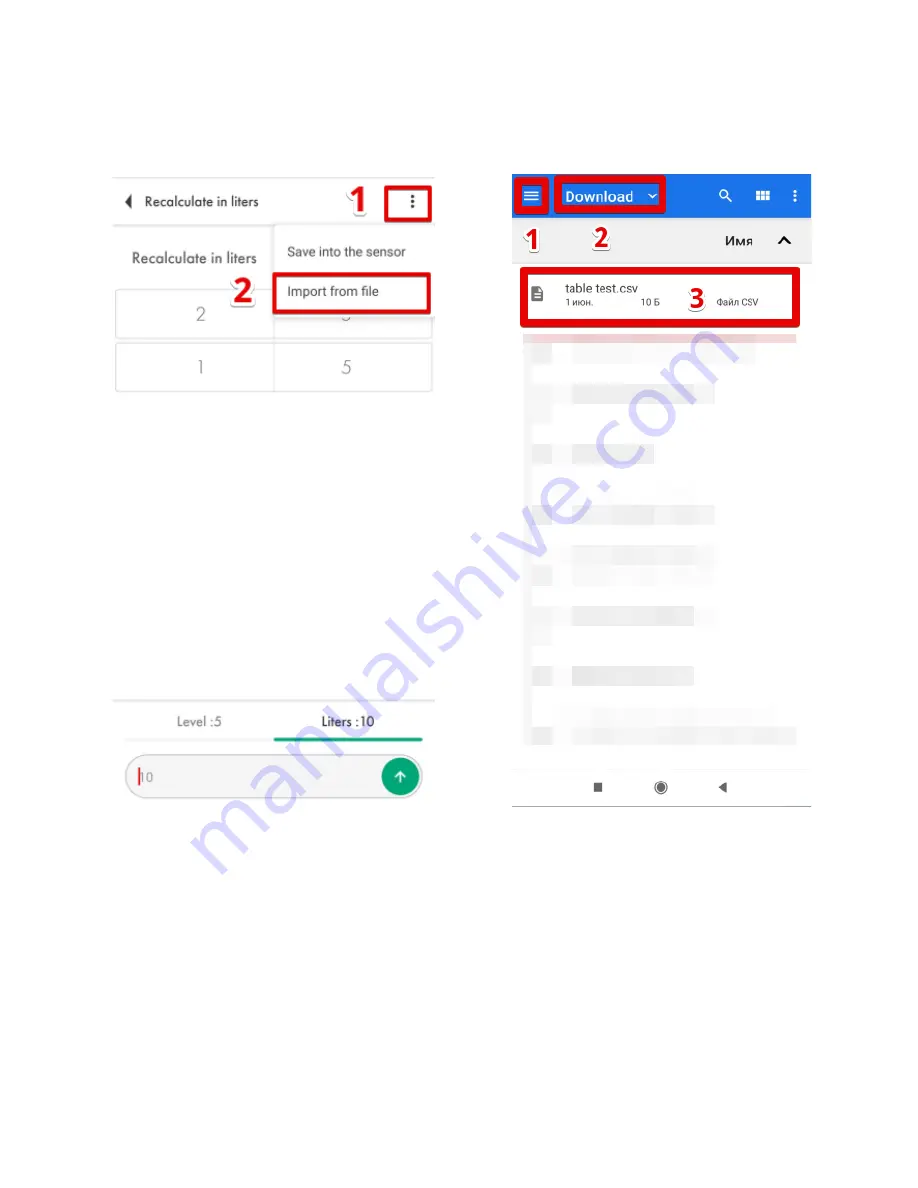
To import the table from a .csv file you created doing the tank calibration, press on the

three

dots

icon (

Fig. 84

,

1

) and then tap on the

Import from file

option (

Fig. 84

,

2

. After that, find the file

with the table on your smartphone and tap on it (

Fig. 85

).

Be sure to save the imported into the sensor as shown on

Figure 83

.

Fig. 84

Importing table

Fig. 85

Saving table

Common issues and how to resolve them

The level reading doesn’t change

56

Содержание TD-BLE

Страница 1: ...hen you calibrate the sensor 9 How to and why calibrate sensors 13 Calibration without fuel 16 When and how to select the 1024 or 4096 range 18 How to check if the sensor is properly calibrated 19 Tan...

Страница 2: ...ge 56 Level 7000 58 Level 6500 59 How to remove replace the battery 60 The battery replacement process for the 1st generation TD BLE 60 The battery replacement process for the 2nd generation TD BLE 62...

Страница 3: ...TD BLE design Design of the 1st generation TD BLE 3...

Страница 4: ...Design of the 2nd generation TD BLE 4...

Страница 5: ...Android devices hereinafter the app Geolocation Run the configurator Be sure to give it access to your smartphone s geolocation Activate the Bluetooth and the geolocation of your smartphone Fig 1 The...

Страница 6: ...cular sensor by introducing the last 6 digits of its serial number The serial number can be found on the sensor s head Or simply find the sensor you need on the list and tap on the Connect button When...

Страница 7: ...Fig 4 Sensor search Fig 5 Data received in Advertising mode 7...

Страница 8: ...ut more on that later 5 RSSI Received Signal Strength Indicator that shows how well your smartphone receives the data from the sensor this parameter is NOT transmitted by the sensor but is calculated...

Страница 9: ...attery charge measurement as well as transmission of the BLE data packages synchronize and thus the power consumption of the device increases while the battery voltage decreases Sensor calibration CNT...

Страница 10: ...on how much fuel there is in the sensor s tubes The CNT is then compared with the Empty and Full values If the tubes are empty and CNT Fig 9 1 Empty calibration value Fig 9 2 the level is displayed a...

Страница 11: ...If the tubes are full and CNT Full calibration value the level is displayed as 1023 or 4095 Fig 11 CNT and Full Fig 12 Level reading when CNT Full 11...

Страница 12: ...e CNT must be increasing as the fuel fills the sensor s tubes It has to be moving from the value close to the Empty calibration value towards the Full calibration value Fig 13 CNT level and physical f...

Страница 13: ...the Empty button Fig 14 CNT and Full before pressing Full Fig 15 CNT and Full after pressing Full How to and why calibrate sensors Initially the sensor is calibrated at its original length Once you c...

Страница 14: ...That is why you need to Insert the centrator from the sensor s kit into the tubes Fig 16 Fig 16 Centrator centralizer 14...

Страница 15: ...Fig 17 Covering drainage hole turning the sensor upside down and filling the tubes from a jerry can Fig 18 Filling the tubes by putting the sensor into fuel Switch off the Calibration without fuel tu...

Страница 16: ...bration without fuel Alternatively you can calibrate the sensor without fuel In this case make sure the sensor s tubes are empty and there is no fuel in its tubes Leave the Calibrate without fuel tumb...

Страница 17: ...e could change a little bit Originally there are two measurement ranges From 1 to 1023 From 1 to 4095 The sensor never transmits the value of 0 When it is empty the level is shown as 1 Sometimes when...

Страница 18: ...ement range is recommended in all other cases To change the range open the Settings menu and select one of the two ranges in the Maximum level dropdown menu Fig 24 Then be sure to tap on the Set param...

Страница 19: ...w to check if the sensor is properly calibrated The Empty calibration value must be at least x1 4 lesser than the Full calibration value Fig 26 Properly calibrated sensor 22 209 Full 15 687 Empty 1 4...

Страница 20: ...d fumes especially if it is a gasoline petrol tank to do so you can boil some water in a separate recipient and administer the vapor from that recipient into the tank so it could push the fuel vapors...

Страница 21: ...e hole in it using a 3mm bit Then probe the space around it for any reinforcement plates ribs or baffles inside the tank using a piece of wire Fig 29 Fig 28 Selecting the spot Fig 29 Drilling a hole t...

Страница 22: ...35 mm bimetallic hole saw be sure to tilt the saw a little bit to prevent the cut piece from falling into the tank Fig 30 and 31 Use a magnet to collect metal shavings and keep them from falling into...

Страница 23: ...ometric center of the tank The highest point must be selected for the sensor to be able to measure all the fuel inside the tank without any blind zones The readings of the sensor installed in the cent...

Страница 24: ...s should be calculated based on the following formula L H 15 mm where L is the length of the tubes after they were cut or extended and H is the height of the tank at the installation spot ATTENTION Th...

Страница 25: ...the sensor s circuit inside its head Fig 35 Cutting the tubes Do not let any metal shavings end up stuck inside the tubes that could provoke a short circuit in the sensor and then you would need to bl...

Страница 26: ...f the inner tube Once inserted into the parts of the inner tubes and screwed onto the stud bolt they don t have to touch but try to drive them as close to each other as possible without breaking the t...

Страница 27: ...nsor s length is adjusted and it has been recalibrated you need to install it in the tank Mount the sensor into the tank driving its tubes through the 30 35 mm hole you drilled previously Make sure th...

Страница 28: ...Fig 41 Putting the sensor inside tank Fig 42 Fixing the self tapping screws 28...

Страница 29: ...akes in the table if it is uploaded onto the platform rather than if it is saved in the sensor s memory To create such a table you need to fill the tank step by step adding the fuel into the tank port...

Страница 30: ...a new table or select the file you might have already created and Continue working with it If you press Continue then you will need to find the table on your Android device where you previously create...

Страница 31: ...ontinue Fig 46 Set parameters to apply the change and remove the red tick If you press Start then once again choose the folder in which the table will be saved Fig 47 1 2 and press the button to selec...

Страница 32: ...full Next give the table s file a name Fig 48 3 and set the portion volume Fig 48 4 ATTENTION Portion volume is not the number of portions It is the number of liters gallons each portion will be equa...

Страница 33: ...and level 1 Fig 50 Also the Tank calibration mode will be activated available in the sensors with the FW 1 3 3 and newer It means that the sensor starts measuring the level every 5 seconds instead of...

Страница 34: ...ou can reset it by saving the table Fig 51 1 2 then going back to the previous menu Fig 51 3 and then pressing Continue and selecting the file with the table to continue doing the tank calibration wit...

Страница 35: ...the fuel into the tank Fig 54 Once the level has changed Fig 55 3 and has been reported to be stable Fig 55 4 tap on the button Fig 54 1 In this example the level Fig 55 3 doesn t change because we di...

Страница 36: ...3 last time Fig 54 Add the 1st portion into the tank Fig 55 Press button and the new row will appear You can also edit any row by pressing and holding it for a few seconds until a new dialogue window...

Страница 37: ...the row by pressing holding and swiping to the left Then you add another portion of the fuel into the tank Fig 58 Wait for the level to change and become stable and then press the button again Fig 59...

Страница 38: ...ow find out how many liters or gallons are already there in it After that you can manually edit the table so it looked like the example below Or simply edit the table file before uploading it onto the...

Страница 39: ...5 to a different value If the level value doesn t change check the drainage holes of the sensor They could be blocked by an insulation tape you left there after the calibration at full and empty or so...

Страница 40: ...Fig 62 Second portion is in Fig 63 The table with two portions You continue like that until the tank is full 40...

Страница 41: ...he tank Once past that shape s peculiarity switch back to the previous volume of portions Let s imagine that you do the tank calibration with portions of 10 liters just like before The level gets to s...

Страница 42: ...ortions volume When the level is above the problematic part you can switch back to filling the tank with portions of 10 liters When the tank is full you should have a tank calibration table that looks...

Страница 43: ...Fig 66 Tank filled Fig 67 Tank calibration table in the app and with all rows in a csv file 43...

Страница 44: ...not reach 1023 or 4095 because you cannot fill the tank completely because of how it is shaped don t worry about that It is fine if your table ends up looking like the following example although the r...

Страница 45: ...e total number of the portions depends on the tank s total capacity See the table with our recommendations below Table 1 The general rule is the more portions the more precise will be the data in the...

Страница 46: ...ration is over select the level of Filtration Fig 70 in the Settings menu Fig 69 1 and tap Set parameters or Write parameters to device Fig 69 Settings Fig 70 Select Filtration and press Set parameter...

Страница 47: ...e general rules are The shorter the sensor 30cm the higher must be the filtration level The closer the sensor is to one of the tank s walls the higher must be the filtration level The rougher is the t...

Страница 48: ...nchronize the time of the black box with the time of your smartphone Currently the app requests you to do that automatically if it detects that the clock of the black box is not synchronized with the...

Страница 49: ...r tap on the three dots in the upper right corner Fig 74 1 and select Black box Fig 74 2 Then you can select the period in days Fig 74 1 and or hours Fig 74 2 and either download the data recorded in...

Страница 50: ...Fig 74 Black box Fig 75 Download options Then tap on the Save the received data button The line chart will be on your display shortly after that 50...

Страница 51: ...Fig 76 Save the received data Fig 77 Line chart If you saved any data before you can get it displayed by tapping on the line chart icon in the upper right corner Fig 78 51...

Страница 52: ...NTION Do not change the position of the Disable Thermal Compensation tumbler it must be grey unless you have some other algorithm applied by the GPS tracker or other device the sensor is connected to...

Страница 53: ...by entering the calibration value of an equally long sensor manually Fig 79 4 and pressing the Install button Fig 79 5 ATTENTION Setting calibration values manually will likely increase the margin of...

Страница 54: ...ain screen of the sensor or on the Recalculate in liters button in the Additional Features menu Fig 81 1 Fig 80 Recalculate in liters Fig 81 Additional Features Recalculate in liters Then you can acti...

Страница 55: ...e could be gallons or any other volume measurement units and enter the value Fig 82 4 and tap on the arrow button Fig 82 5 Then press on the three dots icon Fig 83 1 and then tap on the Save into the...

Страница 56: ...d then tap on the Import from file option Fig 84 2 After that find the file with the table on your smartphone and tap on it Fig 85 Be sure to save the imported into the sensor as shown on Figure 83 Fi...

Страница 57: ...not activated Fig 87 Recalculate in liters is activated but no table has been uploaded into the sensor s memory Another possible reason could be that the sensor is not properly calibrated and its CNT...

Страница 58: ...the sensor s tubes All these can be highly conductive and the sensor is designed to work in an environment with low conductivity such as fuel Fig 88 Level 7000 You need to clean the tubes of the senso...

Страница 59: ...If doesn t help check the CNT If it is below 10 000 then most likely the tubes are disconnected from the sensor s head indeed Take the picture of the sensor s head the serial number must be clearly v...

Страница 60: ...ery The battery replacement process for the 1st generation TD BLE Open the sensor s head by removing the screws and the lid Fig 91 Remove the lid Cut the upper layer of the sealant without damaging th...

Страница 61: ...Fig 92 Cut the compound Take the battery out Replace it with a new one Check if the sensor is detected by the app Fig 93 Remove the battery Replace it or put it back 61...

Страница 62: ...The battery replacement process for the 2nd generation TD BLE Take off the sensor s protecting cap using a screwdriver or any thin object Taking off the protecting cap 62...

Страница 63: ...Take off the cap from the battery holder by unscrewing its self tapping screws Sensor s head without its protecting cap 63...

Страница 64: ...ote that for the 2nd generation TD BLE you can also use the Saft LS17500 battery model which is different from the model used for the 1st generation sensor Saft 17500 and Saft LS14500 battery models A...

Страница 65: ...any other smartphone It can be connected to one smartphone at a time only Then make sure that you have the geolocation activated on your smartphone and the app has the access to it Fig 94 GPS geolocat...

Страница 66: ...ther sensor can be connected to the same smartphone Next try and loosen the screws that are holding the sensor in the tank If even after loosening the screws the sensor cannot be detected or connected...

Страница 67: ...g helps make a video of all these attempts and send it to us If the sensor is available for connection after removing its battery and putting it back then cover the battery with some non acidic automo...

Страница 68: ...he tank without you or your being aware of that put the sensor s protecting cap over its head and then drive the wire of the seal through fitting holes Then drive the wire through the seal itself and...

Страница 69: ...current type TD BLE You will need a protecting cap and a seal from the kit Fig 99 Protecting cap Fig 100 Seal its covered end You should mount the cap on the sensor Fig 101 Sensor with protecting cap...

Страница 70: ...al into the certain hole the seal s covered end must be outside Fig 102 Sealing sensor To remove the seal use a special key from the kit or any self tapping screw of the certain size to screw it into...

Страница 71: ...Fig 103 Key screwed in the seal Fig 104 Extracting the seal 71...

Страница 72: ...Fig 105 Seal after extracting its covered end is damaged Thus you cannot remove the seal without damaging it It provides a sensor with an additional protection 72...

Страница 73: ...Mounting dimensions Fig 106 Mounting dimensions 73...

Страница 74: ...How strong to tight up self tapping screws Fig 107 How strong to tight up self tapping screws 74...

Отзывы: