


14
Changing the Label Settings
Once you create a specific label, you can change
the settings without starting all over again.
To change the label settings
1. Press .
2. Select
Current label config.
and press
.
The settings for the particular label type
are displayed.
3. Make the necessary changes.
4. Press
and then select
Done (OK)
.
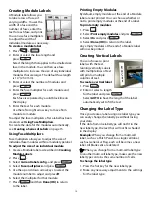
Printing Separator Lines
Between Cells
For multiple cell labels, such as Patch Panel,
Electrical Panel, Terminal Block, 110-Block, and
Module, you can choose to print a separator line
between each of the cells.
To print separator lines between cells
1. Create the type of multiple cell label you want.
2. Press .
3. Select
Current label config.
and press
.
4. Select
Separator lines
and press
.
5. Select
On
.
6. Press
and then select
Done (OK)
.
A line is printed between each cell.
Using Barcodes
The printer can generate Code 39 and Code 128
barcodes. You can add a barcode to the following
label types:
You can only print a barcode on 3/4” (19 mm) wide
labels. You can choose whether or not to print the
human-readable text, and you can serialize
barcodes.
The barcode prints horizontally along the label. You
can choose to print the human-readable text in
small print either underneath or above the
barcode. Optionally, you can add text before and
after the barcode.
Adding a Barcode
The barcode text appears on the label in the
display just like any other text. However, if the
cursor is positioned within the barcode text,
Barcode
and the type of barcode are displayed in
the Caption bar.
To add a barcode
1. Press
+
.
2. Select
Barcode type
and press
.
3. Select the barcode type, and press
.
4. Enter the text for the barcode within the
barcode on the display.
5. Press
and then select
Done (OK)
.
Editing a Barcode
You can edit the text for an existing barcode.
To edit a barcode
1. Move the cursor anywhere within the
barcode text.
Barcode
and the type of barcode are displayed
in the Caption bar.
2. Enter any character. A message appears asking if
you would like to edit the barcode.
3. Press .
The text of the existing barcode is displayed.
4. Edit the barcode text and press
.
Deleting a Barcode
A barcode is entered on the label as one character.
To delete a barcode
1. Place the cursor at the end of the barcode
text on the display.
2. Press .
Positioning Human-Readable
Barcode Text
You can choose to place the human-readable
text above or below the barcode. By default, the
label prints with the human-readable text below
the barcode.
To change the barcode text location
1. Press
+
.
2. Select
HR position
and press
.
3. Select
Above barcode
or
Below barcode
.
4. Press
and then select
Done (OK)
.
General
Fixed
Wire
Patch Panel
Flag
Module
T
F
I
H
S
BKSP
T
F
I
H
S
Содержание PL200
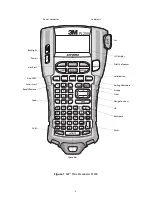
Страница 1: ...Portable Labeler PL200 User Guide...
Страница 22: ...22...


