3M PL200 Скачать руководство пользователя страница 9

9

Removing Labels from a File

You can remove one or more labels from a label file. 

To remove a label

1. Press  

.

2. Select one of the following:

All

 to remove all of the labels in the file.

Current

 to remove the label at the current 

cursor position.

Range

 and then select the range of labels 

to remove.

3. Press . 

The selected labels are removed from the display.

Printing a Label File

When you print a label file, you choose whether to 
print all of the labels, the current label, or a range of 
labels in the file.

To print labels

1. Press 

. If your label file contains more than 

one label, the print menu is displayed.

2. Select one of the following:

All

 to print all of the labels in the file.

Current

 to print the label at the current 

cursor position.

Range

 and then select the range of 

labels to print.

3. Press 

. The selected labels are printed.

4. Press the 

CUT

 button and remove the labels.

Formatting a Label

You can choose from a number of formatting 
options to enhance the appearance of your labels.

Changing the Text Size 

You can print the text on your label in several sizes: 
extra-extra-small, extra-small, small, medium, large, 
extra-large, and BIG (all capital letters). The text size 
selected applies to all the text on all the labels in a 
label file.
The text size available for you to use depends on 
the width set for the label and the type of label you 
are creating.

You can also select Auto as the text size. When Auto 
is selected, the best text size is automatically 
determined for the height and width of the label 
you are creating. BIG font is not used when Auto 
text size is selected.

To set the text size

Press 

. Each time you press 

, the next 

available text size is highlighted on the Size 
feature indicator on the display.

Changing the Text Style 

You can print the text on your label in several styles: 
bold, italic, underlined, and boxed. And, you can 
choose normal width or narrow width. The text 
style applies to all the text on all the labels in the 
label file, including most symbols.

To set the text style

1. Press .
2. Select 

Text styles

 and press 

.

3. Select a style and press 

.

4. Select 

On

 or 

Off

 to enable or disable the 

selected style.

5. Press 


and then select 

Done (OK)

.

To set the text width

1. Press .
2. Select 

Text styles

 and press 

.

3. Select 

Font

 and press 

.

4. Select 

Narrow

 or 

Normal

.

5. Press 


and then select 

Done (OK)

.

To insert an underlined 6 or 9 character 

Press and hold 

 or


 until 

6

 or 

9


appears in the display.

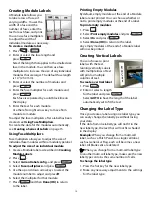
Creating Multi-Line Labels

You can create multi-line labels depending upon 
the width of the label, as follows:

The display only shows two lines of text. Use the 
arrow keys to scroll through more than two lines.

To create a multi-line label

1. Type the text for the first line, and press 

.

2. Type the text for the next line.
3. Repeat these steps for each additional line.

T

F

I

H

S

Label 

Width

1/4”

(6 mm)

3/8” 

(9 mm)

1/2” 

(12 mm)

3/4” 

(19 mm)

# Lines

1

3

3

5

Содержание PL200

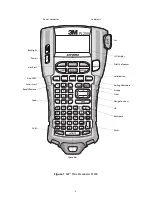
Страница 1: ...Portable Labeler PL200 User Guide...

Страница 2: ...ar Key 8 Cutter Button 8 Hot Keys 8 Working with Label Files 8 Creating a Label File 8 Adding Labels to a Label File 8 Removing Labels from a File 9 Printing a Label File 9 Formatting a Label 9 Changi...

Страница 3: ...ng Symbols 15 Using the Text Library 15 Adding My Library Text 15 Inserting Library Text 15 Deleting My Library Text 15 Creating a Series of Labels 15 Using Simple Serialization 16 Using Simultaneous...

Страница 4: ...S T F I H S BKSP PL200 Feed Print of copies Escape Backspace Shift Size CAPS Backlight Serialization Label exit LCD display Save Insert Hot Keys Navigation keys Space bar Power Clear OK Recall Remove...

Страница 5: ...ation on obtaining an optional rechargeable battery pack The printer can operate with six AA alkaline batteries for power however alkaline batteries should only be used as temporary backup power To sa...

Страница 6: ...tween the label guides If necessary turn the ribbon rewind spool clockwise to tighten the ribbon 3 Insert the cartridge with the label and ribbon positioned between the label guides Figure 5 4 Press f...

Страница 7: ...ttings are remembered however the current label file is lost and you will need to reset the label width when you reconnect the power and turn on the printer LCD Display The LCD display includes a capt...

Страница 8: ...abel file can contain one or more labels When you create a new label you also create a new label file You can then insert additional labels remove labels and store a group of labels as a label file in...

Страница 9: ...d the type of label you are creating You can also select Auto as the text size When Auto is selected the best text size is automatically determined for the height and width of the label you are creati...

Страница 10: ...Labels A Cable label is placed around the width of a wire or cable You can enter up to five lines of text and the text is repeated as many times as possible depending on the size of the text and the l...

Страница 11: ...ce between each port and press The default distance is 0 6 12 mm 4 Enter or select the number of ports and press Each port is separated by a solid black line on the display 5 Enter the text for each p...

Страница 12: ...Block Labels A Terminal Block label is very similar to a Patch Panel label however the text is printed vertically for each block To create a terminal block label 1 Press 2 Select Terminal block and p...

Страница 13: ...o select the module number to adjust and press 6 Select the multiplier for that module 7 Press and then Done OK to return to the label Printing Empty Modules By default empty modules at the end of a M...

Страница 14: ...lly you can add text before and after the barcode Adding a Barcode The barcode text appears on the label in the display just like any other text However if the cursor is positioned within the barcode...

Страница 15: ...want and press The text is added to My Library Inserting Library Text Library text added to a label is the same as text entered from the keypad Library text can be edited formatted or deleted To add...

Страница 16: ...to create and press You can choose to create up to 99 labels A new label is added in the display for each label in the series Using Advanced Serialization Advanced serialization creates a series of l...

Страница 17: ...crements To advance the label 1 Press 2 Press to advance the label Adjusting Print Contrast Depending on the label material you choose you may need to lighten or darken the print on the label To adjus...

Страница 18: ...then press to clear the memory location Cleaning Your Printer Your printer is designed to give you long and trouble free service while requiring very little maintenance Clean your printer from time to...

Страница 19: ...19 Symbols The following tables show the default symbols by category Electrical Voice Data Warning Punctuation Brackets Arrows Numbers Currency _...

Страница 20: ...rtridge cover and that the label cartridge is inserted properly See Inserting and Removing the Label Cartridge Unable to return to the previous menu Press to return to the previous menu Press to retur...

Страница 21: ...llow the specified conditions Do not connect directly to an electric outlet or cigarette lighter charger Do not use or store battery close to fire or inside the car where temperature may be over 60 C...

Страница 22: ...22...

Страница 23: ...loss or damage arising from this 3M product regardless of the legal theory asserted This product is CE marked in accordance with the EMC directive and the low voltage directive and is designed to con...

Отзывы: