background image

3DCPI-02   

START-UP GUIDE


III. Installing software 
 
Configuring 3D printing software 
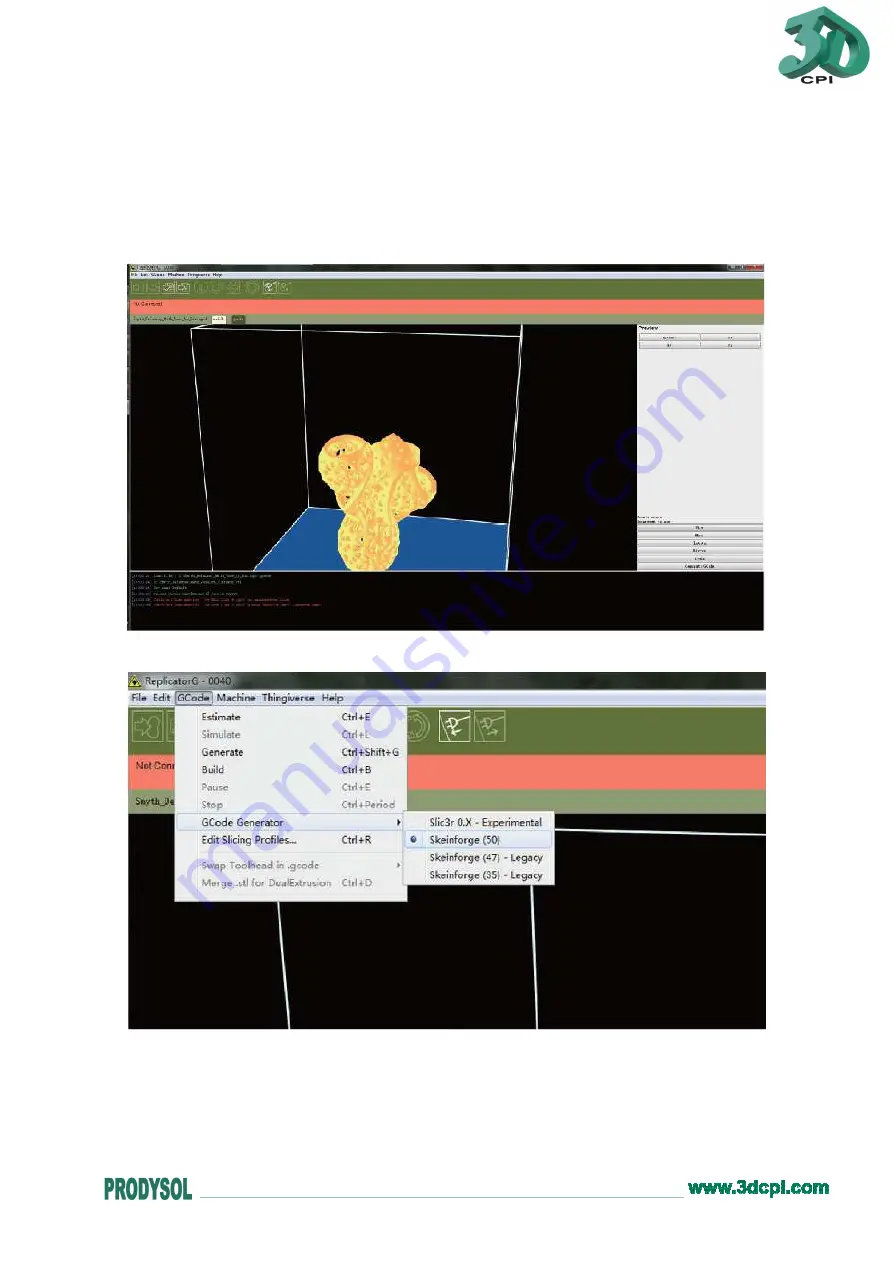
1. Run ReplicatorG. 
2. Choose extruder and connection serial port. 


a. Click GCode->GCode Generator, and select   
“Skeinforge(50)”. 


b. Click Machine->Machine Type (Driver). If your printer is dual-extruder, select “The 
3DCPI-02Dual”. If it´s a single-extruder machine, select “The 3DCPI-02Single”. 

Содержание 3DCPI-02

Страница 1: ...3DCPI 02 START UP GUIDE 3DCPI 02START UP GUIDE ...

Страница 2: ...D printing software Setting up 3D data IV Pre print checks Leveling the build platform Turn on the printer Test printing V Printing Printing from SD card Recommended Printing from computer VI PyPy Acceleration VII Updating firmware VIII Maintenance and Troubleshooting Thanks for choosing 3DCPI 02 personal 3D printers To get a better printing experience we suggest you to take time reading this manu...

Страница 3: ...ment Types PLA ABS PHYSICAL DIMENSIONS Size 405 x405 x405mm Shipping Box 520 x520 x580mm Weight 20 05KG single head 20 55KG dual head ELECTRICAL AC Input 100 240V 50 60 Hz Connectivity USB SD card with SDHC support MECHANICAL Chassis Steel Front Cover PVC Panel XYZ Bearings IKO Linear Bearings Stepper Motors 1 8 step angle with 1 16 micro stepping SOFTWARE Printer Host Software ReplicatorG File Ty...

Страница 4: ... Place the box on the ground and open it up 2 Slowly take 3DCPI 02 out of the box by grasping the upper frame with two hands Place it on a sturdy table 3 Gently remove all the fixtures holding parts in place for transport Be careful with scissors ...

Страница 5: ...02 START UP GUIDE I Meet the 3DCPI 02 What s included The box contains the following accessories If anything is missing or damaged please contact your sales representative from whom you purchased the printer ...

Страница 6: ...3DCPI 02 START UP GUIDE I Meet the 3DCPI 02 At a glance 1 LCD panel 2 Function buttons 3 Threaded Z axis rod 4 Build platform 5 Build plate 6 Feed tube 7 Extruder cable 8 USB port ...

Страница 7: ...START UP GUIDE II Setting up your 3DCPI 02 Power switch The power supply of 3DCPI 02 3D printer could be switched between 220 Volt and 110 volt It is located on the bottom side and the origin out put is 220 volt ...

Страница 8: ...3DCPI 02 START UP GUIDE Installing spool holder Tilt the spool holder and insert it into one of the holder mounts on the back of the printer Then fit your filament spool onto the installed holder ...

Страница 9: ...the machine Make sure the spool spins clockwise when viewed from the back of the machine when printing and that the end of the feed tube isn t lower than the spool holder as shown below Then push filament through the feed tube into the extruder As for CubeII with dual extruders mount the second spool on the left holder and ensure that it spins counter clockwise ...

Страница 10: ...t one end of the USB cable into the port on the right of the machine and DON T attach the other end to any device yet Make sure your printer power switch is in the OFF position and then plug the power cord into the power supply located on the back of the machine and power on ...

Страница 11: ...oftware 2 After you ve downloaded the files install Python 2 7 For Windows XP double click Python2 7 to install For Windows 7 run the installer with administrator rights TIPS Right click on the installer to get the Run as Administrador option ...

Страница 12: ...3DCPI 02 START UP GUIDE 3 Keep clicking Next button until you get only one Finís button to click NOTE Use the default installation directory ...

Страница 13: ...3DCPI 02 START UP GUIDE 4 Click the Finish button to complete the installation ...

Страница 14: ...3DCPI 02 START UP GUIDE III Installing software Installing and setting up printer driver 1 Double click ReplicatorG and you ll see the following window ...

Страница 15: ...er 3 You ll see the installer working as shown below Once done the Device Driver Installation Wizard pops up Click the Next button to install the driver for ReplicatorG 4 Click the Install button on the Windows Security pop up to install the printer driver When another Windows Security pop up appears click on Install this driver software anyway ...

Страница 16: ...3DCPI 02 START UP GUIDE 5 Click the Finís button to complete driver installation Finally on the ReplicatorG Installer window click the Next button to finish the installation of ReplicatorG ...

Страница 17: ...3DCPI 02 START UP GUIDE 6 A short cut icon of ReplicatorG is created on the desktop of your computer ...

Страница 18: ...tware 1 Run ReplicatorG 2 Choose extruder and connection serial port a Click GCode GCode Generator and select Skeinforge 50 b Click Machine Machine Type Driver If your printer is dual extruder select The 3DCPI 02Dual If it s a single extruder machine select The 3DCPI 02Single ...

Страница 19: ...icatorG disconnect the USB cable from your computer and wait for 5 seconds Then connect the USB cable to the computer run ReplicatorG and click Machine Connection Serial Port Rescan serial ports Wait for 10 seconds and you ll be able to select serial port d Make sure you ve selected the corresponding serial port Click the Connect icon as shown below at the right of the top bar Once connected GCode...

Страница 20: ...nnected to your 3DCPI 02 with the supplied USB cable Driver is installed successfully III Installing software Setting up 3D data 1 Importing model file into ReplicatorG The machine supports STL and OBJ model files You can use 3D design software such as Rhinoceros Solidworks Sketchup UG etc to convert file format Open file by selecting the File Open menu option Here we ll print a sample Select File...

Страница 21: ...l file you can position it as follows NOTE When adjusting please make sure the model is enclosed in a box representing the size of your machine s build envelope Otherwise the model can t be built The bottom of the box i e the blue platform stands for the build bed with blue tape in your printer ...

Страница 22: ...bed when finishing printing XY Top view XZ Front view YZ Right view b Move Center Place the model in the middle of the platform If the model can t be seen after opening the file which means it may be far from the printable area please click the Center button Put on Platform The model is rested on the surface of the platform not suspended in air or below the platform Check it before printing X X Mo...

Страница 23: ... Mirror Inverted X Right mirror image Inverted Y Back mirror image Inverted Z Bottom mirror image e Scale Input numbers to scale When the number is less than 1 the model is scaled down When it s greater than 1 the model is scaled up The options below are to convert model dimension between inch and millimeter Click the Fill the Build Area button to maximize the model which is the maximum print size...

Страница 24: ...the Generate GCode button and you ll see the window showing progress as below Select 3DCPI 02 Recommend checking it Rafts are automatically generated under the bottom of the models Fill Density 0 only a shell empty inside 1 99 hexagonal structure 100 solid Test printing cubes to observe differences As the fill density decreases less material is used Set according to your requirements Check these o...

Страница 25: ... print checks Leveling the build platform 1 To achieve perfect print quality leveling platform befote printing is very important Save Gris x3g into the SD card Plug in the SD card Then select Print from SD and press the center button Use up and down arroz buttons to select Gris x3g the message shows as followings ...

Страница 26: ...the leveling file 3DCPI 02GridCalibration gcode and observe the LCD screen of the printer 3 Press the center button and adjust as the LCD screen displays 4 After pressing the center button the print head moves to back left of the build platform Observe the limit switch indicador If the LED lights instantly it s at the right height Otherwise adjust the know under the back left of the build platform...

Страница 27: ... center button to adjust the front pint 7 Repeat step 4 to adjust the know under the front of the build platform until the LED lights 8 After pressing the center button the LCD screen requires you to readjust the three points Repeat step 4 to 7 Three points just touch the limit switches to turn on the LEDs which jeans the build platform is leveled Press the center button to finís this process ...

Страница 28: ... it between the platform and the nozzle wighout tearing or damaging the paper That s the ideal height 10 Now the leveling process is finished Press the left arroz button to quit And press the center button to confirm Turn off the printer and then restart Get ready to Stara printing Controlling PLA fan Switch If you want to turn off the fan during printing press the center button to return to the m...

Страница 29: ...e the machine makes temperature test automatically and supposes there s no temperature when turning on while in fact the extruder is at room temperature Press the center key beside the LCD panel to disarm the alarm Now plug the other end of the USB cable to your computer How to Load Filament Power on and Stara loading filament 1 Navegate menú and select Utilities 2 Select Filament Loading Select L...

Страница 30: ...takes minutes to reach the set temperatura When seeing the message shown as follows Begin loading or unloading load filament 4 Return to Unload Load page keeping clic the left button back to main menú 5 After press Print from SD cose the file for your printing ...

Страница 31: ...computer After GCode is generated click the icon as shown below On the pop up window find and open SD card Input file name and save in s3g or x3g format Make sure the file name isn t in Chinese and over 20 characters Otherwise the printer may make errors or can t read s3g for firmware version 6 2 or lower x3g for firmware version 7 2 ...

Страница 32: ...ow keys beside the LCD panel Press the center key to enter after selecting 3 After selecting file and pressing the center key the printer starts to heat up The LCD panel displays as below 4 If you want to cancel building please press the left arrow key i e the back button A message appears as below 5 Select Yes and press the center key to stop building The LCD panel returns to home screen automati...

Страница 33: ...nt to pause or stop building click the icons as shown below NOTE In the initial phase of 3D printing when the status bar below toolbar is yellow the Pause and Stop icons are disable You can close ReplicatorG to pause building While building it may take seconds to pause after clicking Pause Sometimes it may take about 30 seconds which depends on your computer configuration DON T hit Pause again whe...

Страница 34: ...UIDE VI Dual extruder Printer User Guide Software 1 Clic Machine Machina Type Driver If your printer is dual extruder select The 3DCPI 02Dual See Figure 1 2 Clic GCode GCode Generador and select Skeinforge 50 See Figure 2 ...

Страница 35: ...3DCPI 02 START UP GUIDE 3 G oto GCode menu and select Merge stl for DualExtrusion Then you ll see a pop up window ...

Страница 36: ...3DCPI 02 START UP GUIDE 4 Clic Browse for Left Extruder and find the corresponding data file See Figure 5 5 Select the file to print See Figure 6 ...

Страница 37: ...allows you to go back to main interface 2 NOTE This step is to select two extruders Preheat Stara preheat Right Tool ON Left Tool ON The left arroz allows you to go back to main interface 3 NOTE After selecting Right Left Tool ON the corresponding extruder will be heated Utilities Filament Loading Load Left When the left extruder reaches the temperatura insert filament to it Press the center butto...

Страница 38: ...introduced to GCode generation When converting a model with the same settings PyPy is 2 3 times faster than traditional Python These two kinds of interpreters have their own advantages Python has more stable performance while PyPy has superior processing speed The following paragraphs will show you how to set up PyPy acceleration Use it or not according to your needs PyPy vs Python Processing Spee...

Страница 39: ...CPI 02 START UP GUIDE 1 Open the link http pypy org download html In the imagine below if is user of Windows select the part in red to download PyPy It took 41sec with PyPy It took 1min 45sec with Python ...

Страница 40: ...2 START UP GUIDE 2 After downloaded unzip PyPy to the root folder of the C drive Start ReplicatorG and select File Preferentes 3 On the pop up window click Select PyPy interpreter button under the Advanced tab ...

Страница 41: ...3DCPI 02 START UP GUIDE 4 Find the installation directory and select pypy exe Then click Select button ...

Страница 42: ... interpreter is set to and if the path is right VIII Maintenance and Troubleshooting Cleaning extruder After working for months small pieces of hardened plastic can stick to the drive gear which is the part of the extruder that pushes filament through the extruder To ensure ...

Страница 43: ...then you ll be able to peel it away After cleaning reseat and level the build platform Abnormal noise on X and Y axes Exchange the wires of X axis motor and Y axis motor on the board Open ReplicatorG and go to the Control Panel to move X and Y axes Reseat the wires of X and Y axes and check if the problem is fixed If there s still abnormal noise please contact us for technical support Warping when...

Страница 44: ...5 240 ABS or 190 230 PLA Take apart the extruder and enlarge the distance between the feed gear and the bearing If they are too close the filament will be blocked If the extruder fails to extrude at the very beginning of building please keep pushing for 25 seconds and check Recommend printing from SD card because in this way the data will be transferred into a structure XTL format while printing f...

Отзывы: