


Disabling the 3Com Logo
35
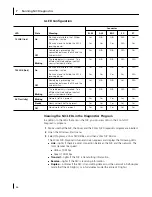
Enabling or Disabling the Boot ROM Setting
To enable or disable the boot ROM setting on the NIC:
1
Make sure that the NIC is installed and is connected to the network and that the
driver is installed.
2
Open the Windows
Start
menu.
3
Select
Programs
, and then
3Com NIC Utilities.
4
Click
3Com NIC Doctor.
The 3Com NIC Diagnostics General screen appears.
5
Click the Configuration tab.
The Configuration screen appears.
6
Under Network Parameter, select
Boot PROM
.
7
Open the Set Value list box and select
Enabled
to enable the boot ROM or
Disabled
to
disable the boot ROM.
8
Click
OK
to save the setting and exit the program.
Disabling the 3Com Logo
To disable the 3Com logo that appears on the screen when the NIC first connects to
the network:
1
Make sure that the NIC, the network driver, and the 3Com NIC Diagnostics program
are installed.
2
Open the Windows
Start
menu.
3
Select
Programs
, and then
3Com NIC Utilities.
4
Click
3Com NIC Doctor.
The 3Com NIC Diagnostics General screen appears.
5
On the General screen, make sure that the check box next to
Show 3Com Logo on
Startup
is not selected.
6
Exit the 3Com NIC Diagnostics program.
NOTE:
For more information on using, configuring, and troubleshooting the MBA
boot ROM, refer to the
Managed PC Boot Agent User Guide
, located with
the MBA software on the
EtherCD
.