background image

Copyright 1010music LLC 2020

Bluebox User Manual v 1.0.5

Page 38 of 50

Jan 7, 2021

EDIT File Menu

NOTE:

When you add a file to a project, the file does not move or get copied. It

stays in its original folder. Bluebox simply adds a pointer to that file to

the list of assets for the project. If that file gets deleted or moved, the

link will be broken and the file will not be able to play.

WAV files must be 48kHz for bluebox to play them.

Add a File to a Project:
If you have another WAV file that you want to play in the MIXER, you can put it on the
microSD card and then add it to the project. You can also add a WAV file from a different
project.

1.

Take the microSD card out of blackbox and put it in your

computer. (The card is spring loaded. Push it in to get it

to pop out.) Copy the file you want onto the microSD

card. Under the Projects folder on the card, there is a

folder named for each project. Put the file here to keep it

with the project.

2.

Push EDIT. You will see a list of files per track for this

project.

3.

Select the track where you want to add the file.

4.

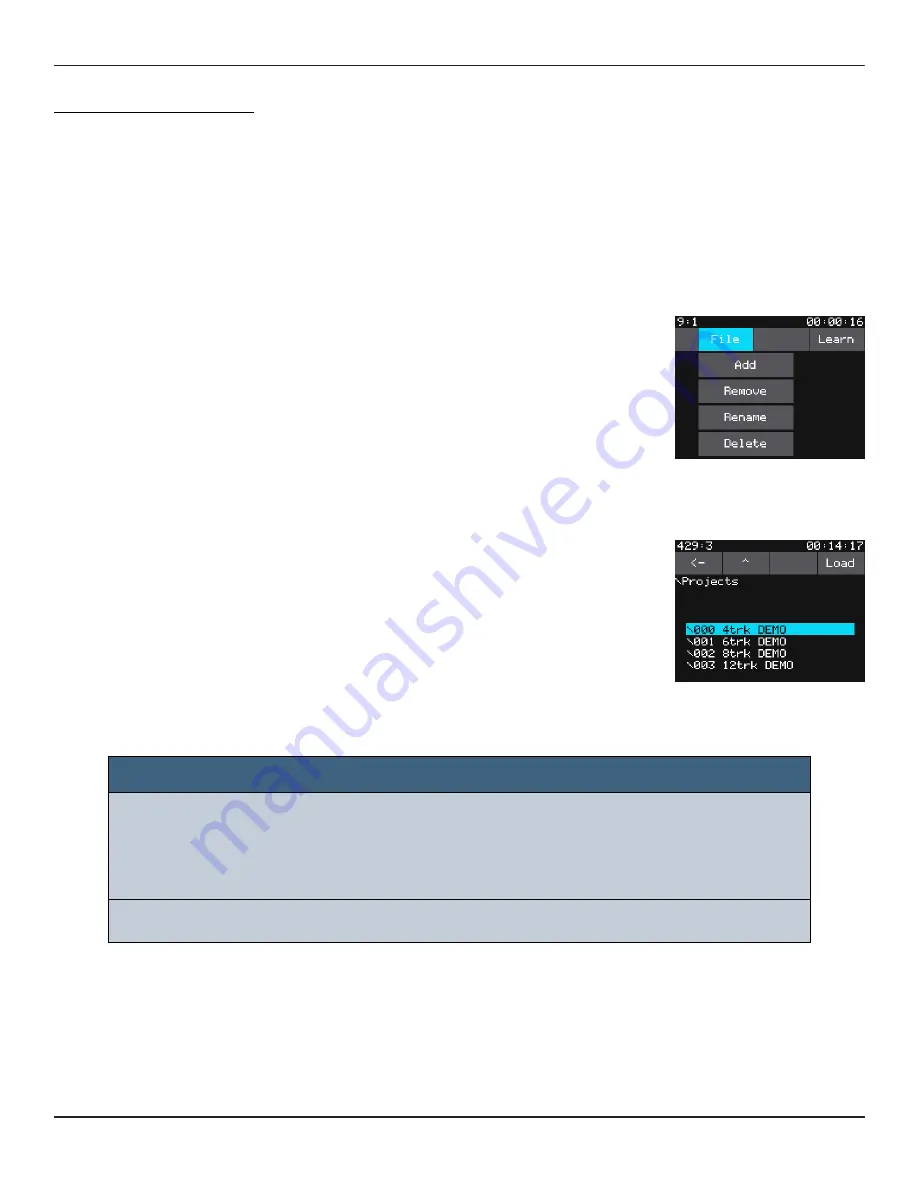
Touch File at the top of the screen to open the File

menu.

5.

Touch Add. Navigate to the folder with the file by

selecting a folder and touching Load or touching the ^

symbol to navigate back in the folder hierarchy. Turn the

knobs to change the folder or file selection.

6.

Touch LOAD with the file selected to add the file to the

project. The file will now appear in the list and will be set

as the ACTIVE file for that track.

7.

If you want to change the file to inactive, select it and

push the A button.

EDIT - File Selection

Содержание BlueBox

Страница 1: ...Bluebox V1 0 5 User Manual ...

Страница 2: ...7 Put Bluebox in Sleep Mode 7 Wake Bluebox Up from Sleep Mode 7 Output Connections 8 Meter Bridge Layout 8 Set the Meter Bridge Layout 8 Mapping of Inputs to Tracks 9 Map Inputs To Tracks 9 Track Labels 9 Rename a Track 9 Gain 10 Adjust the Gain to Balance your Inputs 10 Controls Overview 11 Control Modes 12 MIXER Mode vs TRACK Mode 13 When to Use MIXER Mode 13 When to Use TRACK Mode 13 Display Ov...

Страница 3: ...e the Main Output 22 TRACK Mode 23 Change Settings for a Single Track 24 MAIN Mode 25 Adjust Output Levels 25 Mute an Output 25 Configure Signal Routing and Compression Settings 26 EQ Mode 29 Adjust the EQ for a Track or the Main Mix 30 FX Mode 32 FX View Modes 32 Adjust Reverb and Delay Effects Settings 33 EDIT Mode 36 Make a WAV File Stop Playing 37 Play a WAV file for a Track 37 Add a File to a...

Страница 4: ...er 45 MIDI Clock Synchronization 46 Setup Bluebox to Follow a MIDI Clock 46 Setup Bluebox to Send a MIDI Clock 46 Update Firmware 47 Update the Bluebox Firmware 47 Common Tasks 48 How to Balance Levels for the Main Mix 48 How to Mute a Track 48 How to Mute an Output 48 How to Adjust a Track s Sends to Out 2 and CUE Phones 49 How to Adjust a Track s Sends to FX1 and FX2 49 How to Use Headphones to ...

Страница 5: ...o review how to play back the WAV files you have recorded or stored on your microSD card and how to select the Active WAV file for each track Along the way we will see how to save your settings into different project files configure the metronome adjust the tempo and use MIDI controllers with bluebox If you still have questions after reading this manual join our forum at forum 1010music com You ca...

Страница 6: ...in to remove it when needed later Leave it in for now Power Bluebox needs to be connected to a 2 amp power source You can plug it into a standard power outlet or a USB power supply Either way you will insert the square end of the USB Power cord B into the POWER connection on the back panel The connection is snug to ensure that the device stays plugged in during use Standard Power Outlet If you are...

Страница 7: ...rry power Bluebox comes with a USB Type B power cable If you want to replace it with a longer cable be sure it is rated to carry power You can take the microSD card out and reinsert while bluebox is powered up NOTE Bluebox has AC coupled inputs You cannot use them to record Control Voltage Check out the 1010music blackbox if you want to do this The bluebox outputs are DC Coupled If you are only re...

Страница 8: ...e Layout You can configure bluebox to display meters for 4 6 8 10 or 12 tracks If you keep the track count low the meters will be bigger making them easier to see and easier to control with the touch screen You can choose to display the meters in one row or two In Double Row mode the knob mapping is more intuitive but some people prefer Single Row mode to see all the meters side by side Set the Me...

Страница 9: ...ted blue Touch the inputs to toggle them on and off Track Labels To help you keep track of what you have plugged into each of the inputs you can name your tracks If you are using twelve tracks in Single Row mode only one character will be displayed in the track meter header If you are using fewer tracks and Double Row mode more characters are displayed Rename a Track 1 Push TRACK and then push B Y...

Страница 10: ...signal from your sources 2 Push MIXER and you will see the meters move with the incoming signal 3 Touch Gain at the bottom of the screen If you don t see the Gain option at the bottom of the screen touch MIXER again to toggle the control panel 4 Four of the tracks are highlighted in the meter bridge at the top of the screen The knobs are controlling the highlighted tracks Touch a different group o...

Страница 11: ... settings Touch a meter or on screen knob and slide your finger up and down or left and right to make an adjustment Knobs Turn a hardware knob to adjust a parameter or make a selection in a list In configuration lists the top knobs select a parameter and the bottom knobs change the value A Button Change the knob focus when there are multiple banks of controls In the EDIT screen pushing A toggles t...

Страница 12: ...ly to all signals sent to the effects by the tracks EDIT See the list of WAV files associated with each track These could be files recorded for this track or files chosen from the microSD card You can set a WAV file to be Active to playback when you push PLAY The Active WAV will not play if the track is armed for recording Each track can have zero or one Active WAV files This is also where you can...

Страница 13: ...k Select a setting to control from the bottom of the screen and use the knobs to adjust the different tracks at the top of the screen When to Use TRACK Mode Use TRACK mode when you want to narrow your focus to one track and control various settings for that track all at once In this mode each knob controls a different setting for the selected track Track 5 Track 6 Track 7 Track 8 Choose a Track Se...

Страница 14: ...lected Tap a track to change the selection As you change settings track highlight colors and track name text colors indicate different states Green Highlight Solo mode Red Highlight Armed for recording Gray Text Meter Muted Pink Highlight Selected to work with the knobs Light Blue Frame MIDI Learn mode is enabled Controls with blue frames can be mapped to a MIDI control To toggle MIDI Learn mode o...

Страница 15: ...rojects on the current microSD card There are a few demonstration projects on the included microSD card These projects show the different meter bridge layouts Here s how to use the controls in PROJ mode NOTE Bluebox does not automatically save your changes When you change projects or unplug bluebox any unsaved changes will be lost Control Control Behavior in PROJ Mode Knobs Scroll through the list...

Страница 16: ... the project including the list of WAV files for the project 1 Push PROJ and you will see the list of projects on the microSD card 2 Turn a knob to select project to load 3 Touch Load in the menu bar at the top of the screen Bluebox will update the settings and WAV file list with the information saved in the selected project NOTE The Load menu option is disabled if the current project is selected ...

Страница 17: ...ne typing the new name Bluebox will create the new project with default settings and load it Rename a Project 1 Push PROJ 2 Touch File and then Rename in the menu bar 3 Use the on screen text keyboard to enter a new name for your new project Touch Clear at the top of the screen if you want to start with a blank name Turn a knob to change the cursor position Touch to backspace Touch 123 or ABC to c...

Страница 18: ...onome settings Project Configuration Setting Description BPM The tempo used for the project See the MIDI section below for information about how this works with external MIDI devices Metronome You can turn the metronome off or you can turn it on only when recording or whenever you push PLAY Note that the metronome will not be recorded Met Output Choose which output the metronome will play through ...

Страница 19: ...Solo mode have a green outline Mute Disables the output to Main for the muted tracks or the main output The track label and meter bars are gray for muted tracks Rec Arms the selected track or the Main output for recording Armed tracks have a red outline Pan Adjust how much of the signal is sent to the left and right channels of the sends for this track FX1 Control the level of the track audio sent...

Страница 20: ... mode Control Control Behavior in MIXER Mode Knobs Adjust selected setting for different tracks Touch Touch and drag to adjust a level Tap to change knob focus or toggle state of a meter MIXER button Toggle between two control option panels at bottom of screen A button Change knob focus to the next bank of meters B button Open the Mixer Configuration Screen See the SETUP section above to learn mor...

Страница 21: ... state of the meter You can use this process to Adjust the volume Adjust the gain Solo one or more tracks Mute tracks Arm tracks for recording Pan tracks between left and right channels Control the sends to FX1 and FX2 for various tracks Control the sends to the headphones CUE and Out2 for various tracks MIXER Solo Control 1 Push the MIXER button to enter MIXER mode The MIXER screen shows the mete...

Страница 22: ...Recording or Mute the Main Output 1 Push the MIXER button to bring up MIXER mode If you don t see Rec in the control panel push MIXER again 2 Touch the on screen Rec control option button 3 Touch the M meter along the right side of the screen to arm the Main output for recording Touch the M meter again to disarm it 4 Touch the Mute button on the bottom of the screen 5 Touch the M meter along the r...

Страница 23: ...vels of the control options for the track selected in the meter bridge at the top of the screen Here s how the controls work in TRACK mode Control Control Behavior in TRACK Mode Knobs Adjust different settings for the selected track Touch Touch and drag an on screen knob to adjust a level Tap to change knob focus or toggle state of a meter TRACK button Not used in TRACK mode A button Change knob f...

Страница 24: ...ower left displays the main output level of the current track 3 Push A to toggle the knob focus to the other set of controls or tap a control panel to give it focus 4 Touch and hold a knob on the screen and then drag your finger to change the value of that knob Slide your finger up and down or left and right to adjust the value 5 Tap the REC MUTE or SOLO button to toggle the state for the current ...

Страница 25: ... your finger left and right or up and down to adjust the level for that meter Mute an Output 1 Push MAIN to select Main mode 2 Touch the MUTE button under the heading for the output you want to mute Touch the button again to unmute it Control Control Behavior in MAIN Mode Knobs Top left Adjust the CUE Phones Output Level Bottom left Adjust the level for Out 2 Top right Adjust the level for the Mai...

Страница 26: ...guration MAIN Configuration Scroll for More Settings NOTE A compressor allows the overall output level to sound higher by pushing down the level of the highest highs and boosting the lower levels As a result the average level of the audio signal is higher than it would otherwise be You can adjust the Compressor parameters to control the compression The Threshold Ratio Exp Ratio and Mode are the mo...

Страница 27: ... is governed by the Ratio Parameter 48 0 dB to 0 0 dB Ratio When mode is Peak or RMS this is the ratio between the input and output signal when the compression is active A ratio of 1 means no compression A ratio of 100 means only 1 100th of the input signal is sent to the output 1 to 100 Exp Ratio When mode is Expander this is the ratio between the input and output signal when the expander is acti...

Страница 28: ...u can allow the signal to exceed the threshold for short amounts of time in order to get a more musical sounding output Use Expander mode when you want to further accentuate the highs doing essentially the opposite of a compressor The Exp Ratio value will be used to increase the output level when the input exceeds the threshold Peak RMS or Expander Wet Dry The ratio of wet compressed vs dry signal...

Страница 29: ...for the current selection In this graph the x axis represents frequency and the y axis represents the gain that will be applied at that frequency The resulting graph is called the frequency response As you change parameters for each of the four filter bands the shape of the graph will change to show the impact of all of the bands applied together The gain in this context is the amount of boosting ...

Страница 30: ...he lower right corner of the grid The options are None L Cut Low cut filter L Shelf Low Shelf Param Parametric H Shelf High Shelf H Cut High cut filter 6 Turn the other three knobs to adjust their values The numbers in the respective corners display the current value and the shape of the frequency response graph will change accordingly 7 Tap a spot in the grid to quickly move a filter point on the...

Страница 31: ...r attenuate the gain for a series of bands around the selected center frequency Gain is the amount of attenuation or boosting that is applied at the selected frequency Frequency is the center frequency of the affected band Q controls the width and shape of the band affected H Shelf High Shelf Filter Cut or boost frequencies above the cutoff frequency Below the cutoff signal will not be altered and...

Страница 32: ...e Knobs Adjust the value for an effect setting in the pink frame Touch Touch and drag an on screen knob to adjust a parameter value Tap to change knob focus or toggle state of a button Touch and drag on the x y grid to adjust the effects parameters FX button Cycles through the FX View modes FX1 Delay FX2 Reverb Small FX2 Reverb Large X Y Grid A button When there is more than one bank of knobs on t...

Страница 33: ...tton to toggle its state 7 Push A to to advance the knob focus to the next control group The pink frame will move to show the current focus You can also tap a control to change the focus to the corresponding group 8 In X Y Grid view mode touch and drag in the grids to change the effects settings For the Delay X cut off frequency and Y filter bandwidth For Reverb X size and Y level NOTE If you leav...

Страница 34: ...ff When Filter is On this is the center frequency of the frequency band that the delay will be applied to Width When Filter is On this is the range of frequencies on either side of the Cutoff that will be included in the delay Beat When Beat is on the delay amount is expressed in musical increments and thus synchronized with the MIDI clock When off the Delay time is a percentage of time between 0 ...

Страница 35: ... reverb processing Pre D Use the Pre delay for courser adjustments 0 1000ms to the timing of the entire tail of reflections This simulates how long it takes for the source to reach the sides of the room and bounce back to the listener Increase this to simulate a bigger room ER TM Use the Early Time for fine adjustments 0 90 ms of the timing of the first group of reflections that occur when the sou...

Страница 36: ...TE Recording can be done from any control mode once tracks have been armed in MIXER or TRACK control mode Since it doesn t fit in any one control mode we cover this in the RECORD AND PLAY WAV FILES section after the discussion of all of the control modes If you want to configure an external MIDI controller to work with bluebox you will also start that process by using the LEARN button in EDIT Mode...

Страница 37: ...project on the microSD card You can see the list of files in EDIT mode By default the most recent recording for a track is marked Active If a recording is marked Active here and it is not armed for recording bluebox will play back that track when you press the Play or Rec Play transport buttons To play a WAV file you will need to set its state to Active and disarm it for recording 1 Push EDIT You ...

Страница 38: ...t it in your computer The card is spring loaded Push it in to get it to pop out Copy the file you want onto the microSD card Under the Projects folder on the card there is a folder named for each project Put the file here to keep it with the project 2 Push EDIT You will see a list of files per track for this project 3 Select the track where you want to add the file 4 Touch File at the top of the s...

Страница 39: ... file name is track number track name number For example if you have renamed track 2 to DRUMS the third recording for that track is named 02 DRUMS 003 You can rename it to help you keep track of the files 1 Push EDIT 2 Touch File and then Rename You will see a text keyboard on screen 3 Touch Clear at the top of the screen if you want to start with a blank name Turn a knob to change the cursor posi...

Страница 40: ...Main Output The list of files in EDIT mode does not include the WAV files that were recorded from the Main output The files are on the microSD card in the folder for the project The file names start with 13 Main To play one of these WAV files add it to a track 1 Push EDIT 2 Select the track to be used for playback 3 Touch File then Add 4 Navigate to the project folder and then scroll down to the f...

Страница 41: ... version This is also where you can adjust the brightness of the screen Here is what the controls do in TOOLS mode Adjust the Screen Brightness 1 Push TOOLS 2 Turn the top left knob to select the desired brightness See How Much Space is Available on the microSD Card 1 Push TOOLS 2 The available space is displayed just above the brightness setting in the menu area See What Firmware Version You Are ...

Страница 42: ... options at the bottom of the screen 3 Arm the tracks you want to record by touching them The armed tracks have a red frame 4 To Arm a track in TRACK mode push TRACK touch the track you want to arm and then touch the REC button in the control panel at the bottom of the screen 5 Use your external gear to send a signal to the input for the armed track or tracks 6 Push the REC and PLAY transport butt...

Страница 43: ...n the file to the track set the status of the WAV file to ACTIVE and make sure the track is not armed for recording When you record a file on bluebox it is mapped to the track used to record it You can change this in EDIT mode 1 Push EDIT to see the list of files mapped to each track and the ACTIVE status of the WAV files 2 If the file you want to play is listed but does not have the word ACTIVE i...

Страница 44: ... you open the project You can add the files to tracks if needed In addition to the WAV files each project folder also has two XML files assets xml and project xml These files are updated when you save the project and store your project settings and WAV file mappings Copy a Project or Make a Backup on Your Computer You can copy a project to another project on the microSD card or to your PC for back...

Страница 45: ...s 5 Use the controller you want to connect to this setting Bluebox will now map this MIDI Control to this setting and display the MIDI mapping in blue on the screen The mapping is in the format Channel CC Number 6 Repeat steps 4 and 5 to create additional mappings 7 Push EDIT and touch Learn to exit MIDI Learn mode You can now use the MIDI device to control the mapped settings t EDIT Mode MIDI Lea...

Страница 46: ...her the MIDI Device USB connection on the back panel or to the MIDI IN TRS jack on the front panel 2 Configure the external MIDI device to send a clock signal Bluebox will automatically follow the incoming clock Setup Bluebox to Send a MIDI Clock 1 Connect a MIDI Device that is ready to follow a clock signal to either the MIDI Device USB connection on the back panel or to the MIDI OUT TRS jack on ...

Страница 47: ...ail to confirm your email address before you will be able to access the downloads Email support 1010music com if you have any trouble with registering 3 Once you are logged in to the forum scroll to the Product Downloads section and then go to the Bluebox Firmware Downloads section to look for the latest firmware Download the file to your computer Unzip the contents of the file Some computers will...

Страница 48: ... for a track to adjust the gain for that track Do this for all the tracks until they are all even 5 Touch Vol 6 Touch and drag a meter for a track to adjust the volume for that track Do this for all the tracks until you get the mix you want How to Mute a Track 1 Push MIXER If you don t see Mute in the control options at the bottom of the screen push MIXER again 2 Touch Mute in the control options ...

Страница 49: ...o adjust the send to FX1 which is the delay 5 Turn the top right knob to adjust the send to FX2 which is the reverb 6 You can also touch and drag one of the on screen knobs to adjust its value Move your finger up and down or left and right to change the setting How to Use Headphones to Monitor the Main Output 1 Plug your headphones into the Phones jack 2 Push Main 3 Push the B button 4 Select the ...

Страница 50: ...ol panel to set the knob focus to include this control 6 Turn the bottom right knob to adjust send for this track to Out 2 7 Repeat steps 4 5 and 6 for additional tracks as needed TRACK Mode LEARN MORE Check the bluebox support page on our website for updated user manuals and links to videos Bluebox Support page 1010music com blueboxdocs Look for how to videos that show the bluebox in action on th...

Отзывы: