


Prestige 650 Series User’s Guide
Bridging Setup
21-3
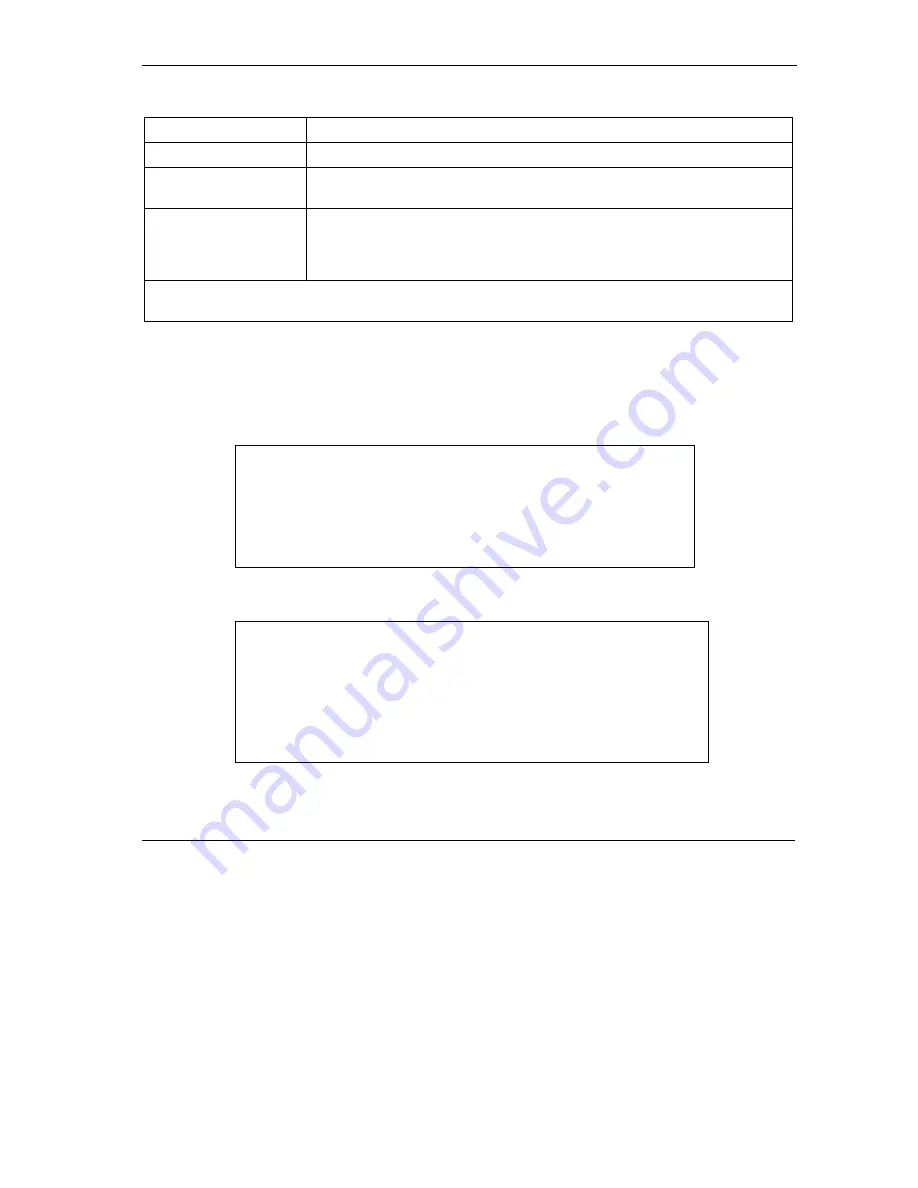
Table 21-1 Menu 11.3 Remote Node Network Layer Options : Bridge Fields
FIELD DESCRIPTION
Bridge (menu 11.1)
Make sure this field is set to
Yes
.
Edit IP/Bridge (menu
11.1)
Press [SPACE BAR] to select
Yes
and press [ENTER] to display menu 11.3.
Ethernet Addr Timeout
(min.) (menu 11.3)
Type the time (in minutes) for the Prestige to retain the Ethernet Address
information in its internal tables while the line is down. If this information is
retained, your Prestige will not have to recompile the tables when the line
comes back up.
When you have completed this menu, press [ENTER] at the prompt “Press ENTER to confirm or ESC to
cancel” to save your configuration or press [ESC] to cancel and go back to the previous screen.
21.2.2 Bridge Static Route Setup
Similar to network layer static routes, a bridging static route tells the Prestige the route to a node before a
connection is established. You configure bridge static routes in menu 12.3.1 (go to menu 12, choose option
3, then choose a static route to edit) as shown next.
Figure 21-3 Menu 12.3 Bridge Static Route Setup
Figure 21-4 Menu 12.3.1 Edit Bridge Static Route
Menu 12.3 - Bridge Static Route Setup
1. ________
2. ________
3. ________
4. ________
Enter selection number:
Menu 12.3.1 - Edit Bridge Static Route
Route #: 1
Route Name=
Active= No
Ether Address= ?
IP Address=
Gateway Node= 1
Press ENTER to Confirm or ESC to Cancel:
Summary of Contents for PRESTIGE 650H -
Page 1: ...Prestige 650 Series ADSL Router User s Guide Version 3 40 July 2003...
Page 24: ......
Page 26: ......
Page 34: ......
Page 40: ......
Page 58: ......
Page 64: ......
Page 78: ...Prestige 650 Series User s Guide 5 14 Wireless LAN Setup Figure 5 7 Local User Database...
Page 82: ......
Page 85: ...Prestige 650 Series User s Guide WAN Setup 6 3 Figure 6 2 Internet Access Setup...
Page 90: ......
Page 104: ......
Page 110: ......
Page 112: ......
Page 116: ......
Page 126: ......
Page 144: ......
Page 145: ...Maintenance VI Part VI Maintenance This part covers the maintenance screens...
Page 146: ......
Page 162: ......
Page 172: ......
Page 188: ......
Page 232: ......
Page 254: ......
Page 274: ......
Page 296: ......
Page 300: ......
Page 310: ......
Page 316: ......
Page 324: ......
Page 336: ......
Page 340: ......
Page 352: ......


