41
EPOXY COMPOUND PREPARATION
When handling this material, the gloves supplied must be worn. The epoxy compound is supplied in the form of
a two part package. These should be mixed into the ratio of I: I until both colours have blended into one, without any
streaks. Rolling and folding is the most satisfactory method of obtaining an even blend. Once mixed, the compound
must be used within 30 minutes. After this time it will begin to stiffen. The compound should be kept at an ambient
temperature of no less than 20 °C prior to using.At lower temperatures it becomes diffi cult to mix. Should any compound
come into contact with the skin it should be cleaned off with skin cleaner and not allowed to dry on the skin. Only
compound for immediate terminations should be mixed.
The mixing and installation of the compound at an ambient temperature below 4 °C is not recommended due to
extended curing period.
The following instructions are the various BASEEFA approved methods of passing drain wires etc. through the com-
pound barrier and should be followed if permitted by cable installation specifi cations.
Drain wire preparation
1.0. Insulating drain wires with heat shrink or cold shrinktubing
1.1. Fold back the armour I braid and bend it to right angles from the inner sheath.
1.2.
Remove foils and tape level with the outer sheath. exposing the drain wires and insulated conductors. Cut
back a further 10 mm of inner sheath.
1.3.
Pass 100 mm length of heat shrink or cold shrink tubing over the drain wire until it comes into contact with the
foils, then shrink the tubing evenly down onto the drain wire so that no air pockets occur.
1.4.
To insulate the joint between the foils and the tubing a suitable piece of 10 mm long shrink tubing or neoprene
stretch tubing or a 10 mm wide lap of PVC tape may be used.
1.5.
After completing 1.1 to 1.4 on each drain wire, lay the armour I braid parallel to the cable, if applicable, then
carry out instruction B.
2.0.
Insulating drain wires i screens with separate insulated crimped conductors or soldered connection
2.1.
Fold back the armour I braid and bend to right angles from the inner sheath.
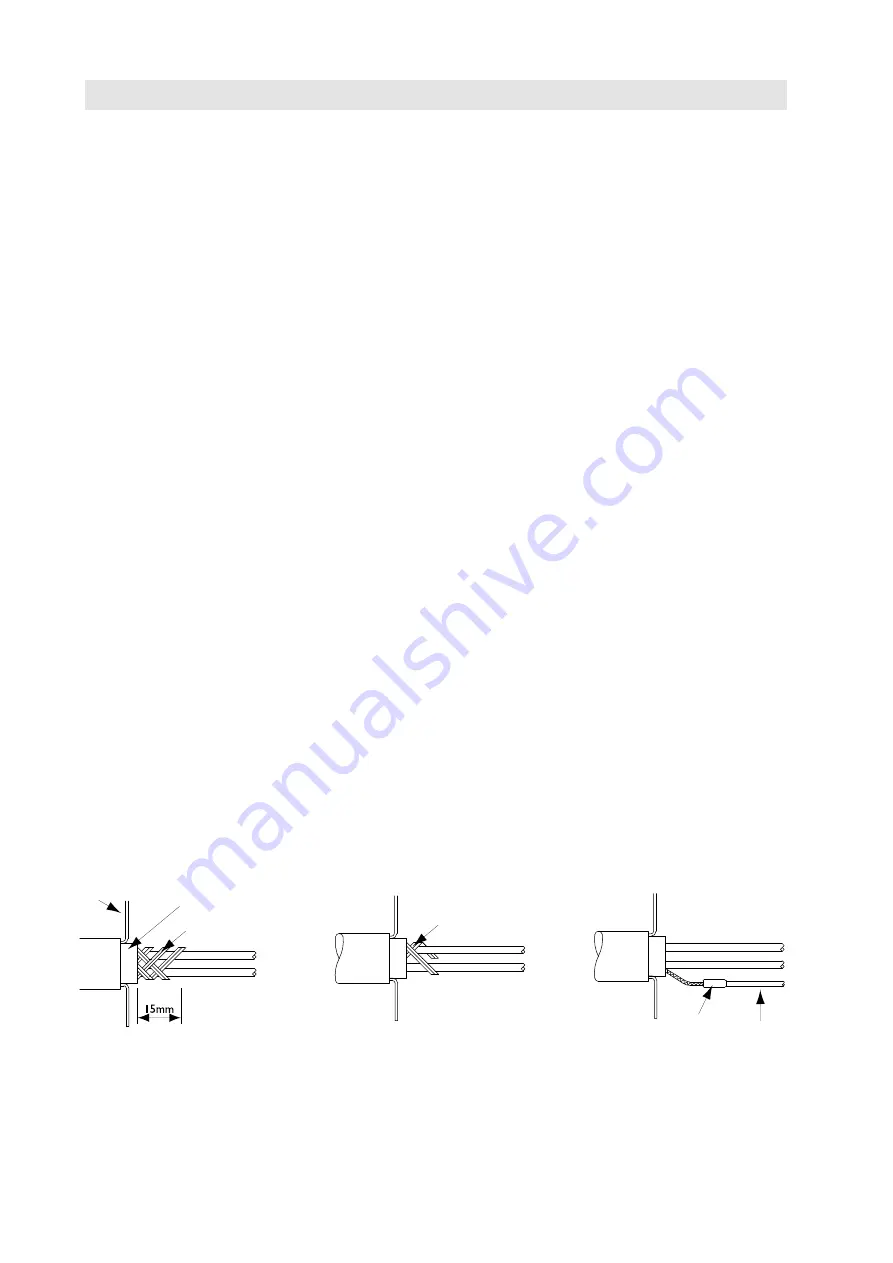
2.2. Remove a further I 5mm of inner sheath
(See Fig. I).
2.3.
Unravel one or two groups of wires from the screen wires, then remove the remainder of the screen wires
(See Fig. 2).
2.4. Twist the group of screen wires into a pigtail and cut to 15 mm long.
2.5.
Crimp an insulated conductor to the pigtail wih a suitable insulated butt ferrule
(or soldered connection),
leaving enough length of the insulated conductor to enable the remote end to be connected to the earth
terminal in the equipment.
(See Fig. 3).
Note:
There shall be a minimum of I Omm of compound on both ends of the crimped I soldered joint.
2.6.
To insulate the joint between the screen wires and the insulated conductor, place one lap of PVC insulating
tape over the exposed metallic joint.
2.7.
After completing 2.1 to 2.6 on each drain wire. lay the armour I braid parallel to the cable. Then carry out
instruction B.
Fig. 1
Fig. 2
Fig. 3
Inner Sheath
Screan Wires
One or two groups of
screen wires
Crimp or Solder
Insulated
Conductor
Armour / braid
Summary of Contents for MODACT MO EE 52 120
Page 2: ......
Page 25: ...25 Terminal board of DMS2 Analog Terminal board of DMS2 Profbus...
Page 49: ...NOTES...
Page 50: ...NOTES...


