background image

TETHERED CONTROLLER MX32, RADIO CONTROLLER MX32FU                                                                    Page 33 

 TAP 

the speedo (in normal view) 


  large image 

and speedo below. There are NO function icons 
in this view.                    



   Display with large image and speedo below        


(TAP the speedo 


Returns to “normal view”


TAP 

the text field (in normal view; Text field = Name & 

Address or just address without name) 


  Speedo is 

removed to make room for larger image and name & 
address. 




    Display with large text for name & address but 

without speedo and function icons 


(TAP the image  + Speedo 


  return 

to “normal view”)


TAP 

the image + text (in normal view)


  Digital speed 

display, large text and function icons. 


(TAP the text + Image + Speedo


Return to “normal view”


Die MN-Key (

“Manual”) and the RG-Key (“Shunting”)  

MN-


Key 

– 

“MANual”


– MN-LED flashing red: Cancels the HLU speed reduction (Signal controlled speed 

influence through MX9 or StEin modules) 
    or ABC (Stop on sections with asymmetrical track signal 

– see decoder instruction manual). 

RG-


Key 

– 

Shunting   


Press


1 x: RG-LED yellow, speed range is cut in half (64 instead of 128 steps). 

                                             Press 2 x: 1/3 of actual speed (42 instead of 128 steps).  
                                             Press again: Shunting mode OFF; RG-LED dark.  


The East-West - Direction 

The ZIMO system offers the possibility to drive a 

vehicle equipped with ZIMO decoder

 (types from 

approx. 2005 and later, with up-to-date software) specifically in the desired layout-related direction, thus 
to "east" or "west". This can just as well be understood as "left" and "right"; the east-west orientation ac-
tually refers to the track polarity as connected to the command station. The usual forward-backward di-
rection in DCC systems, on the other hand, is vehicle-related 

and the “true” direction of travel depends 

on how the locomotive is placed on the track. 

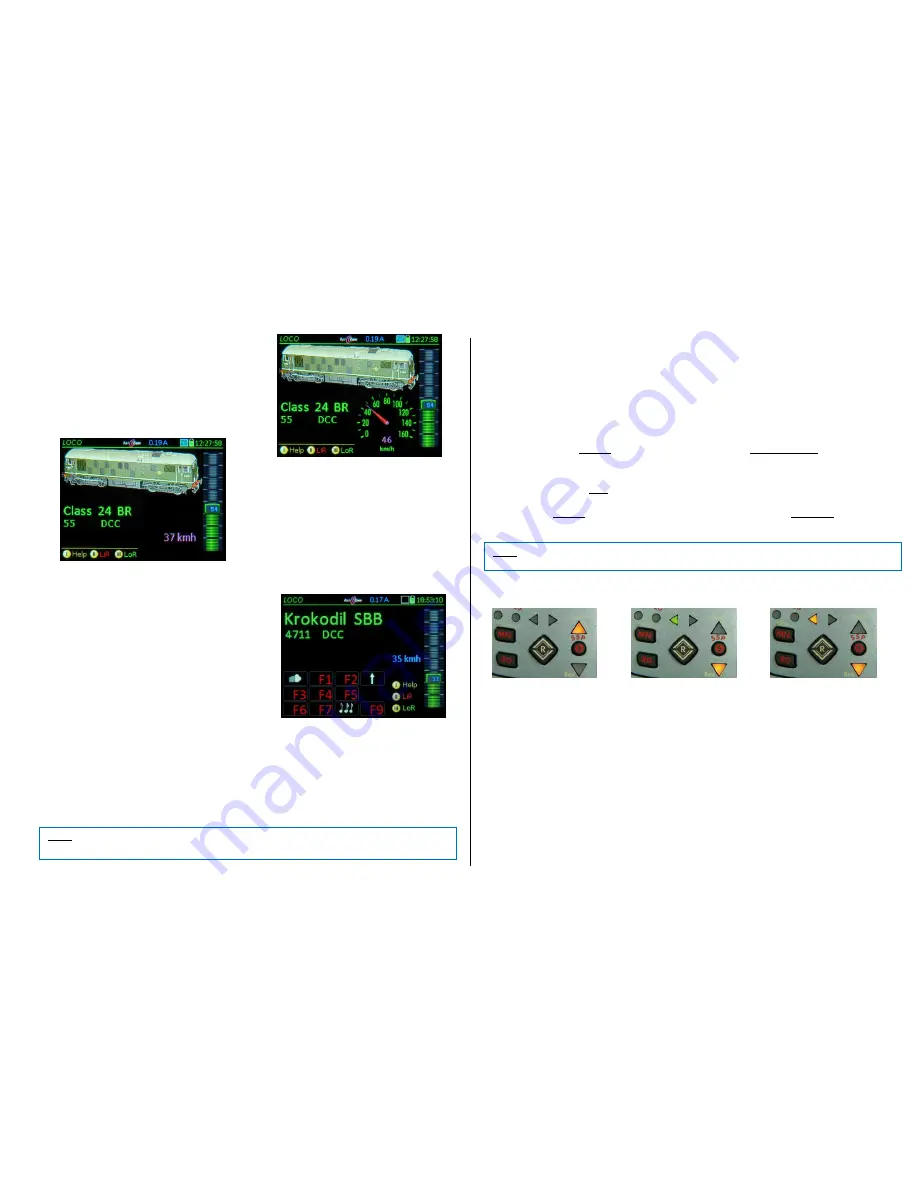
The "East-West direction" on the controller is indicated by the "E-W direction arrows", which remain dark 
as long as the "East-West" feature is not used.  

Press 


(Shift)


– R-Key

 together  (

 ahead)   |  

if the


E-W direction arrows are dark 


the travel di-

rection

 will be set (switches direction if needed) so that the vehicle will be driving "west", or the 

headlights pointing west at standstill, and 

the direction arrow

 "W" lights up. 

(However, if you want to drive to the "east", the 

R-key

 must be pressed):  

Press R-Key again, 

while holding the


 (Shift)-Key  

   that the vehicle will be driving "east", or 

the headlights pointing east at standstill, and 

the direction arrow

 "E" lights up. 


(Shift) 

- R-Key

 together  (

 ahead)  |  

if one of the E-W direction arrows is lit already


Driving di-

rection 

will NOT be influenced anymore, but swaps the E-W direction arrows instead 

(i.e. so that the left-right arrows match the train direction at the back of an track oval) 


The colors of the direction LED

’s (both forward-reverse as well as east-west): 

green


= after change of direction with the R-key, as long as RailCom feedback has not arrived, 

yellow


= direction confirmed by RailCom  


Limitations: 

If it is a ZIMO decoder (with current software) but 

RailCom is turned off

, commands for the E / W di-

rection can still be given, but without feedback on the forward-reverse direction; Fwd-Rev arrows stay 
green. Terminal loops can

’t be reported either (although they are passed through correctly).  

If it is a 

non-ZIMO decoder

 (or a ZIMO decoder with outdated software), East-West can only be used 

as a reminder, i.e. the E-W arrows are assigned at your discretion without having an effect on the ve-
hicle. 

Deactivate the East-West-Display: 


(Shift hold)

 + R + R + R 

(that is 3 times the 

R-Key

 while holding the Shift key)  

  Deactivates the  

E-W-Direction Arrows 

The main purpose of the East-West feature is actually for computer controlled layouts, when trains are 
under control of ZIMO's special "Signal Controlled Speed Influence" HLU or when direct driving com-
mands are given. The logic of the route can then ensure the desired travel direction and thereby prevent 
a train from taking off in the "wrong" direction, because a locomotive has been turned around before, ei-
ther by a shunting maneuver or by hand.  

NOTE

: The  


– R  

is usually used only once, to activate the east-west direction feature and to let the train 

drive in the desired east-west direction, then the simple 

R-key

 action is enough


NOTE

The volume of sounds that can be triggered with function keys can be changed (by turning the 

scrolling wheel): keep the function key pressed, turn the scrolling wheel ("up" = louder, "down" = softer). 
 

Summary of Contents for MX32

Page 1: ...5 1121 2015 04 08 SW Version 01 16 0008 Command station MX10 and Z21 2015 04 24 SW Version 01 16 0014 Command station MX10 2015 05 11 SW Version 01 16 0033 Command station MX10 2015 05 27 2015 06 10 2015 06 25 2015 07 08 2015 07 21 SW Version 01 17 0000 2015 08 26 2015 09 07 2015 09 29 2015 10 13 2015 10 18 2016 02 20 SW Version 01 19 0001 2016 04 22 SW Version 01 20 0001 2016 09 22 SW Version 01 ...

Page 2: ...ehler Textmarke nicht definiert 10 SYSTEM Setting and control of Zimo system products connected to MX1 10 1 SYSTEM Setting and control of Zimo system products connected to MX10 11 LOCO IN and LOCO MOD Fehler Textmarke nicht definiert 12 ADDR FUMT SPEEDO IMAGE FUSY Fehler Textmarke nicht definiert 12 1 Cloning a vehicle Fehler Textmarke nicht definiert 13 GUI handover Fehler Textmarke nicht definie...

Page 3: ... from the ones in the current software version because improvements and enhancements are ongoing General information This manual reflects matches the product and software version at delivery The device may show further features after an update New versions of this manual are published on the ZIMO website www zimo at ZIMO devices should not be operated in extreme surroundings heat humidity The air ...

Page 4: ...ust be adhered to The old devices MX31 must be connected with a 6 conductor CAN bus cable to one of the two ZIMO CAN sockets ZIMO CAN 1 either front or back of the MX10 The new devices MX32 must be connected to the front XNET socket with a CAN bus adapter cable 8 pin plug on the MX10 s side 6 pin plug on the controller s side i e 8POLA1M This special cable connects the ZIMO CAN 2 which is availabl...

Page 5: ... rates when needed up to 1 Mbit sec instead of the 125 Kbit sec in normal mode If this is the case i e for image or audio file transfer and the CAN bus network exceeds the maximum length by a few yards stricter wiring guidelines must be adhered to Please note that the total cable length is also important due to the current supply to the controllers as a rule of thumb there should be no more than 2...

Page 6: ...d CAN bus electrically limited or a poor radio link A continuously lit dot means that the controller commands were not executed by the command station 2 when communication errors occur the EMPTY SQUARE indicates by brief illumination single disturbed transmis sion processes which are corrected automatically continuous illumination means loss of connection The RailCom Logo in the display header ind...

Page 7: ...en and returns to the previous operating mode Softkey II III in some cases these Softkeys are used to switch directly to other help files The help files shown in this manual are part of the explanations HELP EXAMPLES Attention may not always be up to date Consist for defining and activating of a new consist TP Key Softkey III Scroll wheel Number keys Building a consist Softkey III Jumps to the LoR...

Page 8: ...ing the cable This does not turn the controller off immediately but thanks to the built in battery remains on stand by and counts down the time until the controller automati cally turns itself off This can take from 0 to 240 sec depending on the settings in CAB CONF The tethered controller MX32 also contains a battery a smaller one than in the MX32FU The built in battery is al so used to power the...

Page 9: ... Communications dot shows a delayed or failed connection Flashes every time a change is made on the MX32 high quality wireless connection Sometimes longer dark periods Medium quality Permanently dark radio connection failed see explanations below Inidcators and remedies for radio communication loss A time staggered display system informs about radio reception problems If no radio communication for...

Page 10: ...d data format possibly name and group controller switches to operating mode LOCO A or or Accessory panel in lower screen half LoR in lower screen half first because A key by itself is used for selection in the LoR A A A NOTE to the photos on the left The display pictures are examples for the many possible representations in the operating modes LOCO and SWI with without image large small image with...

Page 11: ... A Key Switches to the LOCO IN display Enter new vehicle address F Key Activates the new engine in this example without a name and switches over to the operating mode LOCO Softkey III Show hide Loco Recall LoR The Loco Recall list opens in place of the function icons and lists the vehicles currently stored in the recall memory All vehicles that were activated once are automatically entered into th...

Page 12: ... be listed here automatically and can be op erated with the corresponding function keys To define an additional address it is necessary to first scroll down to the line NEW to edit an existing address it must be marked first with the red cursor Scrolling wheel A Key DCC e single is created and can be changed with the rocker switch to DCC p paired MM1 e Motorola single DCC x extended MM2 p Motorola...

Page 13: ...switches or as red green signals They are however not real switchboard fields but can be exchanged with proper icons on the SWI DEF definitions page The quickest way to change the default accessory addresses is with this shortcut Shift W Shift Opens the SWI DEF page but because of the cursor jumps immediately to the address input line with sub addresses and enables the inline scroll option which a...

Page 14: ...ecoder does not send acknowledgement pulses but the address MAY have been programmed successfully anyway BUT when switching from a small 0 127 to a large address 127 pre viously set values in CV 29 e g analog operation MAY have been erased in the process Right after entering SERV PROG or after reading out programming the decoder address or after decoder identification U Key to CV programming CVs a...

Page 15: ...tarted unlike the F Key which would activate the identified decoder address CVs are programmed by or read out by Typing in a CV number A Key A Key twice Programming or read out steps are acknowledged by the system and displayed see below An automatic line feed occurs after each programming or read out step in order to immediately proceed with the next CV Previously programmed lines can be returned...

Page 16: ...st This is being preserved throughout the update such as the fonts and texts in the key operator languages German and English the system function and switchboard icons speedo dials and instrument graphics the device sound files Controller sound accessible in LOCO IN with address 16382 the help screens Displayed below that a list of data which is available either in addition to the Automatic Update...

Page 17: ...ether the previously contained data of the respective type in the controller should stay or be deleted Exporting the GUI data of an address to the flash drive only usable together with suitable versions of the decoder and the sound programmer ZSP Unlike the data backup described above the purpose of exporting is NOT to secure the data but to pro vide the GUI data for sound project expansions The e...

Page 18: ... Setting of routes in connection with suitable dispatching programs ESTWGJ STP No description in this manual E 8 StEin LIST Displays a list of existing StEin modules for monitoring and actuating their connections i e track sections HLU occupancy detection short circuits turnouts inputs signals See chapter StEin LIST E 9 AOS s not yet implemented and therefore no description E 0 CONFIG SW Version i...

Page 19: ...lable options Number keys Enter a value Command station HW SW Version Info HW Version Version of the MX10 MX10EC board SW Version Software Version installed Build Date Time Software development date MX10 UID Factory serial number Power supply Command station Statistics Various current data regarding communication and devices con nected to the command station Display of available devices via the me...

Page 20: ...l broadcast stop S Key short Single stop Emergency stop for your engine Broadcast stop Stops all engines per BCS mode S Key long Broadcast stop Stops all engines per BCS mode Track power OFF Track 1 or track 1 2 R Key Direction Changes direction at any speed Single stop Direction key initiates an emergency stop for your running engine direction change only at stand still useful when S Key BCS Abov...

Page 21: ...he function keys are available for normal loco functions The shift key only works if a switch panel is active This Controller Object Groups Some groups e g steam and diesel engines are already pre defined as shown or can be defined here and assigned to the objects mostly vehicles usually in the LOCO IN mode while a new address is assigned or modi fied This Controller Info Statistics Battery status...

Page 22: ...Address Name Group and if the data format differs from default DCC 128 speed steps Select the proper format from the list DCC MM speed steps A Key to confirm Rocker switch select from the available options in the Group field New entries are also possible While adding data in the upper half of the screen an object list of already existing vehicles that match the entered data appears in the lower ha...

Page 23: ...cle is moved directly to the LOCO MOD screen for editing the fields Name or Group U Key modify the object with respect to vehicle image function key icons speedo and more with the help of the ADDR screens Activation occurs thereafter directly from these screens See chapter ADDR FUMT ICONS SPEEDO where all GUI elements are described F Key re activation after quick editing i e after changing or comp...

Page 24: ... name or alternatively direction arrow speed step and the first function table all taken from the object da tabases if it is a completely new address neither in the object database of the controller nor the command station the only info that can be shown is the address and the re porting time F Key Saves the new found address and switches over to the LOCO mode If the search TP key shows several ad...

Page 25: ...track power OFF with S TP Key deliberate short circuit or pulling the track connection and subsequent re power Within the first minute after restoring track power or after powering up the system Initiate a Track On search as described above with the A Key or A in LOCO IN TP Key SEARCH All vehicles equipped with appropriate decoders report themselves and will be shown in the Track On list This info...

Page 26: ...he ADDR IMAGE Beyond this point use the U Key to advance to the next setup screen in the order of FUSY SPEEDO FUMT or for the currently active address in the LOCO or SWI mode with the with the E Key numeric keys 1 2 4 5 to the corresponding setup screens ADDR FUMT ADDR SPEEDO ADDR IMAGE ADDR FUSY In each setup screen the Softkey II copies the current CVs to the clipboard Softkey III pastes the dat...

Page 27: ...y Tapping on the speedometer face leads to the adjustment screen for speedometer adjust ment without RailCom feedback 2 Speedometer display without RailCom feedback blue pointer the speed is calculated from the speed steps For a meaningful display the speed steps must be matched to the km value for each vehicle using the curve diagram with the four adjustable points see below for details The follo...

Page 28: ...bviously wrong image for a crocodile type engine The previously selected image is the starting point for scrolling Attributes and filter Each image if properly recorded is associated with a number of attributes Engine type country company locomotive name author etc these can be used as a filter and simplify the search in the comprehensive database which often contains several hundred images TP Key...

Page 29: ...tely applies them to the selected function key Rocker switch jumps between icon groups in the list i e light icons sound icons TP Key selects between latched toggle indicated by illuminated dot continue with image Fu icons speedo F Key Activates the address with the selected function icons and switches to operating mode LOCO or U Key ADDR SPEED Speedo set up screen Fu Key scroll through icon list ...

Page 30: ...address is recalled the name however is not changed Special provision for function icons Those function keys which were still represented with a substi tute symbol F1 F2 F3 etc will when the address is activated again receive the function icons stored in the MX10 for that address even if some of the function keys already had icons assigned Manual Handover saving the GUI in the MX10 via the menu M ...

Page 31: ... Crocodile Crocodile is only an example Clone Name Crocodile 2 Cloning is available from the menu in the LOCO mode Softkey M Enters the Menu in LOCO mode Scrolling wheel Select from the two menu lines Clone A Key Start the selected cloning procedure The clone window opens after the selected cloning pro cedure is started here Cloning from active address In it the desired address mandatory and a nam...

Page 32: ...displayed or hidden on the screen according to individual taste or arranged differently These display modes can be selected via TOUCH screen alternatively also via the LOCO menu this applies in principle TOUCH the GUI Element the touched element changes size larger smaller Text field Name Address larger smaller Image larger smaller Large speedo small digital display the rest of the GUI elements ar...

Page 33: ... west at standstill and the direction arrow W lights up However if you want to drive to the east the R key must be pressed Press R Key again while holding the Shift Key that the vehicle will be driving east or the headlights pointing east at standstill and the direction arrow E lights up Shift R Key together ahead if one of the E W direction arrows is lit already Driving di rection will NOT be inf...

Page 34: ...n that is activated and driven will remain in the LoR recall memory and the ObjectDb object database even after it is deactivated the LoR however is limited to a maximum of 128 objects Both current driving data and the so called GUI data are stored there The latter determines the ap pearance of the vehicle on display screens such as name image function icons etc The task of the LoR recall memory i...

Page 35: ...T in km h Fifth column Direction stand still driving Sixth column Small function table F0 F9 to see which functions are turned on i e headlight sound Rocker switch to second level of the LoR display The individual rows of the second level contain First column to fourth column same as the first level Fifth column Group info if available The arrangement of the symbols is not yet final depending on t...

Page 36: ... ATTENTION Every consist in the residence controller must be provided with information as to which home system command station ID it belongs to It is certainly possible to have consists in one controller that were built in different home systems or are acquired by take over from the home system the controller is currently connected to If a residence controller is connected to a new command station...

Page 37: ...nds are the same for all addresses regardless of which of the addresses is currently in the foreground and receives a speed change for example Softkey III Open Close the LoR is always possible in order to see the function icons for the active vehicle in the foreground for example The turquoise text and the T1 T2 behind the ad dress indicates that this vehicle is part of a consist TP Key only when ...

Page 38: ...sponse to this information depends on the development lev el also removed in the MX10 with the first and second level If an address that has been assigned to a local consist T1 T9 but is NOT THE SECOND LAST ADDRESS of this consist is deleted from the ObjDB with the C key it disappears from the LoR and ObjctDB The MX10 is informed that this address has been re moved from the local consist the MX10 ...

Page 39: ... a BCS Broadcast Stop instead of the longer default actuation o n l y t h e n S Key brief BCS Broadcast Stop on track 1 Stops all trains on track 1 It makes sense when using this setting to also set the single stop function to the direction key a separate set ting in CONFIG Special Key Sequences From the normal operating screen LOCO S Key short TP Key Power OFF on both tracks From any state with a...

Page 40: ...lly when the speed slider is moved to 0 Stop S Key long BROADCAST STOP Stops all trains at the same time opens the BROADCAST STOP window with these options Resume driving S Key Hide window Emergency stop Track 1 Pwr OFF TP Key Touch auf EIN der Schiene 1 links OVERCURRENT SHORT CIRCUIT UNDERVOLTAGE OVC OVERCURRENT Short the OVC message indicates that the maximum current de fined in the command sta...

Page 41: ... header without scrolling because cursor is already pointing to it S short STOP cancelled if slider is moved away from 0 Resumes driving S long BROADCAST STOP U A BROADCAST STOP to issue broadcast stop after S short was pressed by mistake TP OFF track 1 only power to track output 1 is turned off TP TP 2 x TP OFF track 1 2 fastest way to turn all track power off From BROADCAST STOP window A Key hid...

Page 42: ...P TAKEOVER The S Key can also be used as a quick alternative to take over a loco when External Control is shown in the header but the train IS NOT moving i e speed slider at 0 Press the S Key has no effect since the train is already stopped but the External Control is removed and the controller is fully functional the address is deactivated on the other controller and External Control is being dis...

Page 43: ... is actively in use by a controller The control activities changes in speed functions turnout positions etc are shared with each other and displayed To inform the user that a computer cell phone etc takes temporary control of a loco address the MX32 displays Computer control in the header or if known the name of the application For example Roco Multimaus or App X Net Device This image remains unti...

Page 44: ...NOT the decoder addresses The whole panel made up of 18 icons in 6 rows can be accessed with the scrolling wheel These special switch icons the V icons are not copies of actual switch board symbols and do not distinguish between right and left turnouts but rather represent the two possible positions right or left in a simple way by means of the direction and color of a type of switch icon They can...

Page 45: ...cks for three turnout icons per row available in the SWI DEF page for icon se lection orientation adding decoder address sub addresses or modules and other parameters The number in the left top corner of each block indicates which icon is currently being worked on Scrolling wheel highlights individual input fields for icon selection and parameters the cursor ad vances automatically to the next or ...

Page 46: ... for is turnouts or red green signals paired functions light bulb single function or multi aspect signals to call up sequences of 3 4 5 signal aspects one by one with one key Select with rocker switch Paired Single Seq 3 Seq 4 Seq 8 For this input field an automatic suggestion is made on the basis of the icon selected above a change is usually not necessary Enter the accessory decoder address 1 51...

Page 47: ... delay so that no overlapping aspects are created Unclear Should darkening depend on other signals or must it be included as a separate signal as pect in the sequence 2 Signals connected to the light outputs of the MX820 MX821 decoders in control mode 0 Based on the previous inclusion of the Q decoders i e icons handling and selection of icons are used together MX32 Panel DEF A MX820 or MX821 deco...

Page 48: ...switch to change to DCC e 8 single functions per address often for double slip switches DCC x extended MM1 e Motorola 8 single functions per address MM1 p Motorola paired A Key confirms and opens the accessory address input field then use Numeric keys to enter the new address and confirm with the A Key saves the new entry address and adds it to the ACC LIST TP Taste CV programming Already existing...

Page 49: ...lor dot similar to the red green LED on the module the occupancy detection yellow dot similar to the to the yellow LED on the module overcurrent and short circuit states blue dot similar to the blue LED on the module The display logic of the luminous dots is modeled on the LED s next to the screw terminals of the module s track outputs although not identical for practical reasons The track section...

Page 50: ... more quiescent current during programming than the Rail Community intended The keys displayed in the programming menu lead to the actual working areas TP Key identifies the decoder on the program ming track with its address and displays it with name and image if present in the object database Addi tionally some other important information such as manufacturer ID decoder type SW version and de cod...

Page 51: ... instead the warning ATTENTION Unidentified Decoder Ad dress programming is not safe This means it is NOT yet CERTAIN whether 1 a decoder or vehicle with decoder is even on the pro gramming track 2 the decoder is of the proper type for a vehicle or accessory that can be programmed with the F Key or W Key 3 it is a ZIMO or third party decoder important in relation to CV 29 default values or 4 it is...

Page 52: ...lighted number CV number or value then enter a new value in the field followed again with the A Key the process of correcting a line is the same as entering to a new line see above The following actions can be taken at any time during CV programming F Key activates the vehicle and switches to the LOCO mode only when the address is known i e if the decoder was identified with the TP Key or ad dress...

Page 53: ...I paste CV Set Soft Key II Copy CV Set Saves the CV rows of the current screen to the CV Set memory A CV Set input window opens Theme Select one of the suggested themes with toggle switch Name Enter a name of your choice Info Free choice of text Key A Key SAVE Attention otherwise the CV Set is not saved Soft Key III Paste Search for the desired CV Set in the CV Set database and paste the CV set ro...

Page 54: ... decoder WITHOUT working RailCom feedback and is therefore unidentifiable i e the decoder is not equipped with RailCom disrupted transmission etc the message not identifiable is displayed but the CV programming can still be started with the U Key although reading decoder CVs won t work Use the displayed function keys from the menu to switch to the actual working area TP Key the decoder is once aga...

Page 55: ...nd displayed in the input fields where new data can be entered the new consist address for the vehicle the desired direction same as the consist or reversed and the consist automation ON OFF see above for details A Key new data is sent to the decoder OP PROG U Key CV Programming After entering CV programming with U Key the first input line appears for Programming a CV by typing in a CV Number A Ke...

Page 56: ...the programming step was successful Details and screen shots of CV sets see chapter SERV PROG OP PROG Special configuration procedures only for ZIMO decoder Accessible via OP PROG M Key the first MENU lines Scrolling wheel scroll down to the special procedures for ZIMO decoders last menu section A Key starts the selected procedure The available and planned procedures ZIMO LOCO Settings not yet ava...

Page 57: ... breaks off and plays the end part of the loop To simplify the use of this setting it is of advantage to know the sound sample number which is published by the Sound Providers OP PROG NMRA Function mapping Accessible in OP PROG with M Key the first menu lines appear Scrolling wheel scroll to the desired line A Key starts the selected procedure NMRA Function Mapping standard This is the basic funct...

Page 58: ...area and sound group the sound file selection screen is reached F0 Number key 1 playback Plays back the currently selected sound file F1 F2 prev next Plays back the previous or next sound sample stored in the sound decoder F4 F5 prev next Switch to previous or next sound group groups of whistles bells coal shoveling etc starts playing the first sample of the group F6 loop If F6 is on when exiting ...

Page 59: ...ON is also automatically closed To exit the SOUND SELECTION without making changes i e the current setting to be retained press the E Key Also check the ZIMO Sound Decoder manual chapter ZIMO SOUND Selection and Programming The CV 300 procedures described there for manually initiating the sound selection process are replaced with the automated procedures of the MX32 described here There is no need...

Page 60: ...ler FS The consist is controlled by another controller T1 T2 T9 Address is part of a consist FT inactive consist resides in another controller Fourth column Direction highlighted red when at stand still Fifth column Speed see above Sixth column small function table F0 F9 to see which functions are turned on at a glance Rocker switch to second LoR level The individual lines in the second level of t...

Page 61: ...2 from the flash drive menu one of these two can be se lected during operation from CONFIG Keypad Style Gray Style Plain Style Photo Style Black Style The Black style is normally chosen by default and is therefore also used predominantly in this manual Selecting from the two uploaded styles in see chapter CONFIG Examples of a typical LOCO display with various icon styles Black Style Photo Style Ke...

Page 62: ...ase from a ZIMO contractor The warranty covers the repair or replacement of defective parts ZIMO Elektronik GmbH reserves the right to proceed at its own discretion only if the damage is proven to be the result of a design manufac turing material or transport fault A repair does not extend the warranty Warranty claims can be made with a ZIMO contract partner or ZIMO Elektronik GmbH Proof of purcha...

Reviews: