background image

12

Controlling your Rapture Drone

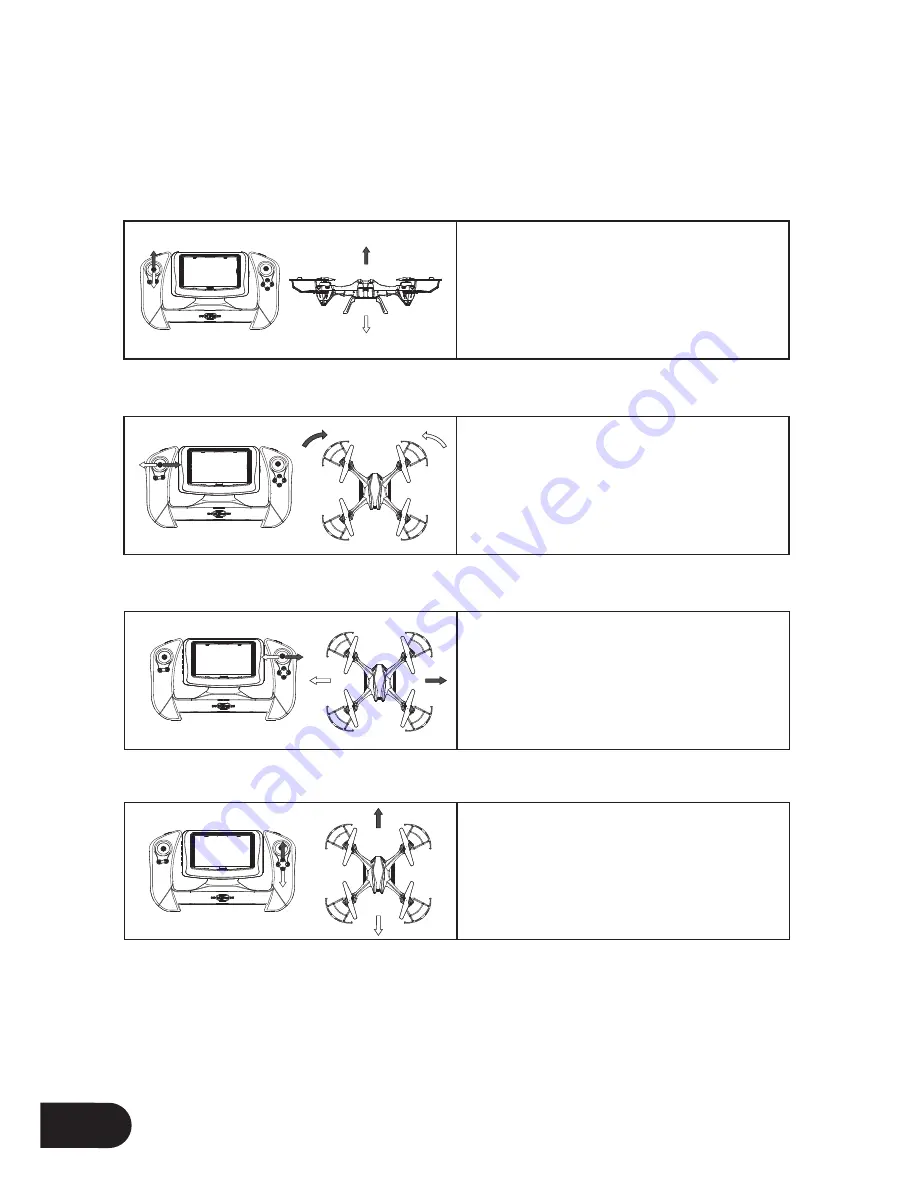
Basic Controls

Lift / Descent

Yaw Left / Right

Roll Left / Right

Pitch Forward / Back

Push up the Throttle Rudder Stick 
and the drone will ly up. Push down 
the Throttle Rudder Stick and the 
drone will ly down.

Push the Left Rudder Stick to the left 
or to the right, the drone will rotate in 
the corresponding direction.

Push the Right Stick to the left or 
to the right, the drone will ly in the 
corresponding direction.

Push the Right Stick forward or 
backward, the drone will ly in the 
corresponding direction.

Summary of Contents for Rapture ZXRAP

Page 1: ...USER MANUAL PRODUCT CODE ZXRAP www zero x com au www zero x co nz RAPTURE DRONE ...

Page 2: ......

Page 3: ...your Zero X Rapture drone Included in the package contents of your Zero X Rapture drone are the Australian CASA guidelines please carefully read and understand this information as operating a drone outside of these guidelines may result in legal issues The manufacturer takes no responsibility for operation of this product outside of what is legally permissible in your local area Do not ly your Rap...

Page 4: ...ely to any potential problems that may occur Do not charge the battery in temperatures hotter than 40 C or colder than 0 C After each light or crash please check battery for any damage or swelling Do not cover the batteries when charging Do not leave batteries in direct sunlight If the batteries are damaged leaking making noise punctured or malformed in any way DO NOT attempt to use it Please disp...

Page 5: ...nts 4 10 9 1 Rapture Drone 2 Rapture Battery 3 Rapture Battery Charger 4 Remote Control 5 Remote Control Battery 6 Remote Control Battery Charger 7 Rotor Blades 8 Rotor Guards 9 Screwdriver 10 User Guide 3 7 5 6 8 2 1 ...

Page 6: ... Drone Diagram 5 8 7 3 3 4 4 3 3 6 3 LED Lights 4 Feet 5 On Off Switch 6 Camera 7 Battery 8 Micro SD Card Slot Micro SD Card not included Under Side View 1 1 2 2 1 Front Rotor Blades 2 Rear Rotor Blades Top View ...

Page 7: ...l 4 Yaw Trim Controller 5 Pitch Roll Trim Controller 6 FPV Screen 7 View Button 8 Record Button 9 Photo Button 10 Up Button 11 Down Button 12 Micro SD Card Slot 13 Glare Shield detachable 14 Speed Button 15 Flip Mode On Off Remote Control Diagram 1 4 5 6 15 14 13 12 2 3 7 8 9 10 11 ...

Page 8: ... screen to view 3 Shoot Video Footage Micro SD card must be inserted in the Rapture Drone to shoot video footage 4 Shoot Still Photo Micro SD card must be inserted in the Rapture Drone to shoot still photos 5 Brightness Up 6 Brightness Down 7 Micro SD Card in camera icon 8 Micro SD Card in FPV icon 1 3 4 5 6 2 7 8 ...

Page 9: ...the computer When connecting the USB cable with the battery make sure to follow the correct polar indicator When Flying the Rapture drone low battery will be indicated when the remote control starts beeping and the lights on the Rapture drone start lashing When using a Wall charger please ensure that only an Australian Standards C Tick certiied charger is used Incorrect charging or overcharging of...

Page 10: ...press the card in until you hear the lock click into place Micro SD Card not included Rotor Guards Rotor Guards are an optional itting on the Rapture drone however for safety reasons we strongly advise you to attach them Whether Rotor Guards are attached or not please be very careful when handling the drone To avoid injury do not touch the drone while the blades are turning or the remote control i...

Page 11: ...trol battery into the battery slot and make sure that the wires are tucked in to ensure they are not crushed buy the battery cover Replace the battery cover making sure not to over tighten the screw Flight Safety Before lying your Rapture drone make sure that you are in a safe setting CASA restrictions regarding lying drones require the drone be no closer than 5 5kms from any airport or airield wh...

Page 12: ... 2 on the Remote Control to the highest up position hold for one second and then return the Left Thumbstick Acceleration Yaw to the lowest down position holding for another 5 seconds The remote should beep three times the lights on the arms of the Rapture drone should shine solid and the power indicator light on the Remote Control will shine solid indicating that the connection has been successful...

Page 13: ...ly charged correctly connected and not damaged b The connection between the Remote Control and the Rapture drone may not have been completed correctly Ensure that when activating the connection the Left Thumbstick is moved all the way to the top and then all the way to the bottom If this is not completed the connection will not activate Once these elements have been checked turn both the Rapture d...

Page 14: ... ly up Push down the Throttle Rudder Stick and the drone will ly down Push the Left Rudder Stick to the left or to the right the drone will rotate in the corresponding direction Push the Right Stick to the left or to the right the drone will ly in the corresponding direction Push the Right Stick forward or backward the drone will ly in the corresponding direction ...

Page 15: ...the Remote Control will quickly beep twice indicating that the Rapture drone is now in the medium Speed Mode In this mode the sensitivity of both the acceleration and directional control of the Rapture drone will be increased making the Rapture drone more nimble and quick HIGH Pushing the Speed Button 14 a second time the Remote Control will quickly beep three times indicating that the Rapture dro...

Page 16: ...below and in all directions around the drone before attempting to lip as this manoeuvre requires considerable space Flips will be deactivated when the Rapture drone has low power and will be reactivated once the battery is charged To trim the Rapture drones pitch use the Pitch Trim Controls 5 which are the top and bottom buttons below the Right Thumbstick This will balance the forward and back mov...

Page 17: ...the Rapture drone If this issue persists please ensure you are using a compatible Micro SD card Shooting Video The Rapture drone will capture 60 second clips once it has inished recording a clip it will begin a new clip and continue recording 60 second clips until you stop recording To start recording video push the Record button 8 on the left side of the FPV Screen The FPV screen will lash the wo...

Page 18: ...he FPV screen use the up 10 and down 11 buttons on the front menu Pairing If you are in an area where more than one drone is being lown it is recommended that you pair your FPV screen to your drone to avoid signal interference To pair your FPV screen to your Rapture Drone 1 Connect your Rapture drone to the controller by following the connection instructions in the section named Launching your Rap...

Page 19: ...ce a video has completed playing the next video in the folder will be queued to play This will continue until playback is stopped or the last ile in a folder is played Deleting videos and Photos With the delete function you can delete videos and photos taken with the Rapture drone To delete a ile from a Micro SD Card select the ile that is required to be deleted and push the Delete button View 7 Y...

Page 20: ...ations of blades which are labelled A and B If the incorrect blade is used in the incorrect placement the Rapture drone WILL NOT WORK Different colour Rotor Blades are used so it is easy to identify the front and rear of the Rapture drone when lying To ensure that it is easy to ly the Rapture drone make sure that the front and rear blades are different colours 4 Gently push the replacement Rotor B...

Page 21: ...ectre drones Black and Red ZXRBSRVP Rotor Blades for Rapture and Spectre drones Value Pack ZXBATSR1K 1000mAh Battery for Rapture and Spectre drones ZXCHSRDR Battery charger for Rapture and Spectre drones ZXBATSRCT Battery and charger for the Rapture remote control Specifications Dimensions 48cm x 48cm x12cm Weight 320g Channels 4 Battery 1000mAh Motors 4 Transmitter Battery 450mAh Rechargeable Scr...

Page 22: ...aging This warranty is only valid where you have used the product in accordance with any recommendations or instructions provided by Zero X This warranty excludes defects resulting from alterations of the product accident misuse abuse or neglect In order to claim the warranty you must return the product to the retailer from which it was purchased or if that retailer is part of a National network a...

Page 23: ......

Page 24: ...www zero x com au www zero x co nz ...

Reviews: