background image

Capture the skies.

11_


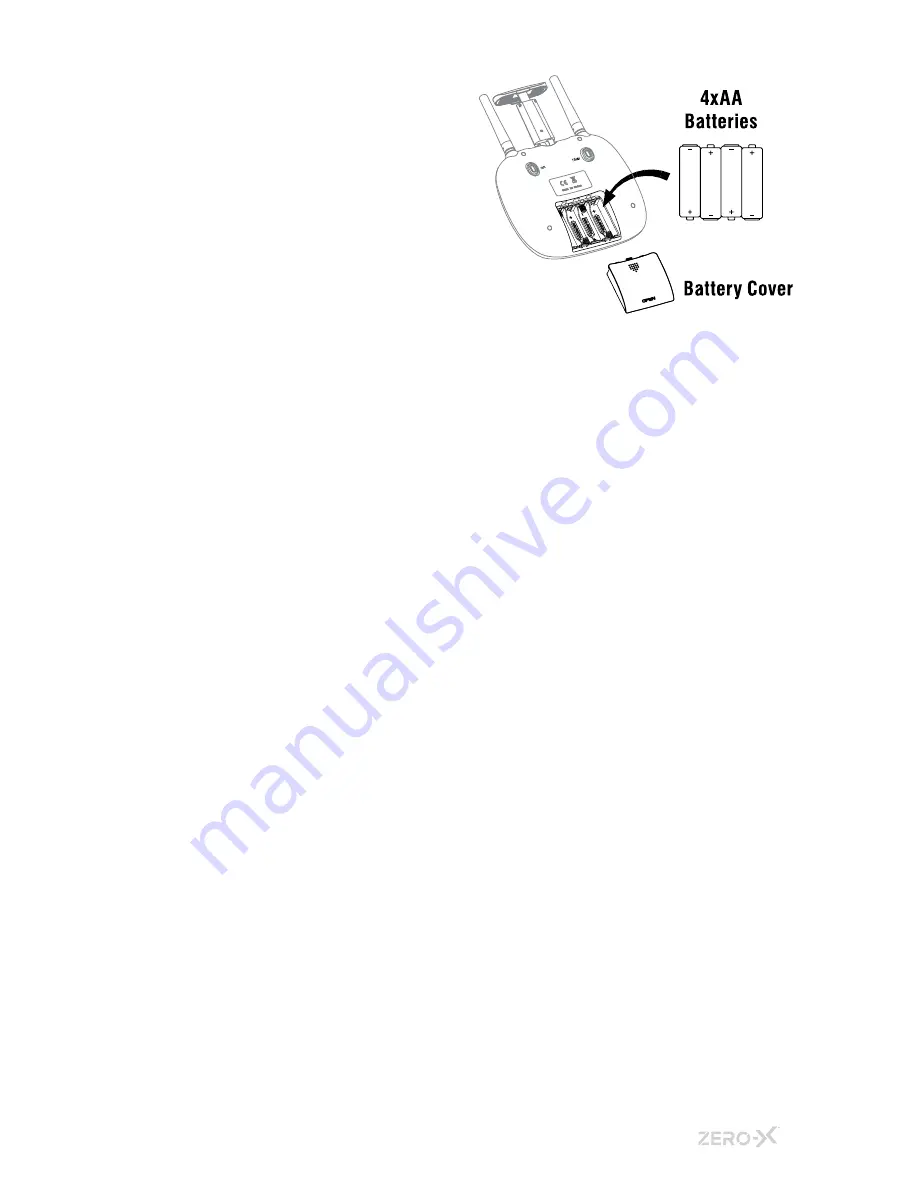
3.1.5  REMOTE CONTROL


1.  

Ensure that the Remote 

Control power switch is in 

the OFF (down) position.


2.  

Remove the battery cover 

on the rear of the Remote 

Control by sliding it 

downward.


3.  

Insert 4 x AA batteries (AA 

Batteries not included) 

making sure that they are in the orientation specified.


4. 

Do not mix new and old batteries or different types of batteries. 


3.1.6  FLIGHT SAFETY


   Before flying your Atlas make sure that you are in a safe setting. CASA 

restrictions regarding flying drones require the drone be no closer 

than5.5kms from any airport or airfield whilst flying. Drones should 

also not be flown over populated areas or any closer than 30 metres 

from vehicles people or animals.


   It is also required that you check your surroundings before taking off 

making sure there are no obstacles or dangers in the area, including 

overhead power lines and bodies of water. If there are hazards present 

in your intended area of flight, please consider an alternative location.


3.1.7  WIFI CONNECTION AND APP SET UP


   To use your Apple or Android smart-phone as a FPV screen you will 

need to wirelessly connect your smart phone to your Atlas over WiFi.


   This is done during the set up and launching of the Atlas and requires 

you to have the Zero-X Atlas App installed.


1.

  To find the Zero-X Atlas App search ‘Zero-X Atlas’ on the Apple 

App store if you are using an iPhone, or on the Google Play store if 

you are using an Android phone.


2.

  Download the Zero-X Atlas App.


3.

  Once the App is downloaded and installed on your Smart phone, 

switch on your Atlas by holding the power button for two seconds 

and move your Smart-phone to be within two metres of the drone.


4.

  When the Atlas is switched on (without the remote controller 

switched on) The lights on the arms of the Atlas will flash. While 

these lights are flashing the WiFi signal will start up be available for 

connection.


  5.

  In your Smart-phone’s WiFi settings find the and select the ZX 

ATLAS WiFi connection.


6.

  Open the Zero-X Atlas App.


7.

  Press the App Control button on screen to access FPV mode

Summary of Contents for Atlas ZX-ATL

Page 1: ...PRODUCT CODE ZX ATL v1 Capture the skies High Performance Drone Full HD Camera DRONE USER MANUAL...

Page 2: ......

Page 3: ...INCLUDED 11 3 1 6 FLIGHT SAFETY 11 3 1 7 WIFI CONNECTION AND APP SET UP 11 3 1 8 USING THE REMOTE CONTROL SMART PHONE HOLDER 12 3 1 9 INSTALLING THE ROTOR GUARDS 12 4 FLYING YOUR ATLAS 12 14 4 1 0 TR...

Page 4: ...ad carefully and understand this information as operating a drone outside of these guidelines may result in legal issues Zero X takes no responsibility for operation of this product outside of what is...

Page 5: ...the batteries when charging Do not leave batteries in direct sunlight After each flight or crash please check battery for any damage or swelling If the battery is damaged leaking making noise puncture...

Page 6: ...the skies 2 INTRODUCTION 2 1 PACKAGE CONTENTS 2 9 8 1 4 5 7 6 3 10 1 Atlas Drone 2 Remote Control 3 USB Charger 4 Battery 5 Drone Feet 6 AC wall charger 7 Rotor Blades 8 Rotor Guards 9 Screwdriver 10...

Page 7: ...Capture the skies 7_ 2 2 PRODUCT OVERVIEW ATLAS DIAGRAM...

Page 8: ...PTER WILL VOID YOUR WARRANTY AND MAY DAMAGE BOTH YOUR BATTERY AND DRONE Fully unwind the included USB charging cable and plug the USB end into the included Zero X Certified USB AC charging adapter Whe...

Page 9: ...ttery from the charger When connecting the USB cable with the battery make sure to follow the guides on the battery connector as these are designed to only be inserted in one direction Forcing the con...

Page 10: ...one cable to the Atlas making sure that the camera is in the correct orientation 3 To connect the Micro USB connection connect the right angle end of the supplied cable to the camera while supporting...

Page 11: ...ntended area of flight please consider an alternative location 3 1 7 WIFI CONNECTION AND APP SET UP To use your Apple or Android smart phone as a FPV screen you will need to wirelessly connect your sm...

Page 12: ...e pegs are In position 2 Secure the rotor guards with the included screws 4 FLYING YOUR ATLAS GETTING STARTED POWERING UP PAIRING CALIBRATING AND UNLOCKING THE MOTORS 1 After installing a fully charge...

Page 13: ...evel and flies straight The Lights on the Atlas will flash fast while calibrating Keep holding the Thumb stick in the bottom right position until calibration is complete If the Atlas starts to fly abn...

Page 14: ...emote Control are of the same brand have an equal amount of charge and have enough charge to power the remote control correctly Using an assortment of batteries will affect the performance of the Remo...

Page 15: ...ff land button The motors will stop completely and the Atlas will fall to the ground PLEASE NOTE When using any land function make sure that there are no obstacles people or animals under the drone Do...

Page 16: ...e Directional Lock button to set your forward direction Directional Lock will now be set and your preferred orientation will be set PLEASE NOTE Do not attempt to set Directional Lock when you are alre...

Page 17: ...the Remote Control and Atlas are switched on and correctly paired 2 Hold the Trimmer button on the rear of the Remote Control 3 While still holding the Trimmer button use the right thumb stick to coun...

Page 18: ...take you back to the home page FPV This will split the screen into two so that it can be used in a smart phone compatible VR headset Headset not included This mode should be used with the controller P...

Page 19: ...ransmission resolution and trimming ON SCREEN CONTROLS This will give the option of Stick Controls or Tilt Controls STICK CONTROLS Allows you to control the Atlas with two on screen virtual thumb stic...

Page 20: ...ode ONE BUTTON TAKE OFF This button will launch the drone When selected the drone will take off and hover at about shoulder height ONE BUTTON LANDING This button will initiate the automatic landing se...

Page 21: ...inserted Micro SD Card or the files that have been transferred to your phone From either of these libraries you can view and transfer your videos and photos 7 MAINTENANCE 7 1 0 REPLACING ROTOR BLADES...

Page 22: ...g how to fly your drone We would like to offer you 50 off your first two orders of any spare parts by using the codes in the coupons below There you will be able to find and buy the spare parts listed...

Page 23: ...ated on the packaging This warranty is only valid where you have used the product in accordance with any recommendations or instructions provided by Zero X This warranty excludes defects resulting fro...

Page 24: ...www zero x com au www zero x co nz Zero X v1 0 2017 Capture the skies...

Reviews: