11
12
Notice: (Disassembling arms)
Disassembling arms: Unscrewing the screw which fixes the arm rotating shaft cap and back
rotating shaft with inner hexagon spanner; Moving the seat cushion and then moving the front/
back cover, unscrewing the screws (M6*16). Plugging off the air tubes. Taking off the arms with
two hands.
Installation Illustration
Installation (3)
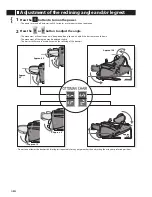
Step 3.Install lower arms
(2) Unscrewing the screw in the shaft cap, moving the lower arm to make the rotating shaft cap
align with shaft rotating in back, then connect them well. Using inner hexag on spanner to screw
the screw into the lower arm screw hole(as picture).(3) Repeat above step to install another arm.
Ins
tal
la
ti
on
Screw
Inner hexagon
spanner
Screw hole
Lower arm shaft
rotating cap
Shaft rotating in back
Using inner hexagon
spanner connect the
back shaft rotating
and arm shaft rotating
cap
Finishing the arm installation
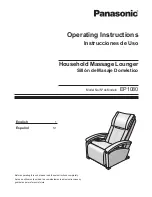
Step 4. Install remote control holder and insert remote control
Using three screws(M5*16), three
5 spring shim to fix the remote control to right upper arm, then
insert the remote control into the bracket and fix the remote control cables to the buckle at the end
of the arm.
ф
Remote control
Remote
control
holder
and
bracket
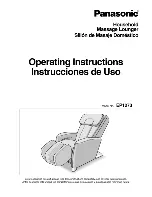
Step 5. Connect seat air tube
Connect the air tubes in seat cushion and seat frame as color (black with black, purple with purple,
gray with gray, brown with brown). Then stick the snap fastener together.
Black air tube
Gray air tube
Brown air tube
Seat cushion
Installation Illustration
Installation (4)
In
st
al
la
tion
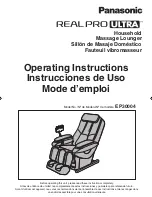
On/off
T m ng
Mechanical
Massage
Pressure
Massage
ZERO-G
Stop
Shoulder
Wa st
Intensity
Fatigue
recovery
Pain
relieving
Comfortable
mood
Demo
Auto
Custom
Returning...Body detecting...
Overall
Shoulder
Back
Waist
Point
Width
Speed
3D
Strength Volume