15
16
2
2
The adjustment before massage
Caution
Environment
Checking environment
Don
’
t use near swimming pool or bath
room and other wet place to avoid lea-
kage and electric shock.
Don
’
t use under sunlight or near stove
and other heating place to avoid upho-
lstery deteriorated.
Please using chair in flat place to avoid
chair falling or noise or other unneces-
sary trouble.
Checking areas before chair
Checking the area when back and leg extended,
make sure no people, pet or other things.
Checking power cable, plug
(1) Cleaning the dust on plug on time.
(using dry cloth).
(2) No damage, re-do, bend, stretch, tie or
press with heavy thing(especially can
’
t be
pressed by the chair) on power cable.
Check
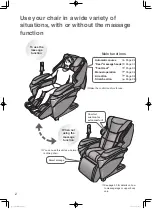
Space size for using the chair
At least 40cm from back to wall.
At least 40cm in front of the leg.
Checking surroundings
When back reclining, leg reclining, leg
extended and moving seat, pay attention
to:
(1)Checking any person or things in every
direction.
(2)Checking the space size.
Op
era
tion
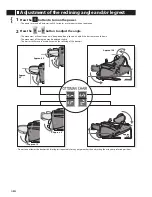
The adjustment before massage
How to move massage chair
Adjustment before massage
Caution
Don
’
t move chair when it
’
s working to avoid
accidents or damage
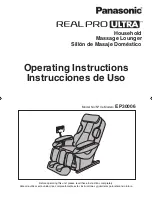
How to move
Binding the cables and put in the seat to avoid
damage when moving.
If you plump the chair, it may damage the inner
parts of the chair.
Don
’
t use the castor if the floor is wooden or
other easy damaged material. It will need 2
or more persons lift the chair.
Don
’
t shake the leg, or it may cause damage
on the chair.
Make sure unplug the power and plug can
’
t
touch the floor(It
’
s better to
let the chair in standing
status to avoid theback
crashing the floor)
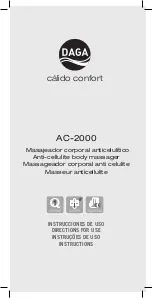
Normally
One person lift the leg to the limited position
and continuing to make
the gravity falls on the
castor, Then pushing
chair to destin-
ationand set it
down.
1
1
Two persons hold the two arms,
lift and moving the chair
to destination.
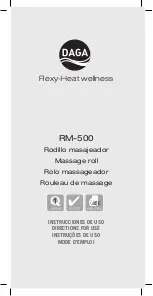
Before adjustment
Please make surethe ma-
ssage headin right position,
then sit down(to avoid ma-
ssage roller hit you head)
Shoulder testing
When test shoulder height, if can
’
t find
the shoulder, the chair has acquiescent
height.
Right position: Your back
cling to the chair back, the
head cling to the pillow.
During testing, the massa-
ge roller goes up and down
to test yourbody, then the
roller stretch out to goes up
to test shoulder, it can test
your shoulder automatically.
Avoid testing out wrong shoulder position,
which makes you can
’
t get good massage.
Op
er
at
io
n
Kind suggestion
When you feel the
intensity isn
’
t strong,
take off the pillow or
cushion.
Because the chair is heavy, it may ruin
your floor in long time setting.
Please put a blanket or
other soft things to
protect your floor.