2. Turn on power, the settled time is 20mins, press this key, the time becomes to 30mins, one
more press, the time becomes to 10mins. The experience time is 8mins.
3. Press this key to start auto massage on back and original air pressure massage. Press this
key again to stop massage on back.
1. Turn on power, press this key the chair is working, but the back wont
’
recline now. You can
choose any manual or auto massage. Pressing any massage key, the back reclines and
does body detect. After testing, it starts massage. Press this key, the massage stops and
massage head goes up.
17
18
1
2
3
4
5
7
8
9
6
14
15
16
17
10
11
12
13
21
22
20
24
19
23
35
18
25 26 29 30 31
34
28
33
27
3
2
!
3D
3D
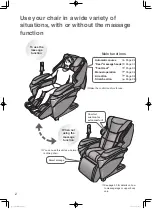
How to use remote control
Remote control manual
air massage/massage program
VFD screen
Auto massage program
Leg reclining
Leg reclining
Massage
Back reclining
Manual operate
massage program
How to use remote control
On/off
Timing
Mechanical
Massage
Pressure
Massage
ZERO-G
Fatigue
recovery
Pain
relieving
Comfortable
mood
Demo
4. Press this key to start auto air pressure massage and original massage on back. Press this key
again to stop air pressure massage.
5.Press this key to realize zero-gravity position. If you press any massage key, then it
stops becoming zero-gravity position. Press this key again to become original position.
6. When the chair is working, press this key to choose
“
Fatigue recovery
”
massage.
Press again to stop it.
7. When the chair is working, press this key to choose
“
Pain relieving
”
massage.
press again to stop it.
8. When the chair is working, press this key to choose
“
Comfortable mood
”
massage.
press again to stop it.
9. When the chair is working, press this key to experience each function for 8mins,
press again to stop it.
10. Press this key to stop all functions.
11. Press this key to start massage on neck and shoulder, it keeps original air pressure
massage. Press again to stop massage on back.
12. Press this key to start massage on waist and back, it keeps original air pressure
massage. Press again to stop massage on back.
13. When the air pressure massage is working, press this key to adjust the air pressure
massage intensity.
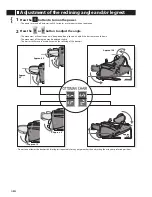
14. Press this key, the leg mechanism goes up. Loose it, the leg mechanism stops at
this position.
15. Press this key, the leg mechanism goes down. Loose it, the leg mechanism stops
at this position.
16. Press this key, the back goes up, leg mechanism goes down. Loose it, the back and
leg mechanism stops at this position.
17. Press this key, the back goes down, leg mechanism goes up. Loose it, the back and
leg mechanism stops at this position.
Stop
Shoulder
Waist
Intensity
On/off
Timing
Mechanical
Massage
Pressure
Massage
ZERO-G
Stop
Shoulder
Waist
Intensity
Fatigue
recovery
Pain
relieving
Comfortable
mood
Demo
Auto
Custom
Returning...Body detecting...
Overall
Shoulder
Back
Waist
Point
Width
Speed
3D
Strength Volume
Op
era
tion
Op
era
tion