background image

Page 56

LT2002 QuickSet Programmer

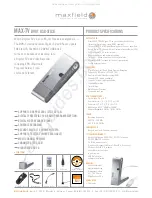
Use the LT2002 QuickSet II “Clone”
Programmer to copy the setup from a
“master” TV then quickly transfer the
setup to duplicate TVs; must be the same
model number as the master TV.

QuickSet II Programmer

LT2000

®

ZENITH ELECTRONICS CORPORATION, GLENVIEW, ILLINOIS, USA

• heartbeat   power on

    communications ok

• slow   

    power on
    no communications

• green       battery ok
• red

    battery low

Blink pattern

Color

Reset

Status

Indicator

Connect cable to
TV MPI Jack and
follow on screen
instructions

MPI

Typical
TV Back

LT2002

Clone Programmer

TV Back Panel

(Expanded View)

RF Coxial Wire

(75 ohm)

Antenna

Learn Master TV Setup
Typical MPI Connections

Teach Other TV the Setup
Typical MPI Connections

L

M.P.I.

C

O

M

P

U

T

E

R

I

N

P

R

VIDEO IN

IN

COMPUTER 

R

DVD IN

AUDIO

AUDIO

S-VIDEO

AUDIO OUT

R

L

R

L

R

L

Y

P

B

480I

DIGITAL

ANTENNA

ANTENNA

CABLE

QuickSet II Programmer

LT2000

®

ZENITH ELECTRONICS CORPORATION, GLENVIEW, ILLINOIS, USA

• heartbeat   power on

    communications ok

• slow   

    power on
    no communications

• green       battery ok
• red

    battery low

Blink pattern

Color

Reset

Status

Indicator

Connect cable to
TV MPI Jack and
follow on screen
instructions

MPI

Typical
TV Back

LT2002

Clone Programmer

TV Back Panel

(Expanded View)

RF Coxial Wire

(75 ohm)

Antenna

L

M.P.I.

C

O

M

P

U

T

E

R

I

N

P

R

VIDEO IN

IN

COMPUTER 

R

DVD IN

AUDIO

AUDIO

S-VIDEO

AUDIO OUT

R

L

R

L

R

L

Y

P

B

480I

DIGITAL

ANTENNA

ANTENNA

CABLE

The optional QuickSet II Clone Programmer (LT2002) allows custom setup and pro-
gramming information to be quickly copied from a master TV into multiple identi-
cal television sets. Once learned from the master, setup data is retained in the
LT2002 for future use.

When using the LT2002, cloning operations will go easier if the TV set is connect-
ed to a good quality signal and operating with a stable picture displayed. To oper-
ate the LT2002, use the indicated keys on the HP602, LP702 or MBR3447 Zenith
installer remotes, or the front panel keys on the TV receiver.

Notes: Use only one MPI port for cloning. Do not run Auto Program while cloning.

THE CLONE HAS CONTROL OF THE TV

THE CLONE IS VERSION

XX

THE TV IS VERSION

XX

THE SW IS REVISION

XX

CLONE CLOCK

=  XX:XX

TV 

   CLOCK

=  XX:XX

-PRESS ANY KEY TO CONTINUE.

-DISCONNECT CLONE WHEN DONE.

Summary of Contents for H27H49S

Page 1: ...on Guide Warranty Model Numbers H27H49S H32H49S Direct View PresentationTM TVs Copyright 2006 LG Electronics U S A Inc Zenith and the lightning Z logo are registered trademarks of Zenith Electronics C...

Page 2: ...protection against harmful interfer ence when the equipment is operated in a residential installation This equipment generates uses and can radiate radio frequency energy and if not installed and used...

Page 3: ...ow the manufacturer s instructions and should use a mounting accessory recommended by the manufacturer 8 Transporting Product A product and cart combination should be moved with care Quick stops exces...

Page 4: ...ervicing to qualified service personnel 20 Damage Requiring Service Unplug this product from the wall outlet and refer servicing to qualified service personnel under the following conditions a If the...

Page 5: ...VCR 18 Cable Service with VCR 19 S Video DVD Player or VCR 20 DVD Player Component Video 21 Composite Video R Audio L 22 External Amplifier Audio Out Hookups 23 Step 2 TV Reception Setup Channel Sear...

Page 6: ...the End User 9 Fine tune source image and sound to personal preference or as required by source See pages 40 through 42 Additional Features Setup See page 5 Table of Contents To connect a PC computer...

Page 7: ...omputer Display Output to TV Requirements Computer display output settings must be set to SVGA 800 x 600 60 Hz Set Up the Presentation TV for Computer Requirements If your Computer is hooked up to the...

Page 8: ...puter As it warms up the TV will adapt to your computer Note Unlike a computer monitor this TV does not show a computer image on the screen until the TV has completely adapted to your computer s outpu...

Page 9: ...g TV to the Television MON to the Computer Monitor PC to the Computer L M P I C O M P U T E R I N PR VIDEO IN IN COMPUTER R DVD IN AUDIO AUDIO S VIDEO AUDIO OUT R L R L R L Y PB 480I DIGITAL ANTENNA A...

Page 10: ...ZE of 25 3 Select under the ITEM category ICON Select SIZE of 40 Select FONT SIZE of 20 Select FONT of TIMES NEW ROMAN BOLD Technical Update Optimum Display November 1998 4 Select under the ITEM categ...

Page 11: ...h your com puter you will simply change the FONT and SIZE through the CONTROL PANEL and VIEW You have now changed the appearance of all your folders but NOT your applications VIEWING FOR PRESENTATION...

Page 12: ...e input If you connect a computer to this connector it will override any other selected source and show the computer dis play on the screen If the source you want to select does not appear as an optio...

Page 13: ...set moves all the above options back to their original facto ry set levels Using the Up Down arrow on the remote control choose Contrast on the menu Using the Left Right arrow change the con trast lev...

Page 14: ...d to computer Wait until TV adjusts to computer image 9 Cable over 25 feet Set up Computer TV where an excessively long cable is not required Local interference Check for disturbing source The followi...

Page 15: ...w MPI Port Connect LT2002 clone program mer to MPI port See page 56 Digital Antenna Connect if digital signal source is available Note If both digital and analog signals are only available from one RF...

Page 16: ...signal splitter Mini Glossary 2 Way Splitter A device that provides two antenna signals from one antenna lead 75 ohm The wire that comes from an off air antenna or cable service provider Each end RF...

Page 17: ...set Connect the CATV cable that runs from the wall according to the connection diagram shown to the right The TV digital tuner does not work with a Digital Cable signal source Cable Service Cable Serv...

Page 18: ...back of the VCR Connect the antenna that runs from the wall jack directly to this jack according to the connection diagram shown to the right Connect a 75 ohm wire to the Digital Antenna input on the...

Page 19: ...he cable box wall jack and Cable In on the cable box Connect a 75 ohm cable from the Cable out jack on the cable box to the Ant In jack on the VCR Connect a 75 ohm cable between the VCR out jack on th...

Page 20: ...DEO AUDIO OUT R L R L R L Y PB 480I DIGITAL ANTENNA ANTENNA CABLE Hook Up S Video DVD Player or VCR 1 2 Locate the S Video out jack on the DVD player or VCR On the DVD player or VCR connect the S Vide...

Page 21: ...R L R L Y PB 480I DIGITAL ANTENNA ANTENNA CABLE TV Back Hook Up DVD Component Video 1 2 Locate the S Video out jack on the DVD player or VCR On the DVD player or VCR connect the S Video out jack to t...

Page 22: ...UTER R DVD IN AUDIO AUDIO S VIDEO AUDIO OUT R L R L R L Y PB 480I DIGITAL ANTENNA ANTENNA CABLE Hook Up Composite Audio Video 1 2 Locate the composite audio video input jacks on the TV Connect the com...

Page 23: ...A CABLE Connect R L Audio Out to an external amplifier and speakers TV Back VIDEO IN DVD IN Hook Up an External Speaker Connect the TV to an external speaker or amplifier 1 2 External Speaker Locate t...

Page 24: ...nect portable PC here Video In Camport Input for a video signal from auxiliary equipment L Audio R In Left Right Channel audio input jacks The front Video jack is an Auto Sense source connection With...

Page 25: ...bers e g 7 1 11 3 etc ENTER Press to view the Channel Time Audio display or to remove any on screen display or menu AUDIO Selects available digital channel audio languages VCR Function Keys Operate fu...

Page 26: ...e blank channels Include channel labels so that they appear on the channel time audio display Choose from the preset label selections Channels labels are only available for analog channels Channel sea...

Page 27: ...CamPort No other sources available 2nd Front Computer In ComPort No other sources available Other Selectable Sources if 1 Front Audio Video In is not connected then 2 Front Computer In is not connecte...

Page 28: ...ng the TV front control panel buttons See page 24 for menu operation instructions If you need to key in numbers use the remote control Note If the source you want to select does not appear as an optio...

Page 29: ...ndRite Front Surround Speakers Audio Pref VIDEO MENU 42 Customizes the picture for the end user The options are Contrast Brightness Color Tint Sharpness Picture Pref PARENTAL 36 Allows user to block p...

Page 30: ...aption Text option On and Off Alarm Menu In the Setup Menu select the ALARM MENU option Set a time for the TV to automatically turn itself On Source Menu Press TV VCR SOURCE Gives access to available...

Page 31: ...Added Notes If the option was turned Off in the Service menu you will have to rein state it before it will appear as an option in the Channel Preview list You can specify Add Delete or Blank for VCR3...

Page 32: ...familiar nationwide channels are avail able i e A E Arts and Entertainment CNN News ESPN Sports HBO Movies and so on 1 AUTO PRG ADD DEL BK CH LABELS CLOCK SET TIMER CAPTIONS ALARM MENU LANGUAGE CH 32...

Page 33: ...st let ter Use Channel Up Down to scroll through and change the character to one of the 255 characters available Repeat Steps 4 and 5 to set characters for the other spaces available on the label Pres...

Page 34: ...S ALARM MENU LANGUAGE 10 32 AM TIMER AUTO PRG ADD DEL BK CH LABELS CLOCK SET TIMER CAPTIONS ALARM MENU LANGUAGE 6 30 AM TIMER SETUP MENU SETUP MENU 3 4 PRG POWER CABLE VCR AUX TV AUDIO FLASHBK MUTE CH...

Page 35: ...ts a time that the TV will turn itself Off each day On Off Timer Enables or disables the On Off Timer func tions The On Off Timer can be disabled but the settings will be retained Notes The clock must...

Page 36: ...tion Caption Text are features which allow the TV to display the closed caption and or text options if made available by the broadcaster Availability and functionality of Caption Text options are dete...

Page 37: ...SET TIMER CAPTIONS DEGAUSS LANGUAGE TO SET CAPTIONS SETUP MENU STYLE SIZE FONT TEXT COLOR TEXT OPACITY BACK COLOR BACK OPACITY EDGE TYPE EDGE COLOR LANGUAGE CAPTION ON OFF STYLE SIZE FONT TEXT COLOR T...

Page 38: ...NTER to remove menu from screen The alarm will only work if the TV is turned Off Be sure the TV s internal clock is set to the current time so that the wake up alarm will work properly 1 2 AUTO PRG AD...

Page 39: ...ss ENTER to save and remove menu 1 2 AUTO PRG ADD DEL BK CH LABELS CLOCK SET TIMER CAPTIONS ALARM MENU LANGUAGE ENGLISH SETUP MENU 3 4 PRG POWER CABLE VCR AUX TV AUDIO FLASHBK MUTE CHANNEL CHANNEL VOL...

Page 40: ...or change the option you have selected Use Up Down arrows to choose other Audio menu options or press ENTER to remove menu Use the Audio button to scan the Audio Languages available for a Digital Cha...

Page 41: ...n to select that audio If however no other language is being included on the program s signal no other audio will be heard This con dition is not the fault of the TV If no other language is being broa...

Page 42: ...ptions back to their original factory set levels Using Up Down arrows on the remote con trol choose Contrast on the menu Use the Left Right ADJ arrow to change or adjust the contrast level as required...

Page 43: ...able to see TV PG TV 14 or TV MA rated programming Do you want to block the auxiliary video source entirely Blocks the signal sent by the equipment such as a VCR connected to the TV Audio Video input...

Page 44: ...justed the parental control menu options to your requirements Set the hours you want Parental Control active Set a 4 number password Set the Lock On Off option to On or Off No Rating means that the br...

Page 45: ...children to view the program PG 13 Parental Guidance Program is inappropriate for preteens with a greater Suggested degree of offensive material than a PG rated program R Restricted viewing Not for ch...

Page 46: ...um Number of Parental Control Default Block Hours You can change the Block hours from the 12 hour default setting to up to 99 hours In the Installer s Menu item 22 I MAX BLK HRS 12 use the ADJ Left Ri...

Page 47: ...utoff 2 I AC ON 0 1 0 Set to 1 to enable auto turn on at power up 3 I BAND AFC 0 7 0 Sets Tuning band 4 I STRT CHANNEL 0 255 255 Channel at turn on 255 for last Channel For digital channels use with i...

Page 48: ...2 4 5 255 Sets the starting AUX source 255 47 I AUX STATUS 0 1 0 Set to 1 for M P I AUX source reported as Channel number instead of Channel 0 48 I DIS SETUP M 0 1 0 Set to 1 to disable Setup menu 49...

Page 49: ...ot in the favorite channel list 74 I CH TIME SIZE 0 1 0 If set to 1 and transparent background is selected for Channel Time display foreground color background color and custom color enabled a large c...

Page 50: ...Detailed Descriptions of Installer Menu Items 0 I INSTALLER SEQUENCE Gives access to Installer Menu depending on the code selected 0 9876 1 4321 2 1478 3 3698 1 I POWER MANAGE Power Management Determ...

Page 51: ...function allows the Installer to determine the initial volume level setting when the TV is turned On This feature is useful for an in house informa tion channel since the TV would always select that V...

Page 52: ...ys Off when TV is initially turned On 24 I TEXT MODE Determines whether TEXT 1 TEXT 2 TEXT 3 or TEXT 4 decoding is enabled when TEXT is turned on either from the Setup Menu or directly with CC on the...

Page 53: ...Audio menu 50 I DIS VIDEO M Disable Video Menu Set to 1 to disable the Video menu Video menu will not appear Set to 0 to enable the Video menu 51 I DIS VCHIP M Disable V Chip Menu Set to 1 to disable...

Page 54: ...urce Menu Foreground Color 0 Black 3 Yellow 6 Cyan 1 Red 4 Blue 7 White 2 Green 5 Violet 68 I BCK SRC M Source Menu Background Color 0 Black 3 Yellow 6 Cyan 1 Red 4 Blue 7 White 2 Green 5 Violet 69 I...

Page 55: ...5 I A MUTE TIME Audio Mute Delay Time Controls audio muting delay time when switching between AUX sources Range is 0 to 254 msec 86 I V MUTE TIME Video Mute Delay Time Controls video muting delay time...

Page 56: ...battery ok red battery low Blink pattern Color Reset Status Indicator Connect cable to TV MPI Jack and follow on screen instructions MPI Typical TV Back LT2002 Clone Programmer TV Back Panel Expanded...

Page 57: ...ur rent time Follow the connection diagrams on the previous page to connect the Clone to a master TV and after learning is complete to another identical TV to teach it the master setup Setting the tim...

Page 58: ...Zenith TV equipped with M P I Input capability Once the time is copied to the Clone programmer the current time can then be transferred to another TV This can be a Master TV or another TV which has a...

Page 59: ...splay capability They can not display entire screens as shown in the quick setup instructions accompanying the LT2002 clone programmer Use the printed menu illustrations on the quick setup sheet suppl...

Page 60: ...the NUMBER keypad enter the three number code found on the charts on pages 63 67 Red LED blinks Press ENTER to save the code The Red LED indicator light will blink two times and turn Off if the code w...

Page 61: ...nnel Down to send a power On Off code Red LED will blink with each press Repeat until the device turns Off This is a trial and error process so it may be necessary to repeat these steps until the remo...

Page 62: ...output for the sound Red LED blinks once Press the Volume key Red LED blinks once Press the mode key you want to change the out put to the device selected in step 3 Red LED blinks once Press ENTER wh...

Page 63: ...G 154 LLOYD 034 LXI 003 009 013 014 017 034 101 106 MAGIN 040 MAGNAVOX 031 033 034 041 067 068 MARANTZ 012 031 033 067 069 MARTA 101 MATSUI 027 030 MEI 031 033 MEMOREX 003 010 014 031 033 034 053 072...

Page 64: ...SUI 022 043 048 135 SANYO 003 007 010 014 102 134 SCOTT 017 037 112 129 131 SEARS 003 008 009 010 013 014 017 020 031 042 073 081 101 SHARP 031 054 149 SHINTOM 024 SONY 003 009 031 052 056 057 058 076...

Page 65: ...COM 033 MAGNAVOX 010 012 064 079 MEMOREX 001 MOTOROLA 103 104 MOVIE TIME 028 032 MOXI 105 NSC 015 028 038 071 073 OAK 016 031 037 053 PANASONIC 044 047 PARAGON 001 PHILIPS 006 012 013 020 065 085 090...

Page 66: ...LG 249 251 253 LUTRON 242 LUXOR 172 223 MACOM 120 169 173 174 175 MEMOREX 167 NEXTWAVE 138 234 235 MOTOROLA 109 NORSAT 179 180 PACE SKY SATELLITE 219 PANASONIC 170 202 PANSAT 231 PERSONAL CABLE 227 P...

Page 67: ...N 133 136 152 166 175 FISHER 113 122 138 140 168 GE 209 HITACHI 133 166 JVC 117 196 227 228 KENWOOD 105 110 113 118 144 154 155 198 200 216 217 LUXMAN 108 123 153 173 MAGNAVOX 127 135 172 179 180 MARA...

Page 68: ...CH CH PRESET SKIP 1 1 1 1 1 1 2 2 2 2 2 2 3 3 3 3 3 3 4 4 4 4 4 4 5 5 5 5 5 5 6 6 6 6 6 6 7 7 7 7 7 7 8 8 8 8 8 8 9 9 9 9 9 9 0 0 0 0 0 0 DASH 100 100 MENU MENU MENU MENU MENU MENU ENTER ENTER SELECT...

Page 69: ...r OFF is okay in the Caption Text menu No Closed Captions Not available on program Check local TV listings to see if available on broadcast 37 or Text Not provided by broadcaster Relocate over the air...

Page 70: ...am 26 Normal picture poor Audio muted Press MUTE or volume right key to increase 8 9 or no sound sound level Broadcast problem Try a different channel 24 25 A V cables incorrectly connected Install A...

Page 71: ...Video audio S Video audio not Connect audio for S Video to Audio In R L 15 connected Use Audio In Left jack to connect only one audio wire Antenna Cable Front Video connected Disconnect equipment con...

Page 72: ...an off air antenna you may also want to disconnect it from the back of the TV If you unplug the TV you may have to reset the clock using the Clock Set menu described earlier See page 34 Symptom s Pos...

Page 73: ...917KHz signal at 455KHz Configuration of frame Repeat code Lead code 1st frame Low custom code Lead code High custom code Data code Data code TC Tf T1 C0 Carrier frequency FCAR 1 TC fOSC 12 Duty rati...

Page 74: ...will not have Video shows a blank screen only audio if present on channel Not available on digital channels DELETED Lets you remove channels from the list that the user will scroll through using CH C...

Page 75: ...Page 75 Notes Write down any special considerations comments regarding your installation...

Page 76: ...Any alteration of the product after manufacture voids this warranty in its entirety THIS WARRANTY IS IN LIEU OF ANY OTHER WARRANTY EXPRESS OR IMPLIED INCLUDING WITHOUT LIMITATION ANY WARRANTY OF MERCH...

Reviews: