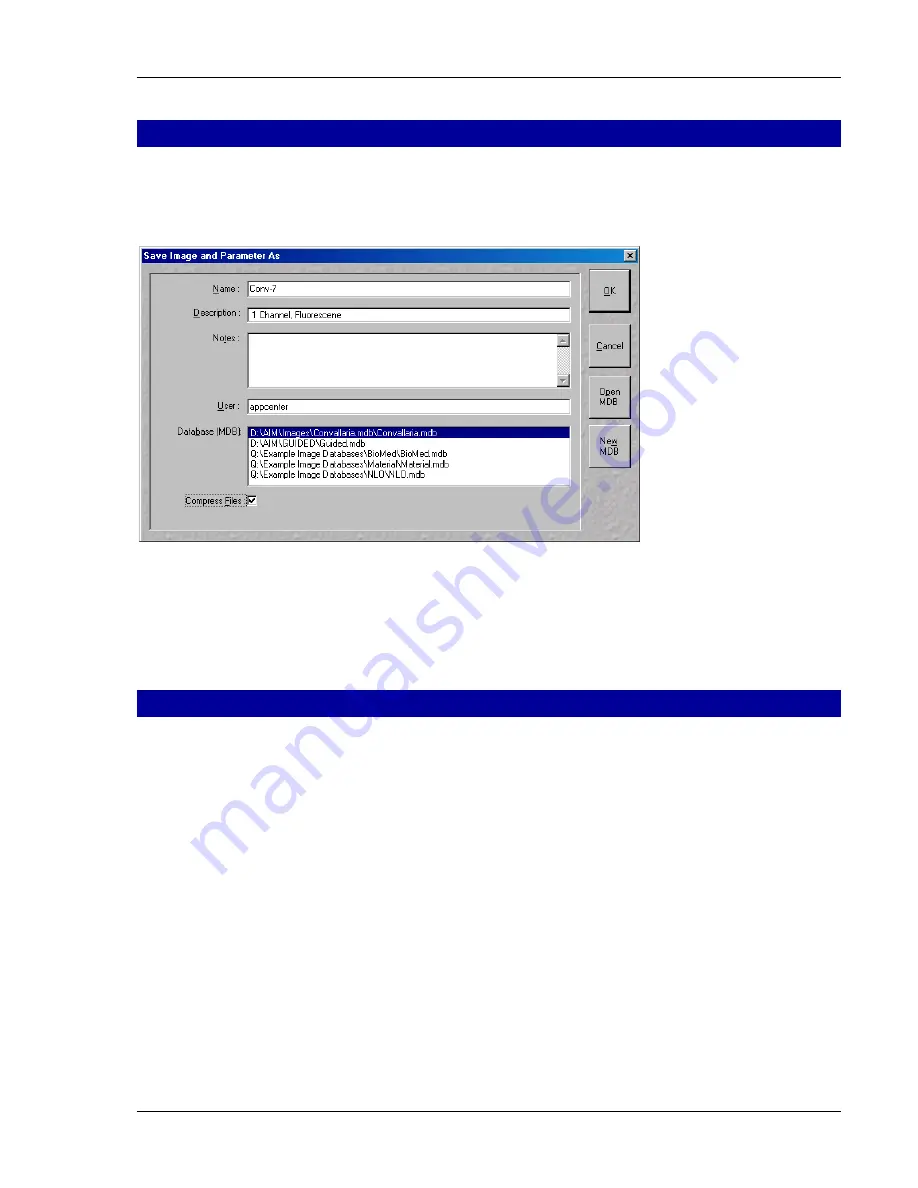
background image


07/05  

15 

Storing an image 

• 

Click on the 

Save

 or 

Save As

 button in the 

Image

 window or in the 

File

 subordinate toolbar of the 

Main

 menu.  

The 

Save Image and Parameter As

 window appears. 


Fig. 23 

Save Image and Parameter As window 


• 

Enter file name, description and notes in the appropriate text boxes. 

• 

Click on the 

OK

 button. 


Switching off the system 

• 

Click on the 

File

 button in the 

Main

 menu and then click on the 

Exit

 button to leave LSM 5 software 

program (Fig. 5). 

• 

If any lasers are still running you should shut them off now in the pop up window indicating the lasers 
still in use. 

• 

Shut down the computer. 

• 

Wait until fan of Argon laser has switched off. 

• 

On the REMOT CONTROL switch turn off the 

Components

 switch and the 

System/PC

 switch (Fig. 1). 

• 

Switch off the HBO 100 mercury lamp. 

• 

Switch the UV-Ar laser of via the toggle switch of the power supply (Fig. 2). 


Summary of Contents for LSM 510 Inverted

Page 1: ...LSM 510 and LSM 510 META Laser Scanning Microscopes Brief Operating Manual Release 3 5 July 2005...

Page 2: ...e LSM 510 and LSM 510 META laser scanning microscope including its original accessories and compatible accessories from other manufacturers may only be used for the purposes and microscopy techniques...

Page 3: ...nents switch also to ON Now the complete system is ready to be initialized with the LSM Software Switching on the HBO 100 mercury lamp Switch on the HBO 100 mercury lamp via the switch of the power su...

Page 4: ...10 Switchboard window Clicking on this button activates the complete LSM hardware on line mode Click on the Start Expert Mode button in the LSM 510 Switchboard window The LSM 510 Expert Mode Main menu...

Page 5: ...ate toolbar Click on the New button in the File subordinate toolbar The Create New Database window appears Select drive C or D from pull down menu Create a new directory if needed Fig 6 Create New Dat...

Page 6: ...cular tube of the microscope Click on the VIS button to set the microscope for direct observation via the eyepieces of the binocular tube lasers are off Click on the TV button to set the microscope ca...

Page 7: ...ting the microscope for reflected light Click on the Reflected Light button to open the shutter of the HBO 100 mercury lamp Click on the Reflector button and select the desired filter set by clicking...

Page 8: ...ick on the Single Track button in the Configuration Control window Fig 12 Click on the Descanned button if necessary The Beam Path and Channel Assignment panel of the Configuration Control window disp...

Page 9: ...he first line of the Configurations list box and click an Store For loading an existing configuration select it in the list box and click on Apply For deleting an existing configuration select it in t...

Page 10: ...position and diameter When Line button is selected the same rules apply as for Frame Fast Settings Add Track button An additional track is added to the configuration list The maximum of four tracks c...

Page 11: ...lts in the best signal to noise ratio Scan speed 8 usually produces good results Us speed 6 or 7 for superior images Choosing the dynamic range Select the dynamic range 8 or 12 Bit per pixel in the Pi...

Page 12: ...same Optical Size This is important for colocalization studies Image acquisition Once you have set up your parameter as defined in the above section you can acquire a frame image of your specimen Use...

Page 13: ...gh it appears blue on the screen Blue zero minimum Adjusting the laser intensity Set the Pinhole to 1 Airy Unit Fig 21 Set the Detector Gain high When the image is saturated reduce AOTF transmission i...

Page 14: ...upper position of the specimen area where the Z Stack is to start Click on the Mark First button to set the upper position of the Z Stack Then focus on the lower specimen area where the recording of t...

Page 15: ...ing off the system Click on the File button in the Main menu and then click on the Exit button to leave LSM 5 software program Fig 5 If any lasers are still running you should shut them off now in the...

Page 16: ......

Reviews: