background image


Technical Note “Complete Guide to Monitoring the Azzurro ZCS Systems via Wi-Fi” 

-

 Rev. 1.2 of 20/05/2019 

Zucchetti Centro Sistemi S.p.A. - Green Innovation Division 

Via Lungarno, 248 - 52028 Terranuova Bracciolini - Arezzo, Italy 

www.zcsazzurro.com 


Page 

33

 of 

38


e.


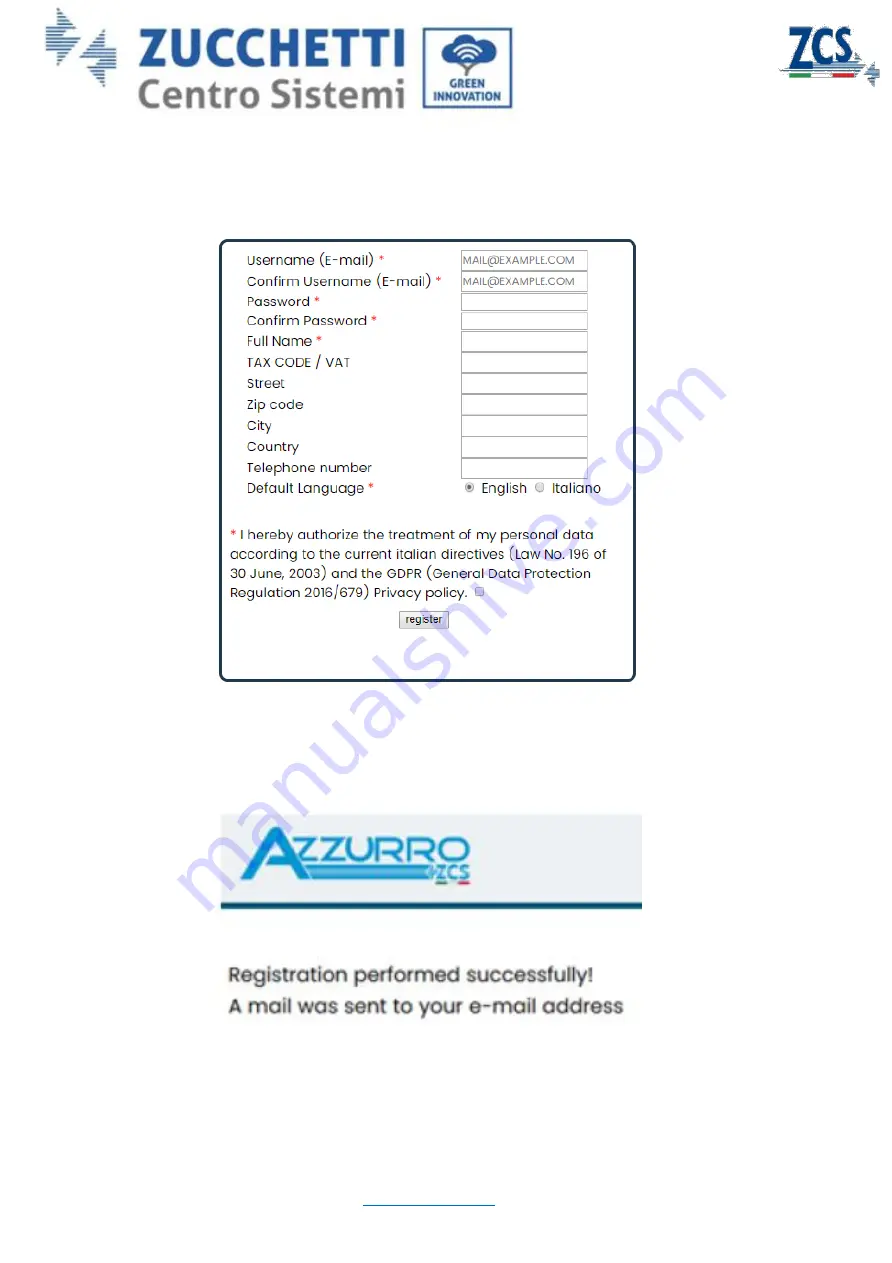
Consent to the processing of personal data (check the box) 

The remaining data are optional and do not affect the monitoring of the system. 
After completion, click Register. 


Figure 48 -  Screen for creating an account on the AzzurroZCS portal


At the end of the registration, the following screen will  appear and a confirmation email will be sent to 
the address used. 


Figure 49 - Message indicating completion of the registration and sending of an email confirmation


f.


Once you have created your account, go back to the section “CONFIGURE YOUR PORTAL” and enter the 
username and password chosen during registration. Click LOGIN. 


Summary of Contents for Azzurro ZSM-WIFI-KIT

Page 1: ...o ZCS Systems via Wi Fi Rev 1 2 of 20 05 2019 Zucchetti Centro Sistemi S p A Green Innovation Division Via Lungarno 248 52028 Terranuova Bracciolini Arezzo Italy www zcsazzurro com Page 1 of 38 COMPLETE GUIDE TO MONITORING OF AZZURRO ZCS SYSTEMS VIA WI FI ...

Page 2: ... 3 2 Procedure for configuring an external Wi Fi adapter 4 Procedure for checking the correct configuration of the Wi Fi card 5 Procedure for registering on the AzzurroZCS application 6 Procedure for registering on the AzzurroZCS portal 1 PRELIMINARY NOTES ON THE CONFIGURATION OF THE WI FI CARD The AzzurroZCS inverters can be monitored by means of a Wi Fi card connected to a Wi Fi network present ...

Page 3: ...ro ZCS 50 70K TL Inverter Azzurro ZCS HYD 3 6K ES hybrid inverter The Wi Fi card whether internal or external must be installed by an installer or technician who is specialised and able to carry out the procedure described in this document In particular the internal card requires the opening of the front cover of the inverter an operation which if not carried out correctly can cause damage to peop...

Page 4: ...AC line via the appropriate wall switch and then the DC line via the appropriate wall switch 2 Unscrew and remove the four Allen screws on the front panel of the inverter using a suitably sized key Figure 2 Position of the four Allen screws securing the front cover 3 Lift the front cover of the inverter using a screwdriver if necessary to lever the aluminium casing open during this operation be ca...

Page 5: ...rd on the communication card Make sure to first insert the two plastic connectors in the slots positioned at the top and then match the pins of the Wi Fi card to the bottom slots Press the card lightly to make sure it is mounted properly 6 Pass the antenna connected to the card through the cable gland on the bottom of the inverter after loosening the ring nut and removing the rubber stopper inside...

Page 6: ...front of the inverter and search for the Wi Fi network using a smartphone or computer to make sure that the signal from the home Wi Fi network reaches the place where the inverter is installed If the Wi Fi signal is present in the location where the inverter is installed you can start the configuration procedure If the Wi Fi signal does not reach the inverter it is necessary to install a system th...

Page 7: ...csazzurro com Page 7 of 38 Figure 6 Screen for logging into the configuration page of the Wi Fi card Autenticazione richiesta Authentication required http 10 10 100 254 richiede un nome utente e una password La tua connessione a questo sito non è privata http 10 10 100 254 requires a username and password Your connection on this site isn t private Nome Utente Username The following page will open ...

Page 8: ...ranuova Bracciolini Arezzo Italy www zcsazzurro com Page 8 of 38 4 Click on the Wizard key shown on the left column to enter the configuration menu Now click on Start to start the configuration wizard Figure 8 Screen for starting 1 the Setup Wizard Check the Wireless connection option if present select SOFAR as the inverter brand then click NEXT Figure 9 Network connection 2 screen ...

Page 9: ...work where you want to connect the Wi Fi card Click Next Figure 10 Screen for selecting the available wireless network 3 N B make sure that the signal strength is greater than 30 if not make sure the antenna has been fully extended by following the three steps shown in the figure If the antenna has been correctly extracted bring the router closer or install a repeater or signal amplifier Figure 11...

Page 10: ... password of the selected home network Figure 12 Screen for entering the password of the wireless network 4 N B The system will check that the two passwords entered match if two different passwords were entered an error message will be displayed and you will have to re enter the password During this step the system is not able to make sure that the password entered is actually the one requested by...

Page 11: ...Terranuova Bracciolini Arezzo Italy www zcsazzurro com Page 11 of 38 Figure 13 Screen showing the warning for entry of wrong password 7 Make sure that the Enable option is selected to automatically obtain the IP address from your router then click Next Figure 14 Screen for automatically obtaining the IP address 5 8 Click on Next without making any changes or checking any options ...

Page 12: ...ranuova Bracciolini Arezzo Italy www zcsazzurro com Page 12 of 38 Figure 15 Screen for setting the security options 6 9 Complete the configuration procedure by clicking OK as shown in the following screen Figure 16 Final configuration screen 7 10 If the configuration procedure is successful the following screen will appear If this screen does not appear try updating the browser page ...

Page 13: ...the page from the background of your telephone or from the close button on your PC Figure 17 Configuration complete screen 11 Enter the IP address 10 10 100 254 again and the login credentials admin as both username and password When you log in again the screen below will appear click on the Remote Server information at the bottom of the screen and check that Pingable is written to the right of Re...

Page 14: ...er of the inverter 1 Turn off the inverter following the procedure described in the manual a In the case of a photovoltaic inverter first disconnect the AC line via the appropriate switch installed on the wall and then the DC line via the appropriate switch installed on the wall or the knob switch on board the inverter b In the case of a hybrid inverter first disconnect the AC line via the appropr...

Page 15: ... and finally voltage from the photovoltaic panels For more details refer to the appropriate section in the user manual 3 2 PROCEDURE FOR CONFIGURING AN EXTERNAL WI FI ADAPTER Position yourself in front of the inverter and search for the Wi Fi network using a smartphone or computer to make sure that the signal from the home Wi Fi network reaches the place where the inverter is installed If the Wi F...

Page 16: ...adapter of the inverter i e AP_51 operating as an Access Point Figure 21 Connection to Access Point of the Wi Fi adapter iOS 3 Open a browser Google Chrome Safari Firefox and enter the IP address 10 10 100 254 in the search bar Enter admin as both the username and password Figure 22 Screen for accessing the IP address to configure the Wi Fi adapter Accedi al sito web Enter the website Accedi a 10 ...

Page 17: ...showing the information of the logger such as the serial number and firmware version Figure 23 Status screen 5 Click the Wizard setup shown in the left column 6 In the new screen that opens select the Wi Fi network to which the Wi Fi adapter is to be connected making sure that the Received Signal Strength Indicator RSSI is greater than 30 N B check that the signal strength is greater than 30 if no...

Page 18: ... for selecting the available wireless network 1 8 Enter the password of the Wi Fi network Wi Fi modem clicking on Show Password to make sure it is correct N B During this step the system is not able to make sure that the password entered is the one actually requested by the modem therefore please make sure you enter the correct password Click Next Figure 25 Screen for entering the password of the ...

Page 19: ...ly www zcsazzurro com Page 19 of 38 Figure 26 Screen for setting the security options 3 10 Click OK Figure 27 Final configuration screen 4 11 At this point if the configuration of the card is successful the last configuration screen will appear and the telephone or PC will unpair from the inverter s Wi Fi network 12 Manually close the web page from the background of the telephone or with the close...

Page 20: ...e 20 of 38 Figure 28 Configuration complete screen 13 Go back to the network selection screen to check that the AP_51 network is no longer present Absence of the Wi Fi network in the list will confirm the configuration of the Wi Fi card Figure 29 Wi Fi network search on Smartphone iOS Access point of the Wi Fi card is no longer visible STATUS OF THE LED OF THE EXTERNAL WI FI ADAPTER 1 Initial stat...

Page 21: ...tion Division Via Lungarno 248 52028 Terranuova Bracciolini Arezzo Italy www zcsazzurro com Page 21 of 38 Figure 30 Initial status of the LEDs 2 Final status Central LED fixed Right LED flashing Left LED fixed Figure 31 Final status of the LEDs 3 Incorrect configuration status of Wi Fi adapter Left LED fixed Central LED off Right LED flashing ...

Page 22: ...ter is 01 and in any case different from 00 To do this refer to the next paragraph of the document Check that the external logger is correctly and securely connected to the inverter making sure to tighten the two cross screws supplied with the Wi Fi card 4 Incorrect configuration status of Wi Fi adapter Left LED off Central LED off Right LED flashing Figure 33 Incorrect configuration status of Wi ...

Page 23: ...ee phase or hybrid right inverters N B to reset the configuration of the Wi Fi adapter press the reset button found on the back of the adapter for 5 seconds After releasing the key the 3 LEDs will flash simultaneously until the adapter returns to its initial configuration state At this point it is possible to repeat the configuration procedure again The adapter can be reset only when the inverter ...

Page 24: ...the submenu Scroll down making sure that the number 01 appears next to the RS485 address 5 N B the following process can be performed either via smartphone or PC 1 Search for any wireless networks so as to display and connect to the network of the inverter s Wi Fi card which is AP_0805739627 The number indicates the serial number of the Wi Fi card which can be checked by referring to the smaller l...

Page 25: ...ccessing the configuration page of the Wi Fi card The following page will open Figure 37 Status screen 4 Make sure that Remote Server A is configured to Pingable 5 In the Wireless STA mode section check that there is an actual IP address and not 000 000 0 000 6 Check that the router name SSID Router is actually the one you are connected to not the default name AP_SOLAR_PORTAL_ and that the signal ...

Page 26: ... Unpingable then it is very likely that there is a problem of transmission with the home network and in particular that the data between the Wi Fi card and the server is not being transmitted correctly In this case it is advisable to carry out checks at the router level in order to ensure that there are no obstructions on the output of data packets to our server To make sure that the problems lies...

Page 27: ...he name of the wireless network SSID or your access key select Configure Wi Fi hotspot Figure 39 Configuration of an Android smartphone as a hotspot router Using an iPhone as a modem a To share the iPhone connection verify that the 3G LTE network is active by going to Settings Mobile Phone and make sure that the Voice and data item is set to 4G or 3G To enter the iOS settings menu click the grey g...

Page 28: ...ord associated with it which can be obtained from the settings of the personal hotspot If at the end of the configuration the word pingable appears next to Remote Server A then the problem depends on the home router It is therefore advisable to check the brand and model of the home router to which you are trying to connect the Wi Fi card some router brands Vodafone Fastweb Infostrada may have some...

Page 29: ...p at first access 3 Click on ENTER CODE and then enter the serial number of the inverter by following one of these two options 1 Scan the barcode allows you to scan the serial number directly from the side label of the inverter N B the serial number to be scanned is the alphanumeric one printed above the barcode if the numeric code is acquired such as 080 repeat the operation 2 Write it down manua...

Page 30: ...k VALIDATE to confirm the choice of inverter IMPORTANT If you are unable to proceed after pressing VALIDATE please ask ZCS to activate the monitoring procedure This operation can be done by simply sending the serial number of the inverter e g ZE1ES330 and of the Wi Fi card e g 080 by email to service inverter zcscompany com or by taking a photo of both labels found on the bottom right of the inver...

Page 31: ...izione Description Impianto di test realizzato per App Azzurro ZCS Test system created for Azzurro ZCS App Impianto Test Test System Selez libreria Select gallery Usare camera Use camera Cancellare Delete 6 Click send at the top right of the screen to complete the configuration and enter the home page of the app From here you can access the system you have just registered or enter other systems by...

Page 32: ...nk shown 2 If it is your first time entering the portal you need to register and create a personal account Click Configure your Portal link at the bottom centre of the page Figure 46 AzzurroZCS portal login screen 3 In the new screen click Sign up Now if you want to create a new user account If you already have an account enter your credentials username and password in the panel shown above Figure...

Page 33: ...e optional and do not affect the monitoring of the system After completion click Register Figure 48 Screen for creating an account on the AzzurroZCS portal At the end of the registration the following screen will appear and a confirmation email will be sent to the address used Figure 49 Message indicating completion of the registration and sending of an email confirmation f Once you have created y...

Page 34: ...el Benvenuto nel pannello di configurazione ZCS Sunflower Welcome to the ZCS Sunflower configuration panel Modifica Informazioni Edit Information Modifica Password Change Password Crea Nuovo Campo Create New Field Modifica Campo Change Field Acquisisci Campo Acquire Field Visualizza Campi View Fields Richiesta di Upgrade Upgrade Request g The panel for the account configuration is easy and user fr...

Page 35: ...5 of 38 Figure 51 Screen for changing information Codice Fiscale Partita IVA Tax Code VAT Number Indirizzo Address CAP Postcode Città City Nazione Country Lingua Language Conferme Confirm Modifica Logo Change Logo Sfoglia Browse Nessun file selezionato No file selected b Change the previous password Figure 52 Screen for changing password Vecchia Password Old Password Nuova Password New Password Co...

Page 36: ...rage inverter combined with a photovoltaic inverter of a different brand In the next screen indicate the serial number of the inverter N B the serial number can be found on the left side of the inverter and is similar to ZAIES Figure 53 Screen for creating a new field Informazioni Campo Field Information Nome Campo Field Name Potenza Nominale kW Nominal Power kW Calcola informazioni Location Calcu...

Page 37: ...isplay the field s entered and their information inverter number serial number model Figure 56 Screen for Displaying Fields g Display the account status and request upgrades both in terms of multiuser and full account You can also request permission to use your own logo and image Figure 57 Upgrade Request Screen Trasforma il tuo Account in un Account Full Convert your Account into a Full Account E...

Page 38: ...g Upgrade to Multiuser Account h Once the system has been configured you can login to the monitoring portal by going back to the main screen http www zcsazzurrowebportal com index jsp entering your credentials in the appropriate panel and clicking LOGIN Figure 59 AzzurroZCS portal login screen ORA Account Multiutenza illimitato NOW Multi user account unlimited Visualizza il tuo logo e le tue immag...

Reviews: