background image


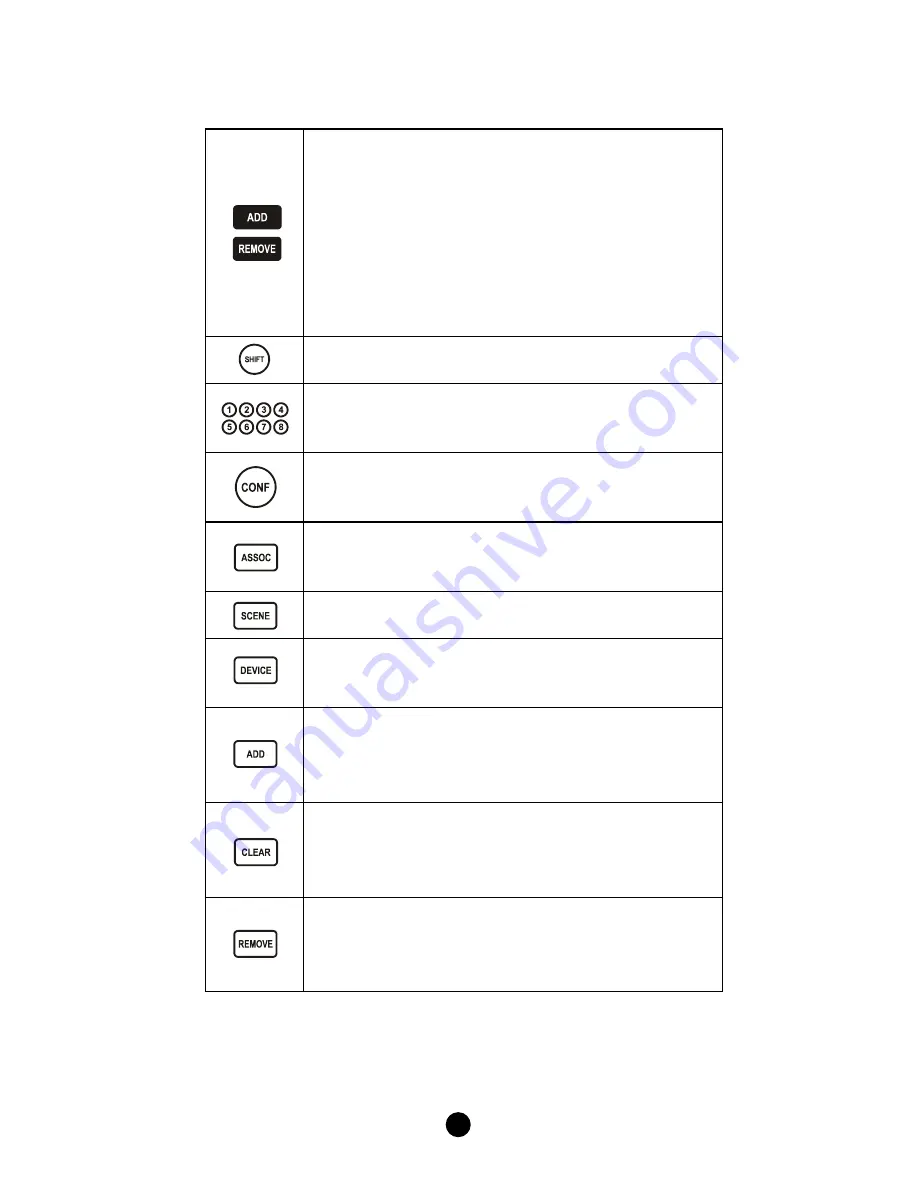
Description of Setup Keys 


The ADD and REMOVE keys are used during basic 
Zone Setup process. ADD key will perform two 
functions: 


Add a target device to Z-Wave network, also 
known as INCLUSION;  


Add the device to the assigned GROUP. 

REMOVE key will only remove the target device 
from its assigned group but will not exclude it from 
the network. 


This SHIFT key is used for accessing group numbers 
9 to 16 while programming your devices. 


These are your group numbers 1 through 8 and also 
become group numbers 9 through 16 when 
combined with the SHIFT key. 


This CONFIGURATION key is used during the 
ADVANCED SETUP process. 


This ASSOCIATION key is used in conjunction with 
ADD, CLEAR or REMOVE keys in order to assign 
association groups. 


This SCENE key is used in conjunction with ADD, 
CLEAR or REMOVE keys in order to program scenes. 


This DEVICE key is used in conjunction with ADD, 
CLEAR or REMOVE keys in order to include or 
exclude devices to the network. 


This ADD key is used in the ADVANCED SETUP to:  


Add a target device to the network (inclusion); 


Add a target device to an association group; 


Add a target device to a scene. 


This CLEAR key is used in the ADVANCED SETUP to: 


Delete a device from the network (exclusion); 


Delete an association group; 


Delete a scene. 


This REMOVE key is used in the ADVANCED SETUP 
to: 


Remove a device from an association group; 


Remove a device from a scene. 

 
For basic on/off or dim up/down control, please refer to Zone Control 
section.  For more advanced setups including scene control, please 
refer to Advanced Setup section. 
 

Summary of Contents for HSK-100Z

Page 1: ...All Network and Device Information to A Secondary Controller 17 Copying Network Information to A Secondary Controller 18 Transferring All Network and Device Information to A New Primary Controller Pri...

Page 2: ...33 Secondary Function 33 IR Boost Mode 33 Restore Factory Settings 33 MAINTENANCE 34 FREQUENTLY ASKED QUESTIONS 34 Z Wave Frequently Asked Questions 34 AV Control Frequently Asked Questions 35 TECHNIC...

Page 3: ...es through its built in IR code database or IR code learning As a Z Wave controller the HSK 100Z works with Z Wave enabled devices and controls their on off or up down individually as a Group or via a...

Page 4: ...ttery cover on the back of your HSK 100Z Check the polarity of the batteries and the marks inside the battery compartment Insert the batteries Push the battery cover back in place CAUTION battery safe...

Page 5: ...s from a network It is recommended that you mark the primary controller for each network for ease in modifying your network Secondary Controller A controller containing network information about other...

Page 6: ...4 Configurations Please open the configuration compartment then you can see the HSK 100Z setup keys Figure 2 Figure 2 Setup Keys of the HSK 100Z Status LED A Status LED B...

Page 7: ...CLEAR or REMOVE keys in order to assign association groups This SCENE key is used in conjunction with ADD CLEAR or REMOVE keys in order to program scenes This DEVICE key is used in conjunction with A...

Page 8: ...uding Device to a Zone Step Setup Key Setup LED Behavior 1 Press in Zone Setup area OK LED on LED A blinks slowly 2 Select a zone group number from 1 to 8 LED A off LED B blinks slowly 3 Press the pro...

Page 9: ...Zone Operation After adding devices to your HSK 100Z using Zone Setup you can turn the device on off or up down via the corresponding zone control keys in front Figure3 For on off switches press key t...

Page 10: ...on on the HSK 100Z could dim the lights and turn on your TV DVD Player and AV Receiver A scene for Arriving Home could open the garage door turn on the hall lights and disarm the security system Z Wav...

Page 11: ...SHIFT 1 8 OK LED blinks once and stays on LED A off LED B blinks slowly 4 Press the program button on the target device OK LED blinks once and stays on LED B keep blinking slowly 5 Adjust the target d...

Page 12: ...e target device the OK light stays on then flashes once and turns off LED B off Device removed from the scene successfully Deleting A Scene Step Setup Key Setup LED Behavior 1 Press The OK light turns...

Page 13: ...class COMMAND_CLASS_ASSOCIATION can be used to add a node to the scene button The scene button 1 will send to devices in the group 9 the scene button 2 will send to group 10 and so on The ON buttons 1...

Page 14: ...Device Setups Add Delete Devices Adding Device to the Network Step Setup Key Setup LED Behavior 1 Press in Advanced Setup The OK light turns on 2 Press OK LED blinks once and stays on LED B blinks sl...

Page 15: ...Setup LED Behavior 1 Press in Advanced Setup The OK light turns on 2 Press OK LED blinks once and stays on LED A blinks slowly 3 Select a group number from 1 to 16 1 8 or SHIFT 1 8 OK LED blinks once...

Page 16: ...blinking slowly 5 Press the program button on the primary device LED B turns off OK LED blinks once then turns off Device removed from the association group successfully Deleting an Association Group...

Page 17: ...troller or inclusion controller Step Setup Key Setup LED Behavior 1 Press OK LED stays on 2 Press 0 9 key in the front OK LED blinks once and stays on for each key press 3 Press enter OK LED stays on...

Page 18: ...o 8 LED A off LED B blinks slowly This will select device AV channel 1 8 4 Press the program button on the target device OK LED blinks for a while and then turns off If a channel is associated with Z...

Page 19: ...hold for 3 seconds OK LED on 2 Place the two controller close to each other 3 Type 8541 on the setup number keypad OK LED blinks once for each number input OK LED keeps blinking after entering the 4...

Page 20: ...etup Key Setup LED Behavior 1 Press hold for 3 seconds OK LED on 2 Place the two controller close to each other 3 Type 8542 on the setup number keypad OK LED blinks once for each number input OK LED k...

Page 21: ...below Step Setup Key Setup LED Behavior 1 Press hold for 3 seconds OK LED on 2 Place the two controller close to each other 3 Type 8361 on the setup number keypad OK LED blinks once for each number in...

Page 22: ...Setup Key Setup LED Behavior 1 Press hold for 3 seconds OK LED on 2 Place the two controller close to each other 3 Type 8362 on the setup number keypad OK LED blinks once for each number input OK LED...

Page 23: ...steps below Step Setup Key Setup LED Behavior 1 Press hold for 3 seconds OK LED on 2 Place the two controller close to each other 3 Type 8363 on the setup number keypad OK LED blinks once for each nu...

Page 24: ...sociation command class To create and maintain associations in this remote Step Setup Key Setup LED Behavior 1 Press hold for 3 seconds OK LED on 2 Place the two controller close to each other 3 Type...

Page 25: ...ach other 3 Type 8761 on the setup number keypad OK LED blinks once for each number input OK LED on after entering the 4 digit 4 OK LED blinking then turns off Reset completed Note 1 If the reset is u...

Page 26: ...gure 5 Audio Video Control Keys of the HSK 100Z Note The audio video control of the HSK 100Z can be done via infrared or Z Wave HSK 200Z Z Wave IR Control Station is needed for Z Wave based AV control...

Page 27: ...iver or similar devices such as DVB T IPTV etc On off key for selected AV equipment Selects DVD player or other optical disc players such as Blue Ray PVR or CD player Selects Auxiliary mode normally a...

Page 28: ...s track Next track Stop Record Rewind Play Pause Fast forward Numeric number 1 also in shift mode can be either triangle A or yellow button for TV or SAT CBL menus Numeric number 2 also in shift mode...

Page 29: ...own CH and VOL on the HSK 100Z simultaneously for 3 seconds until the green indicator lights up 4 Use the number keys 0 9 to enter your 4 digit Device Code The indicator flashes twice then goes out Tu...

Page 30: ...hts up 4 Enter a corresponding Magic Search Code from the following table The green indicator flashes twice then goes out Device to be searched from code library Magic Search Code TV 0001 VCR DVR LASE...

Page 31: ...device codes can be searched for and locked into any device modes Simply press the corresponding device mode key in step 2 5 and enter an appropriate Magic Search Code for your DVD CTV and other devic...

Page 32: ...a desired key once and release on the HSK 100Z which you want to learn the command The green indicator will flash once then stay lit 6 Press and keep holding the key on your original equipment remote...

Page 33: ...ment Normal Operation Once you have setup the HSK 100Z for your AV equipment it works like your original remote control To operate just aim it at your equipment press an appropriate device mode key an...

Page 34: ...the VOL key while in TV mode the remote will act as if pressing the VOL key in SAT mode To deactivate the punch through volume setting 1 Press desired Device Mode Key e g TV 2 Press and Hold VOL key...

Page 35: ...all buttons pressed will use their secondary function Pressing the shift key again will end the shift lock mode IR Boost Mode By activating the boost switch in the battery compartment your HSK 100Z w...

Page 36: ...atible in your region Q Do I need an electrician to install Z Wave products in my house A Installation can be simple In some cases all you need to do is attach the Z Wave plug in module into the wall...

Page 37: ...ll be lost and can not be replicated such as TV and DVD settings Q Where can I keep up to date with the latest Z Wave products A You can get the latest information about Z Wave by visiting the www z w...

Page 38: ...y some commands work properly but some do not Try other codes until most keys work properly You can also use the learning function to learn additional keys TECHNICAL SPECIFICATIONS RF Frequency 908 42...

Page 39: ...r limitation of certain damages and in those cases these limitations do not apply FEDERAL COMMUNICATION COMMISSION INTERFERENCE STATEMENT This equipment has been tested and found to comply with the li...

Page 40: ...to the following two conditions 1 This device may not cause harmful interference 2 This device must accept any interference received including interference that may cause undesired operation FCC Caut...

Page 41: ...e devices to control appliances Operation of the Z Wave device may be in a different room then the controlled appliances also an unintentional activation may occur if the wrong button on the remote is...

Reviews: