background image

Imagined by You

www.tiohome.com

AZSS1 Installation Guide

3

1.    Read all instructions. Read and understand all the  


applicable instructions before installing or operating  


the product.

2.    Retain all instructions. Keep this manual in a convenient   


place for reference.

3.     Heed warnings. Be aware of all warnings on the product 

and in the instructions.

4.     Follow instructions. Install and use this product only as    

  described. Don’t try to use this product in ways for which  

  it wasn’t designed.

5.     Use indoors only. Don’t expose this product to the weather  

  or harsh environmental conditions such as continuous    

  sunlight, excessive humidity, or moisture.

6.     Keep product dry. Don’t use the product near water – for   

  example, near a bathtub, washbowl, kitchen sink, laundry  

  tub, in a wet basement, or near a swimming pool. Also, do  

  not handle the product when your hands are wet or damp. 

7.     Use the right power source. Don’t connect the product    

  directly to electrical line voltage. Use only an approved    

  power adapter. 

8.    Ground product properly. Make sure the product’s means  


of grounding or polarization is not defeated.

9.     Power cord protection. Power supply cords should be    

  routed so that they are not likely to be walked on or  


  pinched by items placed upon or against them, paying    

  particular attention to cords at plugs, receptacles, and  

  the point where they exit from the product.

10.   Keep product clean. From time to time, wipe off the 

exposed parts of the product with a clean, dry, soft cloth. 

Don’t use abrasive materials, thinners, alcohol or other 

chemical solvents or materials.

11.   Avoid spills and foreign objects. Make sure liquids and 

objects don’t get into the product enclosure through  

any openings.

12.  Get professional service. Have the product serviced  


only by certified TiO service personnel when:


•  Liquids spilled/objects have fallen into the product


•  The product has been exposed to excess humidity


•  The product doesn’t appear to operate normally


•  The product is damaged

13.    Don’t attempt to service the product yourself. Doing  

so will void the warranty. If you have any questions, call  

TiO Support at 1-855-999-9846 or 1-407-278-1200  

or email us at [email protected]

Safety Information

NOTE: This equipment has been tested and found to comply with the limits for a Class B digital device, pursuant to part 15 of the FCC rules.  

These limits are designed to provide reasonable protection against harmful interference in a residential installation. This equipment generates, 

uses and can radiate radio frequency energy and, if not installed and used in accordance with the instructions, may cause harmful interference 

to radio communications. However, there is no guarantee that interference will not occur in a particular installation. If this equipment does cause 

harmful interference to radio or television reception, which can be determined by turning the equipment off and on, the user is encouraged to  

try to correct the interference by one of or more of the following measures: reorient or relocate the receiving antenna; increase the separation 

between the equipment and receiver; connect the equipment into an outlet on a circuit different from that to which the receiver is connected,  

or consult the dealer or an experienced radio/TV technician for help.
In accordance with FCC requirements, changes or modifications not expressly approved by Automated Control Technology Partners, Inc.  

could void the user’s authority to operate this product.
This Class B digital apparatus complies with Canadian ICES-003. Cet appareil numérique de la classe B est conforme à la norme NMB-003  

du Canada.
This device complies with Industry Canada licence- ‐exempt RSS standard(s). Operation is subject to the following two conditions: (1) this device 

may not cause interference, and (2) this device must accept any interference, including interference that may  

cause undesired operation of the device. 
Le présent appareil est conforme aux CNR d’Industrie Canada applicables aux appareils radio exempts de licence. L’exploitation est autorisée 

aux deux conditions suivantes: (1) l’appareil ne doit pas produire de brouillage, et (2) l’utilisateur de l’appareil doit accepter tout brouillage 

radioélectrique subi, même si le brouillage est susceptible d’en compromettre le fonctionnement.

Summary of Contents for TiO StealthStream 1

Page 1: ...StealthStream 1 AZSS1 Amplified Streaming Audio Player Installation Guide Imagined by You...

Page 2: ...ons and Controls 10 Audio 11 12 Audio Menu Basic Operation 13 Setting Moods and Experiences 13 Rhapsody 14 SiriusXM Radio 15 TuneIn Radio 15 vTuner Radio 16 Configuring a Stand alone AZSS1 using the T...

Page 3: ...warranty If you have any questions call TiO Support at 1 855 999 9846 or 1 407 278 1200 or email us at support tiohome com Safety Information NOTE This equipment has been tested and found to comply w...

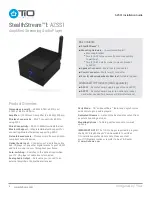
Page 4: ...Bluetooth Support Integrated Bluetooth support for connecting Bluetooth devices supporting A2DP Network based music Stream music from any DLNA compliant network device Optical Audio Input Connect your...

Page 5: ...gh fidelity music in every room Mobile by Design Controlled and configured through the TiO Pro for Android App Just launch the App and enjoy all of your music and audio choices Wireless Connectivity T...

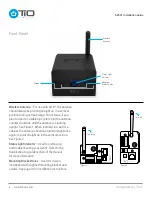
Page 6: ...na counter clockwise until the antenna is standing upright See Figure 1 When installed in a wall or a cabinet the antenna should be turned upright once again to point straight up in the vertical posit...

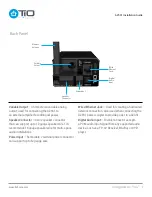
Page 7: ...wire speaker connector that can support up to 12 gauge speaker wire TiO recommends 16 gauge speaker wire for multi space audio installations Power Input Removable 2 terminal power connector can suppo...

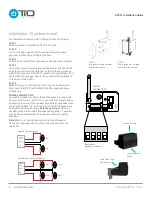
Page 8: ...oltage ring WIRING CONNECTIONS Locate the speaker connector block that came in a clear pack of accessories with your AZSS1 Loosen the four screws before attempting to connect the speaker wire With you...

Page 9: ...red at this time if connecting using Wi Fi STEP 9 Attach the optical Line In if adding a digital input source and Line Out if connecting to a external amplifier STEP 10 With all connections securely c...

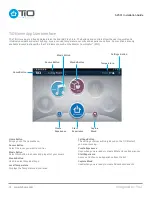
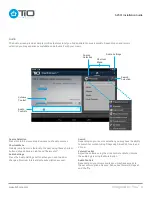
Page 10: ...rience Used when you are ready to create Whole House Experiences Start Experience Access and choose an Experience from the list Capture Mood Used when you are ready to create Room based events Home Bu...

Page 11: ...ou may have the ability to search for content using Rhapsody SiriusXM TuneIn and VTuner Volume Control Adjust the volume using the slide control or Mute Unmute the audio by pressing the Mute button Au...

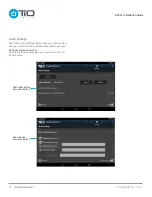
Page 12: ...tings Press the Audio Settings button when you need to add or change a Premium Internet Radio subscription account Add Subscription Accounts Used for adding a new subscription account to the TiO Audio...

Page 13: ...d Type in the search criteria and press search Clear Search Box To return to the source menu screen NOTE A Master Coordinator MC1 is needed to set up these features Use the TiO Home App to design room...

Page 14: ...iption gives you access to the ultimate music catalog delivering millions of songs from thousands of artists to your TiO Audio system To set up your account you will need a computer with internet acce...

Page 15: ...ires a minimum of one subscription To find out more information about SiriusXM Internet Radio visit www siriusxm com internetradio Canadian residents should visit www siriusxm ca or call 1 888 539 747...

Page 16: ...the vTuner Radio main menu Pressing this button will return you up one level per press Depending on your location in the vTuner Radio menu it may take several presses of the navigation button to retu...

Page 17: ...nd allow the App to fully download before attempting to use For more information on using the Google Play Store please visit http play google com STEP 1 Be sure that your tablet is turned on and conne...

Page 18: ...ill be displayed Music Button Music Service Selections Options Show Tips STEP 5 From the TiO Home Music Screen select a music service from the drop down menu STEP 6 Continue through the Options until...

Page 19: ...FL Incandescent Load Level Power Switch Mode 1 2 4 Button Dimmer Mode Wired Network TuneIn VC Retro fit SiriusXM Power Coupler Rhapsody Digital Input Bluetooth Stereo Output DLNA Music Audio Elements...

Page 20: ...App TiO App Home Network Router Home Network Router MC1 Stand alone Multi space AZSS1 AZSS1 AZSS1 Stand alone application The TiO Streaming Audio Players can be configured as a Stand alone single zone...

Page 21: ...s LED BLUE GREEN YELLOW YELLOW BLINKING RED RED BLINKING Issue None None After Over Temperature Blinks Yellow in one second intervals Power Supply Over Voltage Solid Yellow No Ethernet Solid Red light...

Page 22: ...omotions Dimensions overall 6 99W x 4 78H x 9 91D cm 2 75W x 1 88H x 3 90D in Weight 249g 55lb Connectivity Wired or Wireless 802 11n 2 4GHz Ethernet Bluetooth version 3 0 Amplifier Max Output 100W 4...

Page 23: ...TiO 855 999 9846 support tiohome com Imagined by You http tiohome com learnmore http goo gl tTvgnV National Toll Free 888 964 8638 www tiohome com learnmore 2013 Automated Control Technology Partners...

Reviews: