background image

107272-UIM-B-1105

22

Unitary Products Group

FAN-ASSISTED COMBUSTION SYSTEM

An appliance equipped with an integral mechanical means to either
draw or force products of combustion through the combustion chamber
and/or heat exchanger.

SECTION VII: SAFETY CONTROLS

CONTROL CIRCUIT FUSE

A 3-amp fuse is provided to protect the 24-volt transformer from over-
load caused by control circuit wiring errors. This is an ATO 3, automo-
tive type fuse and is located in the control box.

LIMIT CONTROLS

There is a high temperature limit control located on the furnace vesti-
bule panel near the control box. This is an automatic reset control that
provides over temperature protection due to reduced airflow, that may
be caused by a dirty filter, or if the indoor fan motor should fail. 

INDOOR FAN SWITCH

The indoor fan motor is an operation controlled by normally open tem-
perature actuated switch located above the limit control which is set to
close at 110° F (43.3° C) and open at 90° F (32.2° C).

OIL BURNER PRIMARY CONTROL

The R7184A, B, P, U Interrupted Electronic Oil Primary is a line voltage,
safety rated, interrupted ignition oil primary control for residential oil
fired burners used in forced air furnaces. The R7184A, B, P, U used
with a cad cell flame sensor operates an oil burner and optional oil
valve. The primary controls fuel oil, senses flame, controls ignition
spark and notifies a remote alarm circuit when in lockout.

The indicator light on the oil primary control provides lockout, recycle,
and cad cell indications as follows:

1.

Flashing at 1/2 second on, 1/2 second off: system is locked out or
in restricted mode.

2.

Flashing at 2 seconds on, 2 seconds off: control is in recycle
mode.

3.

On: cad cell is sensing flame.

4.

Off: cad cell is not sensing flame.

Cad Cell Resistance Check

For proper operation, it is important that the cad cell resistance is below
1600 ohms. During a normal call for heat, once the control has entered
the Run mode, press and release the reset button. See Table 10 for
equivalent cad cell resistance.

Preliminary Steps

1.

Check wiring connections and power supply.

2.

Make sure power is on to controls.

3.

Make sure limit control is closed.

4.

Check contacts between ignitor and the electrodes.

5.

Check the oil pump pressure.

6.

Check the piping to the oil tank.

7.

Check the oil nozzle, oil supply and oil filter.

Check Oil Primary Control

If the trouble is not in the burner or ignition hardware, check the oil pri-
mary control by using the following equipment:

1.

Screwdriver

2.

Voltmeter (0 to 150 VAC range)

3.

Insulated jumper wire with both ends stripped

4.

Refer to the trouble shooting guide located after the wiring dia-
grams to determine failure.

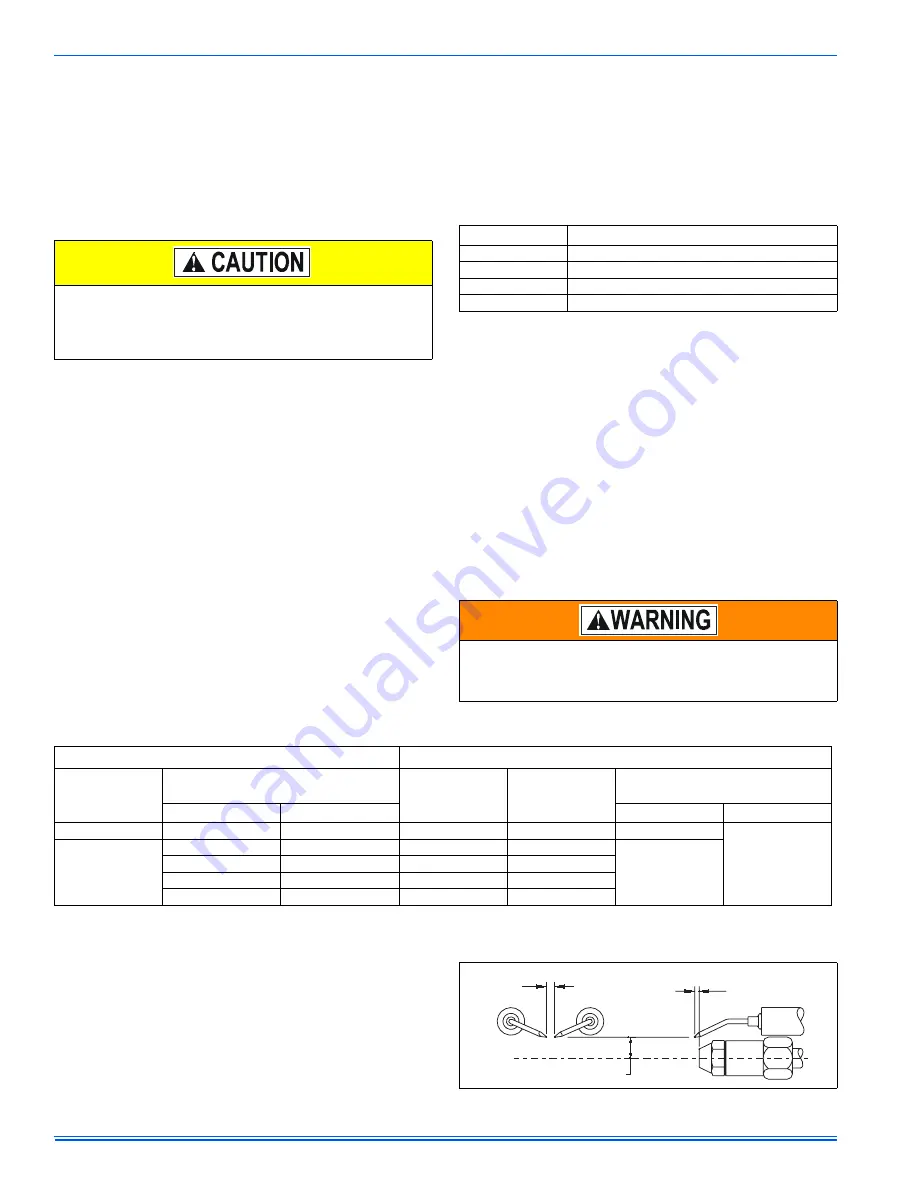
Check / Adjust Electrodes

Check the electrode tip settings. Adjust, if necessary, to comply with the
dimensions shown in Figure 35. To adjust, loosen the electrode clamp
screw and slide/rotate the electrodes as necessary. Securely tighten the
clamp screw when finished.

Main power to the unit must still be interrupted at the main power
disconnect switch before any service or repair work is to be done to
the unit.
Blower and burner must never be operated without the blower
panel in place.

TABLE 10: Cad Cell Resistance When Sensing Flame

Flashes

Cad Cell Resistance in Ohms

1

Less than 400

2

More than 400 and less than 800

3

More than 800 and less than 1600

4

More than 1600 and less than 5000

Electrical Shock Hazard
Can cause severe injury, death or property damage. 
Be careful to observe all precautions to prevent electrical shock or
equipment damage.

TABLE 11: Timings and Settings

Delay Timings

a

DIP Switch Settings

Valve-On Delay

(seconds)

Burner Motor-Off Delay

(minutes)

S-1

S-2

S-3 Enable / Disable

R7184U

R7184P

R7184U

R7184P

0

0

X

X

Off

b

15

0

0.5

Off

Off

On

2

2

Off

On

4

4

On

Off

5

8

On

On

X No Difference or Impact

Specific models may have different timings. Be sure to check device label.

S-3 not provided on R7184P models.

 FIGURE 35:  Electrode Settings

1/16"

Nozzle-to-tip
Spacing

5/32"
Gap

END VIEW

SIDE VIEW

5/16” Above Nozzle Center

Summary of Contents for DFAA

Page 1: ...33 WIRING DIAGRAM GAS CONVERSION BURNER 38 LIST OF FIGURES Label Location 4 Dimensions 5 Air Distribution Systems 7 Closet To Door Clearance 5 or Greater 7 Furnace To Closet Door Clearance 1 To 5 7 Fu...

Page 2: ...rating plate and the firing input rate must be set to the unit nameplate value e The external static pressure of the air distribution system ductwork must be set for heating operation to be at least 0...

Page 3: ...solutions Chlorinated waxes and cleaners Chlorine based swimming pool chemicals Water softening chemicals De icing salts or chemicals Carbon tetrachloride Halogen type refrigerants Cleaning solvents...

Page 4: ...to the unit The following minimum clearances are recommended 1 Twenty four 24 inches 61 cm between the front of the furnace and an adjacent wall or another appliance when access is required for servic...

Page 5: ...manually operated the damper must be equipped with means to pre vent the furnace or the air conditioner from operating unless the damper is in full heat or cool position The duct system is a very imp...

Page 6: ...t design shall be in accordance with the latest HRA Digest the ASHRAE Handbook Fundamentals or other good engineering prin ciples NOTE Refer to HRA Digest Residential Air System Design Manual Sections...

Page 7: ...the front of furnace 6 inches 15 2 cm minimum clearance must be provided on side where return is located and FIGURE 5 Furnace To Closet Door Clearance 1 To 5 Furnace to Closet Door Clearance Greater...

Page 8: ...es FIGURE 7 Duct Connector Dimensions 2 3 8 6 0 cm 12 30 5 cm 13 33 0 cm 11 27 9 cm 18 3 4 47 6 cm 14 35 6 cm SEE CHART DUCT CONNECTOR PART NUMBER DUCT CONNECTOR DEPTH 7990 6011 7990 6021 7990 6041 79...

Page 9: ...terlock system usu ally contains a heat cool switch which must be turned to either HEAT or COOL to activate either heating or cooling operation or a positive OFF switch on the cooling thermostat When...

Page 10: ...er is to be placed on the top cover and secured with screws as shown in Figure 14 The power wires for the Blend Air Damper are inserted through the 7 8 2 22 cm hole in the top cover The wires to the B...

Page 11: ...ity Fuel Line Installation Continuous lengths of heavy wall copper tubing are recom mended Always use flare fittings Never use compression fit tings Always install fittings in accessible locations Fue...

Page 12: ...Fire Protection Standard for Liquid Fuel Equipment NFPA 31 or in Canada the installation must comply with CSA B139 This pump must be used with a control system that provides a valve on delay pre purge...

Page 13: ...8 SOLENOID WIRING DISCONNECT THE POWER SUPPLY BEFORE WIRING TO PRE VENT ELECTRICAL SHOCK OR EQUIPMENT DAMAGE Lead wires on these devices are long enough to reach the junction box on most burner instal...

Page 14: ...owing directly on the thermostat The wall thermostat should be located 52 to 66 inches above the floor The preferred location is on an inside wall situated in an area with good air circulation and whe...

Page 15: ...sealant or other suitable sealant INSTALLATION IN SNOW REGIONS When the combustion air pipe inlet is covered or blocked with snow the furnace will not operate properly due to the depleted combustion a...

Page 16: ...o Vent Connector and Air Intake Connector and compress gasket See Figure 29 Refer to Interior Roof Jack Extension installation instructions if applicable 4 Align holes in Roof Jack and Air Intake Conn...

Page 17: ...lk 900 sealant Not required for Roof Jacks with fixed slant flashing Complete Installation as required 1 Install Exterior Roof Jack Extension if applicable Refer to installa tion instructions provided...

Page 18: ...4084 7141 is dimensionally the same as 4000 7141 C and is available only in Canada The 4084 7151 is dimensionally the same as 4000 7151 C and is available only in Canada DFAH FURNACES DFAA FURNACES IN...

Page 19: ...0 8181 C SWIVEL FLASHING ADJUSTS FROM 0 12 TO 5 12 PITCH SLANT FLASHING 3 12 PITCH 76 59 1 2 IMPORTANT A B Warm Air Duct Duct Connector Warm Air Duct Duct Connector Floor DFAA MODELS Carefully Sealant...

Page 20: ...Cap Crown Assembly Base STEP 1 Remove upper and lower cap Remove the two 2 screws that secure the upper cap to the crown assembly base and remove the upper cap Next remove the three 3 screws that sec...

Page 21: ...in the vicinity of the vent Also in accordance with the current UL 727 Standard for safety for oil fired central furnaces FIGURE 34 Home Layout L E D B V V V X V B V J X B B B V V F V C B X V I V G H...

Page 22: ...ntrol has entered the Run mode press and release the reset button See Table 10 for equivalent cad cell resistance Preliminary Steps 1 Check wiring connections and power supply 2 Make sure power is on...

Page 23: ...ID flexible tubing that is 12 30 cm in length 5 You will need a clear plastic jug 6 You will need a 7 16 open end or box wrench 7 You will need a 1 4 brass NPT x flare fitting These items are require...

Page 24: ...fications ADJUSTMENT OF TEMPERATURE RISE After about 20 minutes of operation determine the furnace temperature rise Take readings of both the return air and the heated air in the ducts about six feet...

Page 25: ...trimmed as necessary TABLE 14 Blower Performance CFM BLOWER PERFORMANCE CFM DFAA066 FACTORY EQUIPPED WITH STANDARD BLOWERS AND FILTERS EXTERNAL STATIC PRESSURE INCHES WC kPa Blower Speed BTU H kW Inpu...

Page 26: ...Fan 15 Combustion Chamber Assembly 16 Oil Burner Assembly 17 Switch Limit Open 140 Close 110 18 Fastener Door Latch 2 Required 19 Diagram Wiring DFAH MODEL ITEM NUMBER DESCRIPTION 1 Limit Switch Manu...

Page 27: ...107272 UIM B 1105 Unitary Products Group 27 SECTION IX WIRING DIAGRAM OIL FIRED FURNACE FIGURE 37 Wiring Diagram for DFAA Oil Fired Furnace...

Page 28: ...107272 UIM B 1105 28 Unitary Products Group FIGURE 38 Wiring Diagram for DFAH Oil Furnace...

Page 29: ...ols will be readily accessible for inspection cleaning adjust ment and repairs GAS PIPING Installation and Checking of Gas Line Gas Supply piping must be sized in accordance with the recommenda tions...

Page 30: ...ape should be closed Immediately after turning on gas the system should be checked for leaks This can be done by watching the 1 2 cubic feet 0 14 m3 test dial and allowing 5 minutes to show any moveme...

Page 31: ...E EXCESSIVE PIPE SEALANT ON PIPE JOINTS Pipe sealant metal chips or other foreign material that could be deposited in the inlet of the gas valve when gas pipe is installed or carried through the gas p...

Page 32: ...1 0 147 26 9951 1471 0 154 23 9951 1541 0 173 17 9951 1731 5 000 1524 0 128 30 9951 1281 0 144 27 9951 1441 0 152 24 9951 1521 0 169 18 9951 1691 6 000 1829 0 128 30 9951 1281 0 144 27 9951 1441 0 149...

Page 33: ...monoxide poisoning or death The following steps shall be followed for each appliance connected to the venting system being placed into operation while all other appliances connected to the venting sys...

Page 34: ...3600 then divided by the time it took to measure 0 10 m3 of gas from the gas meter For Propane LP Gas multiply the Heat content of the gas MJ m3 or Default 93 15 times 0 10 m3 of gas measured at the g...

Page 35: ...ts on the gas valve marked OUT and INLET IMPORTANT The cap for the pressure regulator must be removed entirely to gain access to the adjustment screw Loosening or tightening the cap does not adjust th...

Page 36: ...has been obtained re adjust the primary air damper open or closed to visually obtain a blue flame with well defined orange or yellow tips for natural gas or well defined yellow tips for propane gas 2...

Page 37: ...ion air pres sure is sensed by the air proving switch and closes the switch contacts energizing the S89F gas primary control The S87K gas primary control has an internal 30 second prepurge timer After...

Page 38: ...107272 UIM B 1105 38 Unitary Products Group SECTION XII WIRING DIAGRAM GAS CONVERSION BURNER FIGURE 45 Wiring Diagram for DFAA Gas Conversion Burner...

Page 39: ...107272 UIM B 1105 Unitary Products Group 39 FIGURE 46 Wiring Diagram for DFAH Gas Gun...

Page 40: ...o change without notice Printed in U S A 107272 UIM B 1105 Copyright by York International Corp 2005 All rights reserved Supersedes 107272 UIM A 0905 Unitary 5005 Norman Product York OK Group Drive 73...

Reviews: