


UNIT OPERA
TION
P29 OF 46
YMGI, Engineered Comfort Products for A Sustainable and Efficient Green World !
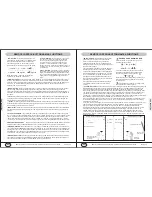
The manual switch can be operated as follow:
* At operation: When the unit has stopped running, press ON/OFF button, unit
will enter into AUTO RUN mode. The microcomputer will accord to the room
temperature to select the (COOL, HEAT, FAN) mode automatically, to obtain
the comfortable effect.
* At stopping: When the unit is running, press the ON/OFF button of the manual
switch, the unit will stop work.
The code switch can be operated as follow:
* At operation: When the unit is stopped running, adjust the code switch to AUTO,
the unit will enter into AUTO RUN mode. The microcomputer will accord to the
room temperature to select the (COOL, HEAT, FAN) mode automatically, to
obtain the comfortable effect.
* At stopping: When the unit is running, adjusts the code switch to STOP position,
the unit will stop working.
CLEAN AND CARE
CLEAN THE FRONT PANEL(MAKE SURE TO TAKE IT OFF BEFORE
CLEANING)
* Turn power off and pull out the power plug before cleaning air conditioner. Or it may cause electric shock.
* Never sprinkle water on the indoor unit for cleaning because it can cause an electric shock.
* Volatile liquid (e.g. thinner or gasoline) will damage the air conditioner. (So wipe the units with a dry soft cloth,
or a cloth slightly moistened with water or cleanser.)
AUTO/STOP
Manual Switch
Code Switch
AUTO
TEST
RUN
STOP
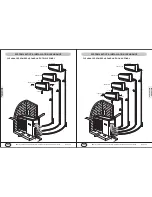
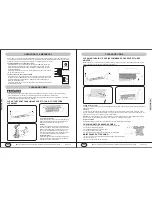
OPERATION AT EMERGENCY
Take off the front panel
Along the direction of arrows to lift the front panel up,
meanwhile to hold both slots of the front panel and
take it out forcibly and then can take it off.
Washing
Clean with a soft brush, water and neutral detergent
and then dry it.(Note: Before cleaning the unit, please
take down the displayed box firstly, then to wash the
panel, if the unit has displayed on the front panel.
O
Never use the water above 113 F
wash the panel,
or it could cause deformation or discoloration.)
to
Install front panel
Place two supporters of the front panel into the slots,
along the direction of arrows to cover and clasp the
front panel. As show in right figure.
If at any time the remote control becomes damaged or lost you can switch to the manual mode on the indoor unit.
This will allow the unit to run in AUTO mode only. While in AUTO mode the unit temperature cannot be switched.
Contact your local service provider for instructions on replacing the remote control.
UNIT OPERA
TION
P30 OF 46
YMGI, Engineered Comfort Products for A Sustainable and Efficient Green World !
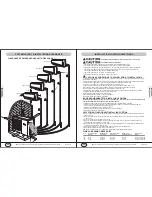
CLEAN AND CARE
CLEANING THE AIR FILTERS (RECOMMENDED ONCE EVERY THREE
MONTHS)
Note:
If the unit is in a dusty area, the air filters should be cleaned more often. After taking off the filter, be sure
not to touch the fin on the indoor unit as this will cause injury.
Cleaning
To clean the dust adhering to the filters, you can either use a vacuum cleaner, or wash them with warm water.
O
the neutral detergent water should be below 113 F when the filters are very dirty and dry in the shade.When the
filters are very dirty (such as oil stain), and dry it in the shade.
NOTE:
Never use water hotter than 113 F to wash the unit or the filters as this can discoloration and/or deform
the unit. Never dry the filters by fire as this can be dangerous. Always air dry the filters.
O
Reinsert the filters
Reinsert the filters along with the arrow head, then cover the surface panel and clasp it.
1) If the unit is still connected to the correct electric power V/Ph/Hz.
2) If the unit is still securely fastened..
3) If the batteries of remote control are good.
4) If the filter is loaded and clean
5) If the intake and discharge vents are clear from any obstruction.
MAINTENANCE AFTER USING
1) Turn main power off, by disconnecting electrical power disconnect switch.
2) Clean filter and unit.
3) Cover unit to keep from dust or moisture.
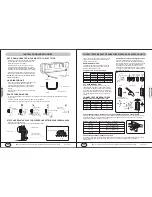
CHECKING BEFORE SEASON COMES:
To Remove the Air Filter
By holding onto the bottom slot of the air filter slightly push the filter in an upward motion at a slight angle and pull
downward carefully.


