


YMGI, Engineered Comfort Products for A Sustainable and Efficient Green World!
25
OUTDOOR UNIT INSTALLATION
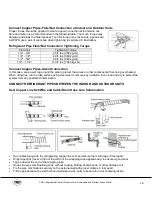
1. Install Condensate Drain for Outdoor Unit
The condensate drains from the outdoor unit when the unit operates in heating mode. In order not to disturb your
neighbors and to protect the environment, install a drain port and a drain hose to direct the condensate water. Install the
drain port and rubber washer to the chassis of the outdoor unit, then connect a drain hose to the port as demonstrated in
the figure below.
2. Install Ground Pad or Wall Brackets
Determine proper location for outdoor unit.
Follow all instructions provided by the manufacturer for installation of wall brackets and rubber pads.
Verify the wall
brackets or rubber pad can safely support eh Outdoor Unit’s weight.
Verify that the wall hangers or rubber pad is level, and meets all clearance requirements.
Fix with bolts and nuts, secured tightly on a flat and strong floor.
If the unit is installed on a wall or roof, make sure that the support structure is firmly attached, and will prevent the
unit from shaking due to severe vibrations or strong winds.
Florida wind load requirements state that outdoor units must be anchored to a concrete pad using four 3/8 inch
diameter power wedge bolts (or equivalent), with 1 inch diameter fender washers.
Anchor bolts must be embedded into 3000 PSI minimum concrete, at a distance of 4 ½ inches from concrete edge. The
concrete thickness must exceed 1.5 times the anchor depth.


