background image

4

Charge the handset

+

 After setting up the handset and charger, place the handset in the charger.

+

 The handset battery takes about 3 hours to fully charge.  The charging status is displayed on the top right hand corner

   of the LCD screen.  

Attach the Belt Clip

+

 Push the clip onto the back of the handset.

+

 Insert the clip into the designated notches in the handset.

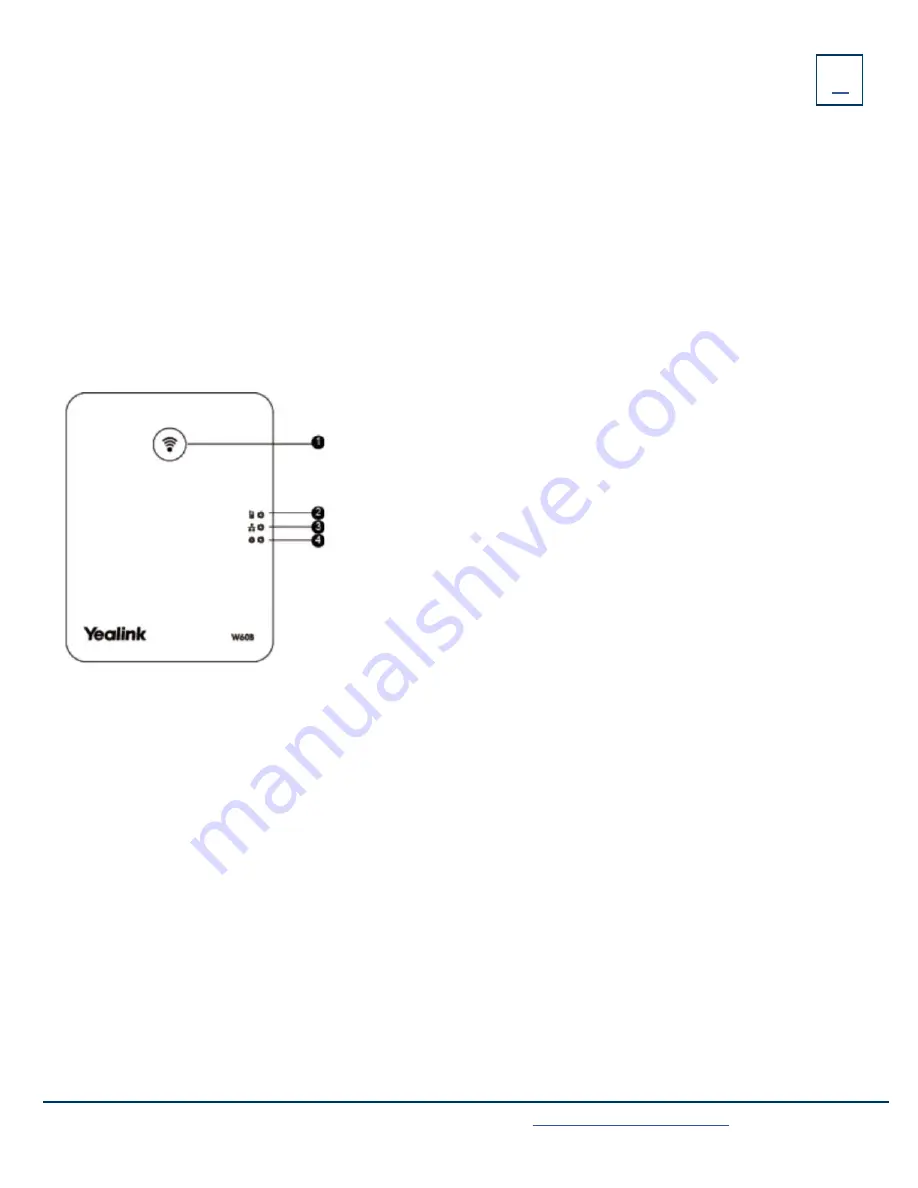
After the base station starts up successfully and the handset is registered to the base station, all LEDs on the base station 
will illuminate green in sequence.

1.  Paging Key

 - Locates a misplaced handset.

     Toggles the registration mode.
     Resets the base station to factory settings.

2.  Registration LED

 - Indicates the mode of the base station.

     + Fast flashing green - paging mode.
     + Slow flashing green - registration mode.
     + Solid green - there is at least one handset registered to the base.
     + Off - the base is powered off or no handsets are registered to base.

3.  Network Status LED

  - Indicates the network status.

     + Slow flashing green - network is unavailable.
     + Solid green - network is available. 
     + Off - base is powered off.  

4.  Power Indicator LED

 - Indicates the power status of the base station.

     + Slow flashing green - base is going through a firmware upgrade.
     + Solid green - base is powered on.
     + Off - base is powered off. 

W60P BASE STATION FEATURES

Need support? Connect with us at 

www.northland.net/support


or 

Dial 

4357 (HELP)

 or 

315-671-6262

 to speak to a Northland Training Representative

Summary of Contents for W60P Telesystem

Page 1: ...YEALINK W60P W56H CORDLESS PHONE VOICEMAIL GUIDE...

Page 2: ...CESSING ANSWERING PLACING CALLS NAVIGATING CONNECTED CALLS DIRECTORIES NAVIGATING LOCAL NETWORK DIRECTORIES YOUR VOICEMAIL LOGGING IN AND UNDERSTANDING COMMON VOICEMAIL COMMANDS 1 3 5 6 7 4 TABLE OF C...

Page 3: ...ion in a damp room and keep it away from water AC Power Optional Connect the DC plug on the power adapter to the DC5V port on the base station and connect the other end of the power adapter into an el...

Page 4: ...Switch NOTE If in line power is provided you don t need to connect the AC adapter Make sure the hub switch is PoE compli ant IMPORTANT Do not remove the power and network to the base station while it...

Page 5: ...ANDSET CHARGER CRADLE HANDSET POWER ADAPTER RECHARGEABLE BATTERY BELT CLIP Set up the Charger Cradle Connect the USB plug on the charger cradle to the DC5V port on the power adapter Connect the power...

Page 6: ...base station to factory settings 2 Registration LED Indicates the mode of the base station Fast flashing green paging mode Slow flashing green registration mode Solid green there is at least one hand...

Page 7: ...Answers an incoming call 7 Navigation keys Moves the cursor Adjusts the ringer volume 8 OK Confirms actions or enters the main menu 9 Power Off key Long presses in the menu screen to return to idle sc...

Page 8: ...r on hold for you to retrieve TO HOLD CALL Press OPTIONS Softkey Select HOLD TO RETURN TO CALLER Press RESUME Softkey CALL PROCESSING TO RETURN TO CALLER Press END Softkey CONFERENCE Allows three way...

Page 9: ...ctory Usually maintained by your System Administrator available on all handsets TO ADD NUMBERS TO THE LOCAL DIRECTORY Press OK key Highlight and Select DIRECTORY icon Select LOCAL DIRECTORY Press OPTI...

Page 10: ...your password and press LOG IN TO VOICEMAIL FROM ANY EXTERNAL TELEPHONE Dial 315 671 0031 Enter your 10 digit telephone number and press Enter your password and press COMMON VOICEMAIL COMMANDS Main M...

Reviews: