Link CX-24 User’s Manual
Version 1.0
Page 21
February 2004
2.9.4 Installation Tools and Materials
Tools
The user should have at least the following tools on hand before installing the Link CX-24 radio:
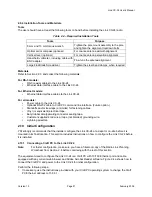
Table 2.4 – Required Installation Tools
Tools Purpose
8 mm and 13 mm torque wrench
Tighten the pole mount assembly to the pole
and tighten the alignment lockdown bolts
Optical aid or compass (optional)
For coarse antenna azimuth alignment
Vertical level (optional)
For coarse antenna elevation alignment
Hand-held voltmeter, including cable with
BNC adapter
Fine-tune the antenna alignment
Large Flat-Blade Screwdriver
Tighten the steel band clamps, when required
Materials
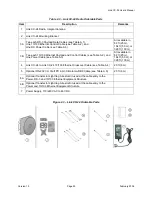
Refer to Section 2.9.3 and collect the following materials:
For DS-3 models:
•
DS-3 coaxial cables to the Link CX-24.
•
Ethernet data interface cable to the Link CX-24.
For Ethernet models:
•
Ethernet data interface cables to the Link CX-24.
For all models:
•
Power cable to the Link CX-24.
•
Optional RS-232 cable to Craft PC command line interface. (Future option.)
•
Standoffs and/or tie wraps (or similar) for fastening cables.
•
Vinyl (or equivalent) electrical tape.
•
Butyl rubber amalgamating connector sealing tape.
•
Customer-supplied solid wire or tape (not braided) grounding wire.
• Lightning
arrestors.
2.10 Initial
Configuration
YDI strongly recommends that the installer configure the Link CX-24 at a depot or on-site before it is
mounted in its final location. This section includes instructions on how to configure the Link CX-24 before
it is installed.
2.10.1 Connecting a Craft PC to the Link CX-24
Note:
For faster configuration, make sure you have a filled-out copy of the Radio Link Planning
Worksheet from Section 2.8 before continuing with the rest of this section.
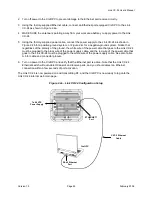
The equipment used to configure the Link CX-24 is a Craft PC with 10/100 Ethernet port and cable,
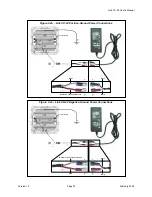
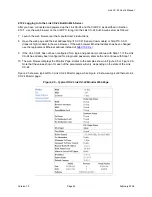
equipped with any current web browser and Adobe Acrobat Reader software. Figure 2.4a shows how to
connect the Craft PC and power to the Link CX-24 for initial configuration.
Perform the following steps:
1 If necessary, use the instructions provided with your Craft PC operating system to change the Craft
PC Ethernet address to 10.0.0.1.

