background image

6.

HYDRAULIC SYSTEM

6-

6

-16

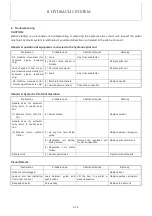
Procedure

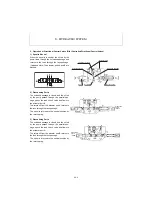
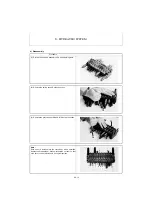
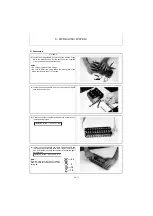
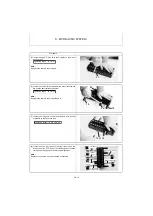
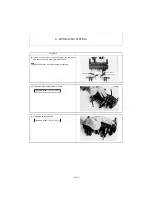
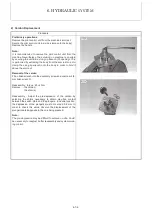
(12) Remove the O-rings 

4

 and 

7

 from the mating face of each

section, and remove the O-ring 

40

.

Notes :

• Put all the sections in order for reassembly.
• Mark the section so that the O-ring 

40

 can be installed cor-

rectly.

7

4

40

7

4

40

Summary of Contents for ViO12-2A

Page 1: ...SERVICE MANUAL EXCAVATOR ViO12 2A...

Page 2: ......

Page 3: ......

Page 4: ...2 4 1 CHAPTER 3 SERVICE STANDARDS 3 1 Machine Performance 3 1 1 3 2 Engine 3 2 1 3 3 Undercarriage 3 3 1 3 3 1 Rubber Crawler Specifications 3 3 1 3 4 Controls 3 4 1 3 5 Hydraulic Equipment 3 5 1 3 5...

Page 5: ...1 4 5 2 Alternator 4 5 2 CHAPTER 5 ELECTRIC SYSTEM 5 1 Parts Layout of Electrical Equipment 5 1 1 5 1 1 ElectricalEquipmentandElectricWiring 5 1 1 5 2 Monitor and Alarm Systems 5 2 1 5 2 1 PartName 5...

Page 6: ...on of Fuel Injection Pump 7 1 11 7 1 4 Removal and Reinstallation of Fuel Tank 7 1 13 7 1 5 Removal and Reinstallation ofRadiator 7 1 15 7 2 Undercarriage 7 2 1 7 2 1 Outline 7 2 1 7 2 2 Points of Rea...

Page 7: ...on and Servicing 8 1 CHAPTER 9 FUEL LUBE OIL AND GREASE RECOMMENDED 9 Fuel Lube Oil and Grease Recommended 9 1 CHAPTER 10 TROUBLESHOOTING 10 1 Non Breakdowns 10 1 1 10 1 1 Natural Release of Bucket 10...

Page 8: ...Disassembly and Reassembly 1 1 1 5 Cautions for Removal and Installation of Hydraulic Equipment 1 2 1 6 Cautions for Removal and Installation of Hydraulic Piping 1 2 1 7 Cautions for Handling Seals 1...

Page 9: ......

Page 10: ...sons 6 Do not enter or pass under the raised load 7 Lift and support the massive parts by crane before removing the installation bolts 8 Disconnect cables from battery before repairing the electric sy...

Page 11: ...tract 8 Be sure to pressurize the hydraulic tank after installing the hydraulic components in the case of the sealed hydraulic tank Otherwise hydraulic pumps might suffer cavitation and their life wil...

Page 12: ...g seals Before installing apply a little gear oil to the matching face of the housing Turn the seals two or three times after installation to break them in 5 Apply grease to the lip of the oil seals t...

Page 13: ...length will change by 2 to 4 when used at high pressure 5 Use the proper adapters not pipes in order to reduce the number and length of joints and improve the external appearance 6 Use an elbow to pre...

Page 14: ...prevents sharp bending 9 When a bent hose is attached to two different planes fix as shown in the diagram to prevent twisting 10 Use the marking on the hose as a guide to prevent twisting during inst...

Page 15: ...umber please refer to our Parts Catalog 1 Yanmar Standard Type The part code consists of 11 digit numbers Hose material code Hose type code Fittings combination code Nominal length code Nominal dia co...

Page 16: ...MPa 1 SAE J517 100R1 02 6 3 13 5 17 2 03 9 5 17 5 13 7 04 12 7 20 6 10 8 2 SAE J517 100R7 02 6 3 15 1 29 4 03 9 5 19 1 24 0 04 12 7 22 2 20 6 1 SAE J517 100R6 02 6 3 12 5 20 6 03 9 5 16 6 17 2 04 12 7...

Page 17: ...8 5 5 Rubber hose high pressure type SAE J517 100R2 Nominal dia 3 8 Hose length 85 cm Straight pipe thread G PF with male 30 degrees seat and 90 degrees bent type Straight pipe thread G PF with male 3...

Page 18: ...3 4 12 1 16 5 Combination of fitting Fitting type Code Taper pipe thread R PT A Straight pipe thread G PF with male 30 degrees seat B 90 degrees bent type Straight pipe thread G PF with male 30 degree...

Page 19: ...30 degrees seat F 90 degrees elbow straight pipe thread male 30 degrees seat V O ring flange type G 90 degrees bent O ring flange type H Eyejoint with O ring groove W 45 degrees bent O ring flange ty...

Page 20: ...se effect on the smooth operation of the hydraulic equipment and shortening the service life 1 Air Release of Each Hydraulic Component Run the engine at medium speed and activate the respective circui...

Page 21: ......

Page 22: ...CHAPTER 2 TECHNICAL DATA 2 1 Specifications 2 1 1 2 2 Outline Drawing and Working Area 2 2 1 2 3 Weight List of Main Parts 2 3 1 2 4 Lifting Capacity List 2 4 1...

Page 23: ......

Page 24: ...1 2 1 High speed Forward Reverse km hr 4 0 4 0 Theoretical climbing ability degrees 25 Permissible water depth limit mm 290 Work performance Bucket Width Standard mm 400 Standard JIS heaped capacity m...

Page 25: ...opy KPa Rubber crawler Cabin KPa Canopy KPa 27 5 Mass Operating mass Steel crawler Cabin kg Canopy kg Rubber crawler Cabin kg Canopy kg 1245 Base machine dry mass Steel crawler Cabin kg Canopy kg Rubb...

Page 26: ...oke mm 376 Inside diameter mm 50 Piston rod diameter mm 30 Speed Up Ground Max sec 1 9 Down Max Ground sec 1 8 Arm Stroke mm 331 Inside diameter mm 50 Piston rod diameter mm 25 Speed Full stroke for d...

Page 27: ...alve Type Counterbalance valve Relief set pressure MPa Type of reduction gear Planetary gear with double reduction mechanism Hydraulic oil tank Tank capacity L 14 3 tank 1 95 7 4 others 1 82 6 9 Sucti...

Page 28: ...LN seal Shaft seal w sleeve Number of sprocket teeth Steel crawler pcs Rubber crawler pcs 12 Crawler tension adjustment Grease adjuster Engine Main specifications Engine model 3TNV70 WBVB Type Vertica...

Page 29: ...ter with coil expander Ring quantity pcs 3 Governor Name Type Fuel feed system Fuel filter Filter paper with automatic air release device Fuel filter filtration area cm2 430 Oil water separator Mesh f...

Page 30: ...pressure MPa Starting device Cold starting aids Super quick glow Starting aids capacity V W 12 120 Battery type 65B24L Battery voltage 5 hrs rate capacity V Ah 12 36 Electrical equipment Alternator T...

Page 31: ...2 TECHNICAL DATA 2 1 8 Item Unit ViO12 2A Electrical equipment Boom light V W 12 27 Room lamp for cabin V W Wiper motor for cabin V W Cabin heater for cabin V W...

Page 32: ...d Working Area Unit mm A 360 B 400 C 590 D 115 E 225 F 1000 830 G G1 R650 R500 H swing 1330 1080 I 210 K 2250 K1 1580 L 230 M 940 Unit mm N 1440 O 3040 Q 3270 R 3350 S 2050 T 890 U 1650 V 1950 Y 2370...

Page 33: ...Rubber crawler Ass y 31 6 22 Swivel joint Fitting 16 0 8 Track frame crawler Ass y 153 0 23 Track gauge change cylinder Ass y 6 2 9 Track roller Ass y 2 9 24 Travel motor 17 0 10 Sprocket 5 6 25 Hydr...

Page 34: ...isk mark is limited by hydraulic lifting capacity rather than tipping The lifting capacity shown in the above list is based on the ISO Standard No 10567 and represents either 87 of hydraulic lifting c...

Page 35: ...ed on the ISO Standard No 10567 and represents either 87 of hydraulic lifting capacity or 75 of tipping load which is smaller Blade above ground Unit kg A m Max 2 5 2 0 1 5 B m 2 0 185 185 1 5 125 160...

Page 36: ...ions 3 3 1 3 4 Controls 3 4 1 3 5 Hydraulic Equipment 3 5 1 3 5 1 Hydraulic Cylinders 3 5 1 3 6 Implement 3 6 1 3 6 1 Front Attachments 3 6 1 3 6 2 Blade Moving Device 3 6 2 3 6 3 Bucket Teeth 3 6 2 3...

Page 37: ......

Page 38: ...rated speed Hydraulic oil temp 50 to 60 C Site Firm flat ground Extend sec 2 7 2 9 Retract 3 6 3 7 Bucket speed Max cylinder retraction Max cylinder extension Machine position Engine rated speed Hydra...

Page 39: ...d speed Hydraulic oil temp 50 to 60 C Site Firm flat ground Travel lever Full throttle Floating crawler side Float one side of the crawler Make a mark on the crawler After turning the floating crawler...

Page 40: ...f each cyl inder rod after leaving the machine at the above position for 10 min Lift the blade to the highest position and mea sure the cylinder rod extension after 10 min mm 10 min 8 or less 12 Arm d...

Page 41: ...0 or less 120 30 Swing time Machine position Engine rated speed Hydraulic oil temp 50 to 60 C Site Firm flat ground Make one idling turn with no load then mea sure the time necessary to make 5 turns s...

Page 42: ...ide dia 6 000 to 6 012 6 08 Oil clearance 0 040 to 0 067 0 17 Valve guide projection mm 9 8 to 10 0 Valve sinkage Intake mm 0 4 to 0 6 0 8 Exhaust 0 4 to 0 6 Valve head thickness Intake mm 0 9 to 1 1...

Page 43: ...0 134 Piston Piston outside dia mm 69 960 to 69 990 69 915 Minimum clearance between piston and cylinder 0 030 to 0 050 Top clearance 0 696 to 0 84 Piston pin Outside dia 21 995 to 22 000 21 965 Hole...

Page 44: ...n side Bush inside dia 22 025 to 22 038 22 068 Piston pin outside dia 21 991 to 22 000 21 963 Oil clearance 0 025 to 0 047 0 105 Twist and parallelism 0 03 or less for 100 0 08 Cam Gear side Cam shaft...

Page 45: ...075 0 175 Trochoid pump Clearance between outer rotor and pump body mm 0 12 to 0 21 0 30 Clearance between outer rotor and inner rotor tip 0 16 Outer rotor side clearance 0 02 to 0 07 0 12 Others Lub...

Page 46: ...G STANDARDS 3 3 1 3 3 Undercarriage 3 3 1 Rubber Crawler Specifications Unit mm Applicable model ViO12 2A Part Measuring position Standard Wear limit 1 Rubber crawler A 15 8 2 Idler shaft A 30 B 32 26...

Page 47: ...3 SERVICING STANDARDS 3 3 2 Unit mm Applicable model ViO12 2A Part Measuring position Standard Wear limit 1 Sprocket A 22 12 B 18 13 C 67 5 2 Track roller shaft A 25 B 69 63 C 130 124...

Page 48: ...vel levers 14 7 19 6 Track gauge change lever 24 5 34 3 Boom swing pedal 29 4 39 2 P T O pedal 29 4 39 2 Play of control lever pedal Right control lever Front rear left right Engine stopped Hydraulic...

Page 49: ...534 331 53 50 25 G1 4 Rc1 4 25 25 5 M18 206 to 235 Bucket 461 270 45 50 25 G1 4 25 25 5 M18 206 to 235 Boom swing 542 305 68 5 60 30 G1 4 30 30 5 M20 294 to 343 Blade 389 93 150 50 25 Rc1 4 25 25 5 M1...

Page 50: ...point Pin Bore of bush or hole 1 Boom bracket fulcrum 40 0 5 0 5 2 Boom fulcrum 30 3 Boom swing cylinder rod 30 4 Boom swing cylinder bottom 30 5 Boom cylinder bottom 30 6 Boom cylinder rod 25 7 Arm f...

Page 51: ...is 1 mm 3 6 3 Bucket Teeth Unit mm No Applicable model ViO12 2A Standard Wear limit Measuring point Pin Bore of bush or hole 1 Blade cylinder rod 25 0 5 0 5 2 Blade cylinder bottom 25 3 Blade fulcrum...

Page 52: ...or its equivalent 2 Sprocket Hexagon socket head bolt M10 44 1 to 58 8 Three Bond 1324 or its equivalent 3 Idler M12 78 4 to 98 Three Bond 1324 or its equivalent 4 Idler fork Plug R1 8 8 8 to 9 8 Loc...

Page 53: ...ent 3 Swivel joint x track frame M10 44 1 to 58 8 Three Bond 1324 or its equivalent 4 Boom tube M8 12 7 to 16 7 Three Bond 1324 or its equivalent 5 Hydraulic oil tank drain M14 98 1 to 117 7 6 Oil lev...

Page 54: ...73 7 Yes 9 Fuel pipe sleeve fastening nut M12 1 25 29 4 to 34 3 No 10 Fuel injection pump cam end nut M12 1 75 58 8 to 68 8 Yes 11 Fuel injection pump drive gear bolt M8 1 0 32 3 to 36 3 No Item Thre...

Page 55: ......

Page 56: ...the Maximum or Minimum Idling Speed 4 2 10 4 2 7 Checking the Cooling Water System and Radiator for Water Leakage 4 2 10 4 2 8 Checking the Sensors 4 2 11 4 3 Measurement Procedure Service Data and Co...

Page 57: ......

Page 58: ...gine nameplate Bonnet Flywheel Starter motor Alternator Regulator handle Crank shaft V pulley V belt Fuel injection pump Cooling water pump Suction manifold Exhaust manifold Fuel filter Cooling fan Li...

Page 59: ...tion and increased consumption of lubricating oil and other trouble and the engine starting failure The compression pressure is influenced by the following factors 1 Degree of the clearance between th...

Page 60: ...portion Clean the filter element Replace the filter element 2 Valve clearance Excessive or no valve clearance Adjust the valve clearance Refer to Section 4 2 2 3 Valve timing Improper valve timing Imp...

Page 61: ...mping the lever of the nozzle tester slowly read the pressure gauge on the nozzle tester the moment the nozzle starts fuel injection For the fuel injection pressure refer to Section 2 1 Specifications...

Page 62: ...r placed about 30 cm below the nozzle The injection spray should form a perfect circle 4 No fuel should drip from the nozzle after injection 5 Fuel should not ooze from the nozzle hole when the fuel i...

Page 63: ...on the No 1 cylinder While checking and adjusting the timing on only No 1 cylinder is usually sufficient the same procedure can be performed on any or all cylinders 1 Checking Fuel Injection Timing No...

Page 64: ...wise direction while looking through the flywheel inspection port 1 Rotate the crankshaft until the injection timing marks on the fly wheel are visible for No 1 cylinder 6 The flywheel markings are as...

Page 65: ...ar the TDC mark 5 on the flywheel 7 Highlight the timing reference mark on the flywheel housing 2 Highlight the TDC Top Dead Center mark 1 on the flywheel 3 2 1 5 4 0002071A 1 1 15 BTDC Before Top Dea...

Page 66: ...tely two more revolutions until the timing grid on the flywheel for the cylinder being checked is at approximately 30 BTDC Note The fuel injection pump injects fuel to a cylinder only once every two e...

Page 67: ...d and will need to be advanced To advance the injection timing Rotate the top of the fuel injection pump away from the engine If the injection timing was greater than the target timing the injection t...

Page 68: ...cooling water system can be checked effectively while the engine is warm 1 Supply cooling water up to the normal water level in the radiator Attach the cap tester body to the radiator 2 Start operati...

Page 69: ...n tainer While measuring the liquid temperature heat the liquid If the tester shows continuity at a temperature of 107 to 113 C the thermoswitch is normal 2 Hydraulic Switch Remove the connector from...

Page 70: ...f the four sides and each diagonal of the cylinder head Measure the clearance between the straight edge and the combustion surface with a thickness gauge 3 Visually check if the combustion surface is...

Page 71: ...Then grind the seat surface with a 15 degrees grinder so that the seat width should be the standard value Note When using a seat cutter apply pressure evenly taking care not to cut the seat surface un...

Page 72: ...meter measured with a micrometer If the oil clearance is near the wear limit replace both the intake exhaust valve and the valve guide with new ones Note Three point micrometer Used for an inside diam...

Page 73: ...tion of the valve guide 4 Valve Stem Seal Time of replacement 1 When oil loss is found excessive 2 When the valve stem seal is removed 3 When the intake exhaust valve is removed Precautions on install...

Page 74: ...the outer surface of the cotter as well as the contact of the inner surface of the cotter with the notch in the head of the valve stem If such contact is uneven or if the cotter has sunk due to wear r...

Page 75: ...rvals Obtain the distortion of the cylinder the roundness and cylindricity of each cylinder from the following measured values Roundness Difference between the max and min bore values on the same cros...

Page 76: ...practice to use the Flex Hone for honing The procedure for using it is described below Any mate rial needs a honing allowance of approx 1 1000 mm for honing with the Flex Hone 1 Items to be prepared...

Page 77: ...and the rocker arm with new ones Standard Wear limit Intake exhaust valve rocker arm Shaft outside dia Refer to Section 3 2 1 Nominal and Allowable Val ues Bush inside dia Oil clearance Service life o...

Page 78: ...e intake exhaust valve rocker arm for the con tact surface with the valve cap If any of them is exces sively worn or partially flaked replace it 3 Check the portion where the valve clearance adjust sc...

Page 79: ...ng the Piston Outside Diameter 3 Shapes of Piston Rings Standard Wear limit Piston outside dia Refer to Section 3 2 1 Nominal and Allowable Values Minimum clearance between piston and cylinder Measuri...

Page 80: ...g the piston head insert a thickness gauge between both ends of the piston ring If the sleeve is worn measure the end gap after pushing the piston ring into the sleeve to the portion which is less wor...

Page 81: ...on pin before inserting it into the piston 6 Measuring the Outside Diameter and Bush Hole Inside Diameter of the Piston Pin Measure the outside diameter and bush hole inside diameter of the piston pin...

Page 82: ...l end 2 Measuring the Twist and Parallelism Measure the twist and parallelism of the connecting rod with a connecting rod aligner Top clearance Refer to Section 3 2 1 Nominal and Allowable Values 0 25...

Page 83: ...in the cor rect way 4 Measuring the Oil Clearance Between the Piston Pin Bush and the Piston Pin To measure the oil clearance between the piston pin bush and the piston pin measure the inside diameter...

Page 84: ...hamber is on the fuel injection pump side as seen from the top 7 Side Gap of the Connecting Rod After installing the connecting rod to the crank shaft tighten the rod bolts at a specified tightening t...

Page 85: ...ng the Bend of the Cam Shaft Support the cam shaft with V blocks Using a dial gauge measure the runout of the journal at the center of the cam shaft while rotating the cam shaft Take 50 of the measure...

Page 86: ...e with the end of the crank shaft Press the crank shaft to each of the right and left sides in the axial direction to measure the side gap Alternatively insert a thickness gauge directly into the clea...

Page 87: ...al gauge while rotating the crank shaft to check the bend of the crank shaft 5 Measuring the of Crank Pin and Journal Measure the outside diameters roundness taper angles of the crank pin and journal...

Page 88: ...l side 5 Place the main metal as a reference one on the flywheel side 7 Undersized Main Metal by 0 25 mm and Oversized Thrust Metal by 0 25 mm Standard Wear limit Crank pin Crank pin outside dia Refer...

Page 89: ...the idle gear shaft and the bush are aligned 4 Gear Train After installing all the gears check that the matchmarkes A B and C on the idle gear are aligned with those on the crank gear the fuel inject...

Page 90: ...r shaft and replace the entire assembly if there is looseness or play 2 Push the oil pressure regulating valve piston from the drill hole side to check if the piston returns normally Replace the entir...

Page 91: ...the Crank Shaft Apply a dial gauge to the end of the crank shaft Press the crank shaft to each of the right and left sides in the axial direction to measure the side gap Alternatively insert a thickn...

Page 92: ...re reinstalling the valve stem 7 Reinstalling the Piston Rings 1 Fit the piston ring into the ring groove with the manu facturer s mark near the end of the piston ring facing upward to the combustion...

Page 93: ...at a specified tightening torque in the numerical order as shown below 11 After Completing the Reassembly Carry Out a Verification Run of the Engine to Check That There is No Water or Oil Leakage Pis...

Page 94: ...on and off the principal current 1 Specifications Yanmar code 119717 77010 Applicable model 3TNV70 WBVB Starter motor model P 1 1 Nominal output Weight kg 3 0 Rotation direction Viewed from pinion sid...

Page 95: ...V 119230 77712 14 to 15 Applicable model 3TNV70 WBVB Alternator model GP8150 Yanmar code of safety relay 119247 77100 Nominal output A 8 5 to 9 5 Weight kg 1 6 Revolution direction Viewed from pulley...

Page 96: ...tor assembly Plate assembly Cap Shaft Coupler Dynamo assembly Screw Coil plate Coupler Clamp Collar Collar Pulley Screw Ball bearing 6201 DDUC3 Ball bearing 6201 DDUC3 Flywheel CMP 12P Adjuster bolt 5...

Page 97: ...4 ENGINE 4 5 4 Standard output Standard characteristics 14V Output current A Alternator speed min 1 Upper Lower 064684 00EN00 0 1 2 3 4 5 103 2 4 6 8 10 12 14 EDC IDC 16...

Page 98: ...nt 5 1 1 5 4 1 Start Engine 5 4 1 5 4 3 Battery charge 5 4 3 5 3 Wiring diagram 5 3 1 5 4 Circuit Description of Engine Start and Stop 5 4 1 5 2 1 Part Name 5 2 1 5 2 2 Performances of Alarm Sensors 5...

Page 99: ......

Page 100: ...5 1 1 5 1 Parts Layout of Electrical Equipment 5 1 1 Electrical Equipment and Electric Wiring 5 ELECTRIC SYSTEM 5 Electric System...

Page 101: ...e switch 28 Starter switch 7 Glow relay 18 Fuel feed pump 29 Working lamp Boom light 8 Current limiter 19 Cut off valve 30 Water temp alarm lamp 9 Safety relay 20 Engine ground cable 31 Battery charge...

Page 102: ...rance of the machine s condition The indications shown on them should be used as a guide for daily check and periodic maintenance according to the Operation Maintenance Manual 5 2 1 Part Name 5 2 2 Pe...

Page 103: ...oil pressure switch 4 Malfunction of pressure control valve 5 Wear or breakage of lube oil pump 2 Cooling water temperature monitoring When the engine cooling water temperature rises to 107 to 113 C o...

Page 104: ...nce R1 is proper because the engine oil pressure switch body also serves for grounding If not clean the thread part or replace the engine oil pressure switch Standard value for continuity resistance R...

Page 105: ...terminal Replace the water temp switch if the oil temperature T and the continuity resistance R2 fall out side the specified range Standard values for oil temperature T and continuity resistance R2 Ch...

Page 106: ...ontinuity Notes Do not reverse the polarity of the cable connection to the battery Reversing the polarity of the connection will trig ger the reverse blocking triode thyristor causing the main rectifi...

Page 107: ...the operating time of the timer unit Check the continuity between the terminals on the 4 P connector with a circuit tester Continuity check Continuity exists No continuity 2 Apply the battery voltage...

Page 108: ...r 3 times at intervals of 10 seconds to temporarily charge the battery Standard value for operating time t of timer unit A length of time during which continuity exists between the YG and B terminals...

Page 109: ...5 3 1 5 ELECTRIC SYSTEM 5 3 Wiring Diagram...

Page 110: ...from the starter switch terminal ACC through the fuse 10A to the engine stop solenoid terminal H to excite the HOLD coil so that the solenoid is held in the suction state Turn the starter switch to ST...

Page 111: ...er of the fuel injection pump is returned to the stop position and the fuel supply to the fuel injection pump is cut off Then the engine stops When the starter switch is turned to OFF the electric cur...

Page 112: ...and then R and the slow blow fuse to the battery positive terminal to charge the battery When the voltage generated by the dynamo is normal no electric current flows from the current limiter terminal...

Page 113: ...nge 6 3 29 6 3 9 Simultaneous Operation of Travel and Blade 6 3 33 6 3 10 Simultaneous Operation of Boom Up and Bucket 6 3 37 6 3 11 Hydraulic P T O 6 3 41 6 4 Pressure Adjustment 6 4 1 6 4 1 System R...

Page 114: ......

Page 115: ...e change cylinder two travel motors and a hydraulic oil tank The oil discharged from the variable displacement piston pumps flows to the actuators through the control valve The hydraulic pilot control...

Page 116: ...ydraulic oil tank and discharge it The discharged oil flows to the ports P1 and P2 of the control valve and returns from the port T to the hydraulic oil tank through the return filter This circulation...

Page 117: ...6 HYDRAULIC SYSTEM 6 1 3...

Page 118: ...6 HYDRAULIC SYSTEM 6 1 4...

Page 119: ...6 HYDRAULIC SYSTEM 6 1 5 This Page Intentionally Left Blank...

Page 120: ...section is positioned the most upstream in the control valve and then the boom swing boom bucket travel R and blade sections are arranged in that order 2 Simultaneous Operation of Boom and Bucket The...

Page 121: ...6 HYDRAULIC SYSTEM 6 1 7...

Page 122: ...6 HYDRAULIC SYSTEM 6 1 8...

Page 123: ...6 HYDRAULIC SYSTEM 6 2 1 6 2 Hydraulic Circuit Schematic...

Page 124: ...nd flows through the port A3 to BU of the boom cylinder to extend its cylinder rod raising the boom The return oil from BD of the boom cylinder flows back to the hydraulic oil tank through the port B3...

Page 125: ...6 HYDRAULIC SYSTEM 6 3 2...

Page 126: ...6 HYDRAULIC SYSTEM 6 3 3...

Page 127: ...6 HYDRAULIC SYSTEM 6 3 4 This Page Intentionally Left Blank...

Page 128: ...the port A8 of the arm sec tion to AI of the arm cylinder to extend its cylinder rod The return oil from AO of the arm cylinder flows back to the hydraulic oil tank through the port B8 of the arm sec...

Page 129: ...6 HYDRAULIC SYSTEM 6 3 6...

Page 130: ...6 HYDRAULIC SYSTEM 6 3 7...

Page 131: ...6 HYDRAULIC SYSTEM 6 3 8 This Page Intentionally Left Blank...

Page 132: ...o BKI of the bucket cylinder to extend its cylinder rod The return oil from BKO of the bucket cylinder flows back to the hydraulic oil tank through the port B4 of the bucket section the port T of the...

Page 133: ...6 HYDRAULIC SYSTEM 6 3 10...

Page 134: ...6 HYDRAULIC SYSTEM 6 3 11...

Page 135: ...6 HYDRAULIC SYSTEM 6 3 12 This Page Intentionally Left Blank...

Page 136: ...o move its spool 2 Oil flow from hydraulic pump The oil flows in the opposite direction to the oil flow in the right swing operation with regard to the swing motor 3 Swing Motor Hydraulic Brake Operat...

Page 137: ...6 HYDRAULIC SYSTEM 6 3 14...

Page 138: ...6 HYDRAULIC SYSTEM 6 3 15...

Page 139: ...6 HYDRAULIC SYSTEM 6 3 16 This Page Intentionally Left Blank...

Page 140: ...d the port B2 of the boom swing section to BSR of the boom swing cylinder to retract its cylinder rod The return oil from BSL of the boom swing cylinder flows back to the hydraulic oil tank through th...

Page 141: ...6 HYDRAULIC SYSTEM 6 3 18...

Page 142: ...6 HYDRAULIC SYSTEM Hydraulic pump P1 BSL BSR P1 B2 A2 T S1 Suction filter Hydraulic oil tank Return filter Swing cylinder 6 3 19 Control valve...

Page 143: ...6 HYDRAULIC SYSTEM 6 3 20 This Page Intentionally Left Blank...

Page 144: ...he blade section and the port E of the swivel joint to BLD of the blade cylinder to extend its cylinder rod low ering the blade The return oil from BLU of the blade cylinder flows back to the hydrauli...

Page 145: ...6 HYDRAULIC SYSTEM 6 3 22...

Page 146: ...6 HYDRAULIC SYSTEM 6 3 23 Hydraulic pump P1 BLU BLD F E F E P1 B6 A6 T S1 Suction filter Hydraulic oil tank Return filter Blade cylinder Swivel joint Control valve...

Page 147: ...6 HYDRAULIC SYSTEM 6 3 24 This Page Intentionally Left Blank...

Page 148: ...the right travel section the port T of the control valve and the return filter 2 Forward Travel Left Oil Flow from Hydraulic Pump The oil from the piston pump P2 flows through the port P2 of the inlet...

Page 149: ...6 HYDRAULIC SYSTEM 6 3 26...

Page 150: ...6 HYDRAULIC SYSTEM 6 3 27...

Page 151: ...6 HYDRAULIC SYSTEM 6 3 28 This Page Intentionally Left Blank...

Page 152: ...ack gauge change section and the port B of the swivel joint to extend its cylinder rod widening the track gauge The return oil from the rod side N of the track gauge change cylinder flows back to the...

Page 153: ...6 HYDRAULIC SYSTEM 6 3 30...

Page 154: ...6 HYDRAULIC SYSTEM 6 3 31 Hydraulic pump P1 N W A A B B B1 A1 T P1 S1 Suction filter Hydraulic oil tank Return filter Track gauge change cylinder Control valve Swivel joint...

Page 155: ...6 HYDRAULIC SYSTEM 6 3 32 This Page Intentionally Left Blank...

Page 156: ...ied with the oil from the piston pump P2 2 Blade Section The oil divided between the travel section and the blade section flows through the parallel passage The divided oil for the blade section is re...

Page 157: ...6 HYDRAULIC SYSTEM 6 3 34...

Page 158: ...6 3 35 Hydraulic pump BLU BLD P1 P2 P1 T P2 A B A10 B10 B6 A6 B5 A5 B A C C G G I I E D E F F J S1 Suction filter Blade cylinder Hydraulic oil tank Return filter Control valve Travel motor R Travel mo...

Page 159: ...6 HYDRAULIC SYSTEM 6 3 36 This Page Intentionally Left Blank...

Page 160: ...assage in the bucket section so that the oil can flow more smoothly to the boom section when the bucket control lever is moved while the boom with a heavy load is being raised Therefore the boom and t...

Page 161: ...6 HYDRAULIC SYSTEM 6 3 38...

Page 162: ...6 HYDRAULIC SYSTEM 6 3 39...

Page 163: ...6 HYDRAULIC SYSTEM 6 3 40 This Page Intentionally Left Blank...

Page 164: ...on its far side the spool of the P T O section is pulled The oil from the piston pump P1 and that from the piston pump P2 each flow through the parallel passage to the P T O section in which they are...

Page 165: ...6 HYDRAULIC SYSTEM 6 3 42...

Page 166: ...6 HYDRAULIC SYSTEM 6 3 43...

Page 167: ...levers are mechanically locked the machine cannot travel 2 When the lock lever is in the unlock position When both the right and left lock levers are pushed down to the unlock position the spool of t...

Page 168: ...6 HYDRAULIC SYSTEM 6 3 45...

Page 169: ...6 HYDRAULIC SYSTEM 6 3 46...

Page 170: ...the system relief valve 5 for the piston pump P2 or the bucket cylinder to its stroke end to operate the sys tem relief valve 6 for the piston pump P1 Holding the control lever in that position read...

Page 171: ...ead 4 to adjust the pressure to the set value After adjustment be sure to tighten the nut M14 3 2 Boom cylinder rod 2 Loosen the nut M14 3 of the circuit relief valve and turn the adjust screw with a...

Page 172: ...move the plugs R G1 8 2 from the swing brake valve and install the pressure gauge 3 After fixing the upperstructure move the swing con trol lever to the right and the left to increase the pres sure in...

Page 173: ...t the connectors of the wiring 2 Install the pressure gauge 4 to the hydraulic hose 3 between the pilot pump and the cut off valve 3 Measurement Procedure 1 Raise the hydraulic oil temperature to 50 t...

Page 174: ...means of a single rotary group The one rotary group is divided into one intake port and two discharge ports The gear pump is connected to this piston pump via a coupling The control system is a simul...

Page 175: ...p dead center to the bottom dead center the volume of it is reduced the oil in the cylinder barrel is discharged to the discharge port Discharge stroke By changing the inclination of the swash plate s...

Page 176: ...applied to the actuator the oil pressure applied to the pistons exceeds the working load of the spring which causes the swash plate to reduce its inclination angle The swash plate is held at the incl...

Page 177: ...the hexagon nut b Tighten or loosen the adjust screw to set the horsepower curve 063267 00EN00 Adjust screw Nut Seal washer Body H Spring T Spring guide Discharge Volume Q1 Q2 L min Loosen the adjust...

Page 178: ...IC SYSTEM 6 5 5 3 Exploded view and component parts 1 Exploded view 063239 00X00 56 5 35 24 14 24 11 4 9 8 6 7 12 12 10 1 25 33 34 30 32 3 39 51 2 20 60 61 19 15 18 31 66 44 69 23 67 64 63 65 70 68 53...

Page 179: ...socket head bolt M10 45 4 8 Shoe holder 1 51 Plug 1 9 Barrel holder 1 53 Plug G 3 8 1 10 Swash plate 1 54 O ring 1 11 Needle 3 56 Spring pin 1 12 Pivot pin 2 60 Adjust screw 1 13 Packing 1 61 Nut 1 1...

Page 180: ...6 HYDRAULIC SYSTEM 6 5 7 4 Special tools Unit mm Oil seal installation jig 063145 00EN00 115 10 19 8 31 7...

Page 181: ...ing seats with clean grease or hydraulic oil 2 The O rings may not be damaged in handing or distorted by heat 3 Do not extend any O rings with such great force as to permanently deform them 4 Avoid ro...

Page 182: ...when removing gear pump 65 2 Loosen nut 61 Note Record height of adjust screw 60 from body H 2 before loosen ing nut 61 3 Loosen four bolts 44 to separate body H 2 from body S 1 4 With elastic hammer...

Page 183: ...g holder 18 from body S 1 6 Lay body S 1 on its side to remove cylinder barrel kit 7 Remove swash plate 10 and pivot pin 12 8 Take off stopper pin A 25 and cone springs 33 063043 00X01 15 18 1 063042...

Page 184: ...hammer to remove it with ball bearing 30 from body S 1 11 Take off spring guide 19 from body H 2 12 Remove barrel holder 9 and needles 11 as well as shoe holder 8 with assemblies of pistons 6 and shoe...

Page 185: ...al 32 must be installed Slightly apply grease on lip and outside of it and lightly drive it into body S 1 with installation jig and hammer 3 Install shaft 3 with ball bearing 30 in body S 1 Note Be ca...

Page 186: ...Note Pay attention to correct direction of cone springs 33 6 Attach pivot pins 12 in spherical hollows on swash plate 10 and install it on body S 1 after coating grease on pivot pins 12 7 Install cyli...

Page 187: ...wly put valve plate 5 on body H 2 in correct position determined by spring pin 56 Note Take care of correct face of valve plate 5 Copper face with lead groove should face to cylinder barrel 11 Install...

Page 188: ...ody H 2 Tightening torque 51 0 to 64 7 N m 13 Set height of adjust screw 60 to original one and tighten nut 61 to lock adjust screw 60 Tightening torque 14 7 to 19 6 N m 14 Install O ring 71 on gear p...

Page 189: ...y and cylinder barrel Check them with eyes for flaws scuffing or excessive wear Especially check the sliding parts Check the clearance between the outer surface d of each piston and the inner surface...

Page 190: ...and retainer holder Check them for scuffing and wear If the scuffing or wear is not repairable replace the retainer and the retainer holder as a set If the scuffing or flaw is minor apply lapping to...

Page 191: ...y the faulty actuator Replace switching valve or actu ator 5 Decreased pump displace ment efficiency Identify the faulty pump Replace the pump 6 Loosened horsepower set ting adjust screw Check for loo...

Page 192: ...via parallel passages The parallel passage allows simultaneous operation of more than one spool however they cannot always operate in the same motion Specifically due to the differences in load and c...

Page 193: ...flows to the actuator port B The return oil from the actuator port A returns to the tank through the tank passage The spool is returned to the neutral position by the return spring 3 Pressurizing Por...

Page 194: ...rom the port B6 returns to the tank through the tank passage The oil from the port P2 returns to the tank through the tank passage because the unloaded passage for the pump port P2 is open When the bl...

Page 195: ...The blade section is supplied with the same specified quantity of divided oil from the ports P1 and P2 therefore the both travel sections are also supplied with the same quantity of oil Thus the mach...

Page 196: ...s pushed in the oil from the port P1 and that from the port P2 are combined and the combined oil flows to the port B7 When the double acting actuator is used the return oil from the port A7 of the P T...

Page 197: ...sses through the inside of the piston the throttle B the inner chamber A the ring shaped throttle C and the drill hole D in sequence and flows outside the socket to the tank passage 3 When the regulat...

Page 198: ...pened At this time the pressure oil passes through the inside of the piston the throttle B the inner chamber A the ring shaped throttle C and the drill hole D in sequence and flows outside the socket...

Page 199: ...pplied to the socket This creates an opening between the section body seat and the socket and oil flows from the tank passage to the port P so that the space in the port P is filled with oil Thus when...

Page 200: ...lows through the inside of the piston to the piston chamber so that it is filled with oil The balance is kept with the spring force in the piston chamber and the oil flow to the tank passage is being...

Page 201: ...amage the O rings in handing or distort them by heat 3 Do not stretch the O rings so strongly as to deform them permanently 4 Avoid rolling the O rings when fitting them A distorted O ring may not ret...

Page 202: ...7 34 23 35 9 24 7 4 9 22 11 12 13 14 17 4 7 16 15 41 4 7 5 6 35 36 33 21 9 18195 20 39 38 25 35 34 9 4 21 4 7 14 17 13 12 5 20 17 4 14 13 12 5 20 19 18 21 9 4 16 15 18195 20 5 6 4 7 4 17 14 13 12 28...

Page 203: ...ring 1B P14 0 12 29 Arm section 1 10 System relief valve 2 30 Swing section 1 11 Boom swing section 1 31 Travel section L 1 12 O ring 1A P10A 12 32 P2 inlet section 1 13 Backup ring T3 P13A 12 33 O ri...

Page 204: ...ble 2 Remove the spring case 15 of each section 3 Remove the pilot cases A1 36 and B1 34 of each section Note Each spool is installed into the valve body with a specified clearance between them Make m...

Page 205: ...uit relief valves 24 and the anti cavitation valve 22 Note Make matchmarks on the valves and the control valve body before removing the valves Swing spool Arm spool Boom spool Bucket spool Swing spool...

Page 206: ...ring 5 the check valve spring 19 and the check valve 18 of each sec tion 10 While holding the nut on one inlet section side loosen the nut on the other inlet section side to separate the sections from...

Page 207: ...edure 12 Remove the O rings 4 and 7 from the mating face of each section and remove the O ring 40 Notes Put all the sections in order for reassembly Mark the section so that the O ring 40 can be insta...

Page 208: ...the check valve 38 and the check valve spring 39 into the bucket section 3 Put all the sections together and tighten the nuts at a spec ified tightening torque 4 Install the check valve 18 the check v...

Page 209: ...l link side 8 Install the boom swing spool the right travel spool the blade spool the P T O spool the left travel spool and the track gauge change spool in their original positions Note Replace any sp...

Page 210: ...iginal positions Note Replace any spool as a spool assembly if necessary 10 Install the pilot cases A1 36 and B1 34 11 Install the spring cases 15 Swing spool Arm spool Boom spool Bucket spool Swing s...

Page 211: ...eg ulating valve and seat surface 3 Improper set pressure or sticking or breakage of relief valve 1 Check and adjust link portion 2 Disassemble and clean parts 3 Adjust set pressure disassemble and cl...

Page 212: ...iness regulations specific to this type of installation All information illustrations instructions and characteristics contained in this document are based on the latest prod uct information available...

Page 213: ...nt for electric signal receivers only 1 Electric function failure Replace handle 2 Handle poorly connect Check the connection Malfunction Probable case Additional checks Remedy Handle does not automat...

Page 214: ...QW DFFLGHQWV SDUWLFXODUO FRQFHUQLQJ WKH K GUDXOLF IOXLG 6HW DOO DFWXDWRUV FRQQHFWHG WR WKH PDFKLQH LQ QHXWUDO SRVLWLRQ RQ WKH JURXQG DW ORZHU OLPLW WR DYRLG DFFLGHQWV ZKLFK FRXOG UHVXOW IURP XQFRQWURO...

Page 215: ...OLIW WKH FRQWURO XQLW E XQGRLQJ WKH IL LQJ VFUHZV RQ WKH DUP UHVW W LV XQQHFHVVDU WR UHPRYH WKH XQLWV ZLWKRXW HOHFWULFDO IXQF WLRQV 0DFKLQH RII SODFH DOO RI WKH PDFKLQH V HTXLSPHQW FRQQHFWHG WR WKH S...

Page 216: ...HQW OHYHU WR HQVXUH WKDW WKH KDQ GOH LV FRUUHFWO RULHQWHG DV LQGLFDWHG E WKH PDFKLQH V WHFKQL FDO VSHFLILFDWLRQV Replace the nut on the threaded section and replace the boot Screw the handle onto the...

Page 217: ...QWR WKH ERG LQ RUGHU WR KROG LW DERYH WKH DUP UHVW 5HPRYDO RI WKH FDUGDQ Fit an Allen wrench into the assembly screw and unscrew it 8 mm Allen wrench Reassembly torque 45r4 N m Remove the cardan the s...

Page 218: ...es for the grommet in both the plate and the body Insert the end of a thin screwdriver between the guide and the body carefully lift the guide to remove it from the body 1RWH ROG WKH JXLGH ZLWK WKH RW...

Page 219: ...6 HYDRAULIC SYSTEM 6 7 8 1 4 3 8 7 12 10 10 15 a b c Loctite 262 0 30Nm 0 45Nm...

Page 220: ...unger kit composed of 4 plunger guides 4 plain plungers 4 spring rings c 12 Regulating kit 15 Set of 4 return springs Item Description 1 Handle SH1 PRAH Deutsch connectors 2 6 pins 3 Lever kit 4 Rubbe...

Page 221: ...pilot pressure supply to the pilot valves 2 Principle of operation When solenoid valve 2 is not energized the oil passage from port P to port A is blocked and pressurized oil supplied from port P flow...

Page 222: ...o Part name Q ty 1 Body 1 2 Spool 1 3 Spool 1 4 Adjust screw 1 5 1 6 1 Hexagon nut Shim 6 5x12x0 5 7 Spring 8 6 1x9 5 3 5 1 No Part name Q ty 1 Body 1 2 Spool 1 3 Spool 1 4 Adjust screw 1 5 1 6 1 Hexa...

Page 223: ...er of disassembly In addition be careful not to allow foreign substances such as dirt to enter the valve during reassembly 2 Disassembly and reassembly of the solenoid valve 1 Remove the hexagon nut o...

Page 224: ...emove adjust screw 4 Tool 14 mm wrench 3 Remove shim 6 spring 8 and spool 3 4 To reassemble the relief valve follow the above steps in reverse order 5 After reassembly set the pressure with adjust scr...

Page 225: ...rd Procedure 1 Solenoid valve Measure the clearance between the body and the spool Clearance D d Standard Approximately 0 01 mm 2 Relief valve Measure the clearance between the body and the spool Clea...

Page 226: ...bstances disassemble and clean the valve and or replace the hydraulic oil Spool damaged or abnormally worn Replace the valve Solenoid malfunction Connector disconnected Firmly insert the connector Coi...

Page 227: ...plate 30 and the displacement per revolution is 11 9 cu in 195 cu cm The pinion gear assembly comprises the pinion gear 42 and the two ball bearings 37 and 40 supporting the pinion gear The hydraulic...

Page 228: ...27 and the seven holes in the valve plate 30 is changed and in turn the relative position of the hydraulic oil which flows into the roller 33 is shifted successively The oil flow is converted into tor...

Page 229: ...r 7 the oil hole in the piston 5 and the orifice in the orifice plug 4 and finally into the other side of the piston 5 The high pressure oil moves the piston 5 to the direction in which the spring loa...

Page 230: ...nes Since some replacement parts are avail able only as subassemblies refer to the parts catalog to prepare the necessary subassemblies in advance 6 Handling of O rings 1 Lubricate the O rings and the...

Page 231: ...ring 1 7 Plunger 2 22 Spring 2 37 Ball bearing 1 8 Cartridge 2 23 Pin 2 38 Bearing housing 1 9 Backup ring 4 24 Inner face seal 1 39 X ring 1 10 O ring 2 25 Outer face seal 1 40 Ball bearing 1 11 O ri...

Page 232: ...y from the motor 2 Hold the valve body with a vice to remove the cartridge assembly 3 Hold the cartridge assembly with a vice to remove plug 2 Note Do not remove the plug unless required 4 Remove pist...

Page 233: ...artridge 8 6 Disassemble the motor section 7 Hold the flange with a vice with pinion gear 42 down and remove four hexagon head bolts 20 8 Remove valve housing 15 Note Be careful not to lose springs 22...

Page 234: ...STEM 6 9 8 Procedure 9 Remove balancing plate 26 and valve 27 10 Remove valve plate 30 and valve drive 32 11 Remove roller 33 and drive 34 12 Remove wear plate 35 27 27 35 35 30 30 35 30 34 34 33 33 3...

Page 235: ...or a plastic hammer 15 Remove X ring 39 from bearing housing 38 16 Remove ball bearing 40 from bearing housing 38 Notes a Remove the bearing by tapping the inner race of it with a punch or the like b...

Page 236: ...er bearing housing 38 to remove another ball bearing 37 Note Do not remove the bearing unless required 18 Remove plug 16 spring 18 and steel ball 19 from valve housing 15 19 This is the end of disasse...

Page 237: ...to bearing housing 38 with a press or a plastic hammer 2 Turn over bearing housing 38 to install another ball bear ing 40 3 Install X ring 39 into bearing housing 38 4 Press fit pinion gear 42 into be...

Page 238: ...wear plate 35 7 Install drive 34 O ring 31 and then wear plate 35 to bear ing housing 38 8 Install O rings 29 and 31 then roller 33 to wear plate 35 Note Align the drain holes in the wear plate and t...

Page 239: ...valve 27 Note The installation of the valve is important because the position of the valve determines the rotation direction of the motor Refer to the right figure for the installation of the valve 1...

Page 240: ...ng 15 and then install valve housing 15 onto valve 27 Notes a Install the valve housing onto the valve while pressing bal ancing plate 26 with a thin rod such as a screwdriver inserted into the port h...

Page 241: ...ighten four hexagon head bolts 20 evenly Tightening torque 49 to 54 N m 18 Install O ring 11 onto cartridge 8 19 Install O ring 10 and two backup rings 9 onto cartridge 8 20 Install plunger 7 into car...

Page 242: ...en the valve body to the motor with six hexagon socket head bolts 14 Tightening torque 34 3 N m This is the end of the procedure for reassembling the swing motor and the brake valve Check that the swi...

Page 243: ...ck the parts Replace any damaged parts 5 Short circuit inside motor The face seals or other parts would be damaged Disassemble the motor to check the parts Replace any damaged parts 2 Unstable rotatio...

Page 244: ...valve is integrated with the piston motor which is housed in the reduction gear The reduction gear reduces the output speed of the piston motor through the planetary double reduction mechanism to inc...

Page 245: ...e toward the circumference of the plate That motion of more than one piston on the high pressure side is converted into the rotational motion of the cylinder barrel 4 The rotational motion is transmit...

Page 246: ...n pressure oil is fed from the port B the above parts operate in the opposite way and the hydraulic motor is rotated in reverse When the pressure oil from the port A is blocked the spool valve 2 which...

Page 247: ...d to the first level between the gears S2 b2 and a2 This one level reduced rotational speed is reduced to the second level between the gear S1 splined to the carrier 2 the gears b1 and a1 This rotatio...

Page 248: ...seals and rings with new ones As some replacement parts are available only as a subassembly refer to the parts catalog to prepare the necessary subassemblies in advance 6 Handling of O rings 1 Lubric...

Page 249: ...C1 0 C0 5 30 degrees C0 2 100 8 0 C0 5 C0 5 C1 0 C1 0 12 Unit mm Unit mm C1 0 C0 5 60 2 0 4 0 C0 5 C1 0 11 6 to 11 8 2 Oil seal press fitting jigs 3 Bearing for body 1 press fitting jig Press 3 0 to...

Page 250: ...1 10 Shoe holder 1 33 Pin 2 11 Barrel holder 1 34 Plug 1 16 2 12 Pin 3 35 High speed spool 1 13 Cylinder barrel 1 36 Spring V3 1 14 Retainer 2 37 O ring 1BP14 2 15 Spring C 1 38 Plug 2 16 Internal sna...

Page 251: ...e to prevent damage to the outside surface of the body 2 Width across flats 5 mm 2 Remove body 1 45 from body 2 1 Notes Take care not to drop valve plate 19 The oil in the case might flow out Take car...

Page 252: ...ring 16 from cylinder barrel 13 and remove retainers 14 and spring 15 7 Remove swash plate 7 shaft 5 and balls 6 from body 2 1 Notes If the shaft cannot be removed easily tap the shaft on the other en...

Page 253: ...38 on both sides to remove high speed spool 35 and spring 36 from body 1 45 Width across flats 8 mm 12 Loosen plugs 23 on both sides to remove the spool assembly rings 26 on both sides and springs 25...

Page 254: ...es Width across flats 27 mm 2 Install high speed spool 35 and spring 36 into body 1 45 and install and tighten plugs 38 with O rings 37 installed on both sides Tightening torque 46 1 to 52 0 N m In tw...

Page 255: ...3 into body 2 1 Notes Fill the space between the lips of the oil seal with grease Press fit the oil seal into the body 2 in the direction as shown in the figure below 7 Press fit bearing 4 onto shaft...

Page 256: ...rface of the swash plate If the swash plate is likely to fall off when installed apply grease to the other side of the swash plate 11 Install retainer 14 spring 15 and retainer 14 in this order into t...

Page 257: ...el holder 11 to the cylinder barrel 14 Install the shoe holder assembly to cylinder barrel 13 15 Insert the cylinder barrel assembly into body 2 1 until shoes 8 contact with swash plate 7 16 Put hydra...

Page 258: ...pply hydraulic oil to the sliding surface the copper face of the valve plate Apply grease to the rear face the iron face of the valve plate to prevent it from falling off 18 Install and tighten seven...

Page 259: ...p ring 1 6 22 Angular bearing 90BVV11S2G 2 7 Snap ring 6 23 Body 1 8 Thrust washer 6 24 Seal ring 1 9 Needle bearing 3 25 O ring 1AG130 1 10 Gear b2 3 26 Floating seat 1 11 b2 pin 3 27 O ring 1 12 Ext...

Page 260: ...dure 1 Remove plugs 1 from cover 4 and drain the lubricating oil Width across flats 5 mm 2 Put a screwdriver or the like in the notch of body 23 to remove O snap ring 3 3 Remove cover 4 from body 23 4...

Page 261: ...mbly from the body 23 7 After removing snap ring 7 from carrier 2 14 remove thrust washer 8 needle bearing 9 gear b2 10 and thrust washer 8 in this order 8 Remove external snap ring 12 and then remove...

Page 262: ...8 thrust washer 20 and ring 19 from each b1 pin portion of body 2 30 11 Compress the flanges of body 23 and body 2 30 with a squill vice or an oil hydraulic press as shown in the fig ure below and rem...

Page 263: ...rom body 23 14 Remove angular bearing 22 another set from body 2 30 Note Angular bearing 22 can be disassembled into an inner race and a retainer 15 Remove floating seat 26 and O ring 27 together from...

Page 264: ...ing can be disassembled into an inner race and a retainer take care that the retainer is installed in the correct direction 3 Insert seal ring 24 with O ring 25 installed into body 23 Notes Apply grea...

Page 265: ...y the thickness of the snap ring 7 Install ring 19 thrust washer 20 gear b1 17 and needle bearing 18 in this order to each b1 pin portion of body 2 30 8 Install thrust plate 16 and fasten it with snap...

Page 266: ...in of carrier 2 14 and fasten them with snap rings 7 to make the carrier 2 assembly Notes The snap ring has the front and back sides Install it with the edge side up toward the cover side Do not expan...

Page 267: ...the letters DRAIN on the cover put above the notch of the body 16 Install O snap ring 3 to fasten cover 4 Note Put a screwdriver or the like on the end face of the O snap ring and install the O snap r...

Page 268: ...n Visible dents Wear of oil seal portion A Wear 0 0010 in 0 025 mm or more Cylinder barrel Wear of surface con tacted with valve plate B Wear 0 020 mm or more Replace the cylinder barrel kit Valve pla...

Page 269: ...ace the hydraulic motor assembly or the carrier 2 kit Carrier 2 Play of b1 pin Hydraulic motor body Play of b2 pin Carrier 2 Play by manual check 0 005 mm or more Gears S1 and b2 Excessive wear of gea...

Page 270: ...travel motor Check and repair or replace the equipment 2 Malfunction of hydraulic motor 1 Lowered volumetric efficiency due to excessive worn Replace the excessively worn part in the sliding section...

Page 271: ...is not energized the oil passage is blocked and pressurized oil supplied from port P does not flow to any other ports In addition port A is connected to port T so that oil returns to the hydraulic oil...

Page 272: ...Exploded view and parts list No Part name Q ty 1 Body 1 2 Solenoid 1 3 Hexagon socket head bolt M4x10 2 4 Spool 1 5 1 6 1 Spring Barrel 7 O ring 012 NBR Hs90 1 8 1 9 O ring 010 NBR Hs90 1 10 O ring 1...

Page 273: ...lange of barrel 6 to remove 5 If O ring 7 8 9 or 10 is damaged replace it with a new one Note Apply grease to the outer surfaces of O rings 7 8 and 9 before installing barrel 6 6 To reassemble the sol...

Page 274: ...rvice standard Procedure Measure the clearance between body 1 and barrel 6 Clearance D d Standard Approximately 0 04 mm D1 2 3 d1 2 3 Measure the clearance between barrel 6 and spool 4 Clearance D d S...

Page 275: ...ssemble and clean the valve and or replace the hydraulic oil Spool damaged or worn Replace the valve Solenoid malfunction Connector disconnected Firmly insert the connector Coil damaged Replace the so...

Page 276: ...ontrol Linkage 7 3 2 7 3 3 Adjustment of Travel and Blade Levers 7 3 4 7 3 4 Adjustment of Boom Swing and P T O Pedals and P T O Pedal Lock 7 3 5 7 3 5 Adjustment of Lock Lever Switch 7 3 6 7 3 7 Adju...

Page 277: ...hydraulic oil 3 Remove the operator s seat 1 by removing pins 2 and open the engine hood 5 Remove the plug of the engine cylinder block and the drain plug 5 of the radiator 4 and drain the cooling wat...

Page 278: ...lts 1 retaining the lower covers 2 and the upper covers 3 L and R from the engine hood 5 Remove two bolts M8x20 retaining safety levers brackets and remove the safety levers as an assembly 4 Disconnec...

Page 279: ...4 and disconnect the air cleaner hose A 5 from the engine intake manifold 4 Remove the mounting bolts 9 and then the engine hood mount 7 with the air cleaner 8 5 Remove the battery 10 and then the ste...

Page 280: ...tank 7 to the pre filter 12 Then remove the fuel tank clamp 13 and remove the fuel tank 7 9 Remove the partition plate 14 with the electrical equip ment 10 Loosen the hose clips 1 and 2 and disconnec...

Page 281: ...he engine oil pressure switch the glow plug the starter motor terminal S and the dynamo 15 Disconnect the accelerator cable 1 from the regulator handle 2 of the fuel injection pump in the engine 16 Di...

Page 282: ...7 ADJUSTMENT AND REPAIR 7 1 6 Procedure 18 Remove the engine using a lifting device Note Put a rope to the lifting lugs 1 to lift up the engine 1 1...

Page 283: ...ning torque No Part Size Adhesive Tightening torque 35 Hose clip CW T 38 2 5 to 2 9 N m 35 1 Hose clip CW T 25 2 2 to 2 5 N m 48 Vibroisolating rubber M10 nut 24 5 to 32 3 N m 47 Stopper plate M10 25...

Page 284: ...5 Remove three bolts M6x20 retaining the joystick and pilot valve element on the bracket 4 Disconnect the electric harness from the joystick R 1 2 1 Disconnect the battery minus cable 1 from the batte...

Page 285: ...ct positions A Pb4 E Pb9 B Pb3 F Pb8 C Pa4 G Pa9 D Pa3 H Pa8 8 Remove the snap pins 1 and the link 2 and then remove the engine hood 3 9 Loosen the hose clip 4 and disconnect the air cleaner hose A 5...

Page 286: ...M10 Tightening torque 44 1 to 58 8 N m 13 Cut the band and disconnect the positive battery cable from the battery and the harness connector 1 from the starter motor terminal S 2 14 Remove the starter...

Page 287: ...nd disconnect the fuel hose the fuel injection pump 3 to the fuel filter 4 Remove the steady retainer 5 and then remove the fuel injection pipes No 1 No 2 and No 3 6 5 Disconnect the stop solenoid har...

Page 288: ...ion pump in the reverse order of the removal procedure 3 Checking of Fuel Injection Timing Refer to 4 2 5 Checking and adjusting the Fuel Injection Timing in the Chapter 4 for further information Note...

Page 289: ...7 1 4 Removal and Reinstallation of Fuel Tank 1 Removal Procedure 2 Remove the battery 2 and then remove the step 3 1 Disconnect the battery minus cable 1 from the battery Note Place a MAINTENANCE IN...

Page 290: ...ning torque of 2 45 to 2 94 N m 2 Tighten the flanged nut 10 C at a tightening torque of 24 5 to 32 4 N m Fuel tank clamp Fuel tank Flanged nut 10 Procedure 3 Remove the side cover R 4 and then remove...

Page 291: ...side of the blade Then lower the bucket to the ground and stop the engine 3 Remove the drain plug 2 of the radiator 1 and drain the cooling water Note The cooling water in the engine cylinder block d...

Page 292: ...ng torque 2 to 2 9 N m Lowest temperature C 5 10 15 20 25 30 35 40 Amount of anti freeze L 0 4 0 6 0 8 0 9 1 0 1 1 1 3 1 4 Amount of water L 2 1 1 9 1 7 1 6 1 5 1 4 1 2 1 1 Procedure 4 Loosen the hose...

Page 293: ...other parts Hydraulic oil fed through the control valve and the swivel joint from the hydraulic pump rotates the travel motors so that the power is transmitted to the crawlers via the sprockets The tr...

Page 294: ...Track roller Be sure to put roller retainer of crawler frame on shaft face and tighten bolts Section A A Bolt 12 x 25 Apply Three Bond 1324 or its equivalent Tightening torque refer to Section List of...

Page 295: ...djustment of Stopper Bolt 85 mm Set length at the widest track gauge Nut M16 Tightening torque refer to Section List of Tightening Torque on page 3 7 1 Apply Three Bond 1324 or its equivalent Apply Th...

Page 296: ...der of the removal procedure Procedure 1 Lower the bucket to the ground Loosen the nipple valve 1 and discharge the grease from the grease cylinder to loosen the rubber crawler tension Note Move the m...

Page 297: ...Component Parts No Part Q ty No Part Q ty 1 Idler 1 8 Shaft 1 2 Internal snap ring C62 1 9 Spring washer 12 2 3 Seal QLN306213 2Y 1 10 Washer 2 4 Idler fork 1 11 Seal QLN306213 2Y 1 5 Bolt 12x25 2 12...

Page 298: ...bly from the idler fork 4 3 Remove the seal 3 from the idler 1 and drain the oil Then remove the seal 11 on the other side 4 Remove the internal snap ring C 2 and take out the shaft 8 with the bearing...

Page 299: ...ith new ones 3 Apply multipurpose grease to the lips of new seals 3 and 11 4 When installing the seal 3 to release air from the inside of the idler remove the sleeve from the seal and install the seal...

Page 300: ...1 Structure and Component Parts No Part Q ty No Part Q ty 1 Seal TW 25 47 16 1 6 Internal snap ring C47 1 2 External snap ring C25 1 7 Bearing 6005 1 3 Bearing 6005 1 8 External snap ring C25 1 4 Int...

Page 301: ...ove the seal 1 from the track roller 5 and drain the oil 3 Remove the seal 9 and the external snap ring C 8 and then take out the roller shaft 10 using a press 4 Remove the bearings 3 and 7 and the in...

Page 302: ...w ones 3 Apply multipurpose grease to the lips of new seals 1 and 9 4 When installing the seal 1 to release air from the inside of the track roller remove the sleeve from the seal and install the seal...

Page 303: ...e and then place blocks 1 under the lower center frame 2 Note Place blocks 1 which have sufficient height to allow work under the lower center frame 2 and make sure that the machine is securely stable...

Page 304: ...the hydraulic hoses to identify their respective fitting positions 7 Remove the under cover SJ 12 8 Disconnect the hoses for the track gauge change cylinder 14 from the hub of the swivel joint 13 Hose...

Page 305: ...e rod end and the pin 19 at the bottom end of the track gauge change cylinder 14 and pull out the pins 10 Remove the right stopper bolt 20 and then pull out the crawler frame R 21 from the lower cente...

Page 306: ...Then tighten the bolt 4 Place the hoses for the track gauge change cylinder in the outermost and undermost position of all the hoses connected to the swivel joint This prevents the hoses from catching...

Page 307: ...7 3 1 7 3 Controls 7 3 1 Control Train 1 Control lever R Boom Bucket Control lever L Arm Swing 2 Travel levers 3 Blade lever 4 Front Lock lever 5 Pedal R Boom swing Pedal L P T O 6 Track gauge change...

Page 308: ...stall them Note Take care not to damage the O rings 2 when installing the links 3 Add grease to the grease nipples 3 after installation C0 0394 C1 C0 0394 C1 R0 00787 R0 2 30 14 20 120 14 Unit mm Jig...

Page 309: ...T AND REPAIR 7 3 3 2 Tightening Torque for Rod Joints Tightening torque Shape of link ball Tightening torque N m Part 1 2 Link ball 6 7 8 to 9 8 N m 4 9 to 6 9 N m Link ball 8 12 7 to 16 7 N m 7 8 to...

Page 310: ...k balls 1 so that they are flush and in alignment with each other in the position as shown in the figure above 2 Adjust the difference between the right and left travel lever grips to 3 mm or less in...

Page 311: ...ighten the stopper bolt 4 fully and depress the pedal R 2 to its stroke end Loosen the stopper bolt 4 until the bolt head touches the pedal R 2 then loosen the stopper bolt 4 another half a turn and t...

Page 312: ...switch 3 so that the distance shown in the figure below is within the specified range when the switch is fully depressed 2 1 Detail of cut off switch Note Confirm that the implement does not move whe...

Page 313: ...m that the left and right tracks do not move when the travel lever grips are pushed or pulled with 44 N 4 5 kgf of power 2 Adjust the clearance between the lock plate and left travel lever shown in th...

Page 314: ...he low idling speed 1225 to 1275 rpm when the regulator handle 7 of the fuel injection pump touches the adjust bolt 6 3 If the engine speed is not within the above range turn the adjust bolt 6 to adju...

Page 315: ...ing speed 2 Make sure if the high idling speed is within 2135 to 2185 rpm 3 Adjust the part A of the accelerator cable 4 so as for the accelerator arm to touch the high idling stopper 5 for accelerato...

Page 316: ...with which the turning frame 1 is mounted on the outer race of the swing bearing 7 Lift up the turning frame 1 8 Remove the eighteen mounting bolts 4 with which the inner race of the swing bearing is...

Page 317: ...vice standards for repair or replacement 4 Check for grease leak from the swing bearing seal Replace the swing bearing if the leakage is excessive Standard Wear limit 0 03 to 0 15 mm 0 4 mm 0 03 to 0...

Page 318: ...en lower the bucket to the ground and stop the engine 1 2 3 Remove the drain plug 1 from the hydraulic oil tank 2 and drain the hydraulic oil 4 Remove the drain plug 3 from the radiator 4 and drain th...

Page 319: ...the swivel joint to the hydraulice oil tank and the hose 6 the swing motor to the return filter 7 5 Loose the hose clip 1 disconnect the radiator hose A and hose B from the connectors 6 Disconnect th...

Page 320: ...REPAIR 7 5 3 10 Remove the mounting bolts 1 and remove the hydraulic oil tank 2 with the return filter 3 from the turning frame 4 Procedure 1 2 3 4 11 Then disassemble the return filter 3 from the hyd...

Page 321: ...l when it has reached the replacement time or it has been deteriorated If reusing the oil maintain the oil quality so that it has no impurities 5 Check the O ring 6 of the oil level gauge 5 for oil le...

Page 322: ...l is between the upper and lower limit marks on the oil level gauge The hydraulic oil level increases or decreases depending on the hydraulic oil temperature due to its nature Therefore check it when...

Page 323: ...nd cover R 3 disconnect the connectors of the starter switch and other associated parts 5 Disconnect the links of the travel levers R and L 5 the blade lever 6 and the track gauge change lever 7 to th...

Page 324: ...e 13 from the valve support 19 7 Remove the mounting bolts 11 from the valve stay 10 and remove the valve stay 10 with the cut off valve 12 installed 8 Disconnect the hydraulic hoses from the connecto...

Page 325: ...o that each of them is not in contact with any other hoses or parts Hydraulic oil to be used After the installation of the control valve raise the hydraulic oil temperature to 50 to 60 C and operate t...

Page 326: ...l and Reinstallation of Swing Motor 1 Removal Procedure 1 Lower the bucket to the ground and stop the engine 3 Remove the step 1 2 Disconnect the battery minus cable 1 from the battery Note Place a MA...

Page 327: ...ee bond 1324 or its equivalent Tightening torque 78 5 to 98 1 N m Type YANMAR SUPER HYDRO OIL VG 46 class or its equivalent Oil quantity 7 4 L Procedure 4 Disconnect the hydraulic hoses from the conne...

Page 328: ...hine 2 Swing the upperstructure so that the drain plug 1 of the hydraulic oil tank and the engine oil drain block 2 are posi tioned halfway between the right and left crawlers on the opposite side of...

Page 329: ...For travel motor R forward travel D For travel motor R reverse travel E For blade cylinder bottom side F For blade cylinder rod side H For high speed travel drain G For travel motor L reverse travel C...

Page 330: ...otor R reverse travel E For blade cylinder bottom side F For blade cylinder rod side H For high speed travel R and L J For travel motors R and L drain C For travel motor L forward travel G For travel...

Page 331: ...nstalling them 2 Install each connector at a specified mounting angle 3 Hydraulic oil to be used Development of Connector Mounting Angles Swivel joint assembly mounting bolt M8 Adhesive Apply Three Bo...

Page 332: ...and hub have holes and grooves and the oil which flows in from the port of the shaft passing through the hub groove is fed to the actuators of the undercarriage No Part Q ty No Part Q ty 1 Swivel sea...

Page 333: ...ck up ring 4 into the swivel hub 6 2 Apply multipurpose grease to the inner surface of the swivel hub 6 3 Install the O ring 2 onto the swivel shaft 7 and insert the shaft into the swivel hub 6 slowly...

Page 334: ...To fit a swivel seal make it heart shaped as shown in the fig ures at the right and press one end of it into the groove Then fit the whole swivel seal pressing it with your finger Figs 1 and 2 3 When...

Page 335: ...Parts No Part Boom cylinder Arm cylinder Bucket cylinder Boom swing cylinder Blade cylinder Track gauge change cylinder 1 Dust seal 2 Lock washer 3 O ring 4 Head 5 O ring 6 ISI packing 7 Back up ring...

Page 336: ...ain the oil from the hydraulic cylinder 2 Hold the cylinder at the bottom end or using the pin hole at the bottom end and put the rod side of the cylinder on a block 3 Raise the pawl of the lock washe...

Page 337: ...U nut 1 and then the piston 2 and the head 3 in that order 7 Remove the O rings 1 2 and 3 the dust seal 4 the ISI packing 5 the RGU packing 6 and the PWL bearing 7 Note Use a sharp tool to raise each...

Page 338: ...linder in the wrong direction Replace the O rings packings and seals with new ones U nut Size end Tightening Torque No Cylinder U nut size U nut tightening torque Adhesive 1 Boom M20 294 to 343 N m Th...

Page 339: ...bucket to the ground and stop the engine 1 3 Remove the operator s seat 1 by removing pins 2 and open the engine hood 1 2 6 Remove three bolts M6x20 retaining the joystick and pilot valve element on...

Page 340: ...sitions A Pb4 E Pb9 B Pb3 F Pb8 C Pa4 G Pa9 D Pa3 H Pa8 9 Remove the snap pins 1 and the link 2 and then remove the engine hood 3 10 Loosen the hose clip 4 and disconnect the air cleaner hose A 5 from...

Page 341: ...and the fuse box 5 from the harness A 15 Remove the side cover R 6 and then remove the drain plug 7 from the fuel tank 8 to drain the fuel 16 Disconnect the fuel hoses 9 one from the fuel filter 10 to...

Page 342: ...e for fuel tank clamp 1 Tighten the flanged nut 10 B at a tightening torque of 2 45 to 2 94 N m 2 Tighten the flanged nut 10 C at a tightening torque of 24 5 to 32 4 N m Adhesive and Tightening Torque...

Page 343: ...pump Control valve 063151 00EN00 P1 P2 P2 T2 A10 B10 A9 B9 A8 B8 A7 B7 A6 B6 A5 B5 A4 B4 A3 B3 A2 B2 A1 B1 P1 T1 P1 P2 IN Control valve Hydraulic pump Hydraulic oil tank Top Track gauge P1port P2port...

Page 344: ...7 ADJUSTMENT AND REPAIR 7 5 27 2 Upperstructure Control valve Swing motor Control valve Boom cylinder Swing motor Boom cylinder Control valve...

Page 345: ...7 ADJUSTMENT AND REPAIR 7 5 28 3 Upperstructure Control valve Swivel joint Control valve Boom swing cylinder...

Page 346: ...7 ADJUSTMENT AND REPAIR 7 5 29 4 Upperstructure Swing motor Hydraulic oil tank Swing motor Control valve Hydraulic oil tank Swivel joint Hydraulic oil tank...

Page 347: ...7 ADJUSTMENT AND REPAIR 7 5 30 5 Control Levers Hydraulic pump Cut off valve Pilot valves Pilot valves Cut off valve Drain connector Hydraulic oil tank...

Page 348: ...7 ADJUSTMENT AND REPAIR 7 5 31 6 Control Levers Pilot valves Control valve...

Page 349: ...7 ADJUSTMENT AND REPAIR 7 5 32 7 Upperstructure Implement Bucket cylinder Arm cylinder...

Page 350: ...ade cylinder Swivel joint Track gauge change cylinder L N N I E F K K K G C G D B B D D L M M C L I E F H J J J H H A A I C 064588 00EN00 G D B B B C A A I E F J J H A A A A A PP PP PP PP Dr Dr Dr Dr...

Page 351: ...7 ADJUSTMENT AND REPAIR 7 5 34 9 Undercarriage High speed travel solenoid valve...

Page 352: ...ons When removing a hose put a plug into the hose connection port to keep the oil from flowing out 1 Removal of Bucket Procedure 3 Remove the bolts 2 M10 and remove the pins 3 4 Remove the bucket 1 1...

Page 353: ...hoses from the bucket cylinder 1 and remove the bolt 2 M10 to pull out the pin 3 Then remove the bucket cylinder 1 Note Rope the bucket cylinder and remove it using a lifting device 5 After roping the...

Page 354: ...the arm cylinder 1 remove the hydraulic hoses from the arm cylinder 4 Remove the bolt 2 M10 and pull out the pin 3 Then remove the arm cylinder 1 Note Remove the arm cylinder using a lifting device 5...

Page 355: ...ube 1 and the bucket R tube 2 9 Remove the plates 3 and remove the tubes 10 After roping the boom 1 remove the bolt 2 M10 and pull out the pin 3 Then remove the boom 1 Notes Remove the boom using a li...

Page 356: ...stop the engine 3 Remove the protector 2 and remove the hydraulic hoses 4 Remove the bolts 3 M10 and pull out the pins 4 Then remove the blade cylinder 5 5 After roping the blade 1 remove the bolts 6...

Page 357: ...rm 2 Refer to Section 7 6 1 2 Removal of Arm 3 Remove the boom 3 Refer to Section 7 6 1 3 Removal of Boom 4 Remove the bolt 4 M12 and pull out the pin 5 for the boom swing cylinder 5 Remove the bolt 6...

Page 358: ...tion Reinstall the implement in the reverse order of the removal procedure Tightening Torque and Adhesive No Size Tightening torque Adhesive 1 6 8 10 and 11 M10 44 1 to 58 8 N m Apply Three Bond 1324...

Page 359: ......

Page 360: ...CHAPTER 8 PERIODIC INSPECTION AND SERVICING 8 1 List of Periodic Inspection and Servicing 8 1...

Page 361: ......

Page 362: ...HDUV VW WLPH GUDXOLF RLO GUDXOLF FLUFXLW VSLUDWLRQ ILOWHU GUDXOLF RLO UHWXUQ ILOWHU VW WLPH 2SHUDWLRQ RI WKH DFFXPXODWRU UHDVLQJ UHDVLQJ SRLQWV 5RWDWLRQ SLQ DQG FURZQ 7UDFN VSDFLQJ SLVWRQ KDVVLV HDULQ...

Page 363: ...8 PERIODIC INSPECTION AND SERVICING 8 2 GUDXOLF RLO QJLQH RLO GUDXOLF RLO UHWXUQ ILOWHU 7UDYHO JHDUV UHDVLQJ SRLQWV LU ILOWHU XHO ILOWHU 2LO ILOWHU HSHQGHQW RQ WHFKQLFDO PRGLILFDWLRQV...

Page 364: ...CHAPTER 9 FUEL LUBE OIL AND GREASE RECOMMENDED 9 Fuel Lube Oil and Grease Recommended 9 1...

Page 365: ......

Page 366: ...mended RPSRQHQWV OXLG 7HPSHUDWXUHV 4XDQWLW SUHVFULEHG 7KHUPDO HQJLQH QJLQH RLO 6 6 6 7UDYHO JHDUV R RLO 6 E UHGXFHU GUDXOLF FLUFXLW GUDXOLF RLO 62 9 LQ WKH WDQN WKH UHVW XHO WDQN LHVHO 1 1 1 6 RROLQJ...

Page 367: ......

Page 368: ...Quick Travel Operation 10 1 2 10 1 4 Thermal Shock of Travel Motor 10 1 3 10 1 5 Change of Blade Speed in Loaded Condition 10 1 4 10 1 6 Time Lag on Travel Speed Switching 10 1 5 10 1 7 Fluctuation in...

Page 369: ......

Page 370: ...nce of three actions of bucket scooping arm extension and boom raising For the models that cannot make the triple sequence actions extend the arm after raising the boom 10 1 2 Discontinuous Arm Moveme...

Page 371: ...n especially on spin or pivot turning Reason Inertial force is given to the upperstructure through the quick operation of the undercarriage and high pressure is applied to the swing motor The relief v...

Page 372: ...starting the engine the machine may travel straight instead of making a pivot turn Reason When the hot hydraulic oil is suddenly fed to the cold brake valve and motor the spool in the brake valve sti...

Page 373: ...n The oil from the port P1 of the inlet section flows to the blade cylinder through the throttle in the parallel passage and the blade section Meanwhile the circuit pressure of the port P1 increases d...

Page 374: ...of A In cold tem peratures however the passage resistance of the throttles becomes larger and it takes more time for the swash plate of the travel motor to return to the low speed 064589 00EN00 R G Hi...

Page 375: ...rmal expansion factor of oil is far larger about 20 times than that of steel Example 1 Liner thermal expansion factor of steel 11 7 10 6 2 Cubical thermal expansion factor of steel 3 51 10 5 3 Cubical...

Page 376: ...uble A B C A a B a C a A b B b C b B c C c C e Factors related to the trouble are enumerated in the columns and instructions for corrective procedures are given below It is recommended that the troubl...

Page 377: ...efective deliv ery valve Wear of plunger barrel Deterioration or breakage of valve spring Scuffing or wear of liners Scuffing or wear of piston Sticking damage or wear of piston ring Malfunction of fu...

Page 378: ...cap Clogging of intake pipe Defective thermostat Clogging of exhaust pipe Clogging of cylinder head exhaust port Clogging of radiator hose Damage or wear of fan belt Clogging of radiator Excessive ex...

Page 379: ...ality fuel or impurities Uneven injec tion volume Improper adjustment Defective lever or link Fuel Water in fuel Lubricating oil Improper grade Fuel injection pump Delayed injection timing Fuel inject...

Page 380: ...t turn Starter motor is faulty Starter motor does not turn or output is low Disconnection or connection failure Battery terminal Ground terminal Disconnection of wire Connection failure of coupler Bat...

Page 381: ...nt ON Short circuit Alternator Damaged diode Short circuit of coil Alternator Loose fan belt Damaged diode Defective IC regulator Regulator Short circuit or breakage of lead wire Damage or rust of ter...

Page 382: ...cient Viscosity Deterioration Piping Faulty joint Filter Clogging Hydraulic pump Oil leak Insufficient dis charge volume Wear of spline of joint Breakage of shaft Inner part failure Replace Replace Re...

Page 383: ...seat Hydraulic cylinder Oil leak Replace Replace Replace Replace Adjust Replace system relief valve Defective seat of circuit relief valve Replace circuit relief valve Replace Replace seal or whole as...

Page 384: ...il discharge volume from pump Replace Replace Replace Replace Repair or replace Repair or replace Movement of valve spool in parallel flow divider Replace Movement of main valve spool in inlet section...

Page 385: ...Hydraulic cylinder Oil leak Boom swing pedal Circuit relief valve pressure Defective spool fitting Dust in circuit relief valve Sticking of swing pedal link Steering equipment Replace seal or whole as...

Page 386: ...e Sticking of swing pedal link Wear of link joint Replace seal or whole assembly Adjust neutral position Adjust lever stroke Replace spool section Repair pedal link or apply grease Replace bush Repair...

Page 387: ...valve Clean Repair or replace Swing brake valve Relief valve pressure Dust in relief valve Swing bearing Breakage of swing bearing gear Wear or rust of swing bearing ball Check pressure Refer to sect...

Page 388: ...ement of valve spool Repair or replace Inspect pilot by switching hose with hose of other normal circuit Drifting of swing Extent of drifting Pilot valve Is valve spool returned to neutral Repair or r...

Page 389: ...e Replace spool section Repair of replace Oil leak Hydraulic motor Replace seal or whole assembly Internal leakage Replace Wear or breakage of coil spring Mechanical brake Replace Operation brake pist...

Page 390: ...on 5 4 Pressure Ad justment Spool link pin comes off Dust in plunger orifice Brake valve or counterbalance valve Loosen ports P1 and P2 joints and check oil flow Clean Sticki of plunger Plunger plug l...

Page 391: ...tion Wear of link joint Wear of relief valve seat surface Internal leakage Malfunction of 2 speed spool Hydraulic motor Oil leak Replace 2 spool valve Replace Replace Improper adjustment of lever stop...

Page 392: ...nomenon Reversed Overhaul or replace the swivel joint 4 Reverse the left and right hydraulic motors Phenomenon Reversed Replace the counter balance valve or counter balance valve or the motor 2 When t...

Page 393: ...ging Hydraulic power source R and L relief valves pressure R and L relief valves pressure Wear of relief valve spring and seat surface Wear of relief valve seat surface Do other implements work normal...

Page 394: ...Discontinuous drift Hydraulic motor is faulty Drift of machine body on slopes Brake valve or counter balance valve Dust in check valve Hydraulic motor Internal leakage Oil leak Extent of drift Check...

Page 395: ...ng to high speed One side Both side Safety switch Switch operation Repair or replace Pipings Oil leak from joint Repair or replace Cut off valve Solenoid operation Replace Relief valve pressure Check...

Page 396: ...be cancelled One side Both side Safety switch Switch operation Repair or replace Cut off valve Solenoid operation Replace Repair or replace Spool operation Dust in spool Clean or replace Repair or re...

Page 397: ...f the connector terminal and lead wire color 3 Color marks of leads W White B Black R Red Y Yellow G Green L Blue Br Brown Lg Light green O Orange Gr Grey Combination of colors Trouble Inspection repa...

Page 398: ...es not go on Failure of all lamps Replace bulb Only one lamp does not go on YES NO Filament blown Check the power line Replace fuse Check wire harness Check connector contact Check starter switch Othe...

Page 399: ...ourmeter YES NO Disconnect the bipole connecter on the back of the instrument panel and check whether a voltage of 10V or more is applied to the termi nal No 22B YB with the starter switch turned on A...

Page 400: ...hen water temp is low Disconnect the wire harness No 14A Lg from the water temp switch terminal YES NO Fuse blown Replace fuse YES NO YES NO Disconnect the wire harness No 14A Lg from the water temp s...

Page 401: ...the alternator and ground it Stop the engine Disconnect the L terminal of the alternator Turn on the starter switch Lamp goes on YES NO Lamp goes on YES NO Disconnect the terminal No 7 WG of the 12 p...

Page 402: ...terminal No 13A LgR from the oil pressure switch terminal and ground it Replace wire harness A or B Replace oil pressure switch Insufficient engine oil Supply engine oil YES NO Lamp goes on YES NO Di...

Page 403: ...NO YES Is engine oil pressure alarm lamp on Normal NO YES Is battery charge alarm lamp on Normal NO YES Is water temp alarm lamp on Normal Replace the indicator box NO YES Is engine oil pressure alar...

Page 404: ...o the female terminal harness side and ground it Turn on starter switch Disconnect the terminal No 4 L of the female connecter of the fuel level gauge connect 80 resistance and ground it Contact failu...

Page 405: ...ater temp sensor connect 80 resistance to the female terminal harness side and ground it Turn on starter switch Disconnect the terminal No 3 LB of the female connecter of the water temp gauge connect...

Page 406: ...CHAPTER 11 REFERENCE DATA 11 1 Specifications for Attachment 11 1...

Page 407: ......

Page 408: ...boss 96 E Internal width of bucket pin boss 97 F External width of bucket pin boss 121 G G Outer diameter of bucket pin 25 25 J Cylinder length when it is fully retracted 461 K Cylinder length when i...

Page 409: ...NT 8523 6 6 All Rights Reserved This manual may not be reproduced or copied in whole or in part without the written consent of YANMAR CONSTRUCTION EQUIPMENT 8523 6 6 MM 58ENMA 0100 ViO12 2A Service Ma...

Reviews: