


ENGINE
Camshaft and Timing Gear Train
5-50
BY Service Manual
© 2009 Yanmar Marine International
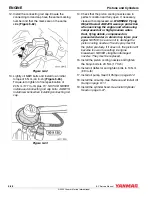
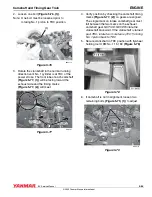
3. If coolant pump was not removed, cut gasket at
three locations (Figure 5-88, (1)). Install gasket
and apply a thin coat of Three Bond
®
1207F
(Yanmar part No. 977770-1207F) sealing agent
to gasket at ends (arrow) on both sides.
Figure 5-88
Figure 5-88
4. Install timing case cover.
5. Install all bolts and tighten to an initial torque of
5 N·m (44 in.-lb), then tighten in an alternating
sequence to final torque specification of 14 N·m
(124 in.-lb).
6. After all bolts have been tightened to final
specification, check the torque and tighten
again if necessary.
7. Install front crankshaft seal. See Replace Front
8. Install vibration dampener. See Remove and
Install Vibration Damper - 4BY2 on page 5-46
or Remove and Install Vibration Damper - 6BY2
on page 5-47.
9. Install alternator belt tensioner.
10. Install cylinder head. See Install Cylinder Head
11. Install oil sump. See Remove and Install Oil
12. 4BY2: Install alternator. See Remove and
Install Alternator on page 11-5.
13. Install alternator belt and belt guard. See
Remove and Install Alternator on page 11-5
and Replace Seawater Pump Belt on
page 7-19.
14. Add engine oil. See Change Engine Oil and
Replace Engine Oil Filter Element on page 8-9.
15. Fill engine with coolant. See Drain and Fill
Closed Cooling System on page 7-10.
16. Connect battery negative (-) cable.
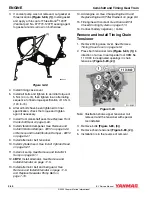
Remove and Install Timing Chain
Tensioner
1. Remove timing case cover. See Remove
Timing Case Cover on page 5-48.
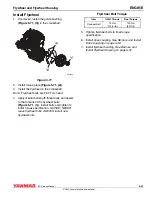
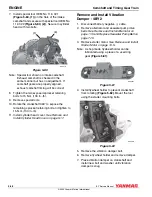
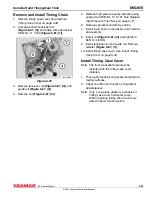
2. Press both tensioner rails (Figure 5-89, (1)) in
direction of arrow. Insert special tool OEM No.
11 3 340 in designated openings in chain
tensioner (Figure 5-89, (2)).
Figure 5-89
Figure 5-89
Note: Illustration shows upper tensioner rail
removed and the tensioner with special
tool installed.
3. Remove bolts (Figure 5-89, (3)).
4. Remove chain tensioner (Figure 5-89, (2)).
5. Installation is in the reverse of removal.
0006524
(1)