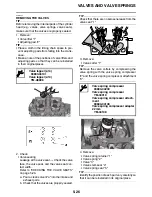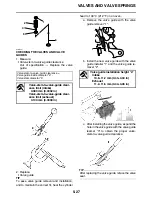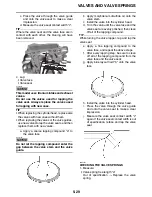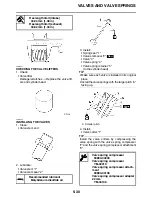
CYLINDER HEAD
5-23
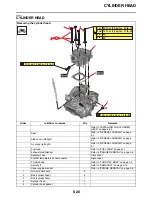
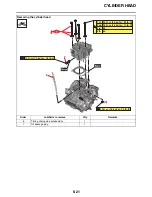
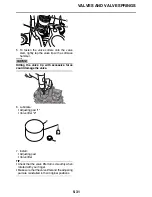
2. Install:
•
Washer “1”
•
Bolt (M9
145 mm (5.71 in)) “2”
•
Bolt (M9
135 mm (5.31 in)) “3”
•
Nut “4”
TIP
•
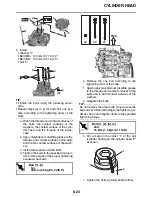
Tighten the bolts using the following proce-
dure.
•
Repeat steps (e) to (j) for each bolt one at a
time according to the tightening order of the
bolts.
a. Wash the threads and contact surfaces of
the bolts, the contact surfaces of the
washers, the contact surface of the cylin-
der head, and the threads of the crank-
case.
b. Apply molybdenum disulfide grease to the
threads and contact surfaces of the bolts
and to both contact surfaces of the wash-
ers.
c. Install the washers and the bolts.
d. Tighten the bolts to the specified torque in
two or three steps in the proper tightening
sequence as shown.
e. Remove the one bolt according to the
tightening order of the bolts.
f. Again apply molybdenum disulfide grease
to the threads and contact surfaces of the
bolts and to both contact surfaces of the
washers.
g. Retighten the bolts.
TIP
Do not remove the other bolts. Only remove the
bolts one at a time according to the tightening or-
der as shown and retighten them to the specified
tightening torque.
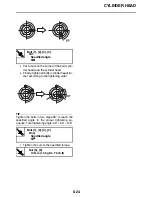
h. Put a mark on the corner “1” of the bolt
(cylinder head) and the cylinder head “2”
as shown.
i. Tighten the bolts (cylinder head) further.
Bolt [1]–[4]
1st
30 N·m (3.0 kgf·m, 22 lb·ft)
1
3
4
2
2
2
3
3
1
M
4
(2)
T
R
.
.
Bolt [1], [2], [3], [4]
2nd
15 N·m (1.5 kgf·m, 11 lb·ft)
x2
x3
x1
FWD
1
5
6
4
2
3
1
5
6
4
2
3
T
R
.
.
1
2
Summary of Contents for YZ 2023 Series
Page 6: ...EAM20162 YAMAHA MOTOR CORPORATION U S A YZ MOTORCYCLE LIMITED WARRANTY...
Page 10: ......
Page 44: ...MOTORCYCLE CARE AND STORAGE 1 32...
Page 61: ...TIGHTENING TORQUES 2 16...
Page 62: ...CABLE ROUTING DIAGRAM 2 17 EAM20152 CABLE ROUTING DIAGRAM Frame and engine left side view...
Page 64: ...CABLE ROUTING DIAGRAM 2 19 Frame and engine right side view...
Page 66: ...CABLE ROUTING DIAGRAM 2 21 Handlebar front view...
Page 68: ...CABLE ROUTING DIAGRAM 2 23 Frame and engine top view...
Page 70: ...CABLE ROUTING DIAGRAM 2 25 Frame and battery top view...
Page 72: ...CABLE ROUTING DIAGRAM 2 27 Rear brake right side view...
Page 74: ...CABLE ROUTING DIAGRAM 2 29...
Page 112: ...ELECTRICAL SYSTEM 3 36...
Page 148: ...REAR BRAKE 4 34 system Refer to BLEEDING THE HYDRAULIC BRAKE SYSTEM on page 3 25...
Page 154: ...HANDLEBAR 4 40 Throttle grip free play 3 0 6 0 mm 0 12 0 24 in...
Page 187: ...INSTALLING THE TRANSMISSION 5 74...
Page 190: ...LUBRICATION SYSTEM CHART AND DIAGRAMS 5 3 1 Oil filter element 2 Oil pump...
Page 191: ...LUBRICATION SYSTEM CHART AND DIAGRAMS 5 4 1 Intake camshaft 2 Exhaust camshaft...
Page 264: ...TRANSMISSION 5 77...
Page 274: ...WATER PUMP 6 9...
Page 284: ...THROTTLE BODY 7 9...
Page 287: ......
Page 288: ...IGNITION SYSTEM 8 1 EAM20142 IGNITION SYSTEM EAM30277 CIRCUIT DIAGRAM...
Page 292: ...ELECTRIC STARTING SYSTEM 8 5 EAM20143 ELECTRIC STARTING SYSTEM EAM30279 CIRCUIT DIAGRAM...
Page 296: ...CHARGING SYSTEM 8 9 EAM20144 CHARGING SYSTEM EAM30282 CIRCUIT DIAGRAM...
Page 299: ...CHARGING SYSTEM 8 12...
Page 300: ...SIGNALING SYSTEM 8 13 EAM20154 SIGNALING SYSTEM EAM30348 CIRCUIT DIAGRAM...
Page 304: ...FUEL INJECTION SYSTEM 8 17 EAM20145 FUEL INJECTION SYSTEM EAM30284 CIRCUIT DIAGRAM...
Page 329: ...FUEL INJECTION SYSTEM 8 42...
Page 330: ...FUEL PUMP SYSTEM 8 43 EAM20146 FUEL PUMP SYSTEM EAM30287 CIRCUIT DIAGRAM...
Page 362: ...SELF DIAGNOSTIC FUNCTION AND DIAGNOSTIC CODE TABLE 9 15...
Page 372: ...CHASSIS 10 9...
Page 374: ......
Page 376: ......
Page 377: ...YZ250FXP 2023 WIRING DIAGRAM BAJ 2819U 13_WD indd 1 2022 04 01 9 58 37...
Page 378: ...YZ250FXP 2023 WIRING DIAGRAM BAJ 2819U 13_WD indd 2 2022 04 01 9 58 37...

