background image

- 9 -

TF series 

Quick Guide

Workflow Overview

Connect your inputs and outputs

Connect your inputs and outputs

Connect the instruments and mics.
Connect output devices such as powered speakers.
Input and output settings are ready to go when the 
console is shipped, so you can start mixing as soon as 
you make your connections (page 12).

When your connections are finished, turn on the power.

NOTICE

• 

Rapidly turning the unit on and off in succession 
can cause it to malfunction. After turning the unit 
off, wait for at least 6 seconds before turning it 
on again.

• 

This product regularly saves the state of its 
workspace so that it can return to the previous 
state when the product is turned on. To ensure 
that the state is saved properly, wait at least 
10 seconds after performing the last operation 
before turning the product off.

Set up each channel

>  Step 1
Select a channel by pressing its [SEL] key 

in the Channel Strip section.

The channel's [SEL] key lights, indicating that you 
can control the channel using the Display section.

>  Step 2
Press the Library key (

) to access the 

Library and recall a Preset.

Adjust the overall balance of the mix

After adjusting each channel, adjust the overall balance 
of the mix while doing a sound check. While listening to 
the main speakers, pay attention to the overall sound 
quality, the balance of each instrument, the volume of 
each performer's monitor, and the amount of effects 
applied to each instrument.

• Adjusting SENDS ON FADER for the level sent to 

AUX for each channel (page 16)

• Muting all input channels or effects (page 15)
• Turning effects on and off, adjusting the overall level 

of effects (page 15)

Save your settings

You can save your entire mix setup as a Scene. 
(SCENE window 

g

 page 18)

If several bands are performing on the same stage, or 
if a single performer’s mix or audio sources vary greatly 
from song to song, you can save a complete mix setup 
for each band or each song as a Scene, and easily 
switch between Scenes.
You can also save individual channel setups by 
overwriting existing Presets or by saving them as new 
Presets in the Library screen.
After fine-tuning the sound of each channel to suit each 
instrument or mic, you can save them as Presets and 
recreate that configuration anytime, easily.

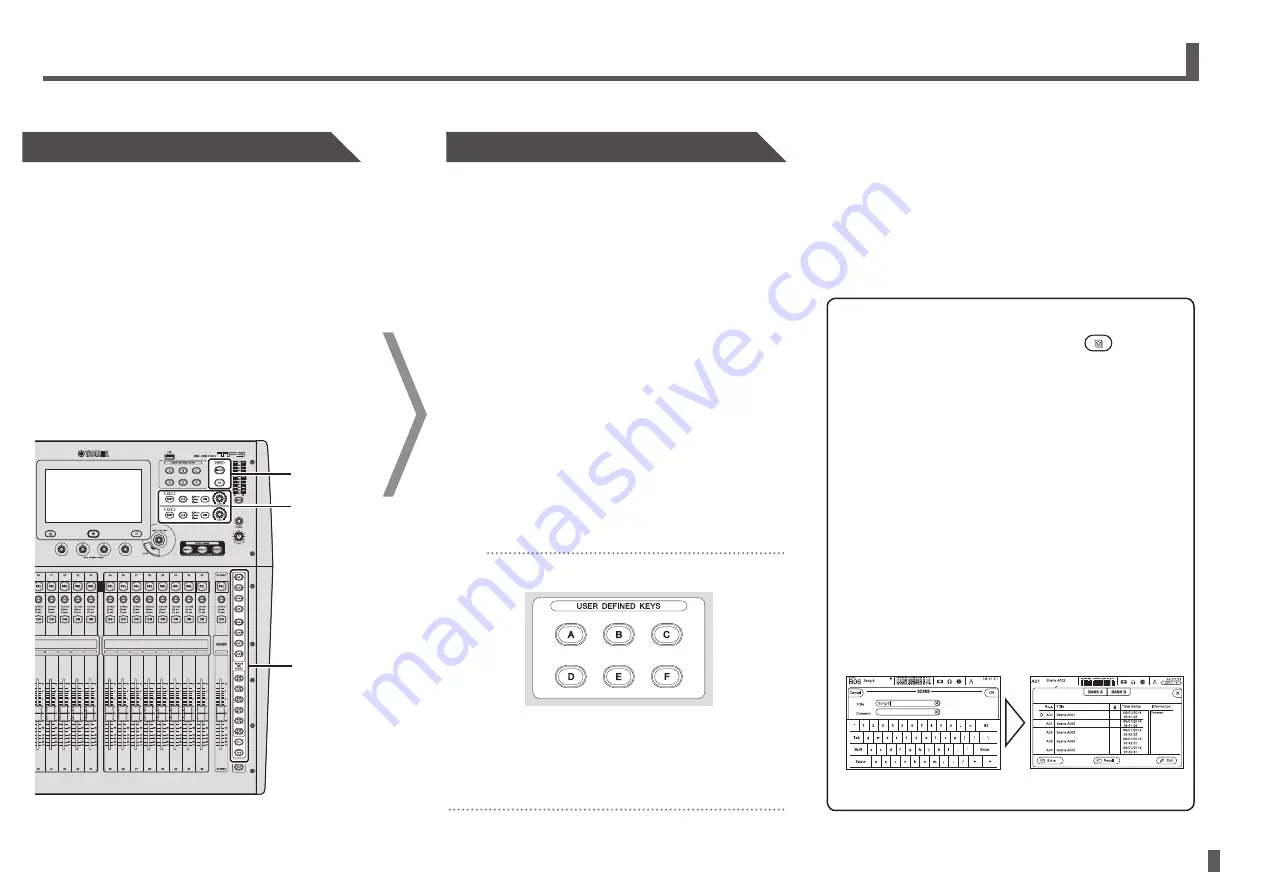
HINT

Using USER DEFINED KEYS

When the console is in the default state, USER DEFINED KEYS 
(page 15) are configured as "Direct Scene Recall" keys. You 
can save a Scene by pressing and holding down one of the 
USER DEFINED KEYS, and recall a Scene by pressing one of 
the USER DEFINED KEYS.

>  Step 3
Adjust the channel’s parameters.

Adjust the input gain, EQ, compressor, and gate 
from the OVERVIEW screen and the individual 
configuration screens (page 18).
Adjust the input gain on the INPUT screen so that 
the loudest sound that is input causes the center 
graph to light.

>  Repeat steps 1 to 3 and set up each 

channel.

NOTE

You can set up channels without using Presets. For details about the available features and parameters, refer to the Reference 
Manual.

What is a "Preset"?

A Preset is a file stored in the Library 

(

)

 that 

contains channel settings such as the type 
of input (instrument or mic), equalizer and 
compression settings, etc. The default Presets 
contain settings for various types of instruments, 
so you can use them as a starting point when 
setting up a channel. You can edit Presets and 
save them as new Presets.

What is a "Scene"?

A Scene is file that contains all the settings for 
every channel in your mix. By saving your setups 
as Scenes, you can load a complete mix in an 
instant and be ready for any situation.

Saving a Scene 

Recalling a Scene

Adjust the Mix

Save Your  Settings

SENDS ON 
FADER

Effects on/
off, effects 
level

MUTE

Summary of Contents for TF5

Page 1: ...for choosing a Yamaha TF5 TF3 TF1 Digital Mixing Console To take full advantage of the superior features and performance offered by your TF series console and to enjoy years of trouble free use please...

Page 2: ...ctions 12 5 1 Connecting inputs 12 5 2 Connecting outputs 13 6 Controls and functions 14 6 1 Channel Strip section 14 6 2 ST IN Stereo Input section 14 6 3 FX section 15 6 4 USER DEFINED KEYS section...

Page 3: ...soires sp cifi s par le fabricant 12 Utiliser exclusivement le chariot le stand le tr pied le support ou la table recommand s par le fabricant ou vendus avec cet appareil Si l appareil est pos sur un...

Page 4: ...s instruktion VAROITUS Paristo voi r j ht jos se on virheellisesti asennettu Vaihda paristo ainoastaan laitevalmistajan suosittelemaan tyyppiin H vit k ytetty paristo valmistajan ohjeiden mukaisesti l...

Page 5: ...physical injury to you or others or damage to the device or other property These precautions include but are not limited to the following Power supply power cord When removing the electric plug from t...

Page 6: ...ow data are retained by the backup battery Internal clock information No other data relies on the backup battery therefore no other data will be lost if the backup battery is depleted This product reg...

Page 7: ...plication to back up console settings or set console parameters without connecting the console TF mobile control application This app allows you to remote control your TF series console using an iPad...

Page 8: ...product off Set up each channel Step 1 Select a channel by pressing its SEL key in the Channel Strip section The channel s SEL key lights indicating that you can control the channel using the Display...

Page 9: ...resets or by saving them as new Presets in the Library screen After fine tuning the sound of each channel to suit each instrument or mic you can save them as Presets and recreate that configuration an...

Page 10: ...reo input section page 14 3 FX effects section page 15 4 USER DEFINED KEYS section page 15 5 MUTE section page 15 6 METER section page 15 7 PHONES section page 15 8 FADER BANK section page 16 9 TAP ke...

Page 11: ...tor program or the iPad app 5 USB TO HOST connector USB connector used to connect the console to a computer allowing the console to function as an audio interface Supports input and output for 34 chan...

Page 12: ...NPUT screen page 18 HINT What if I m using condenser mics Phantom power must be supplied to condenser mics Some direct boxes also need phantom power When using phantom power first set 48V Master on th...

Page 13: ...OUT OMNI OUT 15 L STEREO L OUT OMNI OUT 16 R STEREO R OUT Each OMNI OUT jack is configured by default to output a bus You can change the bus that is output on the SYSTEM OMNI OUT PATCH screen The OMN...

Page 14: ...the input signals for both ST IN1 and ST IN2 from the INPUT screen 1 SEL key Used to select the ST IN channel that you will control You can press the SEL key to switch between controlling the left an...

Page 15: ...ctions are assigned by default such as Direct Scene Recall 6 5 MUTE section Used to mute all channels in a mute group 1 INPUT key Allows you to mute all input channels The key lights when the mute gro...

Page 16: ...X9 10 AUX19 20 The key flashes in time with the tempo The tempo you tap on the TAP key is applied to effects that have Sync set to On 6 10 SENDS ON FADER section Switches each channel strip to tempora...

Page 17: ...from which you can recall saved Presets 3 Home key Returns the display to the OVERVIEW screen 4 Menu key Displays the menu for the current operation The key lights when a menu is available 5 TOUCH AND...

Page 18: ...djusting parameters easily using the TOUCH AND TURN knob and manual mode for adjusting each parameter individually GATE Allows you to configure the noise gate for each channel COMP Allows you to confi...

Page 19: ...an overall view of a channel s settings You can adjust settings on this screen or switch to the dedicated screen for each setting You can also edit the Channel Name on this screen For information abo...

Page 20: ...you to use audio files on your iOS device as background music When a USB storage device is connected you can use the device to play audio files or record the mixer s output directly and save it as an...

Page 21: ...the event that an internal memory error occurs or you have forgotten your password and cannot operate the console you can use the following procedure to initialize the console NOTE All information th...

Page 22: ...pply to the latest specifications as of the printing date Since Yamaha makes continuous improvements to the product this manual may not apply to the specifications of your particular product To obtain...

Page 23: ...a Sucursal en Espa a Ctra de la Coruna km 17 200 28231 Las Rozas Madrid Spain Tel 34 91 639 88 88 GREECE Philippos Nakas S A The Music House 147 Skiathou Street 112 55 Athens Greece Tel 01 228 2160 SW...

Page 24: ...lopment Department 2015 Yamaha Corporation Published 01 2015 CRZC 01A0 Printed in Indonesia Yamaha Pro Audio global website http www yamahaproaudio com Yamaha Manual Library http www yamaha co jp manu...

Reviews: