8
Owner’s Manual
Component Names & Functions
■
Front Panel
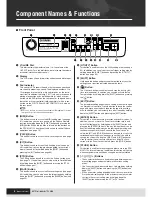
q
VOLUME Dial
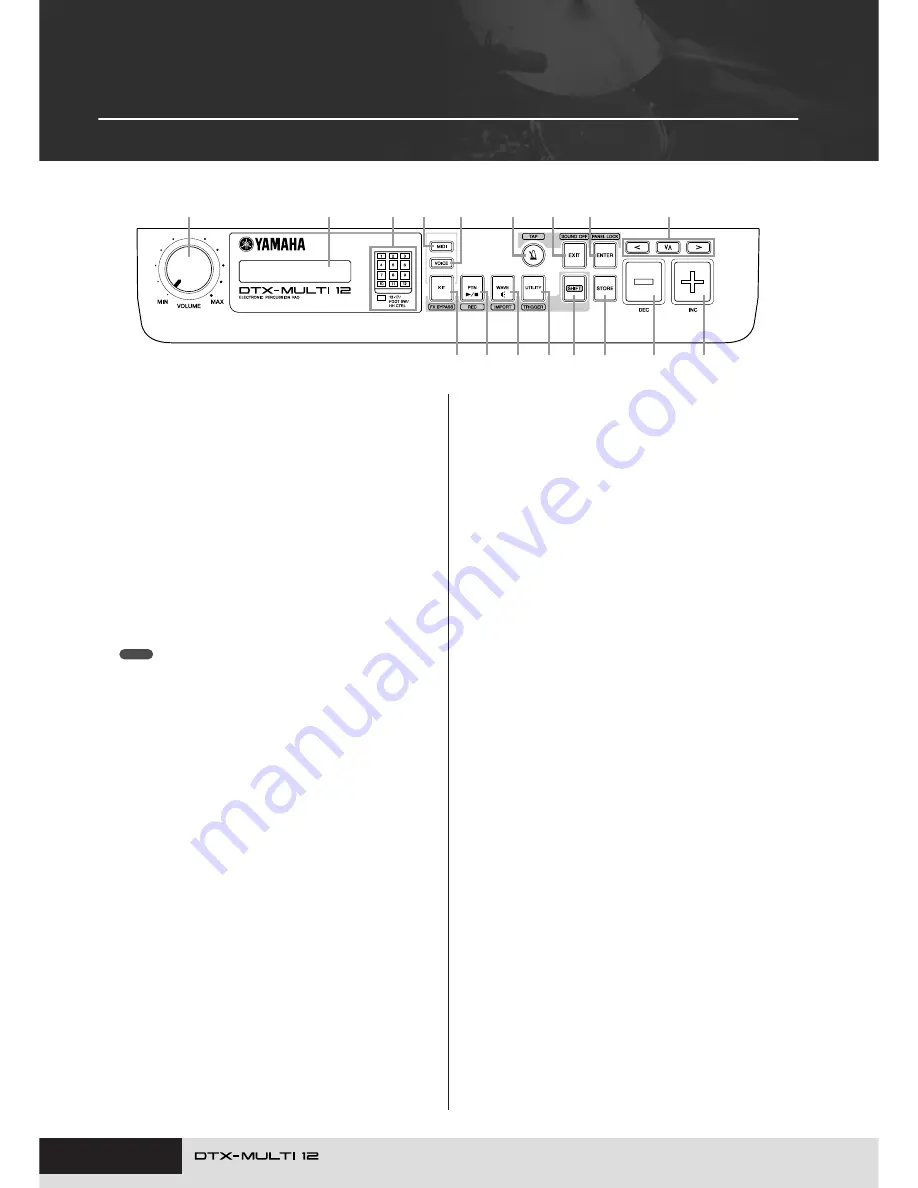
This dial controls the master volume (i.e., the volume at the
OUTPUT jacks). Turn the dial clockwise to increase the volume
or counter-clockwise to decrease it.
w
Display
This LCD screen shows information and data needed for oper-
ation.
e
Pad Indicator
This array of LEDs shows the pads that have been struck and
are currently producing a sound. The displayed numbers 1 to
12 correspond to the twelve main and rim pads on the instru-
ment itself. In addition, the lamp [13-17] turns on in response to
playing of expansion pads (sold-separately), which are con-
nected via the PAD jacks on the rear panel, or to signals from a
foot switch or hi-hat controller (sold-separately), which is con-
nected via the FOOT SW or HI-HAT CONTROL jack, also on
the rear panel.
• Before use, be sure to remove the transparent film applied to the indi-
cator panel to protect it during transportation.
r
[MIDI] Button
This button is used to access the MIDI setting area (see page
61). In addition, you can turn on and off the Cubase Remote
function by holding down the [SHIFT] button and pressing the
[MIDI] button. When this function is turned on, the buttons on
the DTX-MULTI 12 front panel can be used to control Cubase
operations (see page 15).
t
[VOICE] Button
This button is used to access the Voice setting area (see page
55).
y
[KIT] Button
This button is used to access the Kit setting area (see page
46). In addition, you can toggle effects applied to the current
drum kit on and off by holding down the [SHIFT] button and
pressing the [KIT] button (see page 83).
u
[PTN] Button
The Pattern button is used to access the Pattern setting area
(see page 74). In addition, you can also activate Record Mode
by holding down the [SHIFT] button and pressing the [PTN]
button (see page 21).
i
[WAVE] Button
This button is used to access the Wave setting area (see page
69). In addition, you can also open the Import page by holding
down the [SHIFT] button and pressing the [WAVE] button (see
page 25).
o
[UTILITY] Button
This button is used to access the Utility setting area (see page
82). In addition, you can also access the Trigger setting area by
holding down the [SHIFT] button and pressing the [UTILITY]
button (see page 99).
!0
[SHIFT] Button
Hold down this button and press another button to access the
setting area or function indicated above or below it.
!1
[
E
E
E
E
] Button
The Click-track button is used to start and stop the built-in click-
track (or metronome). In addition, you can also activate the Tap
Tempo function by holding down the [SHIFT] button and pressing
the [
] button.
!2
[EXIT] Button
The parameter-setting pages in each setting area are arranged
in a hierarchical structure. Press this button to leave the current
page and move one step back towards the top of the setting
area. In addition, you can instantly turn off all sound by holding
down the [SHIFT] button and pressing the [EXIT] button.
!3
[ENTER] Button
This button is used to execute processes and confirm values. In
addition, you can activate the Panel Lock function to lock and
unlock the front panel by holding down the [SHIFT] button and
pressing the [ENTER] button. In this way, the front panel can be
deactivated during performances in order to avoid making unin-
tentional changes to settings. Even with the Panel Lock acti-
vated, the [KIT] and [VOICE] buttons can be used to access the
corresponding setting areas; however, you will only be able to
change the current kit using the [-/DEC] and [+/INC] buttons or
visually confirm the voice assigned to struck pads. To check
voices with the Panel Lock activated, press the [VOICE] button.
!4
[STORE] Button
This button is used to store settings and other data in the DTX-
MULTI 12’s internal memory. In addition, this button will light up
whenever parameters have been changed but not yet stored.
!5
[
B
] [
D
] [
C
] Buttons
• These selector buttons are used to navigate between param-
eter-setting pages and parameters in the various setting
areas.
• You can activate and deactivate Input Lock mode by holding
down the [SHIFT] button and pressing the [
D
] button (see
page 103).
• With a parameter-setting page displayed, you can move to the
first parameter-setting page of the previous or next parameter
section in the current setting area by holding down the
[SHIFT] button and pressing the [
B
] or [
C
] button.
≤≤≤≤≤YAMAHA
<<DTX-MULTI≤12>>
e
!5
o !0 !4
!6
!7
i
u
y
r
!1
!2
!3
t
q
w
NOTE
E
Summary of Contents for DTX-MULTI
Page 1: ...Owner s Manual EN ...
Page 114: ...114 Owner s Manual MEMO ...


