Setting Up
Owner’s Manual
13
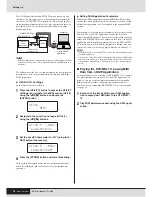
Connecting to a Computer
Although the DTX-MULTI 12 is exceptionally powerful and ver-
satile all by itself, connecting it to a computer via USB allows for
even greater power and versatility. When connected in this way,
MIDI data can be freely transferred between the instrument and
the computer. In this section, you’ll learn how to make the neces-
sary connections.
• As the DTX-MULTI 12 has no built-in speakers, you will need to connect
headphones or an external amplifier and speakers in order to hear it. For
details, see page 10.
• A USB cable is not included. In order to connect to a computer, use a USB
A-B cable of no more than 3 meters in length.
1
Download the latest version of the USB-MIDI
driver to your computer from the following web
page. After clicking the Download button, save
the compressed file in a convenient location and
then expand it.
http://www.global.yamaha.com/download/usb_midi/
• Information on system requirements is also provided on the above web
page.
• The USB-MIDI driver may be revised and updated without prior notice.
Before installing, visit the above web page to confirm the latest related
information and ensure that you have the most up-to-date version.
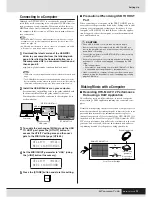
2
Install the USB MIDI driver on your computer.
For instructions on installing, refer to the guide included with
the driver installer. When the guide indicates that your
Yamaha product should be connected to the computer, do so
as shown below.
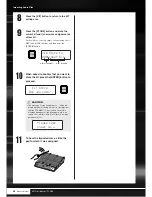
3
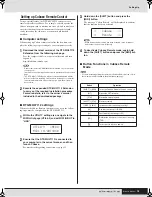
To enable the exchange of MIDI data via the USB
TO HOST port, press the [UTILITY] button to
access the UTILITY setting area and then navi-
gate to the MIDI In/Out page (UTIL6-9).
4
Set the MIDI IN/OUT parameter to “USB” (using
the [+/INC] button if necessary).
5
Press the [STORE] button and store this setting.
■
Precautions When Using USB TO HOST
Port
When connecting to a computer via the USB TO HOST port, be
sure to observe the precautions listed below. Failing to do so risks
freezing your computer and corrupting or losing data. If your
computer or DTX-MULTI 12 should freeze, restart the applica-
tion being used, reboot the computer, or turn the instrument off
once and then back on.
Making Music with a Computer
■
Recording DTX-MULTI 12 Performance
Data using a DAW Application
The following section will describe how to record your perfor-
mances using a DAW application running on a connected com-
puter.
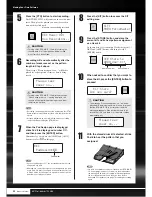
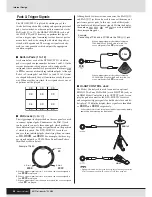
Normally, when playing in order to record on a computer, perfor-
mance data produced by striking the pads is first sent to the com-
puter and then returned to the instrument in order to play its
internal tone generator. If local control of the DTX-MULTI 12 is
turned on (via the Local Control page (UTIL6-5) from the UTIL-
ITY area), performance data will also be sent directly to the tone
generator, and as a result, the direct and returned data will over-
lap, making it sound as if the pads are being struck twice.
NOTE
NOTE
DTX-MULTI 12
USB cable
USB port
USB TO HOST port
Computer
UTIL6-9≥≥≥<MIDI>
MIDI≥IN/OUT=MIDI
UTIL6-9≥≥≥<MIDI>
MIDI≥IN/OUT=USB
• Use a USB A-B cable of no more than 3 meters in length.
• Before connecting to the computer via the USB TO HOST port,
restore the computer from any power-saving mode (such as Sus-
pend, Sleep, or Standby).
• Connect the computer via the USB TO HOST port before turning
on the DTX-MULTI 12.
• Be sure to always perform the following steps before turning the
instrument on or off and either plugging or unplugging the USB
cable.
• Quit all applications.
• Ensure that no data is being sent from the DTX-MULTI 12. (Data
is transmitted by striking the pads or playing patterns.)
• When connected to a computer, allow at least 6 seconds to pass
between turning the instrument on and off and plugging or unplug-
ging the USB cable.
CAUTION
Within DTX-MULTI 12
Internal tone
generator
On
Off
Sound is produced
Local Control Settings
No sound is
produced.
Summary of Contents for DTX-MULTI
Page 1: ...Owner s Manual EN ...
Page 114: ...114 Owner s Manual MEMO ...


