background image

29

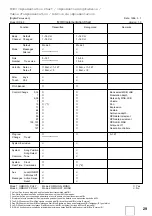
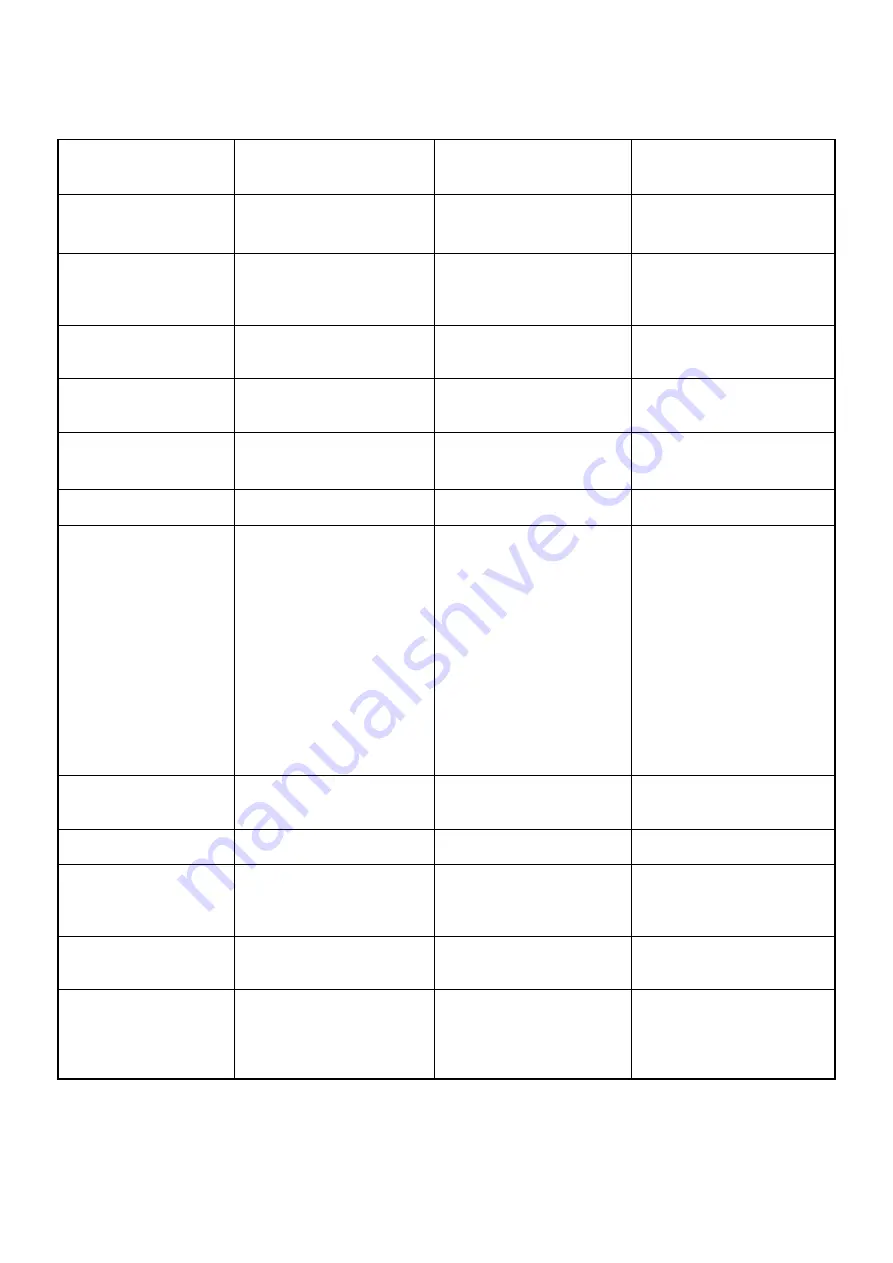
MIDI Implementation Chart / Implementierungstabelle /

Table d'implémentation / Gráfico de implementación

[Digital Percussion]

Date: 1996. 3. 1

Model: DD-50

MIDI Implementation Chart

Version: 1.0

Function

Transmitted

Recognized

Remarks

Basic

Default

1~16 CH

1~16 CH

Channel

Changed

1~16 CH

1~16 CH

Default

Mode 3

Mode 3

Mode

Messages

X

X

Altered

*****************

X

Note

0~127

13~96

Number

: True voice

*****************

13~96

Velocity

Note on

O

 9nH, v=1~127

O

 9nH, v=1~127

Note off

X

 9nH, v=0

X

 9nH, v=0

After

key’s

X

X

Touch

Ch’s

X

X

Pitch Bender

O

O

Control Change

0, 32

O

O

Bank select MSB, LSB

1

O

O

Modulation depth

6, 38

O

O

Data entry MSB, LSB

7

O

O

Volume

10

O

 (*1)

O

Pan

11

O

O

Expression

64

O

O

Sustain

91

O

O

Ambience depth

96

X

O

RPN data increment

97

X

O

RPN data decrement

100, 101

O

O

RPN LSB, MSB

120

X

O

All sound off

121

X

O

Reset all controllers

Program

O

O

0~127

Change

: True #

*****************

System Exclusive

X

X

System

: Song Position

X

X

: Song Select

X

X

Common : Tune

X

X

System

: Clock

O

O

Real Time : Commands

O

O

 (*2)

Aux

: Local ON/OFF

X

X

: All Notes Off

X

X

Messages : Active Sense

O

O

: Reset

X

X

Mode 1: OMNI ON, POLY

Mode 2: OMNI ON, MONO

O

: Yes

Mode 3: OMNI OFF, POLY

Mode 4: OMNI OFF, MONO

X

: No

*1 Value of Pan for each drum pad and foot pedal is not transmitted via MIDI.
*1 Pan-Werte der einzelnen Pads und Pedale werden nicht über MIDI übertragen.
*1 La valeur de Pan pour chaque pad de batterie et pour la pédale n’est pas transmise via MIDI.
*1 El valor del efecto panorámico (Pan) para cada pulsador y pedal de batería no se transmite a través de MIDI.

*2 The DD-50 can accept Start/Stop signals, received via MIDI, by setting the MIDI clock to “External”.
*2 Das DD-50 spricht auf über MIDI empfangene Start/Stop-Signale an, wenn es auf externen MIDI-Taktgeber (“E”) gestellt ist.
*2 Le DD-50 peut accepter les signaux Start/Stop reçus via MIDI, en réglant l’horloge MIDI sur “External (E)”.
*2 El DD-50 puede aceptar señales de inicio/parada recibidas a través de MIDI, ajustando el reloj MIDI a “Externo (E)”.

Summary of Contents for DD-50

Page 1: ...2 DIGITAL Owner s Manual Bedienungsanleitung Mode d emploi Manual de instrucciones DEUTSCH FRANÇAIS ESPAÑOL ENGLISH ...

Page 2: ...osal of products that contain lead batteries plastics etc If your dealer is unable to assist you please contact Yamaha directly NAME PLATE LOCATION The name plate is located on the bottom of the product The model number serial number power requirements etc are located on this plate You should record the model number serial number and the date of purchase in the spaces provided below and retain thi...

Page 3: ...r OFF When Making Connections To avoid damage to the instrument and other devices to which it is connected turn the power switches of all related devices OFF prior to connecting or disconnecting cables Handling and Transport Never apply excessive force to the controls connectors or other parts of the instrument Always unplug cables by gripping the plug firmly not by pulling on the cable Disconnect...

Page 4: ...ON OFF 9 Try Recording 15 RECORD 15 Playback 15 Using the MIDI Utility Mode 16 Data 23 Drum Voice List 23 Drum Kit List 24 Song List 26 Drum Map 27 Specifications 28 MIDI Implementation Chart 29 What is MIDI 16 What you can do with MIDI 16 Enter Exit the MIDI Utility Mode 17 Setting the Clock 17 Local ON OFF 18 Setting the MIDI Transmit Channel 18 Setting the MIDI Note Number 20 Initialize 21 Trou...

Page 5: ...hen a pair of headphones is con nected to the jack the DD 50 s internal speakers will switch off automatically perfect for private practice or late night playing If you want to use an external sound system the headphone jack can also be used to connect the DD 50 to a stereo system or mixing console Use a standard plug n pin plug adaptor to connect the DD 50 to a stereo system Turn the power OFF on...

Page 6: ... PAD ASSIGN button 8 19 4 KIT ASSIGN button 8 20 5 SONG button 10 6 TEMPO button 11 7 Display 8 8 MASTER VOLUME buttons 6 9 REVERB button 9 0 Track buttons DRUM 1 button 12 17 DRUM 2 button 12 18 BASS button 12 BACKING button 11 12 DC IN 10 12V PHONES AUX OUT 88 BEAT TEMPO SONG CLICK BACKING BASS DRUM 2 DRUM 1 POWER OFF ON REVERB PAD KIT ASSIGN PRESET TEMPO MASTER VOLUME SONG VOLUME 1 2 3 4 5 6 7 ...

Page 7: ...Connecting the Foot Pedals 1 2 The supplied foot pedals can be connected to the DD 50 to similarly play the drum set s hi hat pedal or bass drum voices or they can also be assigned to play other voices as well Do not press the pedal while connecting it to the DD 50 or while turning on the power Connecting in this manner with the power on the pedal s function may be reversed Supplied Accessories Fo...

Page 8: ...he volume level rapidly SONG VOLUME The song s volume level is controlled by the two SONG VOL UME buttons 10 volume levels L0 L9 Demo Song Song see page 10 The SONG VOLUME can be used to adjust the balance between the song accompaniment and your own performance on the pads Press the large SONG VOLUME button to increase the song volume by one level Press the small SONG VOLUME button to decrease the...

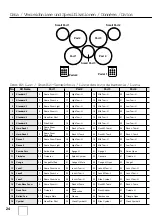
Page 9: ...1 Pad 3 18 Mid Tom High Pedal 1 1 Bass Drum Mid Pedal 2 34 Hi Hat Pedal A hi hat sound is assigned to the Small Pad 3 Drum Kit 00 Striking the Small Pad 3while pressing on Pedal 2 produces a closed hi hat sound Striking the pad without pressing the pedal produces an open hi hat sound The bass drum voice is control led by pressing Foot Pedal 1 Use Foot Pedal 2 to control the Hi hat This is in the c...

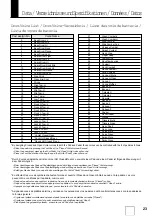
Page 10: ...ally selected when the power is turned ON See Auto Kit Select ON OFF Setting on page 11 The CU Drum Kit is the Custom Kit Changes made to any one of the preset drum kits will be saved here See Assigning a Voice to Individual Pads and Pedals below Assigning a Voice to Individual Pads and Pedals CU Custom Kit The DD 50 contains a total of 75 high quality drum sounds see the Drum Voice List page 23 t...

Page 11: ... pad pedal Repeat the previous steps for any or all of the DD 50 s pads and pedals and try playing your own original drum kit PRESET TEMPO SONG TEMPO REVERB ON OFF Different depths of the DD 50 s reverb effect can be selected to add to the DD 50 s overall sound To turn on the reverb effect press the REVERB button To turn off the reverb effect press the REVERB button again Select the REVERB Depth W...

Page 12: ... 10 BEAT 3 Press the START STOP button Press the START STOP button after a two measure count in or one measure count in the song will start playback As the song is playing the Song s current measure will be shown in the display Try playing the pads and pedals along with the song To stop playback of the song press the START STOP button once again You can also use the TAP START function to start son...

Page 13: ...280 then stop PRESET TEMPO SONG TEMPO 50 BEAT 3 Exit the Tempo setting mode Press the SONG button to exit from the Tempo setting mode When both the SONG and TEMPO buttons are pressed simultaneously the preset tempo of the currently selected song will automatically applied PRESET TEMPO SONG TEMPO 90 BEAT Tempo Display Comment q 90 90 q 110 10 100th digit 1 is shown as a single dot q 250 5 0 100th d...

Page 14: ...ACKING TAP START The TAP START function allows you to set the song s overall tempo as well as start the accompani ment The accompaniment will playback at the tempo with which the pads are struck or the pedals are pressed 1 Press the BREAK TAP START button Press the BREAK TAP START button when the song stops its indicator will flash and the DD 50 is in Tap Start standby mode To cancel the Tap Start...

Page 15: ... is in BREAK standby mode To cancel the Break mode simply press the BREAK TAP START button once again its indicator will turn off Play along with a SONG BREAK TAPSTART ST ART STOP A B REPEAT REC 3 Exit the BREAK mode The DD 50 returns to the BREAK standby mode when the BREAK measure is completed To exit the BREAK mode press the BREAK TAP START button The BREAK mode is also exited when the song is ...

Page 16: ...EPEAT press the A B REPEAT button during playback or while playback is stopped the A B REPEAT mode will be canceled the A B REPEAT points will also be canceled and normal playback of the accompaniment will con tinue When the song playback has reached the end point of the section you want to practice press the A B REPEAT button once again and the A to B repeat points are set b appears in the displa...

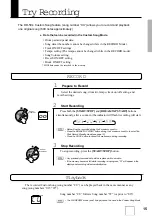
Page 17: ...ng the 2 measure count in Press the BREAK TAP START button during the 2 measure count in to enter Tap Start Record Standby mode see page 12 Press the CLICK button to cancel the metronome during recording 3 Stop Recording To stop recording press the START STOP button Any previously recorded data will be replaced with new data If the memory becomes full while recording is in progress FL will appear ...

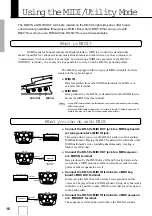
Page 18: ...when making MIDI connections Never use MIDI cables longer than 15 meters in length Cables longer than 15 meters can pick up noise which can cause data errors Connect the DD 50 s MIDI OUT jack to a MIDI keyboard s or tone generator s MIDI IN jack This setup allows you to use the DD 50 s pads to control another MIDI instrument Playing the DD 50 s pads will result in the other MIDI instrument s voice...

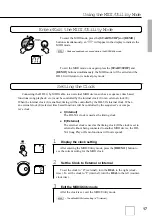
Page 19: ...r the MIDI clock 2 Set the Clock to External or Internal To set the clock to E external turn the DIAL to the right clock wise To set the clock to I internal turn the DIAL to the left counter clockwise 3 Exit the MIDI Utility mode After the clock is set exit the MIDI Utility mode The default MIDI clock setting is I internal UsingtheMIDI UtilityMode DEMO BREAK TAPST ART ST ART STOP A B REPEAT REC mm...

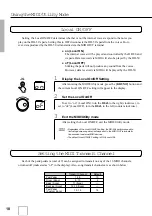
Page 20: ...the Local ON OFF setting the DD 50 s performance data including demo song data is always sent to the MIDI OUT terminals for transmission to external MIDI devices The default Local ON OFF setting is ON Local ON UsingtheMIDI UtilityMode on BEAT oF BEAT DRUM 2 on Local ON The internal voices will be played and controlled by the DD 50 and its pads Data received via MIDI will also be played by the DD 5...

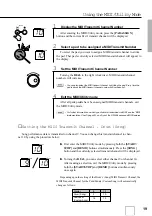
Page 21: ...ansmit Number To select the pad you want to assign a MIDI transmit channel to strike the pad That pad s currently selected MIDI transmit channel will appear in the display 3 Set the MIDI Transmit Channel Number Turning the DIAL to the right clockwise MIDI transmit channel numbers will increase You can also select the MIDI transmit channel by striking the pad Every time the pad is struck the MIDI t...

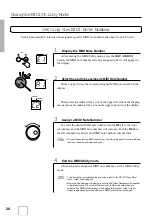
Page 22: ...ht clockwise and the MIDI note numbers will increase Turn the DIAL to the left counter clockwise and MIDI note numbers will decrease You can also select the MIDI note number by striking the pad Every time the pad is struck the value will increase by one 4 Exit the MIDI Utility mode After each pad is assigned a MIDI note number exit the MIDI Utility mode For information on transmit notes and voices...

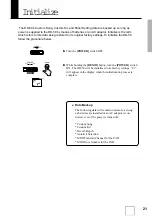
Page 23: ...elow Turn the POWER switch OFF While holding the DEMO button turn the POWER switch ON The DD 50 will be initialized to its factory settings Cr will appear in the display when the initialization process is complete Cr BEAT DEMO POWER OFF ON The following data will remain in memory as long as batteries are installed or an AC adaptor is con nected even if the power is turned off Custom Song Custom Ki...

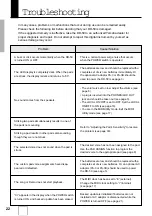
Page 24: ...ired voice has not been assigned to the pad Use the PAD ASSIGN function to program the desired voice to the appropriate pad see page 8 The batteries are low and should be replaced with a complete set of six new batteries Or an optional AC adaptor PA 3 or PA 3B should be used to power the DD 50 see page 3 The custom pad voice assignments have disap peared or defaulted Striking two pads simultaneous...

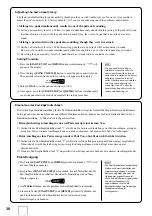
Page 25: ...nd Pedal those voices can be controlled with the foot pedal as follows Strike the pad while pressing the Foot Pedal the Closed Hi Hat voice will sound Strike the pad without pressing the Foot Pedal the Open Hi Hat voice will sound Press the Foot Pedal without striking the pad the Hi Hat Pedal voice will sound Durch Zuordnen derselben Hi Hat Voice HH Closed Open zu sowohl einem Pad und einem Pedal ...

Page 26: ...ck 2 9 Snare Drum 23 Rock H Tom L 25 Rock M Tom L 27 Rock L Tom L Rock Mid 8 Dance 1 11 Snare Drum Dance 16 High Tom H 18 Mid Tom H 20 Low Tom H 9 Dance 2 6 Snare Drum Light 17 High Tom L 19 Mid Tom L 21 Low Tom L 10 Samba Perc 73 Surdo Mute 60 Agogo H 61 Agogo L 74 Surdo Open 11 Timbales 58 Timbale L 42 Splash Cymbal 59 Cascala 57 Timbale H 12 Conga 54 Conga Muffled 51 Conga H Mute 52 Conga H Ope...

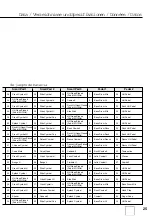
Page 27: ...35 Rock HH Pedal Pedal 2 Off On 36 Dance HH Open Closed 42 Splash Cymbal 49 Dance Cowbell 4 Bass Drum Dance 36 Dance HH Pedal Pedal 2 Off On 41 Chinese Cymbal 39 Ride Cymbal 36 Dance HH Open Closed 0 Bass Drum Lo 36 Dance HH Pedal Pedal 2 Off On 71 Cuica Mute 72 Cuica Open 63 Cabasa 2 48 Rock Cowbell 45 Tambourine 37 Crash Cymal L 38 Crash Cymbal H 50 Latin Cowbell 50 Latin Cowbell 66 Claves 55 Bo...

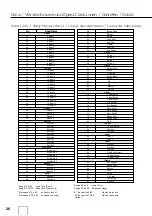
Page 28: ...tin Rock 53 Cha Cha 54 Mambo 55 Rhumba 56 Afro Cuban Swing 57 Swing 1 58 Swing 2 59 Swing 3 60 Swing 4 Others 61 Swing Waltz 62 Waltz 63 3 4 Ballad 64 Swing Blues 65 Blues 66 6 8 67 5 4 68 March 1 69 March 2 8 Beat 70 8 Beat Simple 71 8 Beat Rock 1 72 8 Beat Rock 2 73 Pop Ballad 1 74 Pop Ballad 2 75 Hard Rock 1 76 Hard Rock 2 77 Hard Rock 3 78 Dance Pop 1 79 Dance Pop 2 80 R B 16 Beat 81 16 Beat S...

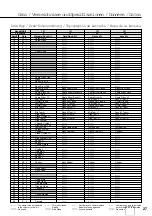
Page 29: ...zz M Tom H 48 C 2 High Tom L Rock H Tom L High Tom L Jazz H Tom L 49 C 2 Crash Cymbal L 50 D 2 High Tom H Rock H Tom H High Tom H Jazz H Tom H 51 D 2 Ride Cymbal 52 E 2 Chinese Cymbal 53 F 2 Ride Cymbal Cup 54 F 2 Tambourine Rock Tambourine Tombourine Tombourine 55 G 2 Splash Cymbal 56 G 2 Cowbell Rock Cowbell Dance Cowbell Cowbell 57 A 2 Crash Cymbal H 58 A 2 59 B 2 Ride Cymbal Cup 60 C 3 Bongo H...

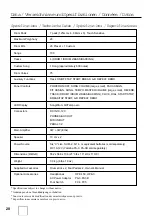
Page 30: ...it Tempo etc Connectors DC IN10 12 V PHONES AUX OUT MIDI IN OUT PEDAL 1 2 Main Amplifier 3W 3W EIAJ Speaker 10 cm x 2 Power Source Six C size SUM 2 R 14 or equivalent batteries sold separately DC 10 12V Yamaha PA 3 PA 3B sold separately Dimensions WxDxH 552 x 348 x 136 21 3 4 x 13 2 3 x 5 3 8 Weight 3 0 kg 6 Ibs 10 oz Supplied Accessories Drum stick x 2 Foot Pedal x 2 Owner s Manual Optional Acces...

Page 31: ...X System Song Position X X Song Select X X Common Tune X X System Clock O O Real Time Commands O O 2 Aux Local ON OFF X X All Notes Off X X Messages Active Sense O O Reset X X Mode 1 OMNI ON POLY Mode 2 OMNI ON MONO O Yes Mode 3 OMNI OFF POLY Mode 4 OMNI OFF MONO X No 1 Value of Pan for each drum pad and foot pedal is not transmitted via MIDI 1 Pan Werte der einzelnen Pads und Pedale werden nicht ...

Page 32: ...ung 2 höher oder niedriger einstellen Beim gleichzeitigen Anschlagen von zwei Pads erzeugt eines keinen Ton Stellen Sie die Pad Empfindlichkeit auf 3 ein Wenn Sie bei dieser Einstellung zwei Pads anschlagen erzeugen beide Ton Bei zu starkem Anschlagen kann es jedoch vorkommen das auch andere Pads mitschwingen Beim Anschlagen eines Pads erzeugen andere Pads Ton obwohl sie nicht berührt wurden Stell...

Page 33: ...uando se accionan dos pulsadores simultáneamente uno de los pulsadores no suena Ajuste el nivel de sensibilidad de los pulsadores a 3 Cuando se accionan dos pulsadores simultáneamente con este ajuste ambos pulsadores sonarán al mismo tiempo Sin embargo si acciona los pulsadores con demasiada fuerza la voz de un pulsador que no se ha accionado también puede sonar Al accionar un pulsador también sue...

Page 34: ...gkok 10330 Thailand Tel 2 215 3443 THE PEOPLE S REPUBLIC OF CHINA AND OTHER ASIAN COUNTRIES Yamaha Corporation International Marketing Division Nakazawa cho 10 1 Hamamatsu Japan 430 Tel 053 460 2317 NORTH AMERICA CANADA Yamaha Canada Music Ltd 135 Milner Avenue Scarborough Ontario M1S 3R1 Canada Tel 416 298 1311 U S A Yamaha Corporation of America 6600 Orangethorpe Ave Buena Park Calif 90620 U S A...

Reviews: