background image

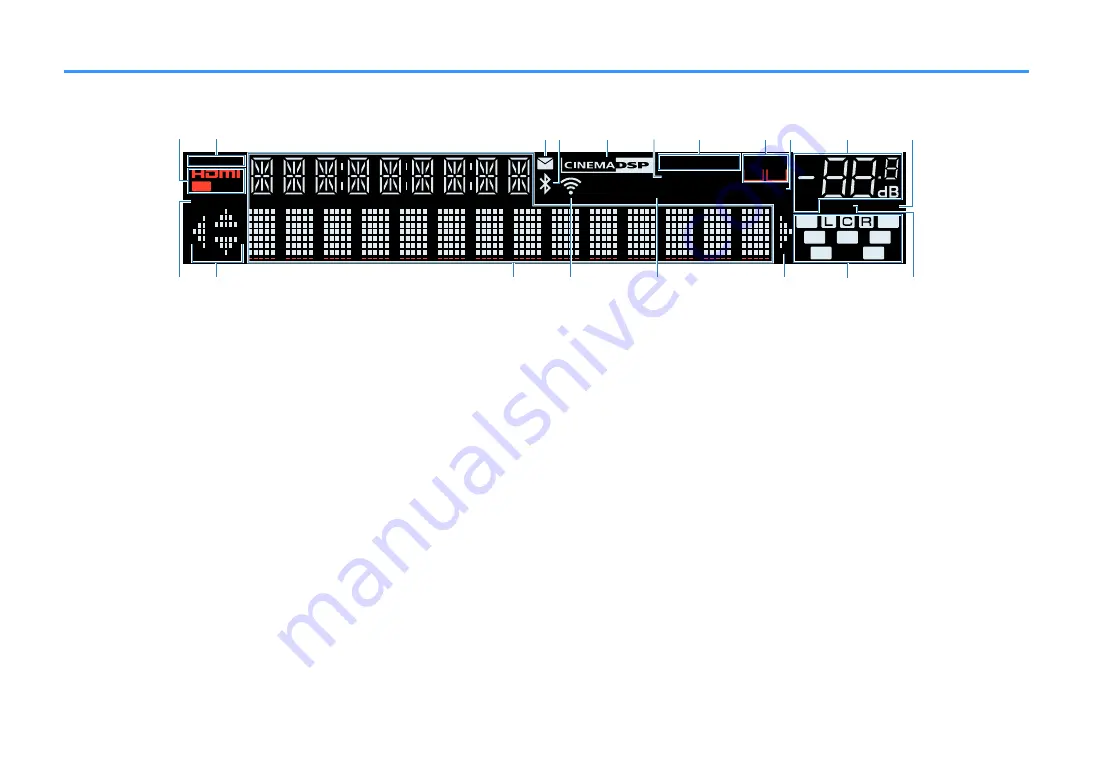
Part names and functions of the front display


The part names and functions of the front display are as follows.

-R

es

Hi

YPAO VOL.

PARTY

2

3

2

SB

ENHANCER

ECO

OUT

A - DRC

SLEEP

STEREO TUNED

VOL.

SL

SW

SR

SBL

SBR

MUTE VIRTUAL

ZONE

LINK MASTER

B

A

FPR

FPL

1

5

7

9

34

2

0

A

6

C

B

C

F

E

D

G

8

H

1

HDMI

Lights up when HDMI signals are being input or output.

OUT

Lights up when HDMI signals are being output.

2

LINK MASTER

Lights up when the unit is the master device of the
MusicCast network.

3

Firmware update indicator

Lights up when a firmware update is available via the
network.

4

Bluetooth indicator

Light up while the unit is connected to a Bluetooth device.

5

CINEMA DSP

Lights up when CINEMA DSP 3D (p.40) is working.

6

SLEEP

Lights up when the sleep timer is on.

7

STEREO

Lights up when the unit is receiving a stereo FM radio
signal.

TUNED

Lights up when the unit is receiving an FM/AM radio station
signal.

8

ZONE indicators

Indicate the zone to which the sound is output (p.47).


9

A-DRC

Lights up when Adaptive DRC (p.82) is working.

:

Volume indicator

Indicates the current volume.

A

VIRTUAL

Lights up when the virtual processing (p.41) is working.

B

ECO

Lights up when the eco mode (p.107) is enabled.

C

Cursor indicators

Indicate the remote control cursor keys currently
operational.

D

Information display

Displays the current status (such as input name and sound

mode name). You can switch the information by pressing
INFO (p.49).

E

Wireless LAN indicator

Light up while the unit is connected to a wireless network
(p.141).

NOTE

This indicator may light up when the unit is added to the
MusicCast network. For details, see “Adding the unit to the
MusicCast network” (p.39).

F

ENHANCER

Lights up when Compressed Music Enhancer (p.44) is
working.

G

Speaker indicators

Indicate speaker terminals from which signals are output.

A

 Front speaker (L)

S

 Front speaker (R)

D

 Center speaker

F

 Surround speaker (L)

G

 Surround speaker (R)

H

 Surround back speaker (L)

J

 Surround back speaker (R)

B

 Presence speaker (L)

N

 Presence speaker (R)

L

 Subwoofer

H

MUTE

Blinks when audio is temporarily muted.

En

13

Summary of Contents for AVENTAGE RX-A680

Page 1: ... s Manual This unit is a product for enjoying video and music at home This manual explains preparations and operations for everyday users of the unit Read the supplied booklet Quick Start Guide before using the unit EN ...

Page 2: ...onnecting to the jack on the front panel 28 4 Connecting the radio antennas 29 Connecting the FM AM antennas Except for U K Europe Russia and Middle East models 29 Connecting the DAB FM antenna U K Europe Russia and Middle East models 30 5 Preparing for connecting to a network 31 Preparing for connecting to a network 31 Connecting a network cable wired connection 31 Preparing wireless antennas wir...

Page 3: ...ning to DAB radio U K Europe Russia and Middle East models 57 Preparing the DAB tuning 57 Selecting a DAB radio station for reception 58 Selecting a preset DAB radio station 58 Registering a DAB radio station as presets 59 Clearing preset DAB radio stations 60 Displaying the DAB information 60 Checking reception strength of each DAB channel label 61 Listening to FM radio U K Europe Russia and Midd...

Page 4: ...up menu 90 Setup menu items 91 Configuring the speaker settings 94 Setting your speaker system 94 Setting the use of a subwoofer 94 Setting the size of the front speakers 94 Setting the use of a center speaker and its size 95 Setting the use of surround speakers and their size 95 Setting the use of surround back speakers and their size 96 Setting the use of presence speakers and their size 96 Sett...

Page 5: ...ddress filter 112 Setting the use of a Digital Media Controller 113 Setting the use of the Network Standby function 113 Setting the network name of the unit 114 Setting the power interlock from the unit to MusicCast compatible devices 114 Updating the firmware via the network 114 Configuring the Bluetooth settings 115 Setting the use of Bluetooth 115 Terminating the connection between a Bluetooth ...

Page 6: ...6 Using presence speakers 147 Presence speaker layout 147 Installing the presence speakers in Front Height position 147 Installing the presence speakers in Overhead position 147 Using Dolby Enabled speakers as the presence speakers 148 Glossary 149 Glossary of audio information 149 Glossary of HDMI and video information 150 Glossary of network information 151 Glossary of Yamaha technologies 151 Su...

Page 7: ...d iPad unless otherwise specified WARNING Indicates precautions for the possibility of death or serious injury CAUTION Indicates precautions for the possibility of minor or moderate injury NOTICE Indicates precautions for use to avoid the possibility of malfunction damage to the unit NOTE Indicates instructions and supplementary explanations for optimum use Checking the accessories Checking the ac...

Page 8: ...remote control Insert the batteries the right way round Operating range of the remote control Point the remote control at the remote control sensor on the unit and remain within the operating range shown in the following figure Within 6 m 20 ft 30 30 En 8 ...

Page 9: ...timized for the type of content p 41 Enjoying sound field effects without surround speakers Virtual CINEMA DSP p 41 Enjoying surround sound with headphones SILENT CINEMA p 41 Enjoying original sound straight decode p 42 Enjoying multichannel playback without sound field effects surround decoder p 42 Enjoying pure high fidelity sound direct playback p 43 Enhancing the bass Extra Bass p 43 Playing b...

Page 10: ... 139 Useful applications Application AV SETUP GUIDE AV SETUP GUIDE is an application that assists you with cable connections between AV Receiver and playback devices as well as AV Receiver setup This app guides you through the various settings such as speaker connections TV and playback device connections and selecting the speaker system For details search for AV SETUP GUIDE on the App Store or Go...

Page 11: ... sensor Receives remote control signals p 8 5 INFO WPS key Selects the information displayed on the front display p 49 Enters the wireless LAN connection setup WPS button configuration by holding down for a few seconds p 142 6 MEMORY key Registers radio stations as preset stations p 54 Registers Bluetooth USB or network content as a shortcut by holding down for a few seconds p 76 7 PRESET keys Sel...

Page 12: ... when it is in standby mode p 74 F PROGRAM keys Select a sound program or a surround decoder p 40 G STRAIGHT CONNECT key Enables disables the straight decode mode p 42 Enters the MusicCast network addition and the wireless LAN setup by holding down for 5 seconds p 39 H AUX jack For connecting devices such as portable audio players p 28 I USB jack For connecting a USB storage device p 69 J VOLUME k...

Page 13: ...dicate the zone to which the sound is output p 47 9 A DRC Lights up when Adaptive DRC p 82 is working Volume indicator Indicates the current volume A VIRTUAL Lights up when the virtual processing p 41 is working B ECO Lights up when the eco mode p 107 is enabled C Cursor indicators Indicate the remote control cursor keys currently operational D Information display Displays the current status such ...

Page 14: ...T jack For connecting to an HDMI compatible TV and outputting video audio signals p 26 When using ARC TV audio signal can also be input through the HDMI OUT jack 3 HDMI 1 4 jacks For connecting to HDMI compatible playback devices and inputting video audio signals p 27 4 ANTENNA jacks For connecting to the radio antennas p 29 5 NETWORK jack For a wired connection to a network p 31 6 Power cable For...

Page 15: ...it 3 SLEEP key Pressing this key repeatedly will specify the time 120 min 90 min 60 min 30 min off in which the unit switches to the standby mode 4 Input selection keys Selects an input source for playback directly by pressing each key NOTE Presses NET repeatedly to select a desired network source 5 ZONE switch Changes the zone that is controlled by the remote control p 46 6 SCENE keys Switch with...

Page 16: ...ction Front L R 1 2 Produce front channel sounds stereo sounds Center 3 Produces center channel sounds such as movie dialogue and vocals Surround L R 4 5 Produce surround channel sounds Surround speakers also produce surround back channel sounds when no surround back speakers are connected Surround back L R 6 7 Produce surround back channel sounds Presence L R E R Produce CINEMA DSP 3D effect soun...

Page 17: ...re to connect the surround back left and right speakers Using only one surround back speaker was discontinued You can also connect up to 2 subwoofers with built in amplifier to the unit Two subwoofers connected to the unit output the same sounds Speaker requirements Speakers and subwoofers to be connected to the unit must meet the following requirements U S A and Canada models only Under its defau...

Page 18: ... available cables to connect speakers to the unit Speaker cables the number of speakers required Audio pin cable for connecting a subwoofer How to connect speakers nConnecting the speaker Connect a speaker cable between the negative terminal of the unit and the negative terminal of the speaker and between the positive terminal of the unit and the positive unit of the speaker NOTICE When connecting...

Page 19: ...erminal 3 Insert the bare wires of the cable into the gap on the side upper right or bottom left of the terminal 4 Tighten the terminal FRONT a a b d c red black This completes the connection NOTE If Check SP Wires appears on the front display when the unit is turned on turn off the unit and then confirm that the speaker cables are not short circuited U S A Canada and General models only When usin...

Page 20: ...ng Setting the layout of the presence speakers p 97 You can also connect up to 2 subwoofers with built in amplifier to the unit Two subwoofers connected to the unit output the same sounds n For Front Height of the presence speakers layout 4 1 2 9 9 E R 5 3 10 to30 10 to30 0 5to1m 1 6to3 3ft 0 5to1m 1 6to3 3ft 1 8m 5 9ft 1 8m 5 9ft n For Overhead of the presence speakers layout 4 1 2 9 9 5 3 E R 10...

Page 21: ...plifier to the unit Two subwoofers connected to the unit output the same sound 4 1 2 9 9 5 6 7 3 10 to30 10 to30 0 3m 1ft ormore OPTICAL COAXIAL COAXIAL VIDEO VIDEO VIDEO AM FM 75 Ω ANTENNA RADIO MONITOR OUT PRE OUT SUBWOOFER BD DVD 2 3 1 4 ARC NETWORK NET FRONT CENTER SPEAKERS SURROUND AV 3 AUDIO 1 AUDI0 2 AUDI0 3 AV 2 AV 1 TV 1 2 HDMI HDCP2 2 HDMI OUT HDCP2 2 3 76 4 5 21 9 9 En 21 ...

Page 22: ...plifier to the unit Two subwoofers connected to the unit output the same sounds 4 1 2 9 5 3 10 to30 10 to30 OPTICAL COAXIAL COAXIAL VIDEO VIDEO VIDEO AM FM 75 Ω ANTENNA RADIO MONITOR OUT PRE OUT SUBWOOFER BD DVD 2 3 1 4 ARC NETWORK NET FRONT CENTER SPEAKERS SURROUND AV 3 AUDIO 1 AUDI0 2 AUDI0 3 AV 2 AV 1 TV 1 2 HDMI HDCP2 2 HDMI OUT HDCP2 2 3 4 5 21 9 En 22 ...

Page 23: ...sence speaker layout For details see the following Setting the layout of the presence speakers p 97 You can also connect up to 2 subwoofers with built in amplifier to the unit Two subwoofers connected to the unit output the same sound 1 2 9 E R 3 0 5to1m 1 6to3 3ft 0 5to1m 1 6to3 3ft 1 8m 5 9ft 1 8m 5 9ft OPTICAL COAXIAL COAXIAL VIDEO VIDEO VIDEO AM FM 75 Ω ANTENNA RADIO MONITOR OUT PRE OUT SUBWOO...

Page 24: ...ration p 34 Setting the use of Virtual CINEMA FRONT p 98 You can also connect up to 2 subwoofers with built in amplifier to the unit Two subwoofers connected to the unit output the same sounds 1 2 9 3 5 4 OPTICAL COAXIAL COAXIAL VIDEO VIDEO VIDEO AM FM 75 Ω ANTENNA RADIO MONITOR OUT PRE OUT SUBWOOFER BD DVD 2 3 1 4 ARC NETWORK NET FRONT CENTER SPEAKERS SURROUND AV 3 AUDIO 1 AUDI0 2 AUDI0 3 AV 2 AV...

Page 25: ...e speakers for details If you are not making bi amp connections make sure that the brackets or cables are connected before connecting the speaker cables 1 2 OPTICAL COAXIAL COAXIAL VIDEO VIDEO VIDEO AM FM 75 Ω ANTENNA RADIO MONITOR OUT PRE OUT SUBWOOFER BD DVD 2 3 1 4 ARC NETWORK NET FRONT CENTER SPEAKERS SURROUND AV 3 AUDIO 1 AUDI0 2 AUDI0 3 AV 2 AV 1 TV 1 2 HDMI HDCP2 2 HDMI OUT HDCP2 2 The unit...

Page 26: ...onized operations p 154 Audio Return Channel ARC p 155 If your TV does not support Audio Return Channel ARC a digital optical cable connection between the TV and the unit is needed VIDEO composite video connection with a TV Connect a TV to the unit with a video pin cable and a digital optical cable OPTICAL COAXIAL COAXIAL VIDEO VIDEO GND AM FM 75 Ω ANTENNA RADIO MONITOR OUT PRE OUT SUBWOOFER BD DV...

Page 27: ...ice Input jacks on the unit Video Audio Composite video Digital coaxial AV 1 VIDEO COAXIAL Analog stereo AV 2 3 VIDEO AUDIO Digital optical You need to change the combination of video audio input jacks p 84 OPTICAL COAXIAL COAXIAL VIDEO VIDEO GND AM FM 75 Ω ANTENNA RADIO MONITOR OUT PRE OUT SUBWOOFER BD DVD 2 3 1 4 ARC NETWORK NET FRONT CENTER SURROUND SINGLE AV 3 AUDIO 1 AUDI0 2 AUDI0 3 AV 2 AV 1...

Page 28: ...d lead Audio output PHONO NOTE The PHONO jack of the unit is compatible with an MM cartridge To connect a turntable with a low output MC cartridge use a boosting transformer Connecting the turntable to the GND terminal of the unit may reduce noise in the signal AUDIO1 is set as TV audio input at the factory If you have connected any external device to the AUDIO 1 jacks use TV Audio Input in the Se...

Page 29: ...AL COAXIAL VIDEO VIDEO GND AM FM 75 Ω ANTENNA RADIO MONITOR OUT PRE OUT SUBWOOFER BD DVD 2 3 1 4 ARC NETWORK NET FRONT CENTER SURROUND SINGLE AV 3 AUDIO 1 AUDI0 2 AUDI0 3 AV 2 AV 1 PHONO TV 1 2 HDMI HDCP2 2 HDMI OUT HDCP2 2 SPEAKERS VIDEO The unit rear FM antenna AM antenna Assembling and connecting the AM antenna Release Hold down Insert NOTE Unwind only the length of cable needed from the AM ant...

Page 30: ... OUT PRE OUT SUBWOOFER BD DVD 2 3 1 4 ARC NETWORK NET FRONT CENTER SURROUND SINGLE AV 3 AUDIO 1 AUDI0 2 AUDI0 3 AV 2 AV 1 TV 1 2 HDMI HDCP2 2 HDMI OUT HDCP2 2 SPEAKERS DAB FM 75 Ω ANTENNA RADIO GND PHONO The unit rear DAB FM antenna NOTE The antenna should be stretched out horizontally If you cannot obtain good reception on the radio adjust the height direction or placement of the DAB FM antenna E...

Page 31: ...work connection method p 141 Connecting a network cable wired connection Connect the unit to your router with a commercially available STP network cable CAT 5 or higher straight cable You can enjoy Internet radio or music files stored on media servers such as PCs and Network Attached Storage NAS on the unit OPTICAL COAXIAL COAXIAL VIDEO VIDEO VIDEO AM FM 75 Ω ANTENNA RADIO MONITOR OUT PRE OUT SUBW...

Page 32: ...TICE Do not apply excessive force on the wireless antenna Doing so may damage the antenna 6 Plugging in the power cable Plugging in the power cable After all the connections are complete plug in the power cable OPTICAL COAXIAL COAXIAL VIDEO VIDEO VIDEO AM FM 75 Ω ANTENNA RADIO MONITOR OUT PRE OUT SUBWOOFER BD DVD 2 3 1 4 ARC NETWORK NET FRONT CENTER SPEAKERS SURROUND AV 3 AUDIO 1 AUDI0 2 AUDI0 3 A...

Page 33: ...it HDMI OUT jack NOTE When you turn on the unit for the first time a message regarding the network setup appears You can switch the language on this message screen 3 Press SETUP 4 Use the cursor keys to select Language and press ENTER 5 Use the cursor keys to select the desired language 6 To exit from the menu press SETUP This completes the necessary settings NOTE The information on the front disp...

Page 34: ...nd switch the TV input to display video from the unit HDMI OUT jack NOTE If you turn on the unit for the first time the message regarding the network setup appears For now press RETURN and proceed to Step 3 3 Press SETUP 4 Use the cursor keys to select Speaker and press ENTER 5 Use the cursor keys to select Configuration and press ENTER 6 Configure the corresponding speaker settings Using surround...

Page 35: ...s keep the room as quiet as possible and do not stand between the speakers and the YPAO microphone for accurate measurement Do not connect headphones 1 Press z receiver power to turn on the unit 2 Turn on the TV and switch the TV input to display video from the unit HDMI OUT jack 3 Turn on the subwoofer and set the volume to half If the crossover frequency is adjustable set it to maximum VOLUME HI...

Page 36: ... YPAO p 37 Warning messages from YPAO p 38 A speaker with a problem is indicated by blinking of the speaker indicators in the front display If multiple warnings are given when operating with the front display use the cursor keys to check the other warning messages 6 Confirm the results displayed on the screen and press ENTER 7 Use the cursor keys to select SAVE and press ENTER The adjusted speaker...

Page 37: ...ected in order to use surround back speakers Exit YPAO turn off the unit and then reconnect the speakers E 7 No MIC E 7 NO MIC The YPAO microphone has been removed Connect the YPAO microphone to the YPAO MIC jack firmly and retry YPAO E 8 No Signal E 8 NO SIGNAL The YPAO microphone cannot detect test tones Connect the YPAO microphone to the YPAO MIC jack firmly and retry YPAO If this error occurs ...

Page 38: ...onnect the speaker cable If the speaker is connected correctly Depending on the type of speakers or room environment this message may appear even if the speakers are connected correctly In this case you can ignore the message W 2 Over Distance W 2 DISTANCE A speaker is placed more than 24 m 80 ft from the listening position Exit YPAO turn off the unit and place the problem speaker within 24 m 80 f...

Page 39: ...t network Perform the following procedure to add the unit to the MusicCast network You can also configure the unit s wireless network settings at once NOTE The SSID and security key for your network will be needed 1 Tap the MusicCast CONTROLLER application icon on your mobile device and tap Setup NOTE If you have already connected other MusicCast compatible devices to the network tap Settings and ...

Page 40: ... MEMORY MEMORY MEMORY M M M MEM EM EM EMO O O ORY RY RY RY BLUE YELLOW YELL YELL GREEN RED HOME STRAIGHT DIRECT ENHANCER BASS POP UP MENU TOP MENU OPTION SETUP MUTE VOLUME PROGRAM SCENE BD DVD TV NET RADIO ZONEA ZONEB POP UP MENU TOP MENU OPTION SETUP MUTE VOLUME PROGRAM SCENE BD DVD TV NET RADIO ZONEA ZONEB POP UP MENU TOP MENU OPTION SETUP MUTE VOLUME PROGRAM SCENE BD DVD TV NET RADIO ZONEA ZONE...

Page 41: ...re connected the unit automatically creates the surround sound field using the front speakers NOTE When Virtual CINEMA DSP is working VIRTUAL lights up on the front display Enjoying surround sound with 5 speakers placed in front Virtual CINEMA FRONT You can enjoy the surround sound even when the surround speakers are placed in front When Virtual CINEMA FRONT in the Setup menu is set to On the unit...

Page 42: ... 2 3 1 2 3 4 NET AUX PROGRAM BASS ENHANCER DIRECT STRAIGHT SCENE BD DVD TV NET RADIO SLEEP ZONEA ZONEB POP UP MENU TOP MENU OPTION SETUP MUTE VOLUME PROGRAM SCENE BD DVD TV NET RADIO ZONEA ZONEB POP UP MENU TOP MENU OPTION SETUP MUTE VOLUME PROGRAM SCENE BD DVD TV NET RADIO ZONEA ZONEB POP UP MENU TOP MENU OPTION SETUP MUTE VOLUME PROGRAM SCENE BD DVD TV NET RADIO ZONEA ZONEB POP UP MENU TOP MENU ...

Page 43: ...ions are not available Selecting sound programs Using the Zone B function Adjusting the tone control Operating the on screen Setup and Option menus Viewing information on the front display when not in operation When the direct playback mode is enabled the front display may become dark Enjoying enhanced bass sound Enhancing the bass Extra Bass Press BASS to enable Extra Bass and enjoy enhanced bass...

Page 44: ...t of Dolby Atmos or DTS X content we recommend a speaker system with presence speakers NOTE For details on the speaker system with the presence speakers see the following Using 5 1 2 channel system p 20 About Dolby Atmos Dolby Atmos contents are decoded as Dolby TrueHD or Dolby Digital Plus in the following situations Dolby Atmos PCM format is always decoded as Dolby Atmos Neither surround back no...

Page 45: ... B separately p 47 You can automatically enable disable the audio output to Zone A B in conjunction with a scene selection For details see the following Registering a scene p 75 Connecting Zone B speakers Connect the device that will be used in Zone B to the unit NOTICE Remove the unit s power cable from the AC wall outlet before connecting speakers Ensure that the bare wires of the speaker cable ...

Page 46: ...ZONE A ZONE B 2 Press z receiver power Each time you press the key the ZONE B audio output is on or off ENHANCER LINK ECO OUT Res Hi YPAO VOL A DRC SLEEP STEREO PARTY TUNED FPR SBL SB SBR FPL MUTE VIRTUAL MASTER 2 VOL SL SW SR ZONE HDMI1 ZONE B lights up 3 Use the input selection keys to select an input source AM PHONO FM HDMI AUDIO AV 1 2 3 BLUETOOTH USB 1 2 3 1 2 3 4 NET AUX SLEEP ZONEA ZONEB AM...

Page 47: ...Async For details see the following Adjusting the volume for Zone B in conjunction with the volume for Zone A p 106 Adjusting the volume for Zone B separately You can separately adjust the volume for Zone B using the remote control NOTE Slide the Zone switch to ZONE A in menu operations 1 Press SETUP 2 Use the cursor keys to select Sound and press ENTER 3 Use the cursor keys to select Volume and p...

Page 48: ...RAM BASS ENHANCER DIRECT STRAIGHT SCENE BD DVD TV NET RADIO SLEEP ZONEA ZONEB PRESET TUNING MEMORY BLUE YELLOW GREEN RED POP UP MENU HOME TOP MENU DISPLAY RETURN OPTION SETUP MUTE VOLUME AM PHONO FM HDMI AUDIO AV A A 1 2 3 BLUETOOTH USB 1 2 3 1 2 3 4 NET AUX PROGRAM BASS ENHANCER DIRECT STRAIGHT SCENE BD DVD TV NET RADIO SLEEP ZONEA ZONEB PRESET TUNING MEMORY MEMORY BLUE YELLOW GREEN RED POP UP ME...

Page 49: ... Program sound mode name Audio Decoder decoder name IP Address Ethernet MAC Wi Fi MAC NET RADIO Song song title Album album name Station station name DSP Program sound mode name Audio Decoder decoder name IP Address Ethernet MAC Wi Fi MAC MusicCast Link DSP Program sound mode name Audio Decoder decoder name IP Address Ethernet MAC Wi Fi MAC TUNER FM AM Frequency frequency DSP Program sound mode na...

Page 50: ...E BD DVD TV NET RADIO SLEEP ZONEA ZONEB PRESET TUNING MEMORY MEMORY BLUE YELLOW GREEN RED POP UP MENU HOME TOP MENU ENTER DISPLAY RETURN OPTION SETUP MUTE VOLUME AUX BLUETOOTH NET USB AM FM PHONO PHONO AM PHONO FM HDMI AUDIO AV 1 2 3 BLUETOOTH USB 1 2 3 1 2 3 4 NET AUX PROGRAM BASS ENHANCER DIRECT STRAIGHT SCENE BD DVD TV NET RADIO SLEEP ZONEA ZONEB PRESET TUNING MEMORY BLUE YELLOW GREEN RED HOME ...

Page 51: ...em and press ENTER to confirm the selection 3 Item number total 4 Status indicators Display the current shuffle repeat settings and playback status such as play pause 5 Operation menu Use the cursor keys to select an item Press ENTER to confirm the selection Icon Function Moves 10 pages backward Moves to the previous page of the list Moves to the next page of the list Moves 10 pages forward Moves ...

Page 52: ...eps to 100 kHz for FM and 10 kHz for AM 1 Set the unit to standby mode 2 When holding down STRAIGHT on the front panel press z power power z STRAIGHT PROGRAM 3 Press PROGRAM to select TU ENHANCER LINK ECO MASTER OUT 2 Res Hi YPAO VOL A DRC SLEEP STEREO PARTY TUNED ZONE 3 B 2 A VOL FPR SL SW SR SBL SB SBR FPL MUTE VIRTUAL TU FM50 AM9 4 Press STRAIGHT to select FM100 AM10 5 Press z power to set the ...

Page 53: ...DIRECT DIRECT STRAIGHT STRAIGHT S STRAIGH TRAIGHT T TUNING PRESET TUNING MEMORY BLUE YELLOW GREEN RED POP UP MENU HOME TOP MENU ENTER DISPLAY RETURN OPTION SETUP MUTE VOLUME AM PHONO FM HDMI AUDIO AV 1 2 3 BLUETOOTH USB 1 2 3 1 2 3 4 NET AUX PROGRAM BASS ENHANCER DIRECT STRAIGHT SCENE BD DVD TV NET RADIO SLEEP ZONEA ZONEB PRESET TUNING MEMORY BLUE YELLOW GREEN RED POP UP MENU HOME TOP MENU DISPLAY...

Page 54: ... SR STEREO TUNED 01 FM 98 50MHz NOTE No Presets appears on the front display when no radio stations are registered Registering FM radio stations automatically Auto Preset Automatically register FM radio stations with strong signals NOTE You can register up to 40 radio stations as presets To register AM radio stations see the following Registering a radio station manually p 55 1 Press FM to select ...

Page 55: ...EP ZONEA ZONEB PRESET TUNING MEMORY MEMORY BLUE YELLOW GREEN RED POP UP MENU HOME TOP MENU ENTER DISPLAY RETURN OPTION SETUP MUTE VOLUME AUX BLUETOOTH NET USB AM FM PHONO PHONO AM PHONO FM HDMI AUDIO AV 1 2 3 BLUETOOTH USB 1 2 3 1 2 3 4 NET AUX PROGRAM BASS ENHANCER DIRECT STRAIGHT SCENE BD DVD TV NET RADIO SLEEP ZONEA ZONEB PRESET TUNING MEMORY BLUE YELLOW GREEN RED HOME BASS ENHANCER DIRECT STRA...

Page 56: ...3 B 2 A FPR SL SW SR SBL SB SBR FPL MUTE VIRTUAL VOL Preset 4 Use the cursor keys to select CLEAR 5 Use the cursor keys to select a preset station to be cleared and press ENTER ENHANCER LINK ECO MASTER OUT 2 Res Hi YPAO VOL A DRC SLEEP PARTY ZONE 3 B 2 A MUTE VIRTUAL FPR SBL SB SBR FPL VOL SL SW SR STEREO TUNED 01 FM 98 50MHz Preset station to be cleared If the preset station is cleared Cleared ap...

Page 57: ...ECO MASTER OUT 2 Res Hi YPAO VOL A DRC SLEEP PARTY ZONE 3 B 2 A MUTE VIRTUAL SBL SB SBR FPR FPL SL SW SR STEREO TUNED VOL Press ENTER 2 Press ENTER to start an initial scan ENHANCER LINK ECO MASTER OUT 2 Res Hi YPAO VOL A DRC SLEEP PARTY ZONE 3 B 2 A MUTE VIRTUAL SBL SB SBR FPR FPL SL SW SR STEREO TUNED VOL 30 When the initial scan finishes the unit automatically tunes into the first DAB radio sta...

Page 58: ...s Hi YPAO VOL A DRC SLEEP PARTY ZONE 3 B 2 A MUTE VIRTUAL SBL SB SBR FPR FPL STEREO TUNED VOL SL SW SR BBC National Secondary station You can watch videos input from external devices while listening to radio For details see the following Selecting a video source to be output with the selected audio source p 85 Selecting a preset DAB radio station Tune into a registered DAB radio station by selecti...

Page 59: ...MENU DAB FM SCENE BD DVD TV NET RADIO HDMI AUDIO AV 1 2 3 BLUETOOTH USB 1 2 3 1 2 3 4 NET AUX TUNING PRESET HOME MEMORY DISPLAY RETURN BLUE YELLOW GREEN RED SLEEP ZONEA ZONEB PHONO STRAIGHT DIRECT ENHANCER BASS TUNING PRESET HOME MEMORY BLUE YELLOW GREEN RED STRAIGHT DIRECT ENHANCER BASS TUNING PRESET HOME BLUE YELLOW YELL YELL GREEN RED MEMORY U K Europe Russia and Middle East models ENHANCER LIN...

Page 60: ...es of DAB information when it is tuned into a DAB radio station 1 Tune into the desired DAB radio station 2 Press INFO on the front panel to select between the various display items ENHANCER LINK ECO MASTER OUT 2 Res Hi YPAO VOL A DRC SLEEP PARTY ZONE 3 B 2 A MUTE VIRTUAL FPR SBL SB SBR FPL STEREO TUNED VOL SL SW SR Program Type Item name About 3 seconds after a display item is selected its corres...

Page 61: ...L SL SW SR 5A Level 80 DAB channel label Reception strength 5 Press OPTION This completes the checking nDAB frequency information The unit supports Band III 174 to 240 MHz only Frequency Channel label 174 928 MHz 5A 176 640 MHz 5B 178 352 MHz 5C 180 064 MHz 5D 181 936 MHz 6A 183 648 MHz 6B 185 360 MHz 6C 187 072 MHz 6D 188 928 MHz 7A 190 640 MHz 7B 192 352 MHz 7C 194 064 MHz 7D 195 936 MHz 8A 197 ...

Page 62: ...HANCER BASS TUNING PRESET HOME MEMORY BLUE YELLOW GREEN RED STRAIGHT DIRECT ENHANCER BASS PRESET HOME MEMORY BLUE YELLOW YELL YELL GREEN RED TUNING STRAIGHT DIRECT ENHANCER BASS ENTER SETUP OPTION TOP MENU MUTE PROGRAM VOLUME POP UP MENU DAB FM SCENE BD DVD TV NET RADIO HDMI AUDIO AV 1 2 3 BLUETOOTH USB 1 2 3 1 2 3 4 NET AUX TUNING PRESET HOME MEMORY DISPLAY RETURN BLUE YELLOW GREEN RED SLEEP ZONE...

Page 63: ... stations as presets Only Radio Data System broadcasting stations are registered automatically by the Auto Preset function 1 Press FM to select TUNER as the input source TUNER is selected as the input source and the frequency currently selected is displayed on the front display 2 Press OPTION 3 Use the cursor keys to select Preset and press ENTER ENHANCER LINK ECO MASTER OUT 2 Res Hi YPAO VOL A DR...

Page 64: ... MUTE PROGRAM VOLUME POP UP MENU DAB FM SCENE BD DVD TV NET RADIO HDMI AUDIO AV 1 2 3 BLUETOOTH USB 1 2 3 1 2 3 4 NET AUX TUNING PRESET HOME MEMORY DISPLAY RETURN BLUE YELLOW GREEN RED SLEEP ZONEA ZONEB PHONO STRAIGHT DIRECT ENHANCER BASS TUNING PRESET HOME MEMORY BLUE YELLOW GREEN RED STRAIGHT DIRECT ENHANCER BASS TUNING PRESET HOME BLUE YELLOW YELL YELL GREEN RED MEMORY U K Europe Russia and Mid...

Page 65: ... countries The unit can receive various types of Radio Data System data such as Program Service Program Type Radio Text and Clock Time when it is tuned into a Radio Data System broadcasting station 1 Tune into the desired Radio Data System broadcasting station NOTE We recommend using Auto Preset to tune into the Radio Data System broadcasting stations For details see the following Registering FM r...

Page 66: ...s see the following Supported Bluetooth devices p 152 1 Press BLUETOOTH to select Bluetooth as the input source 2 On the Bluetooth device select the unit network name of the unit A connection between the Bluetooth device and the unit will be made If the pass key is required enter the number 0000 3 On the Bluetooth device select a song and start playback The playback screen is displayed on the TV N...

Page 67: ...o On 5 Use the cursor keys to select Device Search and press ENTER to search the Bluetooth devices The list of Bluetooth devices is displayed 6 Use the cursor keys to select the Bluetooth speakers headphones to be connected with the unit and press ENTER When the connection process finishes Completed appears and audio played back on the unit will be reproduced from the Bluetooth speakers headphones...

Page 68: ...played on the TV CAUTION When you use iTunes iPhone controls to adjust volume the volume may be unexpectedly loud This could result in damage to the unit or speakers If the volume suddenly increases during playback stop playback on the iTunes iPhone immediately We recommend volume controls from iTunes iPhone within the limited range by setting Volume Interlock Vol Interlock in the Option menu NOTE...

Page 69: ...USB jack of the unit Do not use extension cables The unit cannot charge USB devices while it is in standby mode 2 Press USB to select USB as the input source The browse screen is displayed on the TV NOTE If playback is ongoing on your USB storage device the playback screen is displayed 3 Use the cursor keys to select an item and press ENTER If a song is selected playback starts and the playback sc...

Page 70: ...details on media sharing settings refer to Windows Media Player help Playing back music stored on media servers PCs NAS You can play back music files stored on your media server on the unit NOTE You need to configure the media sharing setting on each music server in advance For details see the following Media sharing setup on media servers PCs NAS p 70 To use this function the unit and your PC mus...

Page 71: ...You can configure the shuffle repeat settings for playback of contents For details see the following Configuring the shuffle setting p 87 Configuring the repeat setting p 87 You can also use the Digital Media Controller DMC to control playback For details see the following Setting the use of a Digital Media Controller p 113 You can register contents as shortcuts and access them directly For detail...

Page 72: ...k starts and the playback screen is displayed NOTE To return to the top level while on the browse screen hold down RETURN To switch the screen mode browse playback off press DISPLAY Registering favorite Internet radio stations You can register the Internet radio station in playback at present to the Favorites folder 1 While listening to Internet radio press OPTION 2 Use the cursor keys to select A...

Page 73: ...ome regions where the unit is purchased Service may change or be discontinued without notice After registering the unit in the MusicCast CONTROLLER app you can use the streaming service For details see the following Adding the unit to the MusicCast network p 39 To use this function the unit must be connected to the Internet You can check whether the network parameters such as the IP address are pr...

Page 74: ...VOLUME AUX BLUETOOTH NET USB AM FM PHONO PHONO AM PHONO FM HDMI AUDIO AV 1 2 3 BLUETOOTH USB 1 2 3 1 2 3 4 NET AUX PROGRAM BASS ENHANCER DIRECT STRAIGHT SCENE BD DVD TV NET RADIO SLEEP ZONEA ZONEB POP UP MENU TOP MENU OPTION SETUP MUTE VOLUME PROGRAM SCENE BD DVD TV NET RADIO ZONEA ZONEB POP UP MENU TOP MENU OPTION SETUP MUTE VOLUME PROGRAM SCENE BD DVD TV NET RADIO ZONEA ZONEB POP UP MENU TOP MEN...

Page 75: ...sable SCENE link playback Enable disable the audio output to Zone A B 2 Hold down the desired SCENE key until SET Complete appears on the front display ENHANCER LINK ECO MASTER OUT 2 Res Hi YPAO VOL A DRC SLEEP STEREO PARTY TUNED ZONE 3 B 2 A FPR SBL SB SBR FPL MUTE VIRTUAL VOL SL SW SR SET Complete This completes the registers NOTE For details on the settings see the following Enjoying sound fiel...

Page 76: ...MUTE VOLUME AUX BLUETOOTH NET USB AM FM PHONO PHONO AM PHONO FM HDMI AUDIO AV 1 2 3 BLUETOOTH USB 1 2 3 1 2 3 4 NET AUX PROGRAM BASS ENHANCER DIRECT STRAIGHT SCENE BD DVD TV NET RADIO SLEEP ZONEA ZONEB PRESET TUNING MEMORY BLUE YELLOW GREEN RED HOME BASS ENHANCER DIRECT STRAIGHT PRESET TUNING MEMORY BLUE YELLOW GREEN RED HOME BASS ENHANCER DIRECT STRAIGHT PRESET TUNING MEMORY MEMORY BLUE YELLOW GR...

Page 77: ... 2 3 1 2 3 4 NET AUX PROGRAM BASS ENHANCER DIRECT STRAIGHT SCENE BD DVD TV NET RADIO SLEEP ZONEA ZONEB PRESET TUNING MEMORY BLUE YELLOW GREEN RED POP UP MENU HOME TOP MENU DISPLAY RETURN OPTION SETUP MUTE VOLUME AM PHONO FM HDMI AUDIO AV A A 1 2 3 BLUETOOTH USB 1 2 3 1 2 3 4 NET AUX PROGRAM BASS ENHANCER DIRECT STRAIGHT SCENE BD DVD TV NET RADIO SLEEP ZONEA ZONEB PRESET TUNING MEMORY MEMORY BLUE Y...

Page 78: ...LAY RETURN OPTION SETUP MUTE VOLUME AM PHONO FM HDMI AUDIO AV A A 1 2 3 BLUETOOTH USB 1 2 3 1 2 3 4 NET AUX PROGRAM BASS ENHANCER DIRECT STRAIGHT SCENE BD DVD TV NET RADIO SLEEP ZONEA ZONEB PRESET TUNING MEMORY MEMORY BLUE YELLOW GREEN RED POP UP MENU HOME TOP MENU ENTER DISPLAY RETURN OPTION SETUP MUTE VOLUME AUX BLUETOOTH NET USB AM FM PHONO PHONO AM PHONO FM HDMI AUDIO AV 1 2 3 BLUETOOTH USB 1 ...

Page 79: ... between Zone A B p 83 Lipsync Lipsync Enables disables the Lipsync setting in the Setup menu p 83 Signal Information Signal Info Displays information about the video audio signals p 84 Audio In Audio In Combines the video of the selected input source with the audio of a different input source p 84 Video Out Video Out Selects a video source to be output together with the selected audio source p 85...

Page 80: ...read richly creating a calming atmosphere The listener s virtual seat is at the center left of the arena Hall in Vienna This program simulates a 1700 seat middle sized concert hall with a shoebox shape that is traditional in Vienna Pillars and ornate carvings create extremely complex reverberations from all around the audience producing a very full rich sound Chamber This program creates a relativ...

Page 81: ...ically created virtual spaces reproduced with clear separation between dialogue sound effects and background music Adventure This program is ideal for reproducing the sound design of action and adventure movies precisely The sound field restrains reverberations but puts emphasis on reproducing a sensation of expansiveness on both sides powerful space expanded widely to the left and right The restr...

Page 82: ...rround decoder parameters in DSP Parameter in the Setup menu For details see the following Adjusting the center localization broadening effect of the front sound field p 103 Setting the use of Center Spread p 103 The selected surround decoder may not work for some input sources We recommend Dolby Surround while network streaming is Dolby contents The Neural X decoder does not work for Dolby Digita...

Page 83: ...crements NOTE This setting is applied separately to each input source nAdjusting the subwoofer volume Fine adjusts the subwoofer volume Option menu Volume Trim Subwoofer Trim Setting range 6 0 dB to 6 0 dB 0 5 dB increments nCorrecting volume difference between Zone A and Zone B If you are bothered by volume difference between Zone A B adjust the volume for Zone B Option menu Volume Trim ZoneB Tri...

Page 84: ...ce that supports HDMI video output but not HDMI audio output Option menu Audio In Input sources HDMI 1 4 AV 1 3 Settings AV 1 3 AUDIO 1 3 Video audio input jacks available on the unit Output jacks on video device Input jacks on the unit Video Audio Video Audio HDMI Digital optical HDMI 1 4 AUDIO 1 OPTICAL Digital coaxial HDMI 1 4 AUDIO 2 COAXIAL AV 1 COAXIAL Analog stereo HDMI 1 4 AUDIO 3 AUDIO AV...

Page 85: ...MORY M M M MEM EM EM EMO O O ORY RY RY RY BLUE YELLOW YELL YELL GREEN RED POP UP MENU TOP MENU DISPLAY RETURN SETUP OPTION ENTER Cursor keys 3 Use the cursor keys to select Audio In and press ENTER ENHANCER LINK ECO MASTER OUT 2 Res Hi YPAO VOL A DRC SLEEP STEREO PARTY TUNED ZONE 3 B 2 A FPR SL SW SR SBL SB SBR FPL MUTE VIRTUAL VOL Audio In 4 Use the cursor keys to select AUDIO 1 audio input jack ...

Page 86: ...o start the Auto Preset process press ENTER ENHANCER LINK ECO MASTER OUT 2 Res Hi YPAO VOL A DRC SLEEP PARTY ZONE 3 B 2 A MUTE VIRTUAL STEREO TUNED FPR SBL SB SBR FPL SL SW SR VOL 01 FM 87 50MHz SEARCH appears during Auto Preset Preset number from which to start the registration The Auto Preset process starts and SEARCH appears during Auto Preset NOTE To cancel the Auto Preset process press RETURN...

Page 87: ... NOTE This setting is available only when USB or SERVER is selected as the input source Configuring the repeat setting Configure the repeat setting for playback Option menu Repeat Settings Off Turns off the repeat function One Plays back the current song repeatedly All Plays back all songs in the current album folder repeatedly NOTE This setting is available only when USB or SERVER is selected as ...

Page 88: ...Use the cursor keys to select Remove from favorites and press ENTER When the removing process finishes the Option menu closes automatically Performing an initial scan for DAB radio reception U K Europe Russia and Middle East models only Perform an initial scan for searching DAB radio stations Option menu Init Scan 1 Press DAB to select the DAB band 2 Press OPTION 3 Use the cursor keys to select In...

Page 89: ...ach DAB channel label Option menu Tune AID 1 Press DAB to select the DAB band 2 Press OPTION 3 Use the cursor keys to select Tune AID and press ENTER 4 Use the cursor keys to select the desired DAB channel label The reception strength of DAB channel label is displayed in 0 none to 100 best 5 Press OPTION This completes the checking En 89 ...

Page 90: ...CENE BD DVD TV NET RADIO SLEEP ZONEA ZONEB PRESET TUNING MEMORY BLUE YELLOW GREEN RED POP UP MENU HOME TOP MENU DISPLAY RETURN OPTION SETUP MUTE VOLUME AM PHONO FM HDMI AUDIO AV A A 1 2 3 BLUETOOTH USB 1 2 3 1 2 3 4 NET AUX PROGRAM BASS ENHANCER DIRECT STRAIGHT SCENE BD DVD TV NET RADIO SLEEP ZONEA ZONEB PRESET TUNING MEMORY MEMORY BLUE YELLOW GREEN RED POP UP MENU HOME TOP MENU ENTER DISPLAY RETU...

Page 91: ...subwoofer p 97 Extra Bass Enables disables Extra Bass p 97 Virtual CINEMA FRONT Enables disables the front 5 channel speaker Virtual CINEMA FRONT configuration p 98 Distance Sets the distance between each speaker and the listening position p 98 Level Adjusts the volume of each speaker p 98 Equalizer Adjusts the tone with an equalizer p 99 Test Tone Enables disables the test tone output p 99 HDMI H...

Page 92: ...nt of time for the auto standby function p 107 ECO Mode Enables disables the eco mode power saving mode p 107 Function Input Rename Changes the input source name displayed on the front display p 108 Input Skip Set which input sources are skipped when operating the INPUT knob p 109 Dimmer Adjusts the brightness of the front display p 109 Memory Guard Prevents accidental changes to the settings p 10...

Page 93: ... p 115 Bluetooth Standby Selects whether to enable disable the function that turns on the unit from Bluetooth devices Bluetooth standby p 115 Audio Send Transmitter Enables disables the Bluetooth audio transmitter function p 116 Device Search Searches available Bluetooth devices speakers headphones when the unit is used as a Bluetooth audio transmitter p 116 Language Select an on screen menu langu...

Page 94: ...use of your subwoofer Setup menu Speaker Configuration Subwoofer Settings Use Select this option when a subwoofer is connected The subwoofer will produce LFE low frequency effect channel audio and low frequency components from other channels None Select this option when no subwoofer is connected The front speakers will produce LFE low frequency effect channel audio and low frequency components fro...

Page 95: ... 4 Setting the use of surround speakers and their size Selects the setting according to the use and size of your surround speakers Setup menu Speaker Configuration Surround Settings Small Select this option for small speakers The subwoofer or front speakers will produce surround channel low frequency components configurable in Crossover Large Select this option for large speakers The surround spea...

Page 96: ...s be sure to connect the surround back left and right speakers Using only one surround back speaker was discontinued Surround Back is not available when Virtual CINEMA FRONT is set to On For details on Virtual CINEMA FRONT in the Setup menu see the following Setting the use of Virtual CINEMA FRONT p 98 Setting the use of presence speakers and their size Selects the setting according to the use and...

Page 97: ...d lower than the specified value will be produced from the subwoofer or front speakers Setup menu Speaker Configuration Crossover Settings 40 Hz 60 Hz 80 Hz 90 Hz 100 Hz 110 Hz 120 Hz 160 Hz 200 Hz NOTE If the volume and crossover frequency are adjustable on your subwoofer set the volume to half and crossover frequency to maximum Setting the phase of the subwoofer Sets the phase of the subwoofer W...

Page 98: ...r and the listening position so that sounds from the speakers reach the listening position at the same time Setup menu Speaker Distance Choices Front L Front R Center Surround L Surround R Surround Back L Surround Back R Presence L Presence R Subwoofer Setting range 0 30 m to 24 00 m 1 0 ft to 80 0 ft 0 05 m 0 2 ft increments NOTE Select the unit of distance from Meter or Feet in Unit Adjusting th...

Page 99: ...gain Setting range 6 0 dB to 6 0 dB 3 Press SETUP This completes the settings NOTE Test tone output helps you to adjust the equalizer while confirming its effect For details see the following Outputting test tones p 99 PEQ is available only when the YPAO has been performed For details on the YPAO see the following Optimizing the speaker settings automatically YPAO p 35 Outputting test tones Enable...

Page 100: ...ut from the TV Setting the use of HDMI Standby Through Select whether to output video audio input through HDMI jacks to the TV when the unit is in standby mode NOTE If this function is set to On or Auto you can use the input selection keys HDMI 1 4 to select an HDMI input even when the unit is in standby mode the standby indicator on the unit blinks Setup menu HDMI Standby Through Settings Off Doe...

Page 101: ...f the unit and the TV Select whether to use HDMI control to link the unit s standby mode to the TV s power when HDMI Control is set to On NOTE For details on HDMI Control in the Setup menu see the following Setting the use of HDMI Control p 100 Setup menu HDMI Standby Sync Settings Off Does not set the unit to standby mode when the TV is turned off On Sets the unit to standby mode when the TV is t...

Page 102: ... device starting playback NOTE For details on HDMI Control in the Setup menu see the following Setting the use of HDMI Control p 100 Setup menu HDMI SCENE Choices SCENE keys BD DVD TV NET RADIO Settings Off Disables SCENE link playback for the selected SCENE key On Enables SCENE link playback for the selected SCENE key NOTE SCENE link playback may not work properly due to the compatibility between...

Page 103: ...following Selecting the surround decoder used in the program p 81 Setting the use of Monaural Mix Enables disables monaural sound output This function can be applicable when the sound program is set to 7ch Stereo only Setup menu Sound DSP Parameter Monaural Mix Settings Off Disables monaural sound output On Enables monaural sound output Setting the adjustment method of the Lipsync function Selects...

Page 104: ...ume of dialogue sounds that are hardly heard Setup menu Sound Dialogue Dialogue Level Setting range 0 to 3 higher to strengthen NOTE This setting is not available when one of the following conditions is met Dolby Atmos content or DTS X content is played back The Dolby Surround or Neural X decoder is working Adjusting the volume of dialogue sound during DTS X playback Adjusts the volume of dialogue...

Page 105: ...ialogue Lift Setting range 0 to 5 The bigger the value the higher the position Ideal position Setting the scale of the volume display Switches the scale of the volume display Setup menu Sound Volume Scale Settings dB Displays the volume in the dB unit 0 97 Displays the volume in the numeric value 0 5 to 97 0 Setting the dynamic range adjustment method Selects the dynamic range adjustment method fo...

Page 106: ...d volume level NOTE This setting works only when the volume level is set lower than Max Volume For details on Max Volume in the Setup menu see the following Setting the limit value of the volume p 106 Adjusting the volume for Zone B in conjunction with the volume for Zone A Selects whether to adjust the volume for Zone B in conjunction with the volume for Zone A Setup menu Sound Volume ZoneB Volum...

Page 107: ... standby mode when you have not operated the unit for the specified time NOTE Just before the unit enters standby mode AutoPowerStdby appears and then countdown starts in the front display Setting the use of the eco mode You can reduce the unit s power consumption by setting the eco mode to On After changing the setting be sure to press ENTER to restart the unit When the eco mode is enabled you ca...

Page 108: ...o reset to the default setting switch the setting to Manual and then back to Auto Manually changing the input source names displayed on the front display Allows the input source names displayed on the front display to be set manually Setup menu Function Input Rename Input sources HDMI 1 4 AV 1 3 AUX AUDIO 1 3 PHONO TUNER MusicCast Link SERVER NET RADIO USB 1 Use the cursor keys to select an input ...

Page 109: ...ct the input sources set to On in this function Adjusting the brightness of the front display Adjusts the brightness of the front display Setup menu Function Dimmer Setting range 4 to 0 higher to brighten NOTE The front display may become dark when ECO Mode is set to On For details see the following Setting the use of the eco mode p 107 Preventing accidental changes to the settings Prevents accide...

Page 110: ...AV 2 BLUE AUX Program Assigns the functions of sound mode to each key RED MOVIE GREEN MUSIC YELLOW STEREO BLUE SUR DECODE TV Control Assigns the functions of TV Control to each key RED EXIT closes the menu on the TV GREEN INFO displays information about the TV such as the resolution YELLOW BROADCAST switches the TV broadcast type BLUE INPUT switches the TV input This setting is effective when HDMI...

Page 111: ...nection method Wired Wireless Selects the network connection method Setup menu Network Network Connection Choices Wired Select this option when you want to connect the unit to a network with a commercially available network cable Wireless Wi Fi Select this option when you want to connect the unit to a network via the wireless router access point NOTE For details on the network connection see the f...

Page 112: ...eat steps 2 to 3 5 Press SETUP This completes the settings Setting the MAC address filter Sets the MAC address filter to limit access to the unit from other network devices NOTE Operation of the AirPlay function or the DMC is not limited by this setting You can specify up to 10 network devices that are permitted to access the unit Setup menu Network MAC Address Filter Filter Settings Off Disables ...

Page 113: ...llows DMCs to control playback Setting the use of the Network Standby function Selects whether the unit can be turned on from other network devices network standby Setup menu Network Network Standby Settings Off Disables the network standby function On Enables the network standby function The unit consumes more power than when Off is selected Auto Enables the network standby function If Network Co...

Page 114: ...ower Interlock Settings Off Disables the power interlock from the unit MusicCast master On Enables the power interlock from the unit MusicCast master Updating the firmware via the network Updates the firmware via the network You can select Perform Update after the unit is ready for firmware update You can also check the firmware version and system ID Setup menu Network Network Update NOTE Firmware...

Page 115: ...ting is not available when no Bluetooth devices are connected Setting the use of the Bluetooth Standby function Selects whether to enable disable the function that turns on the unit from Bluetooth devices Bluetooth standby If this function is set to On the unit automatically turns on when a connect operation is performed on the Bluetooth device Setup menu Bluetooth Audio Receive Bluetooth Standby ...

Page 116: ... the unit and Bluetooth devices that receive audio transmitted from the unit such as speakers and headphones when Transmitter is set to On in the Setup menu NOTE For details on Transmitter in the Setup menu see the following Setting the use of audio transmission to a Bluetooth device p 116 Setup menu Bluetooth Audio Send Device Search 1 Press ENTER A list of Bluetooth devices that can connect to t...

Page 117: ...guage Select the on screen menu language Setup menu Language Settings English English 日本語 Japanese Français French Deutsch German Español Spanish Русский Russian Italiano Italian 中文 Chinese NOTE The information on the front display is provided in English only En 117 ...

Page 118: ...lt settings of the ADVANCED SETUP menu p 163 ADVANCED SETUP menu items Use the following table to configure system settings of the unit Item Function Page SP IMP U S A and Canada models only Changes the speaker impedance setting p 119 REMOTE ID Selects the unit s remote control ID p 119 TU Asia and General models only Changes the FM AM tuning frequency setting p 119 TV FORMAT Switches the video si...

Page 119: ...ding down the left cursor key hold down SCENE BD DVD for 5 seconds To select ID2 while holding down the left cursor key hold down SCENE TV for 5 seconds Changing the FM AM tuning frequency setting TU Asia and General models only ENHANCER LINK ECO MASTER OUT 2 Res Hi YPAO VOL A DRC SLEEP STEREO PARTY TUNED ZONE 3 B 2 A VOL FPR SL SW SR SBL SB SBR FPL MUTE VIRTUAL TU FM50 AM9 Change the FM AM tuning...

Page 120: ... selected use a Premium High Speed HDMI Cable or Premium High Speed Cable with Ethernet Format MODE 1 MODE 2 8 bit 10 bit 12 bit 8 bit 10 bit 12 bit 4K 60 50 Hz RGB 4 4 4 4 YCbCr 4 4 4 4 YCbCr 4 2 2 4 YCbCr 4 2 0 4 4 4K 30 25 24 Hz RGB 4 4 4 4 4 YCbCr 4 4 4 4 4 YCbCr 4 2 2 4 4 Setting DTS Format Notification DTS MODE ENHANCER LINK ECO MASTER OUT 2 Res Hi YPAO VOL A DRC SLEEP STEREO PARTY TUNED ZON...

Page 121: ...3 Press INFO again after the confirmation message appears on the front display 4 When Complete appears on the front display press z power to set the unit to standby mode and turn it on again If Failed appears on the front display check the following and start the process again In case of BKUP You cannot overwrite save When you save the settings repeatedly please move the file in different folder T...

Page 122: ...ovements will be released as needed Updates can be downloaded from our website to a USB memory device You can update the firmware using this USB memory device For details refer to the information supplied with updates ADVANCED SETUP menu UPDATE Choices USB Update the firmware using a USB memory device NETWORK Update the firmware via the network NOTE Do not perform this menu unless firmware update ...

Page 123: ...turn on the power is disabled Contact your nearest Yamaha dealer or service center to request repair nThe power does not turn on in synchronization with the TV l HDMI Control on the unit is disabled If turning off the unit is not synchronized to the TV either check the setting of HDMI Control on the unit For details on HDMI Control see the following Setting the use of HDMI Control p 100 l HDMI Con...

Page 124: ...cting the speaker p 18 nThe unit is not reacting l The internal microcomputer is frozen due to an external electric shock such as lightning or excessive static electricity or to a drop in the power supply voltage Hold down z power on the front panel for more than 15 seconds to reboot the unit If the problem persists disconnect the power cable from the AC wall outlet and plug it again nThe unit can...

Page 125: ...lect an appropriate input source with the input selection keys For details see the following Basic procedure for playing back video and music p 48 l Signals that the unit cannot reproduce are being input Some digital audio formats cannot be played back on the unit Ensure that the signals are types that the unit is able to play back For details on supported file formats HDMI audio formats or compat...

Page 126: ...s defective Check the unit s SPEAKERS terminals and the speaker s terminals If there is no problem with the connection replace a breaking speaker cable with another speaker cable l The speaker is malfunctioning To check it replace with another speaker If the problem persists with using another speaker the unit may be malfunctioning nNo sound is coming from the surround back speaker l Power Amp Ass...

Page 127: ... for TV audio input p 101 l If you are trying to use ARC ARC is disabled on the unit or TV Set ARC in the Setup menu to On and enable ARC on the TV For details see the following Setting the use of ARC p 101 nOnly the front speakers work on multichannel audio l The playback device is set to output 2 channel audio such as PCM only To check it use Signal Information in the Option menu If necessary ch...

Page 128: ...ollowing Checking information about the video audio signals p 84 HDMI signal compatibility p 156 l The TV does not support HDCP High bandwidth Digital Content Protection Refer to the instruction manuals for the TV and check the TV s specifications l The number of devices connected to the HDMI OUT jack is over the limit Disconnect some of the HDMI devices nNo image contents required the HDCP 2 2 2 ...

Page 129: ...ficult to completely eliminate noise It may be reduced by using an outdoor AM antenna nRadio stations cannot be selected automatically l Your area is too far from the FM station transmitter Select the station manually Or use an outdoor antenna We recommend using a sensitive multi element antenna For details on selecting the station manually see the following Selecting a frequency for reception p 5...

Page 130: ...DMB online at http www worlddab org for a listing of the DAB coverage in your area nDAB radio reception is weak or noisy l There is multi path interference Check reception strength in Tune AID in the Option menu and adjust the antenna height or orientation or place it in a different location For details see the following Checking reception strength of each DAB channel label p 61 l Your area is too...

Page 131: ...is not used by other network devices in your network For details see the following Setting the network parameters automatically DHCP p 111 Setting the network parameters manually p 112 l The unit does not support IPv6 network Connect IPv4 network nThe unit cannot connect to the Internet via a wireless router access point l The wireless router access point is turned off Turn on the wireless router ...

Page 132: ...he file format supported by both the unit and the media server For information about the file formats supported by the unit see the following Supported file formats p 152 nThe Internet radio cannot be played l The selected Internet radio station is currently not available There may be a network problem at the radio station or the service may have been stopped Try the station later or select anothe...

Page 133: ...wing Updating the firmware via the network p 114 Bluetooth trouble nA Bluetooth connection cannot be established l The Bluetooth function of the unit is disabled Enable the Bluetooth function For details see the following Setting the use of Bluetooth p 115 l Another Bluetooth device is already connected to the unit Terminate the current Bluetooth connection and then establish a new connection For ...

Page 134: ...to the unit l The Bluetooth connection has been terminated Establish a Bluetooth connection between the Bluetooth device and the unit again For details see the following Playback Bluetooth device music on the unit p 66 l The unit and the Bluetooth device are too far apart Move the Bluetooth device closer to the unit l There is a device such as microwave oven and wireless LAN that outputs signals i...

Page 135: ...ect your USB device If the problem persists try another USB device Not connected The network cable is not connected Connect the network cable properly The wireless router access point is not found Make sure the wireless router access point is turned on Please wait The unit is preparing for connecting to the network Wait until the message disappears If the message stays more than 3 minutes turn off...

Page 136: ...updating method then press INFO to update the firmware again For details see the following Updating the firmware UPDATE p 122 Updating the unit s firmware via the network p 138 FILE NOT READY Preparation for firmware update is not finish yet Wait a while before updating the firmware again En 136 ...

Page 137: ...rmware update is interrupted there is a possibility that the unit will malfunction In this case contact your nearest authorized Yamaha dealer or service center to request repair NOTE The firmware update indicator on the front display lights up when a firmware update is ready This indicator might not light up when the network connection speed is too slow or a later firmware update is available Firm...

Page 138: ...e firmware UPDATE p 122 For details on update visit the Yamaha website If you want to perform update when turning off the unit press not ENTER but the down cursor key in step 2 and follow the on screen instructions When you turn off the unit a screen asking you to confirm the firmware update is displayed and press ENTER to start the firmware update After the firmware update is complete the unit wi...

Page 139: ...work Subwoofer n Sample speaker layout The following is a 5 1 2 channel system using two MusicCast 20 speakers as the surround speakers and one MusicCast SUB 100 as the subwoofer 4 1 2 9 5 3 E R NOTE In a 5 1 2 channel or 5 1 channel system the surround speakers and subwoofer can be wireless With other systems only the subwoofer can be wireless With wireless surround speakers Sound will not be out...

Page 140: ...nd function Tap the settings icon Tap MusicCast Surround Stereo For detailed setup instructions refer to the following https download yamaha com files tcm 39 1212383 3 Adjust the speaker settings automatically YPAO NOTE For details on YPAO see the following Optimizing the speaker settings automatically YPAO p 35 4 Check the settings And then you can enjoy content playback with the MusicCast CONTRO...

Page 141: ...network p 39 Mobile device such as iPhone Internet Modem Wireless router The unit 1 Press z receiver power to turn on the unit 2 Turn on the TV and switch the TV input to display video from the unit HDMI OUT jack 3 Press SETUP 4 Use the cursor keys to select Network and press ENTER 5 Use the cursor keys to select Network Connection and press ENTER 6 Use the cursor keys to select Wireless Wi Fi and...

Page 142: ...twork Setting up a wireless connection using an iOS device You can set up a wireless connection by applying the connection settings on iOS devices iPhone iPad iPod touch Before proceeding confirm that your iOS device is connected to a wireless router NOTE This process will restore the default settings for the following Network settings Bluetooth settings Bluetooth USB media server and network cont...

Page 143: ...g up a wireless connection by selecting from the list of available access points You can set up a wireless connection by selecting an access point from the list of wireless LAN routers access points found by the unit You need to manually enter the security key Setup menu Network Network Connection Wireless Wi Fi 1 Use the cursor keys to select Access Point Scan and press ENTER After searching for ...

Page 144: ...p 2 or try another connection method 7 Press SETUP This completes the network settings Setting up a wireless connection manually You can set up a wireless connection by entering the required information manually You need to set up the SSID network name encryption method and security key for your network Setup menu Network Network Connection Wireless Wi Fi 1 Use the cursor keys to select Manual Set...

Page 145: ... that all the information is entered correctly and repeat from step 2 10 Press SETUP This completes the network settings Setting up a wireless connection by using the WPS PIN code You can set up a wireless connection by entering the unit s PIN code into the wireless router access point The method is available if the wireless router access point supports the WPS PIN code method Setup menu Network N...

Page 146: ...e or Premium High Speed Cable with Ethernet to enjoy 3D or 4K Ultra HD videos Video jacks nVIDEO jacks Transmit analog video signals Use a video pin cable Video pin cable Audio jacks nOPTICAL jack Transmit digital audio signals Use a digital optical cable If there is a protective cap on the tip of the cable remove it before using the cable OPTICAL Digital optical cable nCOAXIAL jacks Transmit digi...

Page 147: ...esence speakers on the front wall Front Height It delivers a natural sound field with excellent linkage of left right top and bottom sound spaces and sound extensity effectively Installing the presence speakers in Overhead position Install the presence speakers to the ceiling above the listening position Overhead It delivers realistic overhead sound effects and sound field with excellent linkage o...

Page 148: ...nd lets you enjoy overhead sound only from speakers that are placed at the same level as traditional speakers NOTE Place the Dolby Enabled speakers on top of or near the traditional front speakers A Dolby Enabled speaker unit may be integrated into a traditional speaker For details refer to the instruction manual of the Dolby Enabled speakers En 148 ...

Page 149: ...tc DTS Dialog Control DTS Dialog Control allows you to boost the dialog This can be useful in noisy environments to help make the dialog more intelligible People with impaired hearing may also benefit Note that the content creator may disable the use of this feature in the mix so that DTS Dialog Control may not always be available Note that updates to your AVR may add more functionality to DTS Dia...

Page 150: ... technologies this compression method achieves a high compression rate Reportedly it is capable of compressing data quantity by about 1 20 maintaining a certain level of audio quality nGlossary of audio information other than audio decoding format This is a glossary of the technical terms related to audio information used in this manual Bi amplification connection Bi amp A bi amplification connect...

Page 151: ...eves the reproduction of the accurate height of the sound images so that it creates the accurate and intensive 3D sound fields in a listening room Compressed Music Enhancer The Compressed Music Enhancer feature compensates for missing harmonics in compression music formats such as MP3 As a result this technology provides improved performance for the overall sound system SILENT CINEMA Yamaha has de...

Page 152: ... 11 4 or later is required Supported file formats The following file formats can be used by the unit File Sampling frequency kHz Quantization bit bit Bitrate kbps Number of channels Support for gapless playback WAV 32 44 1 48 88 2 96 176 4 192 16 24 32 2 4 MP3 32 44 1 48 8 to 320 2 WMA 32 44 1 48 8 to 320 2 MPEG 4 AAC 32 44 1 48 8 to 320 2 FLAC 32 44 1 48 88 2 96 176 4 192 16 24 2 4 ALAC 32 44 1 4...

Page 153: ...deo signals input from a video device to the unit are output to a TV as follows HDMI HDMI VIDEO VIDEO HDMI HDMI VIDEO MONITOR OUT Video device The unit TV HDMI connection Composite video connection HDMI in HDMI out VIDEO in VIDEO out En 153 ...

Page 154: ...e TV with the color RED GREEN YELLOW BLUE keys of the remote control when TV Control is set for the color keys Example HDMI Control HDMI Control Press SCENE BD DVD Playback starts Turns on and displays video from the playback device NOTE HDMI Control might not work properly For details on the scene selection see the following Selecting a registered scene p 74 For details on TV audio input see the ...

Page 155: ... following after the HDMI Control settings NOTE For details on the HDMI Control settings see the following HDMI Control and synchronized operations p 154 1 Select a TV program with the TV remote control 2 Check that the input source of the unit will be automatically switched to AUDIO1 and the TV audio will be played back on the unit If you cannot hear the TV audio check the following ARC in the Se...

Page 156: ...e appropriately so that the device outputs the bitstream audio signals directly does not decode the bitstream signals on the playback device For details refer to the instruction manual for the playback device If the playback device can decode the bitstream audio signals of audio commentaries you can play back the audio sources with the audio commentaries mixed down by using digital audio input OPT...

Page 157: ...ndroid Google Play Android and Google Play are trademarks of Google Inc The Wi Fi CERTIFIED Logo and Wi Fi Protected Setup are certification marks of Wi Fi Alliance Wi Fi Wi Fi CERTIFIED Wi Fi Protected Setup and WPA2 are registered trademarks or trademarks of Wi Fi Alliance The Bluetooth word mark and logos are registered trademarks owned by Bluetooth SIG Inc and any use of such marks by Yamaha C...

Page 158: ...de 4K 60 50Hz 10 12bit 3D Video ARC Audio Return Channel HDMI Control CEC Auto Lip Sync Deep Color x v Color HD audio playback Selectable HDMI input in HDMI standby mode 21 9 Aspect Ratio BT 2020 Colorimetry HDR Compatible HDR10 Dolby Vision HLG Video Format Repeater Mode VGA 480i 60 Hz 576i 50 Hz 480p 60 Hz 576p 50 Hz 720p 60 Hz 50 Hz 1080i 60 Hz 50 Hz 1080p 60 Hz 50 Hz 30 Hz 25 Hz 24 Hz 4K 60Hz ...

Page 159: ...Format Dolby Atmos Dolby TrueHD Dolby Digital Plus Dolby Digital DTS X DTS HD Master Audio DTS HD High Resolution Audio DTS Express DTS DTS 96 24 DTS ES Matrix 6 1 DTS ES Discrete 6 1 Post Decoding Format Dolby Surround DTS Neo 6 Music DTS Neo 6 Cinema Neural X Audio Section Rated Output Power 2 channel driven U S A and Canada models 20 Hz to 20 kHz 0 09 THD 8 Ω Other models 20 Hz to 20 kHz 0 09 T...

Page 160: ... R Speaker Out 150 μV or less Channel Separation AV 2 etc Input 1 kΩ Shorted 1 kHz 10 kHz 70 dB 50 dB or more Volume Control Range MUTE 80 dB to 16 5 dB Step 0 5 dB Tone Control Characteristics Bass Boost Cut 6 dB 0 5 dB Step at 50 Hz Bass Turnover 350 Hz Treble Boost Cut 6 dB 0 5 dB Step at 20 kHz Treble Turnover 3 5 kHz Filter Characteristics fc 40 60 80 90 100 110 120 160 200 Hz H P F Front Cen...

Page 161: ...ndby Through Off 0 1 W HDMI Control On Standby Through Auto No Signals 1 0 W HDMI Control On Standby Through On No Signals 1 0 W HDMI Control Off Standby Through Off Network Standby On Wired 1 3 W Wireless Wi Fi 1 4 W HDMI Control On Standby Through On Network Standby On Wired 2 1 W Wireless Wi Fi 2 2 W HDMI Control Off Standby Through Off Bluetooth Standby On 1 4 W HDMI Control On Standby Through...

Page 162: ...nd Small Surround Back None Presence Small Layout Front Height Crossover 80 Hz Subwoofer Phase Normal Extra Bass Off Virtual CINEMA FRONT Off Distance 3 00 m 10 0 ft Level 0 0 dB Equalizer Off Test Tone Off HDMI HDMI Control Off Audio Output Off Standby Through Off 4K Upscaling Off HDCP Version HDMI 1 4 Auto TV Audio Input AUDIO1 Standby Sync Auto ARC On SCENE BD DVD TV On NET RADIO Off Sound DSP ...

Page 163: ... Connection Wired IP Address DHCP On MAC Address Filter Off DMC Control Enable Network Standby Auto Network Name MusicCast Link Power Interlock Off Network Update Bluetooth Bluetooth On Audio Receive Disconnect Bluetooth Standby On Audio Send Transmitter Off Device Search Language English Default settings of the ADVANCED SETUP menu The default settings of the ADVANCED SETUP menu are as follows SP ...

Page 164: ...Yamaha Global Site https www yamaha com Yamaha Downloads http download yamaha com Manual Development Group 2018 Yamaha Corporation Published 07 2019 NV D0 AV17 0153 ...

Reviews: