background image

4 - 56

ENG

TRANSMISSION

EBS00345

TRANSMISSION

Order

Job/Part

Q’ty

Remarks

Removing the transmission

Remove the parts in the order listed.

Crankcase

Separate.
Refer to “CRANKCASE”. 

1

Main axle/1st pinion gear

1

2

Shift fork guide bar

1

Refer to “REMOVING THE TRANSMIS-
SION” and “INSTALLING THE TRANS-
MISSION”.

3

Shift fork

1

4

Drive axle/middle drive pinion gear 
assembly

1

5

Shift drum

1

6

1st wheel gear

1

7

Drive axle dog gear

1

8

Middle drive gear shim

1

For installation, reverse the removal pro-
cedure.

Summary of Contents for 5YF2-AE1

Page 1: ...YFM50S5YF2 AE1 SERVICE MANUAL ...

Page 2: ......

Page 3: ... YFM50S SERVICE MANUAL 2003 by Yamaha Motor Co Ltd First Edition April 2003 All rights reserved Any reproduction or unauthorized use without the written permission of Yamaha Motor Co Ltd is expressly prohibited ...

Page 4: ...ions and sig nificant changes in specifications or procedures will be forwarded to all authorized Yamaha dealers and will appear in future editions of this manual where applicable NOTE _ Designs and specifications are subject to change without notice EBS00003 IMPORTANT INFORMATION Particularly important information is distinguished in this manual by the following notations The Safety Alert Symbol ...

Page 5: ...parts and clarify procedure steps there are exploded diagrams at the start of each removal and disassembly section 1 An easy to see exploded diagram 4 is provided for removal and disassembly jobs 2 Numbers 5 are given in the order of the jobs in the exploded diagram A number that is enclosed by a circle indicates a disassembly step 3 An explanation of jobs and notes is presented in an easy to read...

Page 6: ...limit clearance F Engine speed G Electrical data Ω V A Symbols H to M in the exploded diagrams indicate the types of lubricants and lubrication points H Apply engine oil I Apply gear oil J Apply molybdenum disulfide oil K Apply wheel bearing grease L Apply lithium soap based grease M Apply molybdenum disulfide grease Symbols N to O in the exploded diagrams indicate where to apply a locking agent N...

Page 7: ...OF CONTENTS GENERAL INFORMATION GEN INFO 1 SPECIFICATIONS SPEC 2 PERIODIC CHECKS AND ADJUSTMENTS CHK ADJ 3 ENGINE ENG 4 CARBURETOR CARB 5 DRIVE TRAIN DRIV 6 CHASSIS CHAS 7 ELECTRICAL ELEC 8 TROUBLESHOOTING TRBL SHTG 9 ...

Page 8: ......

Page 9: ...GEN INFO 1 ...

Page 10: ...ATION NUMBER 1 1 MODEL LABEL 1 1 IMPORTANT INFORMATION 1 2 PREPARATION FOR REMOVAL AND DISASSEMBLY 1 2 REPLACEMENT PARTS 1 2 GASKETS OIL SEALS AND O RINGS 1 2 LOCK WASHERS PLATES AND COTTER PINS 1 3 BEARINGS AND OIL SEALS 1 3 CIRCLIPS 1 3 CHECKING THE CONNECTIONS 1 4 SPECIAL TOOLS 1 5 ...

Page 11: ...GEN INFO ...

Page 12: ...TION EBS00010 VEHICLE IDENTIFICATION NUMBER The vehicle identification number 1 is stamped into the left side of the frame EBS00011 MODEL LABEL The model label 1 is affixed to the frame This information will be needed to order spare parts MACHINE IDENTIFICATION ...

Page 13: ...all of the parts and place them in trays in the order of dis assembly This will speed up assembly and allow for the correct installation of all parts 5 Keep all parts away from any source of fire EBS00014 REPLACEMENT PARTS 1 Use only genuine Yamaha parts for all replacements Use oil and grease recom mended by Yamaha for all lubrication jobs Other brands may be similar in function and appearance bu...

Page 14: ...sible When installing oil seals lubricate the oil seal lips with a light coat of lithium soap based grease Oil bearings liberally when installing if appro priate 1 Oil seal CAUTION _ Do not spin the bearing with compressed air because this will damage the bearing surfaces 1 Bearing EBS00018 CIRCLIPS Before reassembly check all circlips carefully and replace damaged or distorted circlips Always rep...

Page 15: ...t sev eral times 3 Check all connections Loose connection Connect properly NOTE _ If the pin 1 on the terminal is flattened bend it up 4 Connect lead coupler connector NOTE _ Make sure all connections are tight 5 Check continuity with the pocket tester NOTE _ If there is no continuity clean the terminals When checking the wire harness perform steps 1 to 3 As a quick remedy use a contact revitalize...

Page 16: ...ept for US and CDN P N 90890 Tool No Tool name Function Illustration Bolt 90890 01085 Weight 90890 01084 Set YU 01083 A Slide hammer bolt M8 weight set These tools are used to remove the rocker arm shaft 90890 01189 YM 01189 Flywheel puller This tool is needed to remove the rotor 90890 01304 YU 01304 Piston pin puller set This tool is used to remove the piston pin 90890 01311 YM 08035 Tappet adjus...

Page 17: ...sh 90890 01701 YS 01880 A Sheave holder This tool is needed to hold the rotor when removing or installing the rotor nut Gauge 90890 03081 YU 33223 Adapter 90890 04082 Compression gauge Adapter These tools are needed to measure engine compression 90890 03112 YU 03112 C Pocket tester This instrument is needed for checking the electrical system 90890 03113 Engine tachometer This tool is needed for ob...

Page 18: ... remover 5 mm This tool is needed to remove and install the valve guide 90890 04098 YM 04098 Valve guide installer 5 mm This tool is needed to install the valve guide 90890 04099 Valve guide reamer 5 mm This tool is needed to rebore the new valve guide 90890 04100 Clutch holder This tool is needed to hold the clutch boss when removing or installing the clutch boss nut 90890 04129 YM 04129 Pinion g...

Page 19: ...faces etc YM 01363 27 mm hexagon wrench This tool is needed to loosen and tighten the middle driven pinion gear bearing retainer YM 34487 Dynamic spark tester This instrument is necessary for checking the ignition system components YU 8036 B Inductive self powered tachometer This tool is needed for observing engine rpm Tool No Tool name Function Illustration ...

Page 20: ...SPEC 2 ...

Page 21: ...S 2 12 ELECTRICAL SPECIFICATIONS 2 13 TIGHTENING TORQUES 2 15 ENGINE TIGHTENING TORQUES 2 15 CHASSIS TIGHTENING TORQUES 2 16 HOW TO USE THE CONVERSION TABLE 2 18 GENERAL TIGHTENING TORQUE SPECIFICATIONS 2 18 LUBRICATION POINTS AND LUBRICANT TYPES 2 19 ENGINE 2 19 OIL FLOW DIAGRAMS 2 21 CABLE ROUTING 2 23 ...

Page 22: ...SPEC ...

Page 23: ...nimum ground clearance 70 mm 2 76 in Minimum turning radius 2 300 mm 90 6 in Basic weight With oil and full fuel tank 115 kg 253 lb Engine Engine type Air cooled 4 stroke SOHC Cylinder arrangement Forward inclined single cylinder Displacement 49 cm3 Bore stroke 39 0 41 4 mm 1 54 1 63 in Compression ratio 10 0 1 Standard compression pressure at sea level 1 200 kPa 12 0 kg cm2 170 6 psi at 1 000 r m...

Page 24: ... 0 13 US qt Air filter Wet type element Fuel Type Regular unleaded gasoline only for CDN Europe Unleaded gasoline only for Oceania Fuel tank capacity 6 8 L 1 50 Imp gal 1 80 US gal Fuel reserve amount 0 9 L 0 20 Imp gal 0 24 US gal Carburetor Type quantity VM16SH 1 Manufacturer MIKUNI Spark plug Type manufacturer CR7HS NGK Spark plug gap 0 6 0 7 mm 0 024 0 028 in Clutch type Wet multiple disc auto...

Page 25: ...front AT16 7 7 rear AT16 8 7 Manufacturer front DUNLOP rear DUNLOP Type front KT145 rear KT145 Tire pressure cold tire Maximum load 40 kg 88 lb Off road riding front 17 23 kPa 0 17 0 23 kgf cm2 2 5 3 3 psi rear 17 23 kPa 0 17 0 23 kgf cm2 2 5 3 3 psi Load in total weight of rider accessories Brake Front brake type Drum brake operation Right hand operation Rear brake type Drum brake operation Left ...

Page 26: ...C GENERAL SPECIFICATIONS Electrical Ignition system C D I Generator system A C magneto Battery type 12N7D 3B Battery capacity 12 V 7 AH Bulb wattage quantity Neutral indicator light 12 V 1 7 W 1 Item Standard ...

Page 27: ...0 01 mm 0 0004 in Camshaft Drive method Chain drive Left Cam dimensions Intake A 25 300 25 310 mm 0 9961 0 9965 in 25 200 mm 0 9921 in B 20 994 21 094 mm 0 8265 0 8305 in 20 894 mm 0 8226 in Exhaust A 25 301 25 311 mm 0 9961 0 9965 in 25 201 mm 0 9922 in B 21 021 21 121 mm 0 8276 0 8315 in 20 921 mm 0 8237 in Camshaft runout limit 0 03 mm 0 0012 in Timing chain Timing chain type No of links Bush c...

Page 28: ...6 9 mm 0 6575 0 6654 in B face width IN 1 10 2 30 mm 0 0433 0 0906 in EX 1 30 2 40 mm 0 0512 0 0945 in C seat width IN 0 9 1 1 mm 0 0354 0 0433 in 1 6 mm 0 0630 in EX 0 9 1 1 mm 0 0354 0 0433 in 1 6 mm 0 0630 in D margin thickness IN 0 5 0 9 mm 0 0197 0 0354 in 1 6 mm 0 0630 in EX 0 6 1 0 mm 0 0236 0 0394 in 1 6 mm 0 0630 in Stem outside diameter IN 4 975 4 990 mm 0 1959 0 1965 in 4 950 mm 0 1949 ...

Page 29: ... 0630 in EX 0 9 1 1 mm 0 0354 0 0433 in 1 6 mm 0 0630 in Valve spring Free length IN 32 00 mm 1 26 in 30 40 mm 1 20 in EX 32 00 mm 1 26 in 30 40 mm 1 20 in Compressed pressure installed IN 136 158 N at 24 6 mm 13 87 16 11 kg 30 57 35 52 lb at 0 97 in EX 136 158 N at 24 6 mm 13 87 16 11 kg 30 57 35 52 lb at 0 97 in Tilt limit IN 2 5 1 4 mm 2 5 0 06 in EX 2 5 1 4 mm 2 5 0 06 in Direction of winding ...

Page 30: ... 0 5119 0 5123 in 13 043 mm 0 5135 in Piston pin outside diameter 12 996 13 000 mm 0 5117 0 5118 in 12 976 mm 0 5109 in Piston rings Top ring Type Barrel Dimensions B T 1 0 1 7 mm 0 0394 0 0669 in End gap installed 0 08 0 20 mm 0 0031 0 0079 in 0 45 mm 0 0177 in Side clearance installed 0 030 0 065 mm 0 0012 0 0026 in 0 12 mm 0 0047 in 2nd ring Type Taper Dimensions B T 1 0 1 7 mm 0 0394 0 0669 in...

Page 31: ... in Big end side clearance D 0 10 0 40 mm 0 0039 0 0157 in 0 50 mm 0 0197 in Big end radial clearance E 0 004 0 019 mm 0 0002 0 0007 in Small end free play F 0 80 1 00 mm 0 0315 0 0394 in 1 50 mm 0 0591 in Clutch Friction plate 1 with black color marking Thickness 2 92 3 08 mm 0 115 0 121 in 2 90 mm 0 114 in Quantity 4 Friction plate 2 Thickness 2 92 3 08 mm 0 115 0 121 in 2 90 mm 0 114 in Quantit...

Page 32: ...evolution 3 000 3 200 r min Transmission Main axle deflection limit 0 08 mm 0 0031 in Drive axle deflection limit 0 08 mm 0 0031 in Shifter Shifter type Shift drum and guide bar Carburetors I D mark 5YF1 00 Main jet M J 72 5 Air jet A J 1 2 Jet needle J N 3PZ13 2 Needle jet N J D 8M Cutaway C A 3 Pilot outlet P O 0 7 Pilot jet P J 15 Pilot screw turns out A S 2 1 2 Valve seat size V S 1 2 Fuel lev...

Page 33: ...106 mm 0 0042 in Oil pump housing to inner rotor and outer rotor clearance 0 06 0 10 mm 0 0024 0 0039 in 0 17 mm 0 0067 in Shaft drive Middle gear backlash 0 17 0 31 mm 0 007 0 012 in Final gear backlash 0 17 0 31 mm 0 007 0 012 in Lubrication chart Item Standard Limit Pressure feed Splashed scavenge Crankshaft pin Camshaft Rocker arm Valve Timing chain area Oil strainer Oil pump Piston Piston pin...

Page 34: ...material Steel Rim runout limit radial 2 0 mm 0 08 in lateral 2 0 mm 0 08 in Front drum brake Type Leading trailing Brake drum inside diameter 110 0 mm 4 33 in 110 5 mm 4 35 mm Lining thickness 4 0 mm 0 16 in 2 0 mm 0 08 in Shoe spring free length 54 0 mm 2 13 in Rear drum brake Type Leading trailing Brake drum inside diameter 130 0 mm 5 12 in 130 5 mm 5 14 in Lining thickness 4 0 mm 0 16 in 2 0 m...

Page 35: ... manufacturer 2JN YAMAHA Minimum spark gap 6 mm 0 24 in Primary winding resistance 0 18 0 28 Ω at 20 C 68 F Secondary winding resistance 6 32 9 48 kΩ at 20 C 68 F Spark plug cap Type Resin Resistance 10 kΩ Charging system Type A C magneto Model manufacturer F2FM YAMAHA Nominal output 14 V 45 W at 5 000 r min Charging coil resistance color 0 72 1 08 Ω at 20 C 68 F White Black Lighting coil resistan...

Page 36: ... 4 22 N 330 430 gf 11 66 15 19 oz Commutator diameter 16 5 mm 0 65 in 15 5 mm 0 61 in Mica undercut 1 mm 0 04 in Starter relay Model manufacturer MS5E 661 JIDECO Amperage rating 100 A Coil winding resistance 4 18 4 62 Ω at 20 C 68 F Starting circuit cut off relay Model manufacturer ACA12115 3 MATSUSHITA Coil resistance 72 88 Ω at 20 C 68 F Diode Yes Circuit breakers Type Fuse Amperage for individu...

Page 37: ... 2 Muffler Bolt M8 2 25 2 5 18 Spark arrester Screw M6 2 8 0 8 5 8 Muffler purging bolt Bolt M6 1 10 1 0 7 2 Crankcase Screw M6 9 7 0 7 5 1 Crankcase cylinder head Stud bolt M6 4 10 1 0 7 2 Main axle bearing retainer Screw M6 2 8 0 8 5 8 LT Drive axle middle drive pinion gear assembly plate Bolt M6 3 10 1 0 7 2 Clutch cover Screw M6 3 7 0 7 5 1 C D I magneto cover Screw M6 9 7 0 7 5 1 Starter clut...

Page 38: ...ing M8 8 0 8 5 8 Front wheel and brake drum M8 28 2 8 20 Front axle and brake drum M14 70 7 0 50 Front brake camshaft and camshaft lever M6 9 0 9 6 5 Rear brake camshaft and camshaft lever M6 9 0 9 6 5 Rear axle and nut M28 See NOTE Rear wheel and wheel hub M8 28 2 8 20 Rear axle and wheel hub M12 70 7 0 50 Rear brake drum boss and brake drum M8 21 2 1 15 Rear axle housing and rear swingarm M10 40...

Page 39: ...ly locking agent LOCTITE to rear axle threads 2 Tighten the inside nut to 110 Nm 11 0 m kg 80 ft lb 3 Tighten the outside nut to 130 Nm 13 0 m kg 94 ft lb while holding the inside nut 4 Loosen the inside nut to 160 Nm 16 0 m kg 115 ft lb while holding the outside nut ...

Page 40: ...nless otherwise specified tightening torque specifications require clean dry threads Com ponents should be at room temperature A Distance between flats B Outside thread diameter Ex METRIC MULTIPLIER IMPERIAL mm 0 03937 in 2 mm 0 03937 0 08 in METRIC TO IMPERIAL Torque Metric unit Multiplier Imperial unit m kg m kg cm kg cm kg 7 233 86 794 0 0723 0 8679 ft lb in lb ft lb in lb Weight kg g 2 205 0 0...

Page 41: ...Timing chain tensioner E Intake side timing chain guide E Oil pump assembly E Starter idle gear shaft M Starter wheel gear E Primary driven gear spacer E Clutch push rod oil seal E Drive axle 1st wheel gear M Drive axle dog splines M Drive axle dog shift fork groove E Middle drive driven pinion gear E Shift drum E Shift fork guide bar O ring E Shift shaft E Shift shaft washer LS Middle driven pini...

Page 42: ...2 20 SPEC LUBRICATION POINTS AND LUBRICANT TYPES Final gear case and rear axle housing mating surface Sealant Quick Gasket Yamaha Bond No 1215 Lubrication points Lubricant ...

Page 43: ...2 21 SPEC OIL FLOW DIAGRAMS EBS00026 OIL FLOW DIAGRAMS 1 Camshaft 2 Crankshaft 3 Main axle 4 Drive axle ...

Page 44: ...2 22 SPEC OIL FLOW DIAGRAMS 1 Oil pump 2 Oil strainer ...

Page 45: ... breather hose 6 Crankcase breather hose 7 Starter relay 8 Starting circuit cut off relay 9 Positive battery lead 0 Wire harness A Negative battery lead B Rectifier regulator C Engine stop switch lead frame end D Battery breather hose E Starter motor lead F Fuel overflow hose G Right front brake cable H Left front brake cable I Engine stop switch frame ...

Page 46: ...o slack or bends in the hose Do not route the hose over the throttle cable Ê Route the final gear case breather hose and crankcase breather hose to the right of the ignition coil Ë Align the white tape of the wire harness with the bracket Ì 200 mm 7 87 in Í To starter motor Î Fasten the engine stop switch lead frame end to the frame with a plastic band Ï Pass the final gear case breather hose thro...

Page 47: ...LE ROUTING Ñ Fasten the carburetor air vent hose with a plastic band Be sure to not pinch the hose Install the plastic band with the buckle facing backward and the end inward Ò Route the cables under the frame Ó 45 ...

Page 48: ...s 3 Ignition coil 4 Handlebar switch lead 5 Rear brake switch lead 6 Neutral indicator light lead 7 Main switch 8 C D I unit 9 Fuel hose 0 Crankcase breather hose A Final gear case breather hose B Fuel tank breather hose C Throttle cable D Front brake cables ...

Page 49: ...nkcase breather hose over the wire harness Fasten the hoses with a plastic band Be sure to not pinch the hoses Pass the ends of the hoses between the frame and bracket Ë Fasten the rear brake cable and wire harness near the ignition coil with a plastic locking tie Ì Do not fasten the main switch lead Í Fasten the crankcase breather hose and final gear case breather hose with a plastic band Î Face ...

Page 50: ...OUTING 1 Rear brake switch 2 Rear brake cable 3 Left front brake cable 4 Right front brake cable 5 Throttle cable 6 Fuel tank breather hose 7 Negative battery lead 8 Main fuse 9 Positive battery lead 0 Handlebar switch ...

Page 51: ... the hole Ë To wire harness Ì To starter relay Í Fasten the handlebar switch lead and rear brake switch lead with a plastic band Î Connect the negative battery lead to the battery so that the lead is routed to the side of the battery Ï Connect the positive battery lead to the battery so that the lead contacts the battery case ...

Page 52: ...ake switch lead 6 Air filter joint 7 Neutral indicator light lead 8 Right front brake cable 9 Left front brake cable È Route the front brake cables to the left of the steering stem Route the left front brake cable to the right of the air filter joint Route the right front brake cable to the left of the air filter joint ...

Page 53: ...CHK ADJ 3 ...

Page 54: ...E COMPRESSION PRESSURE 3 15 CHECKING THE ENGINE OIL LEVEL 3 17 CHANGING THE ENGINE OIL 3 19 CLEANING THE AIR FILTER ELEMENT 3 20 CHASSIS 3 22 CHECKING THE FRONT AND REAR BRAKE SHOES 3 22 ADJUSTING THE FRONT BRAKE 3 22 ADJUSTING THE REAR BRAKE 3 23 CHECKING THE FINAL GEAR OIL LEVEL 3 24 CHANGING THE FINAL GEAR OIL 3 24 CHECKING THE SWINGARM DUST BOOT 3 25 CHECKING THE STEERING SYSTEM 3 26 ADJUSTING...

Page 55: ...CHK ADJ ...

Page 56: ...heck condition Adjust gap and clean Replace if necessary Air filter element Clean Replace if necessary Every 20 40 hours more often in wet or dusty areas Carburetor Check idle speed choke lever operation Adjust if necessary Crankcase breather system Check breather hose for cracks or damage Replace if necessary Exhaust system Check for leakage Tighten if necessary Replace gasket if necessary Fuel l...

Page 57: ...ts in the order listed 1 Seat 1 NOTE _ Pull back the seat lock lever than pull up on the rear of the seat 2 Front panel 1 3 Fuel tank breather hose 1 4 Handlebar cover 1 NOTE _ When installing the handlebar cover pass the fuel tank breather hose through the hole in the handlebar cover 5 Neutral indicator light connectors 2 Disconnect For installation reverse the removal pro cedure ...

Page 58: ... 0 7 m kg 5 1 ft Ib Order Job Part Q ty Remarks Removing the front fender Remove the parts in the order listed Seat and front panel Refer to SEAT AND FRONT PANEL 1 Fuel tank top panel 1 2 Air cleaner joint clamp screw 1 Loosen 3 Main switch 1 4 Front fender 1 For installation reverse the removal pro cedure ...

Page 59: ... 7 7 Order Job Part Q ty Remarks Removing the rear fender and foot rest boards Remove the parts in the order listed Seat Refer to SEAT AND FRONT PANEL Front fender Refer to FRONT FENDER 1 Battery band 1 2 Main fuse 1 3 Negative battery lead 1 Disconnect CAUTION _ First disconnect the negative lead then disconnect the positive lead 4 Positive battery lead 1 Disconnect 5 Battery breather hose 1 Disc...

Page 60: ... 1 ft Ib T R 7 Nm 0 7 m kg 5 1 ft Ib T R 7 Nm 0 7 m kg 5 1 ft Ib T R 7 Nm 0 7 m kg 5 1 ft Ib 7 7 Order Job Part Q ty Remarks 6 Battery 1 7 Footrest board 2 8 Rear fender 1 For installation reverse the removal pro cedure SEAT FENDERS AND FUEL TANK ...

Page 61: ...ving the fuel tank Remove the parts in the order listed Seat and front panel Refer to SEAT AND FRONT PANEL Front fender Refer to FRONT FENDER 1 Fuel hose 1 Disconnect NOTE _ Before disconnecting the fuel hose turn the fuel cock to OFF 2 Fuel tank 1 For installation reverse the removal pro cedure ...

Page 62: ...er 2 on the crankcase When the T mark is aligned with the sta tionary pointer the piston is at the Top Dead Center TDC NOTE Be sure to align the alignment mark 3 on the camshaft sprocket with the alignment mark 4 on the cylinder head c Turn the crankshaft counterclockwise to align the camshaft sprocket alignment mark 5 and alignment tab 6 with the adjuster 7 as shown in the illustration d Tighten ...

Page 63: ...tappet cover exhaust tappet cover camshaft sprocket cover Refer to CYLINDER HEAD in chapter 4 2 Measure valve clearance Out of specification Adjust a Turn the crankshaft counterclockwise with a wrench b Align the T mark 1 on the rotor with the stationary pointer 2 on the crankcase When the T mark is aligned with the sta tionary pointer the piston is at the Top Dead Center TDC Valve clearance cold ...

Page 64: ...turn c Measure the valve clearance using a thick ness gauge 5 3 Adjust valve clearance a Loosen the locknut 1 b Insert a thickness gauge 2 between the adjuster end and the valve end c Turn the adjuster 3 clockwise or counter clockwise with the tappet adjusting tool 4 until the proper clearance is obtained d Hold the adjuster to prevent it from moving and then tighten the locknut e Measure the valv...

Page 65: ...rk plug lead 3 Measure engine idling speed Out of specification Adjust 4 Adjust engine idling speed a Turn in the pilot screw 1 until it is lightly seated b Turn out the pilot screw for the specified number of turns c Turn the throttle stop screw 2 in or out until the specified engine idling speed is obtained Inductive self powered tachome ter P N YU 8036 B Engine tachometer P N 90890 03113 Engine...

Page 66: ... free play 1 Measure throttle lever free play a Out of specification Adjust 2 Adjust throttle lever free play a Pull back the adjuster cover 1 b Loosen the locknut 2 on the carburetor side c Turn the adjuster 3 in or out until the cor rect free play is obtained d Tighten the locknut 2 e Push in the adjuster cover 1 WARNING _ After adjusting the free play turn the han dlebar to the right and left t...

Page 67: ...adjuster 2 in or out until the speci fied speed limiter length is obtained c Tighten the locknut WARNING _ Particularly for a beginner rider the speed limiter should be screwed in com pletely Screw it out little by little as their riding technique improves Never remove the speed limiter for a beginning rider For proper throttle lever operation do not turn out the adjuster more than 12 0 mm 0 47 in...

Page 68: ...eplace Normal color is a medium to light tan color 4 Clean spark plug with a spark plug cleaner or wire brush Standard spark plug CR7HS NGK 5 Measure spark plug gap a Use a wire gauge or thickness gauge Out of specification Regap 6 Tighten spark plug NOTE _ Before installing a spark plug clean the gasket surface and plug surface Spark plug gap 0 6 0 7 mm 0 024 0 028 in T R 13 Nm 1 3 m kg 9 4 ft lb...

Page 69: ...rk plug lead 3 Check ignition timing a Warm up the engine and keep it at the specified speed b Visually check the stationary pointer 1 to verify it is within the required firing range 2 indicated on the rotor Incorrect firing range Check the pickup coil 4 Detach timing light engine tachometer 5 Install C D I magneto cover Refer to C D I MAGNETO in chapter 4 Inductive self powered tachome ter P N Y...

Page 70: ...isconnect spark plug cap 4 Remove spark plug CAUTION _ Before removing a spark plug use com pressed air to blow away any dirt accumu lated in the spark plug well to prevent it from falling into the cylinder 5 Attach adapter compression gauge 1 6 Measure compression pressure Out of specification Refer to steps c and d Compression gauge P N YU 33223 90890 03081 Adapter P N 90890 04082 Compression pr...

Page 71: ...der head valve surfaces and piston crown for carbon deposits Carbon deposits Eliminate d If the compression pressure is below the minimum specification squirt a few drops of oil into the cylinder and measure again Refer to the following table 7 Install spark plug 8 Connect spark plug cap Compression pressure with oil applied into the cylinder Reading Diagnosis Higher than without oil Piston ring s...

Page 72: ...l a Warm up the engine for several minutes and stop it then wait at least several min utes for the oil to drain back into the crank case WARNING _ Never remove the dipstick just after high speed operation because the heated oil could spurt out Wait until the oil cools down before removing the dipstick b Screw the dipstick 1 completely out and wipe the dipstick clean then just rest the dipstick in ...

Page 73: ...commended oil classification API Service SE SF SG type or equiva lent e g SF SE CC SF SE SD etc CAUTION _ Do not add any chemical additives or use oils with a grade of CD a or higher Do not use oils labeled ENERGY CON SERVING II b or higher Engine oil also lubricates the clutch and additives could cause clutch slippage Do not allow foreign materials to enter the crankcase È For CDN É For Europe an...

Page 74: ...se 5 Check engine oil drain bolt gasket Damage Replace 6 Install engine oil drain bolt 1 along with the gasket 7 Fill crankcase with the specified amount of the recom mended engine oil 8 Install dipstick 9 Start the engine warm it up for several min utes and then turn it off 10 Check engine for engine oil leaks 11 Check engine oil level Refer to CHECKING THE ENGINE OIL LEVEL Quantity Total amount ...

Page 75: ...emove air filter cover 1 1 1 3 Disconnect rubber band 1 4 Remove air filter element guide 2 air filter element 3 CAUTION _ The engine should never be run without the air filter excessive piston and or cylinder wear may result 5 Check air filter element Damaged Replace 6 Clean air filter element a Wash the element gently but thoroughly in solvent WARNING _ Use a cleaning solvent which is designed t...

Page 76: ... material c Apply engine oil to the element d Squeeze out the excess oil NOTE _ The element should be wet but not dripping 7 Install air filter element air filter element guide 8 Connect rubber band 9 Install air filter cover NOTE _ Make sure its sealing surface matches the sealing surface of the case so there is no air leak 10 Install front panel Refer to SEAT FENDERS AND FUEL TANK ...

Page 77: ...adjusting the front brake the front brake linings should be checked CAUTION _ Proper lever free play is essential to avoid excessive brake drag 1 Measure front brake lever free play a Out of specification Adjust 2 Adjust front brake lever free play a Loosen the locknuts 1 b Turn the adjusters 2 in or out until the specified front brake lever free play is obtained NOTE Make sure that the difference...

Page 78: ...ever side b Turn the adjuster 3 in or out until the speci fied rear brake lever free play is obtained drum side c Tighten the locknut NOTE If the free play cannot be adjusted here adjust if at the lever side of the cable Second step a Loosen the locknut 1 b Turn the adjuster 2 in or out until the speci fied rear brake lever free play is obtained lever side c Tighten the locknut WARNING _ After thi...

Page 79: ... proper level CAUTION _ Take care not allow foreign material to enter the final gear case 4 Install dipstick Recommended oil SAE80 API GL 4 Hypoid gear oil 1 a b EBS00102 CHANGING THE FINAL GEAR OIL 1 Place the machine on a level surface 2 Place a receptacle under the final gear case 3 Remove dipstick 1 final gear oil drain plug 2 4 Drain final gear oil 5 Install final gear oil drain plug NOTE _ C...

Page 80: ...to CHECKING THE FINAL GEAR OIL LEVEL 8 Install dipstick Total amount 0 12 L 0 11 Imp qt 0 13 US qt Recommended oil SAE80 API GL 4 Hypoid gear oil EBS00105 CHECKING THE SWINGARM DUST BOOT 1 Remove C D I magneto cover Refer to C D I MAGNETO in chapter 4 2 Check dust boot 1 Damage Replace Refer to REAR SHOCK ABSORBER AND REAR SWINGARM in chapter 7 3 Install C D I magneto cover Refer to C D I MAGNETO ...

Page 81: ...he left and or right until it stops completely then slightly move the handlebar from left to right Tie rod end has any vertical play Replace the tie rod end s Refer to STEERING SYSTEM in chapter 7 4 Raise the front end of the machine so that there is no weight on the front wheels 5 Check knuckles and or wheel bearings Move the wheels laterally back and forth Excessive free play Replace the follow ...

Page 82: ...tly opposite one another f Measure the width É between the marks g Calculate the toe in using the formula given below h If the toe in is incorrect adjust it Ê Forward 3 Adjust toe in WARNING _ Be sure that both tie rods are turned the same amount If not the machine will drift right or left even though the handlebar is positioned straight This may lead to mis handling and an accident After setting ...

Page 83: ... so that A and B are equal EBS00109 CHECKING THE FRONT AND REAR SHOCK ABSORBERS 1 Place the machine on a level surface 2 Check damper rod 1 Scratch damage Replace as a set oil leakage Excessive oil leakage Replace as a set Refer to FRONT SHOCK ABSORBER ASSEMBLIES AND FRONT SWINGARM and REAR SHOCK ABSORBER AND REAR SWINGARM in chapter 7 3 Check operation Pump the shock absorbers up and down for sev...

Page 84: ...re Front 20 kPa 0 20 kgf cm2 2 9 psi Rear 20 kPa 0 20 kgf cm2 2 9 psi 2 Tire pressure below the minimum speci fication could cause the tire to dislodge from the rim under severe riding condi tions The following are minimums Front 17 kPa 0 17 kgf cm2 2 5 psi Rear 17 kPa 0 17 kgf cm2 2 5 psi 3 Use no more than Front 250 kPa 2 5 kgf cm2 36 psi Rear 250 kPa 2 5 kgf cm2 36 psi when seating the tire bea...

Page 85: ... second reading WARNING _ Uneven or improper tire pressure may adversely affect the handling of this machine and may cause loss of control Maintain proper tire pressures Set tire pressures when the tires are cold Tire pressures must be equal in both front tires and equal in both rear tires Cold tire pressure Front Rear Standard 20 kPa 0 20kgf cm2 2 9 psi 20 kPa 0 20kgf cm2 2 9 psi Minimum 17 kPa 0...

Page 86: ...ification replace the tire immediately Tire wear limit a Front and rear 3 mm 0 12 in EBS00116 CHECKING THE WHEELS 1 Check wheel 1 Damage bends Replace NOTE _ Always balance the wheel when a tire or wheel has been changed or replaced WARNING _ Never attempt even small repairs to the wheel Ride conservatively after installing a tire to allow it to seat itself properly on the rim ...

Page 87: ...a damaged cable as soon as possi ble 1 Check cable sheath Damage Replace 2 Check cable operation Unsmooth operation Lubricate or replace NOTE _ Hold the cable end up and apply several drops of lubricant to the cable Recommended lubricant Lithium soap base grease EBS00118 LUBRICATING THE LEVERS STEERING SHAFT AND STEERING KNUCKLES Lubricate the pivoting point and metal to metal moving parts of the ...

Page 88: ...O NOT SMOKE when charging or han dling batteries KEEP BATTERIES AND ELECTROLYTE OUT OF REACH OF CHILDREN Avoid bodily contact with electrolyte as it can cause severe burns or permanent eye injury FIRST AID IN CASE OF BODILY CONTACT EXTERNAL Skin Wash with water Eyes Flush with water for 15 minutes and get immediate medical attention INTERNAL Drink large quantities of water or milk fol lowed with m...

Page 89: ...tilled water Tap water con tains minerals which are harmful to the bat tery b a 5 Check specific gravity Less than 1 280 Recharge the battery Specific gravity 1 280 at 20 C 68 F 6 Charge battery WARNING _ Do not quick charge a battery CAUTION _ Loosen the battery sealing caps Make sure the battery breather hose and battery vent are free of obstructions To ensure maximum performance always charge a...

Page 90: ...sure to turn off the battery charger Make sure the battery charger lead clips are in full contact with the battery termi nal and that they are not shorted A cor roded battery charger lead clip may generate heat in the contact area and a weak clip spring may cause sparks If the battery becomes hot to the touch at any time during the charging process disconnect the battery charger and let the batter...

Page 91: ...ned so as to allow electro lyte or hydrogen gas from the battery to contact the frame the machine and its fin ish may be damaged NOTE Refer to CABLE ROUTING in chapter 2 10 Check battery terminals Dirt Clean with a wire brush Loose connection Connect properly 11 Connect battery leads to the battery terminals CAUTION _ First connect the positive battery lead 1 and then the negative battery lead 2 1...

Page 92: ...UEL TANK fuse holder 1 2 Check fuse a Connect the pocket tester to the fuse and check the continuity NOTE _ Set the pocket tester selector to Ω 1 b If the pocket tester indicates replace the fuse Pocket tester P N YU 03112 C 90890 03112 3 Replace blown fuse a Set the main switch to OFF b Install a new fuse of the correct amperage c Set on the switches to verify if the electrical circuit is operati...

Page 93: ...n amperage rating other than that specified Improvising or using a fuse with the wrong amperage rat ing may cause extensive damage to the electrical system cause the ignition sys tems to malfunction and could possibly cause a fire 4 Install seat Refer to SEAT FENDERS AND FUEL TANK Items Amperage rating Q ty Main 5 A 1 Reserve 5 A 1 ...

Page 94: ...ENG 4 ...

Page 95: ...S 4 12 REMOVING THE ROCKER ARMS AND CAMSHAFT 4 14 REMOVING THE VALVES AND VALVE SPRINGS 4 14 CHECKING THE CAMSHAFT 4 15 CHECKING THE ROCKER ARMS AND ROCKER ARM SHAFTS 4 15 CHECKING THE VALVES AND VALVE SPRINGS 4 17 INSTALLING THE VALVES AND VALVE SPRINGS 4 21 INSTALLING THE CAMSHAFT AND ROCKER ARMS 4 22 CYLINDER AND PISTON 4 23 REMOVING THE PISTON 4 24 CHECKING THE CYLINDER AND PISTON 4 24 CHECKIN...

Page 96: ...TOPPER LEVER 4 48 INSTALLING THE STOPPER LEVER 4 48 INSTALLING THE SHIFT SHAFT 4 48 CRANKCASE 4 49 CRANKCASE BEARINGS 4 50 SEPARATING THE CRANKCASE 4 51 CHECKING THE TIMING CHAIN 4 51 CHECKING THE BEARINGS AND OIL SEALS 4 52 CHECKING THE CRANKCASE 4 52 INSTALLING THE BEARINGS 4 52 ASSEMBLING THE CRANKCASE 4 53 CRANKSHAFT 4 54 CHECKING THE CRANKSHAFT 4 55 INSTALLING THE CRANKSHAFT 4 55 TRANSMISSION...

Page 97: ...b Part Q ty Remarks Removing the exhaust pipe muffler breather hose and leads Remove the parts in the order listed Rear fender Refer to SEAT FENDERS AND FUEL TANK in chapter 3 1 Exhaust pipe muffler 1 2 Exhaust pipe gasket 1 3 Spark plug lead 1 4 C D I magneto coupler 2 5 Crankcase breather hose 1 For installation reverse the removal pro cedure ENGINE ...

Page 98: ...ing bolts Remove the parts in the order listed Carburetor Refer to CARBURETOR in chapter 5 Starter motor Refer to ELECTRIC STARTING SYS TEM in chapter 8 C D I magneto cover Refer to C D I MAGNETO 1 Metal clamp 2 2 Lower engine mounting nut bolt 1 1 CAUTION _ Install all of the bolts nuts and then tighten them to full torque specifica tions Refer to INSTALLING THE ENGINE ...

Page 99: ...Nm 3 3 m kg 24 ft Ib Order Job Part Q ty Remarks 3 Upper engine mounting nut bolt 1 1 Refer to INSTALLING THE ENGINE 4 Engine assembly 1 5 Dust boot 1 Refer to REMOVING THE ENGINE and INSTALLING THE ENGINE For installation reverse the removal pro cedure ENGINE ...

Page 100: ...stall dust boot 1 NOTE Before mounting the engine assembly install the dust boot onto the middle driven gear bear ing housing 1 2 Install upper engine mounting bolt nut 1 lower engine mounting bolt nut 2 NOTE _ Do not fully tighten the bolts and nuts 3 Tighten upper engine mounting nut 1 lower engine mounting nut 2 1 2 T R 33 Nm 3 3 m kg 24 ft lb T R 33 Nm 3 3 m kg 24 ft lb ...

Page 101: ...pipe muffler Refer to ENGINE C D I magneto cover Refer to C D I MAGNETO 1 Spark plug lead 1 2 Spark plug 1 3 Camshaft sprocket cover 1 4 Intake tappet cover 1 5 Exhaust tappet cover 1 6 Timing chain tension adjuster 1 Refer to REMOVING THE CYLINDER HEAD and INSTALLING THE CYLIN DER HEAD 7 Timing chain tensioner assembly 1 8 Camshaft sprocket 1 9 Cylinder head 1 10 Intake side timing chain guide 1 ...

Page 102: ...4 6 ENG Order Job Part Q ty Remarks 11 Exhaust side timing chain guide 1 12 Cylinder head gasket 1 13 Dowel pin 2 For installation reverse the removal pro cedure CYLINDER HEAD ...

Page 103: ...e when the camshaft sprocket alignment mark 3 is aligned with the cylinder head alignment mark 4 If not give the crankshaft one counterclock wise turn to meet the above condition 2 Loosen camshaft sprocket bolt 1 Use the sheave holder 2 to hold the rotor NOTE Do not allow the sheave holder to touch the projection on the rotor 3 Remove timing chain tension adjuster timing chain tensioner assembly c...

Page 104: ...ng chain as a set 1 1 4 of a tooth 2 Correct 3 Roller 4 Sprocket CHECKING THE TAPPET COVERS AND CAMSHAFT SPROCKET COVER 1 Check tappet covers 1 camshaft sprocket cover 2 O rings Cracks damage Replace 2 1 EBS00226 CHECKING THE TIMING CHAIN GUIDES 1 Check intake side timing chain guide 1 exhaust side timing chain guide 2 Wear damage Replace EBS00228 CHECKING THE TIMING CHAIN TENSIONER ASSEMBLY 1 Che...

Page 105: ...ral deposits rust Eliminate 3 Measure cylinder head warpage Out of specification Resurface the cylin der head a Place a straightedge and a thickness gauge across the cylinder head b Measure the warpage c If the limit is exceeded resurface the cylin der head as follows d Place a 400 600 grit wet sandpaper on the surface plate and resurface the cylinder head using a figure eight sanding pattern NOTE...

Page 106: ... is at the Top Dead Center TDC CAUTION _ Do not turn the crankshaft during the cam shaft sprocket installation d Place the timing chain onto the camshaft sprocket e Install the camshaft sprocket onto the cam shaft and finger tighten the sprocket bolt NOTE _ Be sure to align the alignment mark 5 on the camshaft sprocket with the alignment mark 2 on the cylinder head f Force the camshaft clockwise a...

Page 107: ...tion 2 The flat surface 3 of the timing chain ten sioner rod should face towards the adjuster threaded hole 4 WARNING _ Always use a new gasket 4 Adjust timing chain tensioner Refer to ADJUSTING THE TIMING CHAIN TENSIONER in chapter 3 T R 18 Nm 1 8 m kg 13 ft lb 3 4 1 2 5 Tighten camshaft sprocket bolt 1 NOTE _ Use the sheave holder 2 to hold the rotor Do not allow the sheave holder to touch the p...

Page 108: ...YLINDER HEAD 1 Intake manifold 1 2 Rocker arm shaft 2 Refer to REMOVING THE ROCKER ARMS AND CAMSHAFT and INSTALLING THE CAMSHAFT AND ROCKER ARMS 3 Rocker arm 2 4 Adjuster 2 5 Camshaft 1 6 Valve cotter 4 Refer to REMOVING THE VALVES AND VALVE SPRINGS and INSTALL ING THE VALVES AND VALVE SPRINGS 7 Valve spring retainer 2 8 Valve spring 2 9 Intake valve 1 10 Exhaust valve 1 11 Valve stem seal 2 12 Va...

Page 109: ...4 13 ENG Order Job Part Q ty Remarks 13 Valve guide 2 For installation reverse the removal pro cedure CAMSHAFT ROCKER ARMS AND VALVES ...

Page 110: ...rew a M8 bolt 2 into the threaded end of the camshaft and then pull out the camshaft Slide hammer set P N YU 01083 A Slide hammer bolt M8 P N 90890 01085 Weight P N 90890 01084 2 1 EBS00238 REMOVING THE VALVES AND VALVE SPRINGS 1 Check valve sealing Leakage at the valve seat Check the valve face valve seat and valve seat width Refer to CHECKING THE VALVES AND VALVE SPRINGS a Pour a clean solvent 1...

Page 111: ...nt P N YM 04108 90890 04108 2 1 EBS00223 CHECKING THE CAMSHAFT 1 Check cam lobes Pitting scratches blue discoloration Replace 2 Measure cam lobe dimensions a and b Out of specification Replace Camshaft lobe limit Intake a 25 200 mm 0 9921 in b 20 894 mm 0 8226 in Exhaust a 25 201 mm 0 9922 in b 20 921 mm 0 8237 in EBS00239 CHECKING THE ROCKER ARMS AND ROCKER ARM SHAFTS The following procedure appl...

Page 112: ...iameter 10 000 10 015 mm 0 3937 0 3943 in 5 Measure rocker arm shaft outside diameter a Out of specification Replace 6 Calculate rocker arm to rocker arm shaft clearance NOTE _ Calculate the clearance by subtracting the rocker arm shaft outside diameter from the rocker arm inside diameter Above 0 08 mm 0 0031 in Replace the defective part s Rocker arm shaft outside diame ter 9 981 9 991 mm 0 3930 ...

Page 113: ...alve guide remover 1 and valve guide installer 2 c After installing the valve guide bore the valve guide using a valve guide reamer 3 to obtain proper stem to guide clearance NOTE _ After replacing the valve guide reface the valve seat Stem to guide clearance valve guide inside diameter a valve stem diameter b Stem to guide clearance Intake 0 010 0 037 mm 0 0004 0 0015 in Limit 0 08 mm 0 0031 in E...

Page 114: ... Intake 0 5 0 9 mm 0 0197 0 0354 in Limit 1 6 mm 0 0630 in Exhaust 0 6 1 0 mm 0 0236 0 0394 in Limit 1 6 mm 0 0630 in 5 Measure runout valve stem Out of specification Replace NOTE _ When installing a new valve always replace the guide If the valve is removed or replaced always replace the oil seal 6 Eliminate carbon deposits from the valve face and valve seat 7 Check valve seats Pitting wear Refac...

Page 115: ...ce made contact blueing will have been removed e If the valve seat is too wide too narrow or the seat is not centered the valve seat must be refaced Valve seat width Intake 0 9 1 1 mm 0 0354 0 0433 in Limit 1 6 mm 0 063 in Exhaust 0 9 1 1 mm 0 0354 0 0433 in Limit 1 6 mm 0 063 in 9 Lap valve face valve seat NOTE _ After refacing the valve seat or replacing the valve and valve guide the valve seat ...

Page 116: ...e sure to clean off all of the compound from the valve face and valve seat f Apply Mechanic s blueing dye Dykem to the valve face g Install the valve into the cylinder head h Press the valve through the valve guide and onto the valve seat to make a clear pattern i Measure the valve seat width again If the valve seat width is out of specification reface and relap the valve seat 10 Measure valve spr...

Page 117: ...spring retainers NOTE _ Install the valve springs with the larger pitch a facing upwards b Smaller pitch 3 Install valve cotters NOTE _ Install the valve cotters while compressing the valve spring with the valve spring compressor 1 and attachment 2 4 To secure the valve cotters onto the valve stem lightly tap the valve tip with a piece of wood CAUTION _ Hitting the valve tip with excessive force c...

Page 118: ...G THE CAMSHAFT AND ROCKER ARMS 1 Install camshaft 1 NOTE _ Install the camshaft groove a facing down 2 Apply engine oil onto the rocker arm shafts 3 Install rocker arms 1 rocker arm shafts NOTE _ Use a slide hammer bolt 2 to install the rocker arm shaft 1 a 1 2 ...

Page 119: ...emove the parts in the order listed Cylinder head Refer to CYLINDER HEAD 1 Cylinder 1 Refer to INSTALLING THE CYLINDER 2 Cylinder gasket 1 3 Dowel pin 2 4 Piston pin clip 2 Refer to REMOVING THE PISTON and INSTALLING THE PISTON 5 Piston pin 1 6 Piston 1 7 Piston ring set 1 For installation reverse the removal pro cedure ...

Page 120: ...s NOTE _ Spread the end gaps apart while at the same time lifting the piston ring over the top of the piston crown Piston pin puller set P N YU 01304 90890 01304 3 2 1 EBS00249 CHECKING THE CYLINDER AND PISTON 1 Check piston wall cylinder wall Vertical scratches Rebore or replace the cylinder and replace the piston and piston rings as a set 2 Measure piston to cylinder clearance a Measure cylinder...

Page 121: ... the following formula f If out of specification rebore or replace the cylinder and replace the piston and piston rings as a set Cylinder bore C 39 000 39 005 mm 1 5354 1 5356 in Taper limit T 0 05 mm 0 002 in Out of round R 0 01 mm 0 0004 in C maximum of D1 D2 T maximum of D1 or D2 maximum of D5 or D6 R maximum of D1 D3 or D5 minimum of D2 D4 or D6 Piston size P Standard 38 960 38 975 mm 1 5339 1...

Page 122: ...inder with the piston crown 3 Measure piston ring end gap Out of specification Replace the piston ring NOTE _ The oil ring expander spacer s end gap cannot be measured If the oil ring rail s gap is exces sive replace all three piston rings Piston ring side clearance Top ring 0 030 0 065 mm 0 0012 0 0026 in Limit 0 12 mm 0 0047 in 2nd ring 0 020 0 055 mm 0 0008 0 0022 in Limit 0 12 mm 0 0047 in Pis...

Page 123: ...17 0 5118 in Limit 12 976 mm 0 5109 in 3 Measure piston pin bore diameter b Out of specification Replace the piston 4 Calculate piston pin to piston pin bore clearance Out of specification Replace the piston pin and piston as a set Piston pin bore diameter 13 002 13 013 mm 0 5119 0 5123 in Limit 13 043 mm 0 5135 in Piston pin to piston pin bore clearance Piston pin bore diameter b Piston pin outsi...

Page 124: ... ring end b Upper oil ring rail end c Expander end d Lower oil ring rail end e 2nd ring end f 20 mm 0 79 in 3 Install piston 1 piston pin 2 piston pin clips 3 NOTE _ Apply engine oil onto the piston pin piston rings and piston Be sure that the arrow mark a on the piston points to the exhaust side of the engine Before installing the piston pin clips cover the crankcase with a clean rag to prevent t...

Page 125: ...inder NOTE _ Install the cylinder with one hand while com pressing the piston rings with the other hand CAUTION _ Be careful not to damage the timing chain damper during installation Pass the timing chain through the timing chain cavity CYLINDER AND PISTON ...

Page 126: ...S AND FUEL TANK in chapter 3 1 Shift lever 1 Refer to INSTALLING THE SHIFT LEVER 2 C D I magneto cover 1 3 C D I magneto cover gasket 1 4 Dowel pin 2 5 C D I magneto rotor 1 Refer to REMOVING THE C D I MAG NETO ROTOR and INSTALLING THE C D I MAGNETO ROTOR 6 Woodruff key 1 7 Pickup coil stator assembly 1 8 Neutral switch 1 For installation reverse the removal pro cedure ...

Page 127: ...e holder 2 loosen the rotor nut Do not allow the sheave holder to touch the projection on the rotor Sheave holder P N YS 01880 A 90890 01701 1 2 2 Remove C D I magneto rotor 1 woodruff key NOTE _ Use the flywheel puller 2 Flywheel puller P N YM 01189 90890 01189 1 2 EBS00262 CHECKING THE PICKUP COIL STATOR ASSEMBLY 1 Check pickup coil stator assembly Damage Replace ...

Page 128: ...l the key and rotor 2 Tighten C D I magneto rotor nut NOTE _ While holding the C D I magneto rotor 1 with the sheave holder 2 tighten the C D I magneto rotor nut Do not allow the sheave holder to touch the projection on the rotor Sheave holder P N YS 01880 A 90890 01701 1 2 T R 40 Nm 4 0 m kg 29 ft lb INSTALLING THE SHIFT LEVER 1 Install shift lever NOTE Temporarily install the left footrest board...

Page 129: ...Refer to CHANGING THE ENGINE OIL in chapter 3 C D I magneto cover Refer to C D I MAGNETO 1 Clutch cover 1 Refer to REMOVING THE CLUTCH and INSTALLING THE CLUTCH 2 Clutch cover gasket 1 3 Dowel pin 2 4 Push plate 1 5 Circlip 1 6 Pressure plate 1 7 Push rod 1 8 Friction plate 1 with black color mark ing 4 Refer to INSTALLING THE CLUTCH ...

Page 130: ...te 2 1 12 Thrust weight plate 1 13 Clutch ball 12 14 Thrust plate 1 15 Clutch boss 1 16 Clutch boss one way cam 1 17 Primary driven gear clutch housing 1 18 Spacer 1 19 Primary drive gear 1 Refer to REMOVING THE PRIMARY DRIVE GEAR and INSTALLING THE PRIMARY DRIVE GEAR For installation reverse the removal pro cedure CLUTCH ...

Page 131: ...ING THE PRIMARY DRIVE GEAR 1 Loosen primary drive gear nut 1 NOTE _ Place an aluminum plate 2 between the teeth of the primary driven gear clutch housing 3 and primary drive gear 4 1 4 2 3 EBS00300 CHECKING THE FRICTION PLATES The following procedure applies to all of the friction plates 1 Check friction plate Damage wear Replace the friction plates as a set 2 Measure friction plate thickness Out ...

Page 132: ...LUTCH SPRINGS The following procedure applies to all of the clutch springs 1 Check clutch spring Damage Replace the clutch springs as a set 2 Measure clutch spring free length a Out of specification Replace the clutch springs as a set EBS00303 CHECKING THE CLUTCH HOUSING 1 Check clutch housing dogs Damage pitting wear Deburr the clutch housing dogs or replace the clutch housing clutch housing bear...

Page 133: ...atic clutch operation EBS00305 CHECKING THE PRESSURE PLATE 1 Check pressure plate Cracks damage Replace CHECKING THE CLUTCH BALLS 1 Check clutch ball Pitting damage wear Replace the clutch balls as a set EBS00307 CHECKING THE PRIMARY DRIVE GEARS 1 Check primary drive gear 1 primary driven gear 2 Damage wear Replace the primary drive gear and clutch housing as a set Excessive noise during operation...

Page 134: ...ve holder P N YS 01880 A 90890 01701 1 4 2 3 T R 50 Nm 5 0 m kg 36 ft lb INSTALLING THE CLUTCH 1 Install clutch balls NOTE Install the clutch balls 1 on the primary driven gear clutch housing as shown 1 1 1 1 2 Install thrust weight plate clutch boss one way cam clutch boss NOTE Align section a of the clutch boss one way cam with section b of the clutch boss and then install the primary driven gea...

Page 135: ...riction plate 1 4 Adjust friction plate height a Push the friction plate 1 1 down by hand b Measure the friction plate height a dis tance between the primary driven gear clutch housing 2 and friction plate 11 c If the height is out of specification adjust the friction plate height d Remove the clutch plate 1 friction plates 1 clutch plates 2 and friction plate 2 e Select the suitable clutch plates...

Page 136: ...lutch boss one way cam with section b of the clutch boss and then install the primary driven gear clutch housing b a 1 2 7 Tighten clutch boss nut 1 NOTE _ While holding the clutch boss 2 with the clutch holder 3 tighten the clutch boss nut 8 Install clutch balls NOTE Install the clutch balls on the primary driven gear clutch housing as shown Clutch holder P N 90890 04100 1 2 3 T R 60 Nm 6 0 m kg ...

Page 137: ... plates alter nately on the clutch boss starting and ending with a friction plate CAUTION The friction plate 2 2 must be placed between the thrust weight plate and the third clutch plate 2 The clutch plate 1 5 must be placed between the first and second friction plate 1 10 Install clutch cover NOTE _ Tighten the screws in stage using a crisscross pattern 4 4 2 1 3 5 6 a T R 7 Nm 0 7 m kg 5 1 ft lb...

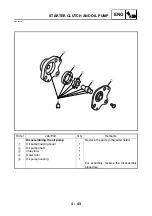
Page 138: ... and oil pump Remove the parts in the order listed Clutch assembly Refer to CLUTCH 1 Starter idle gear assembly 1 2 Starter wheel gear 1 3 Starter clutch assembly 1 4 Spacer 1 5 Oil pump drive gear 1 6 Oil pump driven gear 1 7 Oil pump assembly 1 8 Oil pump gasket 1 9 Oil strainer 1 For installation reverse the removal pro cedure ...

Page 139: ... 5 4 3 2 1 Order Job Part Q ty Remarks Disassembling the oil pump Remove the parts in the order listed 1 Oil pump housing cover 1 2 Oil pump shaft 1 3 Inner rotor 1 4 Outer rotor 1 5 Oil pump housing 1 For assembly reverse the disassembly procedure ...

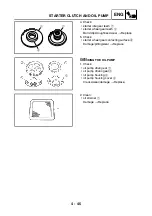
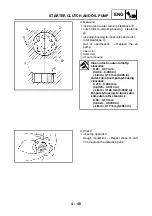
Page 140: ... a center punch T R Starter clutch screw 10 Nm 1 0 m kg 7 2 ft lb LOCTITE 3 Check starter clutch operation a Install the starter wheel gear to the starter clutch and hold the starter clutch b When turning the starter wheel gear clock wise È the starter clutch and the wheel gear should be engaged If not the starter clutch is faulty Replace it c When turning the starter wheel gear coun terclockwise ...

Page 141: ... clips roughness wear Replace 5 Check starter wheel gear contacting surface a Damage pitting wear Replace a 2 1 EBS00330 CHECKING THE OIL PUMP 1 Check oil pump drive gear 1 oil pump driven gear 2 oil pump housing 3 oil pump housing cover 4 Cracks wear damage Replace 2 Clean oil strainer 1 Damage Replace ...

Page 142: ...nner rotor 2 Outer rotor 3 Oil pump housing Inner rotor to outer rotor tip clearance 0 05 0 07 mm 0 002 0 003 in Limit 0 15 mm 0 006 in Outer rotor to oil pump housing clearance 0 013 0 036 mm 0 0005 0 0014 in Limit 0 106 mm 0 0042 in Oil pump housing to inner rotor and outer rotor clearance 0 06 0 10 mm 0 0024 0 0039 in Limit 0 17 mm 0 0067 in 4 Check oil pump operation Rough movement Repeat step...

Page 143: ...er Job Part Q ty Remarks Removing the shift shaft Remove the parts in the order listed Clutch assembly Refer to CLUTCH 1 Shift shaft 1 2 Stopper lever 1 3 Dowel pin 5 For installation reverse the removal pro cedure SHIFT SHAFT ...

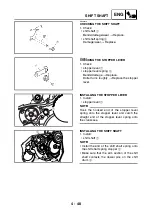
Page 144: ... stopper lever INSTALLING THE STOPPER LEVER 1 Install stopper lever 1 NOTE Hook the hooked end of the stopper lever spring onto the stopper lever and catch the straight end of the stopper lever spring onto the crankcase 1 INSTALLING THE SHIFT SHAFT 1 Install shift shaft 1 NOTE Install the end of the shift shaft spring onto the shift shaft spring stopper 2 Make sure that the arm section of the shif...

Page 145: ...EAD Cylinder and piston Refer to CYLINDER AND PISTON C D I magneto Refer to C D I MAGNETO Clutch Refer to CLUTCH Starter clutch and oil pump Refer to STARTER CLUTCH AND OIL PUMP Shift shaft Refer to SHIFT SHAFT 1 Timing chain 1 2 Shift drum retainer 1 3 Right crankcase 1 Refer to SEPARATING THE CRANK CASE and ASSEMBLING THE CRANKCASE 4 Dowel pin 2 5 Left crankcase 1 For installation reverse the re...

Page 146: ...art Q ty Remarks Removing the crankcase bearings Remove the parts in the order listed Crankshaft Refer to CRANKSHAFT Transmission Refer to TRANSMISSION Middle driven pinion gear Refer to MIDDLE GEAR 1 Bearing retainer 1 2 Bearing 6 Refer to INSTALLING THE BEARINGS For installation reverse the removal pro cedure ...

Page 147: ...NOTE _ Insert a screwdriver or pry bar into the pry points in the crankcase and then carefully pry apart the crankcase halves CAUTION _ Use a soft hammer to tap on one side of the crankcase Tap only on reinforced portions of the crankcase Do not tap on the crank case mating surfaces Work slowly and carefully Make sure that the crankcase halves separate evenly c Remove the dowel pins EBS00335 CHECK...

Page 148: ...ughly wash the case halves in a mild solvent 2 Clean all the gasket mating surfaces and crankcase mating surfaces thoroughly 3 Check crankcase Cracks damage Replace oil delivery passages Clogged Blow out with compressed air INSTALLING THE BEARINGS 1 Install left main axle bearing 1 NOTE Press the left main axle bearing into the left crankcase 2 as shown in the illustration a 34 0 34 5 mm 1 34 1 36...

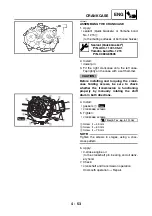
Page 149: ...her the transmission is functioning properly by manually rotating the shift drum in both directions 4 Install gaskets 1 crankcase screws 5 Tighten crankcase screws 2 Screw 45 mm 3 Screw 60 mm 4 Screw 75 mm NOTE _ Tighten the screws in stages using a criss cross pattern 6 Apply 4 stroke engine oil to the crankshaft pin bearing and oil deliv ery hole 7 Check crankshaft and transmission operation Uns...

Page 150: ...er Job Part Q ty Remarks Removing the crankshaft Remove the parts in the order listed Crankcase Separate Refer to CRANKCASE 1 Crankshaft 1 Refer to INSTALLING THE CRANK SHAFT For installation reverse the removal pro cedure CRANKSHAFT ...

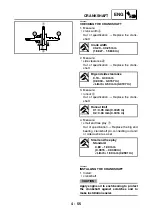
Page 151: ...he big end bearing crankshaft pin connecting rod and or side washer as a set Crank width 40 20 40 25 mm 1 5827 1 5846 in Big end side clearance 0 10 0 40 mm 0 0039 0 0157 in Limit 0 50 mm 0 0197 in Runout limit C1 0 05 mm 0 0020 in C2 0 04 mm 0 0016 in Small end free play Standard 0 80 1 00 mm 0 0315 0 0394 in Limit 1 50 mm 0 0591 in f a d C1 C2 EBS00362 INSTALLING THE CRANKSHAFT 1 Install cranksh...

Page 152: ...eparate Refer to CRANKCASE 1 Main axle 1st pinion gear 1 2 Shift fork guide bar 1 Refer to REMOVING THE TRANSMIS SION and INSTALLING THE TRANS MISSION 3 Shift fork 1 4 Drive axle middle drive pinion gear assembly 1 5 Shift drum 1 6 1st wheel gear 1 7 Drive axle dog gear 1 8 Middle drive gear shim 1 For installation reverse the removal pro cedure ...

Page 153: ...case together 4 1 2 3 EBS00350 CHECKING THE SHIFT FORK 1 Check shift fork cam follower 1 shift fork pawl 2 Bends damage scoring wear Replace the shift fork 2 Check shift fork guide bar Roll the shift fork guide bar on a flat surface Bends Replace WARNING _ Do not attempt to straighten a bent shift fork guide bar 3 Check shift fork movement along the shift fork guide bar Rough movement Replace the ...

Page 154: ... 2 Measure drive axle runout with a centering device and dial gauge 1 Out of specification Replace the drive axle 3 Check transmission gears Blue discoloration pitting wear Replace the defective gear s transmission gear dogs Cracks damage rounded edges Replace the defective gear s 4 Check transmission gear engagement each pinion gear to its respective wheel gear Incorrect Reassemble the transmissi...

Page 155: ...t fork should face towards the left of the engine Be sure to install the forked section a of the drive axle middle drive gear assembly around the shift fork guide bar when install ing the transmission 2 4 3 1 a 2 Check transmission Rough movement Repair NOTE _ Oil each gear and bearing thoroughly Before assembling the crankcase be sure that the transmission is in neutral and that the gears turn fr...

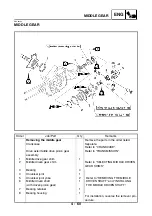
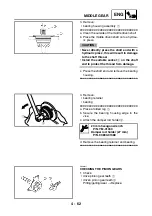
Page 156: ...ar assembly Refer to TRANSMISSION 1 Middle drive gear shim 1 2 Middle driven gear shim Refer to SELECTING MIDDLE DRIVEN GEAR SHIMS 3 Bearing 4 Refer to REMOVING THE MIDDLE DRIVEN SHAFT and INSTALLING THE MIDDLE DRIVEN SHAFT 4 Universal joint 1 5 Universal joint yoke 2 6 Middle driven shaft with driven pinion gear 1 7 Bearing retainer 1 8 Bearing housing 1 For installation reverse the removal pro c...

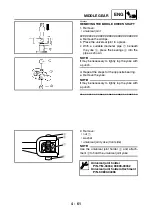
Page 157: ...own NOTE _ It may be necessary to lightly tap the yoke with a punch d Repeat the steps for the opposite bearing e Remove the yoke NOTE _ It may be necessary to lightly tap the yoke with a punch 2 Remove nut 1 washer universal joint yoke front side NOTE _ Use the universal joint holder 2 and attach ment 3 to hold the universal joint yoke Universal joint holder P N YM 04062 90890 04062 Universal joi...

Page 158: ...e socket 2 on the shaft end to protect the thread from damage c Press the shaft end and remove the bearing housing 4 Remove bearing retainer bearing a Place a folded rag 1 b Secure the bearing housing edge in the vise c Attach the damper rod holder 2 d Remove the bearing retainer and bearing 27 mm hexagon wrench P N YM 01363 Damper rod holder 27 mm P N 90890 01388 1 2 EBS01021 CHECKING THE PINION ...

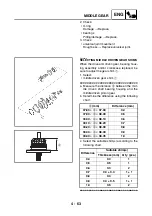
Page 159: ...ddle driven gear shim 1 a Measure the distance a between the mid dle driven shaft bearing housing and the middle driven pinion gear b Determine the difference using the following chart c Select the suitable shim s according to the following chart a mm Difference mm 37 83 a 37 90 0 4 37 90 a 38 00 0 5 38 00 a 38 10 0 6 38 10 a 38 20 0 7 38 20 a 38 30 0 8 38 30 a 38 40 0 9 38 40 a 38 45 1 0 Differen...

Page 160: ...eads with a drift punch 27 mm hexagon wrench P N YM 01363 Damper rod holder 27 mm P N 90890 01388 T R Bearing retainer 60 Nm 6 0 m kg 43 ft lb LOCTITE New 1 2 2 Install universal joint yoke front side washer nut 1 NOTE _ Use the universal joint holder 2 and attach ment 3 to hold the yoke Apply locking agent LOCTITE to the nut threads Lock the threads with a drift punch Universal joint holder P N Y...

Page 161: ...g The needles can eas ily fall out of their races Slide the yoke back and forth on the bearings the yoke will not go all the way onto a bearing if a needle is out of place d Press each bearing into the universal joint using a suitable socket NOTE _ The bearing must be inserted far enough into the universal joint so that the circlip can be installed e Install the circlips into the groove of each yo...

Page 162: ... clamp as shown to secure the pinion gear fix clamp c Attach the gear lash measurement tool 2 and dial gauge 3 a 25 2 mm 0 99 in d Measure the gear lash while rotating the middle driven shaft back and forth NOTE _ Measure the gear lash at 4 positions Rotate the middle driven gear 90 each time e If the gear lash is incorrect adjust the gear lash by middle driven gear shim s Middle gear lash 0 17 0 ...

Page 163: ...CARB 5 ...

Page 164: ...CARB CHAPTER 5 CARBURETOR CARBURETOR 5 1 CHECKING THE CARBURETOR 5 3 ASSEMBLING THE CARBURETOR 5 4 INSTALLING THE CARBURETOR 5 5 MEASURING AND ADJUSTING THE FUEL LEVEL 5 5 ...

Page 165: ...CARB ...

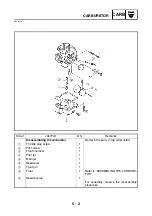
Page 166: ...the carburetor Remove the parts in the order listed 1 Fuel overflow hose 1 2 Carburetor air vent hose 1 3 Fuel hose 1 4 Carburetor assembly 1 5 Carburetor top cover 1 6 Throttle cable 1 Refer to INSTALLING THE CARBURE TOR 7 Spring 1 8 Piston valve 1 9 Jet needle set 1 For installation reverse the removal pro cedure CARBURETOR ...

Page 167: ...he carburetor Remove the parts in the order listed 1 Throttle stop screw 1 2 Pilot screw 1 3 Float chamber 1 4 Pilot jet 1 5 Main jet 1 6 Needle jet 1 7 Float pin 1 8 Float 1 Refer to ASSEMBLING THE CARBURE TOR 9 Needle valve 1 For assembly reverse the disassembly procedure ...

Page 168: ...ed fuel chamber body Contamination Clean a Wash the carburetor in a petroleum based solvent Do not use any caustic carburetor cleaning solution b Blow out all of the passages and jets with compressed air 2 Check float 1 float tang 2 Damage Replace 3 Check needle valve 1 Contamination wear damage Replace 4 Check piston valve 1 Scratches wear damage Replace ...

Page 169: ... the jets with com pressed air 7 Check piston valve movement Sticks Replace the piston valve Insert the piston valve into the carburetor body and check for free movement 8 Check choke valve movement Sticks Replace EBS00152 ASSEMBLING THE CARBURETOR CAUTION _ Before reassembling wash all of the parts in a clean petroleum based solvent Always use a new gasket 1 Install pilot screw 1 Pilot screw sett...

Page 170: ...NG THE FUEL LEVEL 1 Measure fuel level a Out of specification Adjust a Stand the machine on a level surface b Install the fuel level gauge 1 onto the fuel drain pipe 2 c Loosen the fuel drain screw 3 d Hold the fuel level gauge vertically next to the line on the float chamber e Measure the fuel level Fuel level below the float chamber mating surface 4 0 5 0 mm 0 16 0 20 in Fuel level gauge P N YM ...

Page 171: ...needle valve seat and needle valve c If either is worn replace them as a set d If both are fine adjust the float level by slightly bending the float tang 1 e Install the carburetor assembly f Measure the fuel level again g Repeat steps a to f until the fuel level is within specification ...

Page 172: ...DRIV 6 ...

Page 173: ...6 8 REMOVING THE REAR AXLE FINAL DRIVE ASSEMBLY 6 8 DISASSEMBLING THE REAR AXLE HOUSING 6 9 DISASSEMBLING THE FINAL GEAR CASE 6 9 CHECKING THE REAR AXLE 6 10 CHECKING THE DRIVE SHAFT 6 10 CHECKING THE REAR AXLE HOUSING AND FINAL DRIVE ASSEMBLY 6 10 ASSEMBLING THE FINAL GEAR CASE 6 11 ASSEMBLING THE REAR AXLE HOUSING 6 11 INSTALLING THE REAR AXLE FINAL DRIVE ASSEMBLY 6 12 INSTALLING THE NUTS 6 13 ...

Page 174: ...DRIV ...

Page 175: ... pronounced hesitation or jerky move ment during acceleration deceleration or sustained speed This must not be con fused with engine surging or transmission characteristics 2 A rolling rumble noticeable at low speed a high pitched whine a clunk from a shaft drive component or area 3 A locked up condition of the shaft drive train mechanism no power transmitted from the engine to the rear wheels A B...

Page 176: ...tremely destructive to the gear teeth If a test ride following reassembly indicates this condition stop riding immediately to minimize gear dam age c A slight thunk evident at low speed opera tion This noise must be distinguished from normal machine operation Diagnosis Possible broken gear teeth WARNING _ Stop riding immediately if broken gear teeth are suspected This condition could result in the...

Page 177: ...est the machine for the distance nec essary to locate the leak Leakage Check the component housing gasket and or seal for damage Damage Replace the component NOTE _ An apparent oil leak on a new or nearly new machine may be the result of a rust preven tative coating or excessive seal lubrication Always clean the machine and recheck the suspected location of an apparent leakage ...

Page 178: ...brake adjustment NO Adjust per instructions Refer to ADJUSTING THE REAR BRAKE in chapter 3 YES Check the rear axle Feel for bearing dam age NO Rear axle bearings and rear drive shaft bearings are probably not damaged Repeat the test or remove the individual compo nents YES Remove the rear axle Check for axle bear ing damage YES Replace the rear axle bearing Refer to REAR AXLE FINAL DRIVE ASSEMBLY ...

Page 179: ...mbly and drive shaft Remove the parts in the order listed Rear wheels Refer to FRONT AND REAR WHEELS in chapter 7 Brake drum cover Refer to FRONT AND REAR BRAKES in chapter 7 Final gear oil Drain Refer to CHANGING THE FINAL GEAR OIL in chapter 3 1 Nut 1 Refer to REMOVING THE NUTS and INSTALLING THE NUTS 2 Nut 1 3 Final gear case breather hose 1 4 Bolt nut 1 1 5 Swingarm guard 1 ...

Page 180: ...nal drive assembly 1 Refer to REMOVING THE REAR AXLE FINAL DRIVE ASSEMBLY and INSTALLING THE REAR AXLE FINAL DRIVE ASSEMBLY 7 Drive shaft 1 8 Coupling gear 1 For installation reverse the removal pro cedure REAR AXLE FINAL DRIVE ASSEMBLY AND DRIVE SHAFT ...

Page 181: ...Rear axle housing 1 2 Rear axle housing bearing retainer 1 Refer to DISASSEMBLING THE REAR AXLE HOUSING and ASSEMBLING THE REAR AXLE HOUSING 3 Spacer 1 4 Final gear case bearing retainer 1 Refer to DISASSEMBLING THE FINAL GEAR CASE and ASSEMBLING THE FINAL GEAR CASE 5 Spacer 1 6 Final drive pinion gear 1 7 Rear axle with final drive ring gear 1 8 Final gear case 1 For assembly reverse the disassem...

Page 182: ... by placing the suit able stand under the frame 4 Remove rear wheels wheel hubs nuts 5 Remove rear brake assembly Refer to FRONT AND REAR BRAKES in chapter 7 Axle nut wrench 36 mm P N YM 37132 90890 01422 REMOVING THE REAR AXLE FINAL DRIVE ASSEMBLY 1 Remove rear axle final drive assembly 1 NOTE Remove the rear axle final drive assembly as an assembly after removing each bolt and nut REAR AXLE FINA...

Page 183: ...81 DISASSEMBLING THE FINAL GEAR CASE 1 Remove rear axle with final drive ring gear CAUTION _ Never directly tap the axle end with a ham mer since this will result in damage to the axle thread and spline 2 Remove final gear case bearing retainer NOTE _ Use a ring nut wrench 1 3 Remove final drive pinion gear assembly With a soft hammer lightly tap on the final drive pinion gear end Ring nut wrench ...

Page 184: ...mit 1 5 mm 0 06 in EBS00191 CHECKING THE DRIVE SHAFT 1 Check drive shaft splines 1 coupling gear splines 2 Wear damage Replace EBS00192 CHECKING THE REAR AXLE HOUSING AND FINAL DRIVE ASSEMBLY 1 Check final gear case 1 rear axle housing 2 Cracks damage Replace 2 Check gear teeth Pitting galling wear Replace the drive pinion gear and ring gear as a set oil seals O rings Damage Replace 3 Check bearin...

Page 185: ...nstall the oil seal and dust seal as shown a 6 6 5 mm 0 24 0 26 in b 1 2 mm 0 04 0 08 in Ring nut wrench P N YM 38404 90890 01430 T R 80 Nm 8 0 m kg 58 ft lb EBS00195 ASSEMBLING THE REAR AXLE HOUSING 1 Install rear axle housing bearing retainer Use a bearing retainer wrench 1 CAUTION _ Always use a new bearing 2 Install bearing 1 NOTE Install the bearing as shown a 0 5 mm 0 02 in 2 rear axle housi...

Page 186: ... mating surfaces of the swingarm and the final gear case b Temporarily install the rear axle final drive assembly 1 on the swingarm 2 The bolts and nuts should be temporarily tightened c Check that the rear axle rotates smoothly d Tighten the bolts and nuts 1 Rear axle final drive assembly 2 Swingarm 3 Bolt 4 4 Nut 3 5 Bolt 6 Lithium soap based grease Sealant Quick Gasket P N ACC 11001 05 01 Yamah...

Page 187: ...ighten the inside nut with rear axle nut wrench to specification while holding the rear axle d Hold the inside nut 1 and tighten the out side nut 2 with the rear axle nut wrench to specification e Draw a line a on the inside and outside nut f Hold the outside nut 2 and tighten back the inside nut 1 with the rear axle nut wrench to specification g Measure the distance b between the lines If distanc...

Page 188: ......

Page 189: ...CHAS 7 ...

Page 190: ...THE HANDLEBAR GRIPS 7 16 REMOVING THE REAR BRAKE SWITCH 7 16 CHECKING THE HANDLEBAR 7 16 INSTALLING THE HANDLEBAR 7 17 INSTALLING THE HANDLEBAR GRIPS 7 17 INSTALLING THE REAR BRAKE LEVER 7 18 INSTALLING THE FRONT BRAKE LEVER ASSEMBLY 7 18 STEERING STEM 7 19 REMOVING THE STEERING STEM 7 20 CHECKING THE STEERING STEM 7 20 INSTALLING THE STEERING STEM 7 20 INSTALLING THE LOCK WASHER 7 20 TIE RODS AND...

Page 191: ... REAR SHOCK ABSORBER AND REAR SWINGARM 7 26 REMOVING THE REAR SWINGARM 7 27 CHECKING THE REAR SHOCK ABSORBER 7 27 CHECKING THE REAR SWINGARM 7 28 CHECKING THE DUST BOOT 7 28 INSTALLING THE LOCK WASHER 7 28 ...

Page 192: ...chine on a level surface WARNING _ Securely support the machine so there is no danger of it falling over The following procedure applies to both of the front wheels 1 Cotter pin 1 Refer to INSTALLING THE WHEEL HUBS 2 Axle nut 1 3 Front wheel 1 Refer to INSTALLING THE WHEELS 4 Front brake drum 1 For installation reverse the removal pro cedure FRONT AND REAR WHEELS ...

Page 193: ...el surface WARNING _ Securely support the machine so there is no danger of it falling over The following procedure applies to both of the rear wheels 1 Cotter pin 1 Refer to INSTALLING THE WHEEL HUBS 2 Axle nut 1 3 Rear wheel 1 Refer to INSTALLING THE WHEELS 4 Rear wheel hub 1 For installation reverse the removal pro cedure FRONT AND REAR WHEELS ...

Page 194: ...to do so may cause an accident resulting in machine damage and possible operator injury Wheel runout limit Radial 2 2 0 mm 0 08 in Lateral 3 2 0 mm 0 08 in EBS00385 CHECKING THE FRONT WHEEL HUBS The following procedure applies to both of the front wheel hubs 1 Check front wheel hub 1 Cracks damage Replace 2 Check wheel bearings Wheel hub play wheel turns roughly Replace a Clean wheel hub exterior ...

Page 195: ...uter race EBS00384 CHECKING THE REAR WHEEL HUBS The following procedure applies to both of the rear wheel hubs 1 Check rear wheel hub 1 Cracks damage Replace wheel hub splines 2 Wear damage Replace EBS00390 INSTALLING THE WHEEL HUBS The following procedure applies to both of the front and rear wheel hubs 1 Install axle nut 1 cotter pin 2 NOTE _ Do not loosen the axle nut after torquing it If the a...

Page 196: ... WHEELS The following procedure applies to both of the front and rear wheels 1 Install wheel NOTE _ The arrow mark 1 on the tire must point in the direction of rotation of the wheel È Front wheel É Rear wheel 2 Tighten nuts È É T R 28 Nm 2 8 m kg 20 ft lb ...

Page 197: ...edure applies to both of the front brakes 1 Brake shoe 2 Refer to INSTALLING THE FRONT BRAKES 2 Front brake cable drum side 1 3 Brake shoe plate 1 4 Brake camshaft lever 1 Refer to REMOVING THE BRAKES and INSTALLING THE FRONT BRAKES 5 Brake shoe wear indicator 1 6 Brake camshaft 1 7 Left front brake cable lever side 1 8 Right front brake cable lever side 1 9 Front brake lever 1 For installation re...

Page 198: ...ake drum cover 1 2 Nut 1 Refer to REAR AXLE FINAL DRIVE ASSEMBLY AND DRIVE SHAFT in chapter 6 3 Nut 1 4 Lock washer 2 Refer to INSTALLING THE REAR BRAKE 5 Brake drum 1 6 Brake drum boss 1 7 Brake shoe 2 8 Rear brake cable drum side 1 9 Brake camshaft lever 1 Refer to REMOVING THE BRAKES and INSTALLING THE REAR BRAKE 10 Brake shoe wear indicator 1 11 Brake camshaft 1 ...

Page 199: ...7 8 CHAS Order Job Part Q ty Remarks 12 Rear brake cable lever side 1 13 Rear brake switch 1 14 Rear brake lever 1 For installation reverse the removal pro cedure FRONT AND REAR BRAKES ...

Page 200: ...d with the punch mark in the brake camshaft EBS00439 CHECKING THE BRAKE SHOE PLATES The following procedure applies to each brake 1 Check brake shoe plate pivot pin brake camshaft Bends cracks damage Replace dust seal Wear damage Replace EBS00440 CHECKING THE BRAKE SHOES The following procedure applies to each brake 1 Check brake shoes 1 brake shoe springs 2 Cracks damage Replace as a set NOTE _ W...

Page 201: ...nts NOTE _ Replace the brake shoes as a set if either is found to be worn to the wear limit Brake lining thickness 4 0 mm 0 16 in Limit 2 0 mm 0 08 in EBS00441 CHECKING THE BRAKE DRUMS The following procedure applies to each brake 1 Measure brake drum inside diameter a Out of specification Replace È Front brake drum É Rear brake drum Rear brake drum inside diameter Front 110 0 mm 4 33 in Limit 110...

Page 202: ...shaft and the pivot pin Wipe off the excess grease 2 Install brake camshaft 1 brake shoe wear indicator 2 brake camshaft lever NOTE _ Install the brake camshaft so its punch mark a is positioned as shown Align the projection on the brake shoe wear indicator with the notch in the brake cam shaft Align the punch mark in the brake camshaft with the mark on the brake camshaft lever È Left side É Right...

Page 203: ...ake shoes are properly posi tioned 5 Check brake camshaft operation Unsmooth operation Repair 6 Adjust front brake Refer to ADJUSTING THE FRONT BRAKE in chapter 3 EBS00442 INSTALLING THE REAR BRAKE Reverse the Removal procedure Note the following points 1 Lubricate brake camshaft pivot pin CAUTION _ During installation lightly grease the brake camshaft and the pivot pin Wipe off the excess grease ...

Page 204: ...h mark in the brake camshaft with the mark on the brake camshaft lever 3 Install rear brake cable drum side brake shoes NOTE Check that the brake shoes are properly posi tioned 4 Install brake drum boss brake drum lock washers 1 NOTE Bend the tabs of each lock washer along a flat side of each nut 5 Check brake camshaft operation Unsmooth operation Repair 6 Adjust rear brake Refer to ADJUSTING THE ...

Page 205: ...AT FENDERS AND FUEL TANK in chapter 3 1 Handlebar grip 2 Refer to REMOVING THE HANDLEBAR GRIPS and INSTALLING THE HAN DLEBAR GRIPS 2 Front brake cable 2 3 Front brake lever assembly 1 Refer to INSTALLING THE FRONT BRAKE LEVER ASSEMBLY 4 Handlebar switch 1 Refer to INSTALLING THE REAR BRAKE LEVER 5 Rear brake cable 1 6 Rear brake switch 1 7 Rear brake lever 1 8 Plastic band 1 ...

Page 206: ...15 CHAS Order Job Part Q ty Remarks 9 Upper handlebar holder 2 Refer to INSTALLING THE HANDLE BAR 10 Handlebar 1 11 Lower handlebar holder 1 For installation reverse the removal pro cedure STEERING SYSTEM ...

Page 207: ...sh the grip off the handlebar EBS00445 REMOVING THE REAR BRAKE SWITCH 1 Remove rear brake switch 1 NOTE _ Push the fastener when removing the rear brake switch out of the rear brake lever holder EBS00448 CHECKING THE HANDLEBAR 1 Check handlebar 1 Bends cracks damage Replace WARNING _ Do not attempt to straighten a bent handle bar as this may dangerously weaken the handlebar ...

Page 208: ... punched mark 1 forward 2 CAUTION _ First tighten the bolt 3 on the front side of the handlebar holder and then tighten the bolt 4 on the rear side T R 20 Nm 2 0 m kg 14 ft lb EBS00450 INSTALLING THE HANDLEBAR GRIPS 1 Install handlebar grips NOTE _ Before installing the handlebar grips tempo rarily install the rear brake lever and front brake lever assembly on the handlebar Before applying the adh...

Page 209: ... the positions shown in the illustration 2 Adjust rear brake Refer to ADJUSTING THE REAR BRAKE in chapter 3 EBS00452 INSTALLING THE FRONT BRAKE LEVER ASSEMBLY 1 Install front brake lever assembly 1 NOTE _ Install the front brake lever assembly within 10 from the horizontal line shown in the illustration After installing the front brake lever assem bly make sure that the clearance a between the fro...

Page 210: ...listed Front fender Refer to SEAT FENDERS AND FUEL TANK in chapter 3 Handlebar Refer to HANDLEBAR 1 Lock washer 1 Refer to INSTALLING THE LOCK WASHER 2 Steering stem bushing 2 3 Spacer 2 4 Oil seal 2 5 Steering stem 1 Refer to REMOVING THE STEERING STEM and INSTALLING THE STEER ING STEM For installation reverse the removal pro cedure ...

Page 211: ...tempt to straighten a bent stem this may dangerously weaken the stem 2 Check steering stem bushings 1 Wear damage Replace INSTALLING THE STEERING STEM 1 Tighten steering stem nut 1 tie rod end nut 2 NOTE When tightening each tie rod end nut 2 hold the tie rod ball joint with a 14 mm wrench 3 EBS00459 INSTALLING THE LOCK WASHER 1 Install lock washer 1 NOTE Bend a lock washer tab along a flat side o...

Page 212: ... Remove the parts in the order listed Front brakes Refer to FRONT AND REAR BRAKES The following procedure applies to both of the tie rods and steering knuckles 1 Tie rod 1 Refer to REMOVING THE TIE RODS and INSTALLING THE TIE RODS 2 Steering knuckle 1 3 Thrust cover 2 4 Spacer 1 5 Bushing 2 For installation reverse the removal pro cedure ...

Page 213: ... then loosen the tie rod end nut EBS00462 CHECKING THE TIE RODS The following procedure applies to both of the tie rods 1 Check tie rod free play and movement Free play Replace the tie rod end Turns roughly Replace the tie rod end 2 Check tie rod Bends damage Replace EBS00464 CHECKING THE STEERING KNUCKLES The following procedure applies to both of the steering knuckles 1 Check steering knuckle Da...

Page 214: ...all tie rod NOTE _ The tie rod side which must be installed on the inside has grooves 1 When installing the tie rod hold each tie rod ball joint with a 14 mm wrench 2 and then tighten the tie rod end nut 2 Adjust toe in Refer to ADJUSTING THE TOE IN in chapter 3 T R 15 Nm 1 5 m kg 11 ft lb STEERING SYSTEM ...

Page 215: ...T SWINGARM Order Job Part Q ty Remarks Removing the front shock absorber assemblies and front swingarm Remove the parts in the order listed Steering knuckles Refer to STEERING SYSTEM 1 Front shock absorber 2 2 Front swingarm 1 Refer to REMOVING THE FRONT SWINGARM For installation reverse the removal pro cedure ...

Page 216: ...d down If the vertical movement is tight or rough or if there is binding check the bushings 2 Remove front swingarm EBS00470 CHECKING THE FRONT SWINGARM 1 Check front swingarm 1 Bends damage Replace 2 Check bushings 2 Wear damage Replace EBS00471 CHECKING THE FRONT SHOCK ABSORBER ASSEMBLIES 1 Check shock absorber rod Bends damage Replace the shock absorber assembly shock absorber assembly Oil leak...

Page 217: ... order listed C D I magneto cover Refer to C D I MAGNETO in chapter 4 Rear axle final drive assembly Refer to REAR AXLE FINAL DRIVE ASSEMBLY AND DRIVE SHAFT in chapter 6 1 Rear shock absorber 1 2 Pivot shaft 1 3 Lock washer 1 Refer to INSTALLING THE LOCK WASHER 4 Rear swingarm 1 Refer to REMOVING THE REAR SWIN GARM 5 Metal clamp 2 6 Dust boot 1 For installation reverse the removal pro cedure ...

Page 218: ...eck the rear swingarm vertical movement É by moving it up and down If vertical movement is tight or rough or if there is binding check the bushings spacer and pivot shaft 2 Remove pivot shaft rear swingarm T R Pivot shaft 85 Nm 8 5 m kg 61 ft lb EBS00478 CHECKING THE REAR SHOCK ABSORBER 1 Check shock absorber Oil leaks Replace the shock absorber assembly shock absorber rod Bends damage Replace the...

Page 219: ...e Replace 2 Check bushings Wear damage Replace EBS00481 CHECKING THE DUST BOOT 1 Check dust boot 1 Damage Replace INSTALLING THE LOCK WASHER 1 Install lock washer 1 NOTE Insert the small tab of the lock washer in the groove on the swingarm and then bend the other lock washer tab along a flat side of the pivot shaft head New ...

Page 220: ...ELEC 8 ...

Page 221: ... OF THE BULB SOCKETS 8 6 IGNITION SYSTEM 8 7 CIRCUIT DIAGRAM 8 7 TROUBLESHOOTING 8 8 ELECTRIC STARTING SYSTEM 8 13 CIRCUIT DIAGRAM 8 13 STARTING CIRCUIT OPERATION 8 14 TROUBLESHOOTING 8 15 STARTER MOTOR 8 19 CHECKING THE STARTER MOTOR 8 20 ASSEMBLING THE STARTER MOTOR 8 21 CHARGING SYSTEM 8 22 CIRCUIT DIAGRAM 8 22 TROUBLESHOOTING 8 23 SIGNAL SYSTEM 8 25 CIRCUIT DIAGRAM 8 25 TROUBLESHOOTING 8 26 CH...

Page 222: ... ELEC ...

Page 223: ... Rear brake switch 4 Handlebar switch 5 Battery 6 Main fuse 7 Engine stop switch frame 8 Rectifier regulator 9 Diode 0 Starting circuit cut off relay A Starter relay B Neutral switch C Pickup coil stator assembly D Starter motor E Ignition coil F C D I unit G Wire harness ELECTRICAL COMPONENTS ...

Page 224: ...ty switch back and forth between the switch positions a few times The terminal connections for switches e g main switch engine stop switch are shown in an illustration similar to the one on the left The switch positions a are shown in the far left column and the switch lead colors b are shown in the top row in the switch illustration NOTE _ indicates a continuity of electricity between switch term...

Page 225: ... to CHECKING SWITCH CONTINUITY Damage wear Repair or replace Improperly connected Properly connect Incorrect continuity reading Replace the switch ON OFF B B B R R Br Br Br B W B W R W B W OFF ON RUN OFF Br B R W BLACK B B Sb BLACK B B 1 2 3 4 5 6 1 Main switch 2 Start switch 3 Engine stop switch handlebar 4 Rear brake switch 5 Neutral switch 6 Engine stop switch frame ...

Page 226: ...illustration on the left Bulbs a and b are used for the headlights and usually use a bulb holder that must be detached before removing the bulb The majority of these types of bulbs can be removed from their respective socket by turning them counterclockwise Bulbs c is used for turn signal and tail brake lights and can be removed from the socket by pushing and turning the bulb counterclockwise Bulb...

Page 227: ...lb and the luminous flux will be adversely affected If the headlight bulb gets soiled thoroughly clean it with a cloth moistened with alcohol or lacquer thinner 2 Check bulb for continuity with the pocket tester No continuity Replace NOTE _ Before checking for continuity set the pocket tester to 0 and to the Ω 1 range a Connect the positive tester probe to termi nal 1 and the negative tester probe...

Page 228: ...ntinuity Replace NOTE _ Check each bulb socket for continuity in the same manner as described in the bulb section however note the following a Install a good bulb into the bulb socket b Connect the pocket tester probes to the respective leads of the bulb socket c Check the bulb socket for continuity If any of the readings indicate no continuity replace the bulb socket Pocket tester P N YU 03112 C ...

Page 229: ...G W W L W R B R W Y R B Sb B Y R W Sb B Y R W B R Br B W B W B B B B W Br R B W R Y R B Br Br Sb Y R B W R B B W B R O R W L R W R R R R R B B B B 5A L W R W L W B L W R W B Y Sb L W L W R W Sb B Y G Y B Y Br B R W Br B R W B W B B Y G Y BLACK BLACK B B G Y B G Y B B B B R R 1 4 5 6 9 A E 7 8 3 K B C D 2 G F H I J 0 1 C D I magneto 3 Main switch B C D I unit C Ignition coil D Spark plug G Engine s...

Page 230: ...shoot with the following special tool s EBS01032 YES NO The ignition system fails to operate no spark or intermittent spark Dynamic spark tester P N YM 34487 Ignition checker P N 90890 06754 Pocket tester P N YU 03112 C 90890 03112 1 Spark plug Check the condition of the spark plug Check the spark plug type Measure the spark plug gap Refer to CHECKING THE SPARK PLUG in chapter 3 Standard spark plu...

Page 231: ...spark gap until a misfire occurs Minimum ignition spark gap 6 mm 0 24 in Is there a spark and is the spark gap within specification The ignition system is OK 2 Ignition spark gap Disconnect the spark plug cap from the spark plug Connect the ignition checker 1 as shown 2 Spark plug cap Set the main switch to ON Measure the ignition spark gap a Crank the engine by pushing the starter switch and grad...

Page 232: ...sconnect the ignition coil connectors from the ignition coil terminals Connect the pocket tester Ω 1 to the ignition coil as shown Positive tester probe orange terminal Negative tester probe ignition coil base Measure the primary coil resistance Primary coil resistance 0 18 0 28 Ω at 20 C 68 F Connect the pocket tester Ω 1k to the ignition coil as shown Positive tester probe orange terminal Negati...

Page 233: ...gine stop switches OK Replace the handle bar switch or engine stop switch frame 7 Pickup coil resistance Disconnect the C D I magneto coupler from the wire harness Connect the pocket tester Ω 100 to the pickup coil terminal as shown Positive tester probe white red terminal 1 Negative tester probe white blue terminal 2 Measure the pickup coil resistance Pickup coil resistance 264 396 Ω at 20 C 68 F...

Page 234: ...ster probe green white terminal 2 Measure the source coil resistance Source coil resistance 304 456 Ω at 20 C 68 F black red and green white Replace the pickup coil stator assembly 9 Wiring Check the entire ignition system s wiring Refer to CIRCUIT DIAGRAM Is the ignition system s wiring properly connected and without defects Replace the C D I unit Properly connect or repair the ignition system s ...

Page 235: ... Y R W Sb B Y R W B R Br B W B W B B B B W Br R B W R Y R B Br Br Sb Y R B W R B B W B R O R W L R W R R R R R B B B B 5A L W R W L W B L W R W B Y Sb L W L W R W Sb B Y G Y B Y Br B R W Br B R W B W B B Y G Y BLACK BLACK B B G Y B G Y B B B B R R 1 4 5 6 9 A E 7 8 3 K B 2 G F H I J 0 2 Neutral switch 3 Main switch 5 Main fuse 6 Positive battery lead 7 Battery 8 Negative battery lead 9 Starter rel...

Page 236: ...d the engine stop switch is in the RUN position the starter motor can be operated only if 1 Main fuse 2 Battery 3 Starter relay 4 Starter motor 5 Starting circuit cut off relay 6 Diode 7 Rear brake switch 8 Start switch 9 Neutral switch È TO MAIN SWITCH É FROM MAIN SWITCH The transmission is in neutral the neutral switch is closed or You pull in the rear brake lever the rear brake switch is ON R L...

Page 237: ... fuse Check the main fuse for continuity Refer to CHECKING THE FUSE in chap ter 3 Is the main fuse OK Replace the fuse 2 Battery Check the condition of the battery Refer to CHECKING AND CHARGING THE BATTERY in chapter 3 Specific gravity 1 280 at 20 C 68 F Is the battery OK Refill battery fluid Clean the battery terminals Recharge or replace the battery 3 Starter motor Connect the positive battery ...

Page 238: ...ting circuit cut off relay have continuity between red white and blue white B Y L W Sb R W 1 3 2 Second step Connect the pocket tester Ω 1 to the starting circuit cut off relay coupler as shown Measure the starting circuit cut off relay for continuity as follows Positive tester probe sky blue 4 Negative tester probe black yellow 5 Continuity Positive tester probe black yellow 5 Negative tester pro...

Page 239: ...inuity between red and black Replace the starter relay 6 Main switch Check the main switch for continuity Refer to CHECKING THE SWITCHES Is the main switch OK Replace the main switch 3 4 1 2 L W R W R B 7 Neutral switch Check the neutral switch for continuity Refer to CHECKING THE SWITCHES Is the neutral switch OK Replace the neutral switch 8 Rear brake switch Check the rear brake switch for conti...

Page 240: ...ositive tester probe black yellow 2 Negative tester probe green yellow 1 No continuity NOTE _ When you switch the tester s positive and negative probes the readings in the above chart will be reversed Are the testing readings correct Replace the diode 1 2 G Y B Y 11 Wiring Check the entire starting system s wiring Refer to CIRCUIT DIAGRAM Is the starting system s wiring properly connected and with...

Page 241: ...the order listed 1 Starter motor lead 1 2 Ground lead 1 3 Starter motor 1 For installation reverse the removal pro cedure Disassembling the starter motor Remove the parts in the order listed 1 Yoke 1 Refer to ASSEMBLING THE STARTER MOTOR 2 Armature coil 1 3 Brush 1 4 Bracket 1 For assembly reverse the disassembly procedure ...

Page 242: ...he mica of the commutator must be undercut to ensure proper operation of the commutator 4 Measure armature assembly resistances commutator and insulation Out of specification Replace the starter motor a Measure the armature assembly resis tances with the pocket tester b If any resistance is out of specification replace the starter motor Commutator wear limit 15 5 mm 0 61 in Mica undercut 1 mm 0 04...

Page 243: ...a set 7 Check gear teeth Damage wear Replace the gear 8 Check bearing oil seal O rings Damage wear Replace the defective part s Brush length wear limit 3 5 mm 0 14 in Brush spring force 3 24 4 22 N 320 430 gf 11 66 15 19 oz a EBS00515 ASSEMBLING THE STARTER MOTOR 1 Install bracket brush armature coil yoke NOTE _ Align the projection a on the yoke with the slot b on the bracket ...

Page 244: ...RUN OFF B R W R W L G W GRAY G W W L W R B R W Y R B Sb B Y R W Sb B Y R W B R Br B W B W B B B B W Br R B W R Y R B Br Br Sb Y R R W L R W R R R R R B B B B 5A L W R W L W B B Y Sb L W L W R W Sb Br B R W Br B R W B W B B B B R R 1 4 5 6 9 A 7 8 3 K 2 G F H I J 0 1 C D I magneto 4 Rectifier regulator 5 Main fuse 6 Positive battery lead 7 Battery 8 Negative battery lead ...

Page 245: ...4 YES NO The battery is not being charged Inductive self powered tachome ter P N YU 8036 B Engine tachometer P N 90890 03113 Pocket tester P N YU 03112 C 90890 03112 1 Main fuse Check the main fuse for continuity Refer to CHECKING THE FUSE in chap ter 3 Is the main fuse OK Replace the fuse 2 Battery Check the condition of the battery Refer to CHECKING AND CHARGING THE BATTERY in chapter 3 Specific...

Page 246: ...within specifica tion The charging circuit is OK 4 Charging coil resistance Disconnect the C D I magneto coupler from the wire harness Connect the pocket tester Ω 1 to the charging coils Positive tester probe white terminal 1 Negative tester probe black terminal 2 Measure the charging coil resistance Charging coil resistance 0 72 1 08 Ω at 20 C 68 F between white and black Replace the rectifier re...

Page 247: ...R B R W Y R B Sb B Y R W Sb B Y R W B R Br B W B W B B B B W Br R B W R Y R B Br Br Sb Y R W R B B W B R O R W L R W R R R R R B B B B 5A L W R W L W B L W R W B Y Sb L W L W R W Sb B Y G Y B Y Br B R W Br B R W B W B B Y G Y BLACK BLACK B B G Y B G Y B B B B R R 1 4 5 6 9 A E 7 8 3 K B 2 G F H I J 0 2 Neutral switch 3 Main switch 5 Main fuse 6 Positive battery lead 7 Battery 8 Negative battery le...

Page 248: ...n chap ter 3 Is the main fuse OK Replace the fuse 2 Battery Check the condition of the battery Refer to CHECKING AND CHARGING THE BATTERY in chapter 3 Specific gravity 1 280 at 20 C 68 F Is the battery OK Refill battery fluid Clean the battery terminals Recharge or replace the battery 3 Main switch Check the main switch for continuity Refer to CHECKING THE SWITCHES Is the main switch OK Replace th...

Page 249: ...t bulb socket or both 2 Neutral switch Check the neutral switch for continuity Refer to CHECKING THE SWITCHES Is the neutral switch OK Replace the neutral switch 3 Voltage Connect the pocket tester DC 20 V to the neutral indicator light connectors wire har ness side as shown Positive tester probe brown 1 Negative tester probe sky blue 2 Set the main switch to ON Measure the voltage DC 12 V Is the ...

Page 250: ......

Page 251: ...TRBL SHTG 9 ...

Page 252: ...GH SPEED PERFORMANCE 9 2 POOR MEDIUM AND HIGH SPEED PERFORMANCE 9 2 FAULTY DRIVE TRAIN 9 3 FAULTY GEAR SHIFTING 9 4 HARD SHIFTING 9 4 SHIFT LEVER DOES NOT MOVE 9 4 JUMPS OUT GEAR 9 4 CLUTCH SLIPPING DRAGGING 9 4 CLUTCH SLIPPING 9 4 CLUTCH DRAGGING 9 4 OVERHEATING 9 4 OVERHEATING 9 4 FAULTY BRAKE 9 5 POOR BRAKING EFFECT 9 5 SHOCK ABSORBER MALFUNCTION 9 5 MALFUNCTION 9 5 UNSTABLE HANDLING 9 5 UNSTAB...

Page 253: ...TRBL SHTG ...

Page 254: ... Sucked in air Deformed float Worn needle valve Improperly sealed valve seat Improperly adjusted fuel level Improperly set pilot jet Air filter Clogged air filter element ELECTRICAL SYSTEM Spark plug Improper plug gap Worn electrodes Wire between terminals broken Improper heat range Faulty spark plug cap Ignition coil Broken or shorted primary secondary Faulty spark plug lead Broken body C D I sys...

Page 255: ... Valve train Improperly adjusted valve clearance Improperly adjusted valve timing EBS00538 POOR IDLE SPEED PERFORMANCE POOR IDLE SPEED PERFORMANCE Carburetor Loose pilot jet Clogged pilot jet Clogged pilot air jet Improperly adjusted idle speed throttle stop screw Improper throttle cable play Flooded carburetor Electrical system Faulty battery Faulty spark plug Faulty C D I unit Faulty pickup coil...

Page 256: ...Possible Causes 1 A pronounced hesitation or jerky move ment during acceleration deceleration or sustained speed This must not be con fused with engine surging or transmission characteristics 2 A rolling rumble noticeable at low speed a high pitched whine a clunk from a shaft drive component or area 3 A locked up condition of the shaft drive mechanism no power transmitted from the engine to the re...

Page 257: ...0545 CLUTCH SLIPPING DRAGGING CLUTCH SLIPPING Clutch Loose clutch spring Fatigued clutch spring Worn friction plate Worn clutch plate Incorrectly assembled clutch Engine oil Low oil level Improper quality low viscosity Deterioration CLUTCH DRAGGING Clutch Warped pressure plate Unevenly tensioned clutch springs Loose clutch boss nut Bent clutch plate Swollen friction plate Broken clutch boss Engine...

Page 258: ...551 SHOCK ABSORBER MALFUNCTION MALFUNCTION Bent or damaged damper rod Damaged oil seal lip Fatigued shock absorber spring EBS00552 UNSTABLE HANDLING UNSTABLE HANDLING Handlebar Improperly installed or bent Steering Incorrect toe in Bent steering stem Improperly installed steering stem Damaged bearing or bearing race Bent tie rods Deformed steering knuckles Tires Uneven tire pressures on both sides...

Page 259: ......

Page 260: ......

Page 261: ...YAMAHA MOTOR CO LTD 2500 SHINGAI IWATA SHIZUOKA JAPAN ...

Page 262: ...B B B B R R 1 4 5 6 9 A E 7 8 3 K B C D 2 G F H I J 1 C D I magneto 2 Neutral switch 3 Main switch 4 Rectifier regulator 5 Main fuse 6 Positive battery lead 7 Battery 8 Negative battery lead 9 Starter relay 0 Starter motor A Starting circuit cut off relay B C D I unit C Ignition coil D Spark plug E Diode F Rear brake switch G Engine stop switch frame H Handlebar switch I Start switch J Engine stop...

Reviews: