4 - 39
ENG
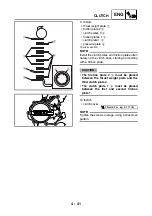
3. Install:
• friction plate 2
1
• clutch plates 2
2
• friction plates 1 (with black color marking)
3
• clutch plate 1
4
5
thrust weight plate
a
silver section
NOTE:
Install the clutch plates and friction plates alter-
nately on the clutch boss, starting and ending
with a friction plate.
CAUTION:
• The friction plate 2
1
must be placed
between the thrust weight plate and the
third clutch plate 2.
• The clutch plate 1
4
must be placed
between the first and second friction
plate 1.
4. Adjust:
• friction plate height
▼▼▼
▼
▼ ▼▼▼
▼
▼ ▼▼▼
▼
▼ ▼▼▼
▼
▼ ▼▼▼
▼
▼ ▼▼▼
▼
▼▼▼
a. Push the friction plate 1
1
down by hand.
b. Measure the friction plate height
a
(dis-
tance between the primary driven gear/
clutch housing
2
and friction plate 1
1
).
c. If the height is out of specification, adjust
the friction plate height.
d. Remove the clutch plate 1, friction plates 1,
clutch plates 2, and friction plate 2.
e. Select the suitable clutch plates 2 (3 plates)
using the following chart.
f. Install all parts. Refer to step 2.
g. Remeasure the friction plate height.
h. Remove all parts.
▲▲▲
▲
▲ ▲▲▲
▲
▲ ▲▲▲
▲
▲ ▲▲▲
▲
▲ ▲▲▲
▲
▲ ▲▲▲
▲
▲▲▲
Friction plate height
1.30 ~ 1.65 mm (0.051 ~ 0.065 in)
Clutch plates 2 (3 plates)
Thickness (mm)
1.2
1.4
1.6
3
3
1
5
2
4
a
a
1
2
CLUTCH
Summary of Contents for 5YF2-AE1
Page 1: ...YFM50S5YF2 AE1 SERVICE MANUAL ...
Page 2: ......
Page 8: ......
Page 9: ...GEN INFO 1 ...
Page 11: ...GEN INFO ...
Page 20: ...SPEC 2 ...
Page 22: ...SPEC ...
Page 44: ...2 22 SPEC OIL FLOW DIAGRAMS 1 Oil pump 2 Oil strainer ...
Page 53: ...CHK ADJ 3 ...
Page 55: ...CHK ADJ ...
Page 94: ...ENG 4 ...
Page 163: ...CARB 5 ...
Page 165: ...CARB ...
Page 172: ...DRIV 6 ...
Page 174: ...DRIV ...
Page 188: ......
Page 189: ...CHAS 7 ...
Page 220: ...ELEC 8 ...
Page 222: ... ELEC ...
Page 250: ......
Page 251: ...TRBL SHTG 9 ...
Page 253: ...TRBL SHTG ...
Page 259: ......
Page 260: ......
Page 261: ...YAMAHA MOTOR CO LTD 2500 SHINGAI IWATA SHIZUOKA JAPAN ...


