background image

17

Introduction

Getting Started — Playing the Clavinova as a Piano

The instrument has a built-in metronome (a device that keeps an accurate tempo) that is a convenient tool 
for practice.

1.

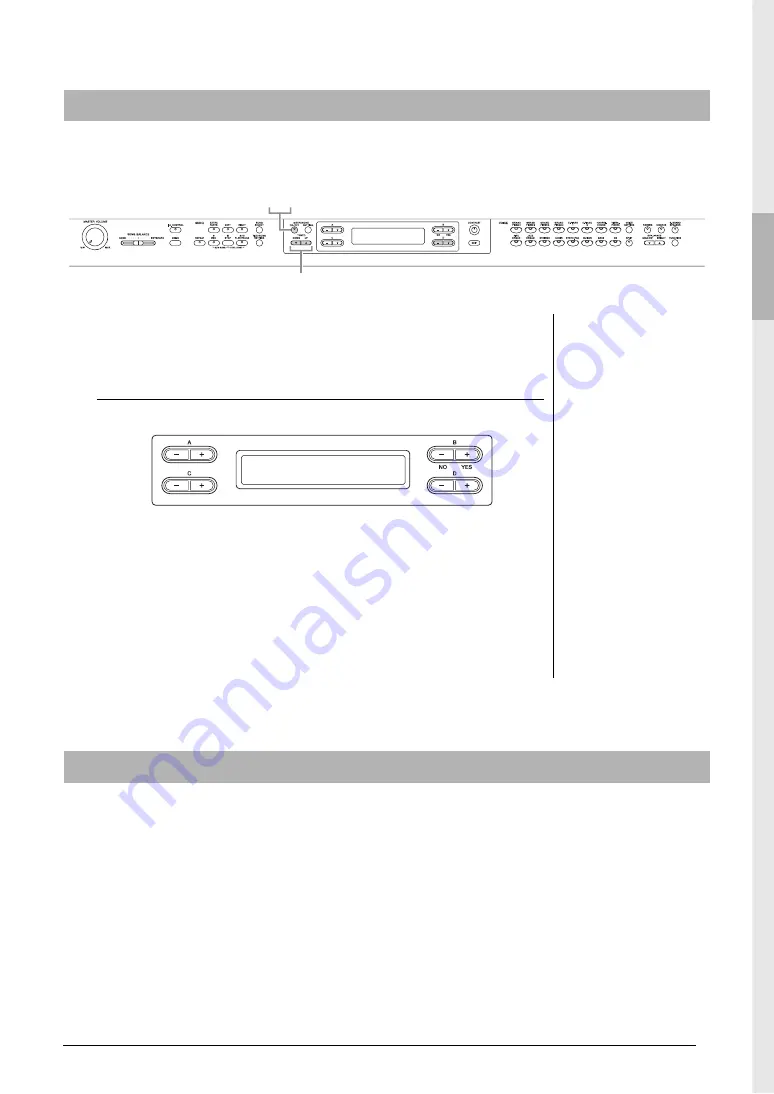
Press the METRONOME [ON/OFF] button to start the 
metronome.

Adjusting the tempo

Press the TEMPO [DOWN] or [UP] button to call up the tempo in the display.

To adjust the tempo (number of beats per minute: 5 – 500), use the TEMPO 
[DOWN]/[UP] or the D [–]/[+] buttons. To reset the tempo to the default setting 
(120), press the [DOWN] and [UP] buttons or the D [–] and [+] buttons 
simultaneously.
Press the [EXIT] button to return to the Voice display.

2.

Press the METRONOME [ON/OFF] button to stop the 
metronome.

You can specify the Touch Response (how the sound responds to the way you play the keys). You should 
adjust this setting according to the specific Voice you’re playing or the particular Song you’re performing, as 
desired. For information about how to make settings, refer to “Other settings — [FUNCTION]” on page 68.

Using the metronome — METRONOME [ON/OFF]

1 2

TEMPO [DOWN] [UP] buttons

NOTE

You can set the time signature, 
metronome volume, and 
metronome sound using the 
METRONOME [SETTING] 
button (page 60).

Tempo

120

Touch Response

Summary of Contents for 480

Page 1: ...du clavier à côté du câble d alimentation Assurez vous que ce sélecteur est réglé sur la tension utilisée dans votre pays À sa sortie d usine le sélecteur est réglé sur 240 V Pour modifier ce réglage utilisez un tournevis plat et faites tourner le cadran du sélecteur jusqu à ce que la valeur correcte apparaisse à côté de l indicateur figurant sur le panneau Pour plus d informations sur l assemblage ...

Page 2: ...dly We sincerely believe that our products and the production methods used to produce them meet these goals In keeping with both the letter and the spirit of the law we want you to be aware of the following Battery Notice This product MAY contain a small non rechargeable battery which if applicable is soldered in place The average life span of this type of battery is approximately five years When ...

Page 3: ...enna If the antenna lead in is 300 ohm ribbon lead change the lead in to co axial type cable If these corrective measures do not produce satisfactory results please contact the local retailer authorized to distribute this type of product If you can not locate the appropriate retailer please contact Yamaha Corporation of America Electronic Service Division 6600 Orangethorpe Ave Buena Park CA90620 T...

Page 4: ...ernal components in any way If it should appear to be malfunctioning discontinue use immediately and have it inspected by qualified Yamaha service personnel Do not expose the instrument to rain use it near water or in damp or wet conditions place on it any containers such as vases bottles or glasses containing liquids which might spill into any openings If any liquid such as water seeps into the i...

Page 5: ...ore turning the power on or off for all components set all volume levels to minimum Be sure to set the volumes of all components at their minimum levels and gradually raise the volume controls while playing the instrument to set the desired listening level Do not insert a finger or hand in any gaps on the key cover or instrument Also take care that the key cover does not pinch your finger Never in...

Page 6: ...computer software style files MIDI files WAVE data musical scores and sound recordings Any unauthorized use of such programs and contents outside of personal use is not permitted under relevant laws Any violation of copyright has legal consequences DON T MAKE DISTRIBUTE OR USE ILLEGAL COPIES About functions data bundled with the instrument Some of the Preset Songs have been edited for length or ar...

Page 7: ...ious functions useful for your practice such as Preset Song playback and Song recording Detailed Settings This section explains how to make detailed settings for the Clavinova s various functions Refer to this section as necessary Appendix This section introduces Message List a description of Preset Voices and other reference material Data List This document contains lists of XG Voices and Effect ...

Page 8: ...grip and a natural friction that lets you play easily The special Natural Wood keyboard uses real wood white keys just as an actual grand piano Moreover Linear Graded Hammer features the lower keys are heavy in touch and the higher keys are light with all the natural gradations in between The CLP 480 provides the performance functions and expressive power found only on grand pianos such as having ...

Page 9: ...Recording without specifying the Part MIDI Audio data format 34 Multi Recording of specific Parts MIDI data format 36 Other recording techniques 37 Handling Song files FILE SONG SETTING 41 Basic File operation 42 Deleting files Delete 43 Renaming files Rename 43 Copying files Copy 44 Moving files Move 45 Making folders in the USB storage device MakeFolder 45 Formatting a USB storage device Format ...

Page 10: ...metronome functions TEMPO UP DOWN buttons page 17 For changing the tempo speed of the Song and metronome A D buttons Display page 18 For selecting an item or setting a value shown at the location corresponding to each of A D buttons in the display CONTRAST knob page 14 For adjusting the display contrast EXIT button page 18 Pressing this button returns to the Voice display main operation display Vo...

Page 11: ...3 G3 A3 B3 C4 D4 E4 F4 G4 A4 B4 C5 D5 E5 F5 G5 A5 B5 C6 D6 E6 F6 G6 A6 B6 C7 1 A A B B C C D D Music rest page 13 Music braces page 14 Key cover pages 12 13 PHONES jacks page 15 Terminal panel page 49 Pedals page 16 AC IN connector page 12 Rear side ...

Page 12: ...n open the key cover so that only the keyboard appears This hides the electronic panel controls and lets you feel as if you re playing an actual acoustic piano Turning the power on WARNING Make sure your instrument is rated for the AC voltage supplied in the area in which it is to be used voltage rating appears on the name plate on the bottom panel In some areas a voltage selector may be provided ...

Page 13: ... the music rest 3 Lower the music rest so that it rests on the metal supports To lower the music rest 1 Pull the music rest toward yourself as far as it will go 2 Raise the two metal supports at the rear of the music rest 3 Gently lower the music rest backward until it is all the way down CAUTION Do not try to use the music rest in a half raised position Also when raising or lowering the music res...

Page 14: ...Do not use the instrument at a high volume level for a long period of time or your hearing may be damaged I A Control Intelligent Acoustic Control I A Control is a function which automatically adjusts and controls the sound quality according to the overall volume of the instrument Even when the volume is low it permits both low sounds and high sounds to be clearly heard Pressing the I A CONTROL bu...

Page 15: ...l the headphone hanger using included two screws 4 10mm as shown in the illustration NOTICE Do not hang anything other than the headphones on the hanger Otherwise the instrument or the hanger may be damaged This special speaker system located on the rear side effectively reproduces the reverberation and spaciousness of the sound of the soundboard on an actual grand piano Press the S BOARD SPEAKER ...

Page 16: ... other functions to each pedal by using RPedalFunc CPedalFunc and LPedalFunc in Voice Setting page 65 NOTE While the sostenuto center pedal is held the Voices in the PIPE ORGAN JAZZ ORGAN STRINGS CHOIR and some Voices in the XG may sound continuously without decay after the notes have been released NOTE The center pedal or left pedal can be used as equivalent to the PLAY PAUSE button on the panel ...

Page 17: ...he DOWN and UP buttons or the D and buttons simultaneously Press the EXIT button to return to the Voice display 2 Press the METRONOME ON OFF button to stop the metronome You can specify the Touch Response how the sound responds to the way you play the keys You should adjust this setting according to the specific Voice you re playing or the particular Song you re performing as desired For informati...

Page 18: ...ng If you ve changed the parameter values or settings you may want to reset them to their default settings To do this simply press the buttons simultaneously The TEMPO and BRILLIANCE buttons are the same shape as the A D buttons You can reset the related values or parameters by simultaneously pressing buttons of this shape Executing or canceling the operation When a prompt is shown on the upper ri...

Page 19: ... handle Rotating clockwise heightens the bench Before shipment the handle is firmly fastened Pedal Cleaning As with an acoustic piano pedals may become tarnished over years of use When this occurs polish the pedal with a compound designed for piano pedals Before using the compound make sure to read the instructions for proper usage Tuning Unlike an acoustic piano the instrument does not need to be...

Page 20: ...of each Preset Voice NOTE Touch Response page 17 will not be applied to some Voices For information about Voices to which Touch Response can be applied refer to Preset Voice List detailed on page 75 Voice group No Voice name Voice group No Voice name GRAND PIANO1 1 Grand Piano JAZZ ORGAN 24 Jazz Organ 2 Ballad Grand 25 Rotary Organ 3 Rock Piano 26 Mellow Organ 4 HonkyTonk Piano STRINGS 27 Strings ...

Page 21: ...he VoiceDemo display is shown The indicators of the Voice group buttons will flash in succession 2 Press the desired Voice group button to start playback of the Demo Song The Demo Songs will play back consecutively from the upper left Voice group button until you stop the playback 3 Press the STOP button to stop playback This operation lets you exit from the Demo mode NOTE XG is a major enhancemen...

Page 22: ...he EXIT or STOP button NOTE For information about the GP Soundboard Speaker refer to page 15 NOTE For explanation about the each sampling and details about the Voices to which the sampling can be applied refer to Preset Voice List detailed on page 75 Refer to page 71 to set the depth of the sampling effect on the Voices Sampling technology Voice group buttons Piano demo Stereo Sampling GRAND PIANO...

Page 23: ...horus effect on and off by setting ChorusOnOff parameter in Voice Setting on page 63 The CHORUS ON OFF button setting on the panel is temporary That is if you select another Voice the chorus setting for the previous Voice is cancelled The Chorus On Off parameter setting is saved for each Voice That is if you select a given Voice the chorus setting is automatically turned on or off according to the...

Page 24: ...he Voices for layering 2 1 Use the A buttons to select Voice 1 2 2 Use the B NO YES buttons to select Voice 2 After selecting play the keyboard 3 To exit from the Dual mode press any Voice group button Using Voices in the same Voice group 1 Press the desired Voice group button 2 Select the Voices for layering 2 1 Use the A buttons to select Voice 1 2 2 Press the B NO or YES button to enter the Dua...

Page 25: ... for the left hand area 2 2 Use the C buttons to select the left hand Voice 3 Hold down the SPLIT button then use the D buttons to specify the split point the border between the right and left hand range Alternatively hold down the SPLIT button and press the key you wish to assign as the split point The default setting of the split point is F 2 After setting play the keyboard 4 Press the SPLIT but...

Page 26: ...ce 1 and 2 for the left hand area Using Voices in different Voice groups 1 Hold down the SPLIT button press two different Voice group buttons simultaneously to enter the Dual mode 2 Select the Voices for layering 2 1 Use the C buttons to select Voice 1 2 2 Use the D NO YES buttons to select Voice 2 Using Voices in the same Voice group 1 Hold down the SPLIT button and press the desired Voice group ...

Page 27: ...e 2 Select a Song to be played back 2 1 Use the A buttons to select a drive data location MIDI Songs and Audio Songs There are two kinds of Songs that can be recorded and played back on this instrument MIDI Songs and Audio Songs A MIDI Song is comprised of your keyboard performance information and is not a recording of the actual sound itself The performance information refers to which keys are pl...

Page 28: ...1 3 Press the PLAY PAUSE button to start playback You can play the keyboard along with Song playback You can also change the Voice for your keyboard performance To adjust the volume balance between your keyboard performance and Song playback use the SONG BALANCE slider page 40 NOTE If a Song or folder name is too long to be shown at one time press the SONG SELECT button to show the entire name up ...

Page 29: ...paused During playback press the C button to start playback of the previous Song and press the C button to start playback of the next Song Tempo control MIDI Songs Press the TEMPO DOWN UP buttons to adjust the playback tempo of the MIDI Songs The original tempo of the current Song can be recalled by pressing the DOWN and UP buttons simultaneously Press the SONG SELECT button to return to the song ...

Page 30: ...pressing any note of the keyboard will start Song playback To call up the Sync Start mode select a song and then press the PLAY PAUSE button while holding down the STOP button The PLAY PAUSE lamp will flash at the current tempo Press the STOP button to disengage the Sync Start mode Playback will then start as soon as you begin playing the keyboard Starting pausing playback by using a pedal You can...

Page 31: ...k status between on and off 3 Press the PLAY PAUSE button to start playback Play and practice the part you just turned off while listening to the playback part as a guide 4 Stop playback Press the STOP button to stop playback Even if you don t press the STOP button the Song stops automatically when Song playback reaches the end Playing a one hand part Part Cancel function MIDI Songs 4 3 2 NOTE The...

Page 32: ...g see page 27 2 Press the PLAY PAUSE button to start playback 3 Specify the repeat range 3 1 Press the REPEAT button at the Starting point A of the range to be repeated 3 2 Press the REPEAT button again at the Ending point B After an automatic lead in to help guide you into the phrase the range from point A to point B is played back repeatedly 4 Press the STOP button to stop playback then press th...

Page 33: ...nstructions below after connecting the USB storage device to the USB TO DEVICE terminal For details about the difference between MIDI Songs and Audio Songs refer to page 27 As described above two methods are available Recording without specifying the Part MIDI Audio data format page 34 With MIDI data format recording the performance will be recorded to Part 1 Multi Recording of specific Parts MIDI...

Page 34: ...taneously press the REC and STOP buttons to create an empty new Song When the MIDI recording MEMORY or USB1 is selected in step 1 When the Audio recording USB AUDIO is selected in step 1 NOTICE If you select a Song other than New Song and New Audio as recording destination recording will overwrite and erase the already recorded data Recording Method Recording without specifying the Part Multi Reco...

Page 35: ...E With MIDI data format recording the performance will be recorded to Part 1 However in the Dual Split mode the parts assigned for recording and the parts actually used for recording are different Refer to page 40 for details NOTE You can use the metronome while recording although the metronome sound will not be recorded NOTE The lamp of a Part with data is lit in green The lamp indications and th...

Page 36: ...ied part is assigned to the EXTRA PARTS button 2 3 Hold down the REC button and press the EXTRA PARTS button With the above operations the REC lamp and specified part lamp flash in red To exit from this status press the REC button again or press the STOP button 3 Play the keyboard or press the PLAY PAUSE button to start recording 4 Press the STOP button to stop recording This operation exits from ...

Page 37: ...art recording then stop recording by executing steps 2 4 of Multi Recording of specific Parts on page 36 When you select a Preset Song in step 1 the recorded Song will be automatically saved as a new Song to the MEMORY drive When you select a Song in the MEMORY drive USB storage device in step 1 the recorded Song will be overwritten 4 Press the PLAY PAUSE button to play back the recorded Song Re r...

Page 38: ... playback then press the PLAY PAUSE button again slightly prior to the desired point 5 If necessary select the settings Voice and other parameters Select the desired settings if you wish to change the previous ones 6 Call up the Record mode When you specify the recording part Follow step 2 on page 36 When you do not specify the recording part Press the REC button 7 Play the keyboard or press the P...

Page 39: ...imultaneously to actually change the settings as made in step 2 5 Press the B YES button to overwrite the settings to the MIDI Song selected in step 1 This operation exits from the Record mode and automatically overwrites the Song To cancel the Overwrite operation press the B NO button 6 Press the PLAY PAUSE button to start playback of the changed Song NOTE The time signature cannot be changed Dat...

Page 40: ...caution In the following example RIGHT LEFT and EXTRA PARTS n have been selected for recording Part n Part 3 Part 16 NOTE The Song Balance will not be recorded NOTE Some commercially available music data contains extremely high volumes When using such data please adjust the Song Balance Your playing volume will be lower The Song playback volume will be lower NOTE Switching between the Dual and Spl...

Page 41: ...layback cannot be done File A file contains a group of data On this instrument a Song file includes Song data and a Song number Operation Indication Page Deleting files Delete 43 Renaming files Rename 43 Copying files Copy 44 Moving files Move 45 Making folders in the USB storage device MakeFolder 45 Formatting a USB storage device Format 46 Converting a MIDI Song to an Audio Song during playback ...

Page 42: ...rmation about this procedure refer to the corresponding section on pages 43 48 During operation messages information confirmation etc may be shown on the display For explanations and details refer to Message List on page 78 Also see some of the common display messages shown at right NOTICE Do not disconnect the USB Storage Device during file handling or when a USB Storage Device is mounted Doing s...

Page 43: ...neously will delete the character at the current cursor position The Song name can contain up to 46 characters The characters which exceed the display capacity and invisible can be called up by moving the cursor via the C buttons 4 3 Press the B YES button located next to Name then follow the on screen instructions After you rename a Song this instrument sorts Songs alphabetically and renumbers th...

Page 44: ...isplay Copying files Copy NOTE Please note that the copy features are intended for your personal use only NOTE The folder cannot be copied NOTE For instructions about the Move operation refer to page 45 Root The highest level of a hierarchical structure This indicates an area which does not belong to a folder Copy Start _ M_001 NewSong001 Range of the Copy Move operation You can copy a Song file f...

Page 45: ...ge device to organize Songs This instrument enables you to create folders only in the USB storage device not in the internal MEMORY drive See page 42 for information on basic operations The following is a detailed procedure of Step 4 on that page 4 1 Press the B YES button located next to Start 4 2 Assign the name to the folder For instructions on naming refer to page 43 The folder name can contai...

Page 46: ...o not turn off the power or disconnect the USB storage device while Executing is shown in the display The MIDI Song in the MEMORY drive and USB storage device USB1 drive can be converted to the Audio Song then saved in the USB storage device USB AUDIO drive For information about Song types which can be converted refer to page 41 See page 42 for information on basic operations The following is a de...

Page 47: ...phone sound When the conversion is completed Completed will appear in the display This function shows the amount of remaining memory and entire memory in the USB storage device See page 42 for information on basic operations The following is a detailed procedure of Step 4 on that page 4 1 If two or more USB devices are connected use the B buttons to select the device whose memory capacity you wish...

Page 48: ... root directory will be selected When Off is selected no Song in the USB storage device will be selected Setting range MIDI AUDIO Off You can change the type of characters that appear on display The default setting is International To input katakana change this setting to Japanese See page 42 for information on basic operations The following is a detailed procedure of Step 4 on that page 4 Use D b...

Page 49: ... or control various other functions By using an FC4 FC5 you can switch various selected functions on off To select the function that will be controlled use the AuxPedalFunc page 65 of the VOICE SETTING The PLAY PAUSE function can also be assigned to a foot switch page 70 5 AUX OUT L L R R jacks These jacks let you connect the Clavinova to external powered speaker systems for playing in larger venu...

Page 50: ... when you turn the power off Clavinova Powered speakers AUX OUT Phone plug standard AUX OUT Phone plug standard Audio cable NOTE Use audio cables and adaptor plugs with no resistance NOTE Do not route the output from the AUX OUT jacks to the AUX IN jacks If you connect the Clavinova s AUX OUT jacks to an external system such as Powered speakers do not connect the Powered speakers to Clavinova s AU...

Page 51: ...nt supports the USB 1 1 standard you can connect and use a USB 2 0 storage device with the instrument However note that the transfer speed is that of USB 1 1 Using USB Storage Devices By connecting the instrument to a USB storage device you can save data you ve created to the connected device as well as read data from the connected device The number of USB storage device to be used Up to two USB s...

Page 52: ...ruction on connecting refer to the manual of the MIDI interface NOTE For information on setting up your sequence software refer to the owner s manual of the relevant software Clavinova USB TO HOST terminal USB cable Computer Precautions when using the USB TO HOST terminal When connecting the computer to the USB TO HOST terminal make sure to observe the following points Failing to do so risks freez...

Page 53: ...MIDI OUT Transmits MIDI messages generated on this instrument to another MIDI device MIDI THRU Simply relays the MIDI messages received at MIDI IN Connecting external MIDI devices NOTE For details about MIDI refer to MIDI Basics page 7 NOTE Since MIDI data that can be transmitted or received varies depending on the type of MIDI device check the MIDI Data Format to find out what MIDI data and comma...

Page 54: ...ging the type of characters on the display CharacterCode International page 48 Playing back a Song all Songs repeatedly SongRepeat Off page 57 Playing back the phrase specified by the phrase number PhraseMark RepeatOff page 58 Correcting note timing Quantize 1 16 page 58 Setting the Quantize strength 100 Specifying whether playback starts immediately along with the first voicing QuickPlay On page ...

Page 55: ... is selected for the DSP Type parameter VibeRotorOnOff page 64 Setting the rotation speed of the rotary speaker only the Rotary is selected for the DSP Type parameter RotarySpeed page 64 Adjusting the depth of the DSP effect DSP Depth page 64 Adjusting the brightness of the sound Brightness page 64 Adjusting the resonance effect HarmonicContent page 64 Setting the touch sensitivity TouchSense page...

Page 56: ...fying the volume of the key off sound KeyOffSamplingDepth 5 page 71 Setting the range of pitch bend PitchBendRange 2 page 71 Switching the speaker on off Speaker Normal HeadphoneSW page 71 Setting the MIDI transmit channel MidiOutChannel Main Midi Usb1 Ch1 Left Midi Usb1 Ch2 M L MainLayer Midi Usb1 Ch3 L L LeftLayer Midi Usb1 Ch4 page 72 Selecting performance from the keyboard or Song data for MID...

Page 57: ...plays back a selected single Song All Continuously plays back all Songs within a designated range in order Random Continuously plays back all Songs within a designated range in random order Range designated for repeated playback PRESET All 50 Preset Songs MEMORY All Songs in the instrument s MEMORY drive USB1 USBx All MIDI Songs in designated folder in the connected USB storage device USB AUDIO Al...

Page 58: ...e by the straight eighth notes all notes in the part are quantized to straight eighth notes completely eliminating any triplet feel However if you use the eighth note eighth note triplet setting both the straight and triplet notes will be quantized correctly Default setting 1 16 Setting the Quantize strength From this display you can determine how strongly the notes will be quantized A setting of ...

Page 59: ...ng range Ch1 Ch16 ALL all channels Default setting Ch1 NOTE The Song data consists of 16 channels A channel is assigned to a part so in this instrument channel means the same as part NOTE Even channels that contain no data are displayed NOTE When you clear all channels using the ALL parameter you can overwrite the Song In this case the file which contains Song settings with no channel data is save...

Page 60: ...ular Song Setting range 0 127 Default setting 82 Setting range BellOn Click and bell BellOff Click standard metronome sound EnglishVoice Click and 1 2 3 4 in English GermanVoice Click and 1 2 3 4 in German JapaneseVoice Click and 1 2 3 4 in Japanese FrenchVoice Click and 1 2 3 4 in French SpanishVoice Click and 1 2 3 4 in Spanish Default setting BellOff NOTE To mute the beat count select BellOff M...

Page 61: ...ied to both Voice 1 and Voice 2 for the right hand Left Available when the instrument is in the Split mode When this is selected the setting is applied to Voice 1 for the left hand L L Left Layer Available when the instrument is in the Split mode and the left hand area is in the Dual mode When this is selected the setting is applied to Voice 2 for the left hand Left Layer Available when the instru...

Page 62: ...lt setting Differs depending on the Voice or Voice combination NOTE The reverb effect is not applied if the ReverbSend parameter is set to 0 Setting range 0 127 Default setting Differs depending on the Voice The Chorus Type selection is applied to all the Voice parts commonly or the instrument entirely Setting range Chorus Adds a rich spacious sound Celeste Adds swell and a spacious sound Flanger ...

Page 63: ...he volume level changes in rapid cycles VibeRotor The vibrato effect of a vibraphone AutoPan The sound pans left to right and back and forth Phaser The phase changes periodically swelling the sound AutoWah The center frequency of the wah filter changes periodically Off No effect Default setting Differs depending on the Voice Rotor The rotating portion of an electrical device etc This will be displ...

Page 64: ...ting Differs depending on the Voice Resonance can produce a distinctive peaky tone making the sound brighter and harder NOTE Harmonic content may have little audible effect or not be applied to some Voices Setting range 64 63 Default setting Differs depending on the Voice This parameter enables determines the manner and degree to which the volume level changes in response to your touch on the keyb...

Page 65: ...t smoothly lowers the pitch RotarySpeed Change the rotational speed of the JazzOrgan rotary speaker switch between fast slow each time you press the pedal VibeRotor Switch the vibraphone vibrato on off switch on off each time you press the pedal Default setting SustainCont Various functions other than the original one can be assigned to the center pedal Setting range Sustain Sostenuto Soft RotaryS...

Page 66: ...ing Differs depending on the Voice This turns the left pedal function on or off for the relevant Voice part In other words you can select the desired Voice part and determine whether the left pedal function set on page 65 will affect that part or not Setting for Main M L Main Layer Left L L Left Layer Setting range On Off Default setting Differs depending on the Voice This turns the auxiliary peda...

Page 67: ...ly that low and high sounds are heard at lower volume levels Setting range 3 3 Default setting 0 This sets the depth of the GP Soundboard Speaker page 15 Hold the S BOARD SPEAKER button and use the D buttons to set the value Setting range 0 127 Default setting 110 I A CONTROL button S BOARD SPEAKER button Setting the I A Control depth Acoustic Control Depth Acoustic Control Depth 0 Change the sett...

Page 68: ...g playback Default setting Master Determines the amount of pitch transposition Setting range 12 1 octave 0 normal pitch 12 1 octave Default setting 0 You can specify a touch response how the sound responds to the way you play the keys Setting range Light With a soft touch the Clavinova produces a loud sound The volume level of tones tends to be consistent Medium Standard touch response Heavy You m...

Page 69: ...hagorean This scale designed by Pythagoras a Greek philosopher is based on the interval of a perfect 5th The 3rd produces swells but the 4th and 5th are beautiful and suitable for some leads MeanTone This scale is an improvement of the Pythagorean in that the swell of the 3rd has been eliminated It spread during the late 16th century through the late 18th century Handel used this scale Werckmeiste...

Page 70: ...o reverse this mechanism Setting range Make Break Default setting Make Here you can specify the point to which you must depress the pedal right and AUX before the assigned effect begins to be applied This setting applies only to the SustainCont effect page 65 that is assigned to the right or AUX pedal Setting range 2 effective with the shallowest press 0 4 effective with the deepest press Default ...

Page 71: ...ed sound This setting can be made in semitone steps You can set the pedal function page 65 to determine whether the pitch will be raised or lowered Setting range 0 12 Pressing the pedal will raise lower the pitch by 12 semitones 1 octave Default setting 2 NOTE For some Piano and Harpsichord Voices the pitch may not be changed according to the pitch bend setting range here This setting lets you swi...

Page 72: ...LeftLayer Others Off Local Control On is a state in which the Clavinova produces the sound from its tone generator when you play the keyboard In Local Control Off state the keyboard and the tone generator are cut off from each other This means that even if you play the keyboard the Clavinova will not produce the sound Instead the keyboard data can be transmitted via MIDI to a connected MIDI device...

Page 73: ...the setting may not be saved Setting for Transpose Brilliance ReverbOnOff SoundSetting for the I A Control and GP Soundboard Speaker SplitPoint Main LeftVoice MetronomeSetting File SongSetting MidiSetting MidiOutChannel TransmitParameter in the Function settings Function except for Transpose SplitPoint and Midi settings Setting range On Off Default setting The Transpose Main LeftVoice MetronomeSet...

Page 74: ...urn off the power during full backup Doing so could result in damage to the data If the backup file clp 480 bup is already saved in the USB storage device the Save operation will overwrite or replace this file with new one Protected Songs indicated by MS Ms in the display cannot be backed up Move such Songs to the USB storage device before executing Full Backup by following the instructions page 4...

Page 75: ...d Good for relaxing music GRAND PIANO 3 Bright Grand Bright piano sound Good for clear expression and cutting through other instruments in an ensemble Pop Grand A slightly brighter piano sound than the Grand Piano Good for popular styles GRAND PIANO 4 Live Grand Spacious and clear piano with bright reverb Good for popular music Dynamic Grand A solid bass heavy piano sound Good for making your perf...

Page 76: ...ard in jazz and rock idioms Rotary Organ A bright electric organ sound Mellow Organ A mellow electric organ sound Ideal for calmer songs STRINGS Strings Stereo sampled large scale strings ensemble with realistic reverb Try combining this Voice with acoustic piano in the Dual mode Synth Strings A bright and spacious strings sound Suitable for sustained parts in the background of an ensemble Slow St...

Page 77: ...ass The sound of a finger plucked upright bass Frequently used in jazz and Latin music Bass Cymbal The sound of a cymbal has been layered onto the bass Effective when used for jazz walking bass lines Electric Bass The sound of an electric bass Frequently used in jazz rock and popular music Fretless Bass The sound of a fretless bass Suitable for styles such as jazz and fusion Voice group Voice name...

Page 78: ... storage device page 46 and try again Device media removed This message appears when the USB storage device is removed from the instrument Duplicate name This message indicates that an identically named file already exists Rename the file page 43 Execute This message prompts you to execute the operation Press the B YES button to proceed or press the EXIT button to cancel Executing The instrument i...

Page 79: ...save the data on a read only USB storage device Cancel the read only setting if possible and try again If you still see this message the USB storage device is internally protected such as commercially available music data You cannot make the file operation or record your performance to such a device Protected Song You attempted a file operation to a Protected Song or read only file Data of those t...

Page 80: ...mption of the connected USB device exceeds the predetermined value This message appears when a bus powered USB hub is used The USB hub must be self powered with its own source and the power must be on Wrong device The file operation cannot be made to the connected USB storage device The following causes can be considered The USB storage device in not formatted Format it page 46 and try again The n...

Page 81: ...n page 50 Pedals do not function The pedal cord may not be securely connected to the PEDAL jack Be sure to insert the pedal cord all the way until the metal part of the cord plug disappears from view page 85 The on off setting of the pedal connected to the AUX PEDAL jack is reversed Some types of pedals may turn on and off in opposite fashion Use the AuxPedalType parameter page 70 in the FUNCTION ...

Page 82: ... all parts from the package and make sure you have all of the items Have a Philips head screwdriver of the appropriate size ready A B C D F E AC IN Connector panel The pedals are covered with vinyl covers when shipped from the factory For optimum use of the GP Responsive Damper Pedal we recommend that you remove the cover from the damper pedal Pedal cord 6 x 20 mm long screws x 4 6 x 16 mm short s...

Page 83: ...ng the 4 x 14mm thin screws Insert two screws into the smaller holes on the brackets 2 4 Temporarily secure with 4 x 14mm thin screws Insert four screws into the smaller holes on the brackets 3 Lay A into position Align the screw threads on the bottom of A with the screw threads of E and F while gently lowering A into position CAUTION Be extra careful not to drop or let your fingers be pinched by ...

Page 84: ...astened in step 2 4 assembly B 5 Connect the speaker cord 5 1 Remove the twist tie attaching the speaker cord 5 2 Insert the speaker cord plug into the connector so that the tab extends toward the front when viewed from the rear 6 Connect the pedal cord 6 1 Insert the pedal cord plug into the PEDAL connector 6 2 Attach the cord holders to the instrument then clip the cord into the holders At this ...

Page 85: ...eadphone hanger Use the included two screws 4 x 10 mm to attach the hanger as shown in the illustration Insert the pedal cord securely until the metal part of the cord plug disappears from view Otherwise the pedal may not function properly Voltage Selector Before connecting the AC power cord check the setting of the voltage selector which is provided in some areas To set the selector for 110V 127V...

Page 86: ...e pedal and power cords inserted securely into the sockets Check the connection If the unit creaks or is otherwise unsteady when you play on the keyboard refer to the assembly diagrams and retighten all screws CAUTION When moving the instrument after assembly always hold instrument by the lower surface in the front of the main unit and by the handles in the rear panel Do not hold the key cover Imp...

Page 87: ...hite keys Linear Graded Hammer Yes Touch Sensitivity Yes Pedal Number of Pedals 3 Damper Sostenuto Soft Half Pedal Yes Damper GP Responsive Damper Pedal Yes Display Type Backlit LCD 24 character x 2 line Contrast Yes Color Monochrome Language English Japanese Panel Language English Cabinet Key Cover Style Sliding Music Rest Yes Music Braces Yes Voices Tone Generation Tone Generation Technology Rea...

Page 88: ...rmat 0 Format 1 ESEQ Data Size Approx 550KB song max Preset Number of Preset Songs 50 Recording Playback Audio Songs Length of Recording Playback 80 minutes song max Data Format wav 44 1 kHz sample rate 16 bit resolution stereo Functions Demo Songs Voice Demo 16 Overall Controls Metronome Yes Tempo Range 5 500 Transpose 12 to 0 0 to 12 Tuning Yes Scale Type 7 types Storage and Connectivity Storage...

Page 89: ...P Soundboard Speaker 15 H Half pedal 16 Handling Song files 41 Headphone hanger 15 Headphones 15 I I A CONTROL 14 Included Accessories 7 Intelligent Acoustic Control 14 K Key 68 Key cover 12 Key off sound Key Off Sampling 71 77 L Load backup file 74 M Maintenance 19 MASTER VOLUME 14 MEMORY 28 41 Message List 78 Metronome 17 MID settings Other settings 56 MIDI Basics 7 MIDI Song 27 MIDItoAUDIO 46 M...

Page 90: ...off 71 Split 25 String Resonance 71 77 Sustain Sampling 71 77 Sync Start 30 T Tempo metronome 17 Tempo Song playback 29 Time signature 60 Touch Response 68 Transpose 68 Troubleshooting 81 Tuning 69 U USB AUDIO 28 41 USB storage device 51 USB1 28 41 V Voice 20 Voice Dual 24 Voice Demo 21 Volume Dual Split 61 Volume Master Volume 14 Volume metronome 60 ...

Page 91: ...and recycling of old products please contact your local municipality your waste disposal service or the point of sale where you purchased the items For business users in the European Union If you wish to discard electrical and electronic equipment please contact your dealer or supplier for further information Information on Disposal in other Countries outside the European Union This symbol is only...

Page 92: ... and a third grounding prong The wide blade or the third prong are provided for your safety If the provided plug does not fit into your outlet consult an electrician for replacement of the obsolete outlet 10 Protect the power cord from being walked on or pinched particularly at plugs convenience receptacles and the point where they exit from the apparatus 11 Only use attachments accessories specif...

Page 93: ...lankykite mūsų svetainėje toliau nurodytu adresu svetainėje yra spausdintinas failas arba kreipkitės į Yamaha atstovybę savo šaliai kitas puslapis EEE Europos ekonominė erdvė Za podrobnejše informacije o tem Yamahinem izdelku ter garancijskem servisu v celotnem EGP in Švici obiščite spletno mesto ki je navedeno spodaj natisljiva datoteka je na voljo na našem spletnem mestu ali se obrnite na Yamahi...

Page 94: ...MK7 8BL United Kingdom Tel 353 0 1526 2449 Fax 44 0 1908 369278 ITALY Yamaha Musica Italia s p a Viale Italia 88 20020 Lainate Milano Italy Tel 39 0 02 93577 1 Fax 39 0 02 937 0956 LATVIA Yamaha Music Europe GmbH Sp z o o Oddział w Polsce Branch Poland ul 17 Stycznia 56 PL 02 146 Warszawa Poland Tel 48 0 22 500 29 25 Fax 48 0 22 500 29 30 LIECHTENSTEIN Yamaha Music Europe GmbH Rellingen Branch Swi...

Page 95: ...5462 Rellingen Germany Tel 49 4101 3030 Yamaha Corporation Asia Pacific Sales Marketing Group Nakazawa cho 10 1 Naka ku Hamamatsu Japan 430 8650 Tel 81 53 460 2317 TURKEY CYPRUS Yamaha Music Europe GmbH Siemensstraße 22 34 25462 Rellingen Germany Tel 04101 3030 OTHER COUNTRIES Yamaha Music Gulf FZE LOB 16 513 P O Box 17328 Jubel Ali Dubai United Arab Emirates Tel 971 4 881 5868 THE PEOPLE S REPUBL...

Page 96: ...Yamaha Home Keyboards Home Page http music yamaha com homekeyboard Yamaha Manual Library http www yamaha co jp manual U R G Digital Musical Instruments Division 2011 Yamaha Corporation 103MW B1 WV81530 ...

Reviews: