18
Tyros2
MO
TR
OWNE
BEDIE
MODE
13.
FSX Keyboard Assembly
(Time required: About 5 minutes)
13-1
Remove the eight (8) screws marked [110]. (See
procedure 1.)
13-2
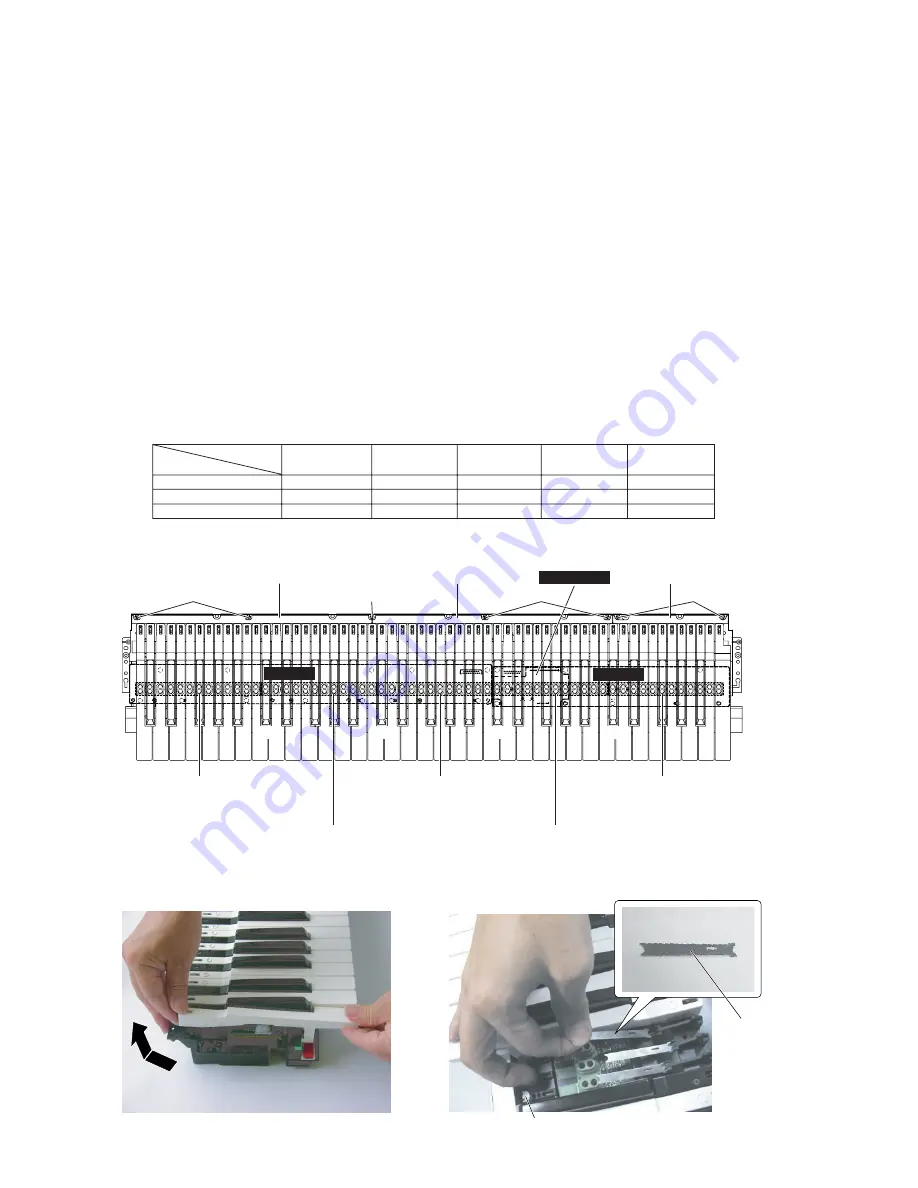
Separate the unit into the upper case assembly and the
lower case assembly. (See procedure 1.)
13-3
Remove the five (5) screws marked [530]. The FSX
keyboard assembly can then be removed. (Fig.3)
Key Stopper L
Rubber Contact 13 Keys
(C1 - C2)
C1
[240A]
[240B]
C2
C3
C4
C5
C6
MK61L
MKH-D
EMKS-FD
C2#
C3#
C4#
C5#
Rubber Contact 12 Keys (LOW)
(C3# - C4)
Rubber Contact 12 Keys
(C5# - C6)
[240D]
[240C]
Key Stopper H
Key Stopper FSX 61
Rubber Contact 12 Keys
(C2# - C3)
Rubber Contact 12 Keys (HIGH)
(C4# - C5)
Rubber Contact
Rubber Contact
Rubber Contact
Rubber Contact
Rubber Contact
13 Keys
12Keys
12Keys (LOW)
12Keys (HIGH)
12 Keys
Application Circuit Board
MK61
MK61
MK61
MK61
MKH-D
Remove Key Stopper
L
L, H
L, H
H
FSX61
Remove Key
C1 - C2
C2# - C3
C3# - C4
C4# - C5
C5# - C6
[240]: Bind Head Tapping Screw-P 3.0X16 MFZN2B3 (WE983200)
14.
White (Black) Key
14-1
Separate the unit into the upper case assembly and the
lower case assembly. (See procedure 1.)
14-2
Depending on the key to be replaced, remove only the
necessary key stopper such as L, H or 61. (Fig.7)
The key stopper L can be removed by the two (2) screws
marked [240A] and the screw marked [240B]. (Fig.7)
The key stopper H can be removed by the screw marked
[240B] and the two (2) screws marked [240C]. (Fig.7)
The key stopper 61 can be removed by the two (2)
screws marked [240D]. (Fig.7)
14-3
White Key
14-3-1 While pressing the white key backward keeping it in a
horizontal position, lift and remove it. (Fig.7A)
*
At that time, the key guide cap may come off. Be careful
of it. (Fig.7C)
(Fig.7A)
(Fig.7)
(Fig.7C)
Key Guide Cap
Key Spring


