Using USB Multi Media Player
(Continued)
33
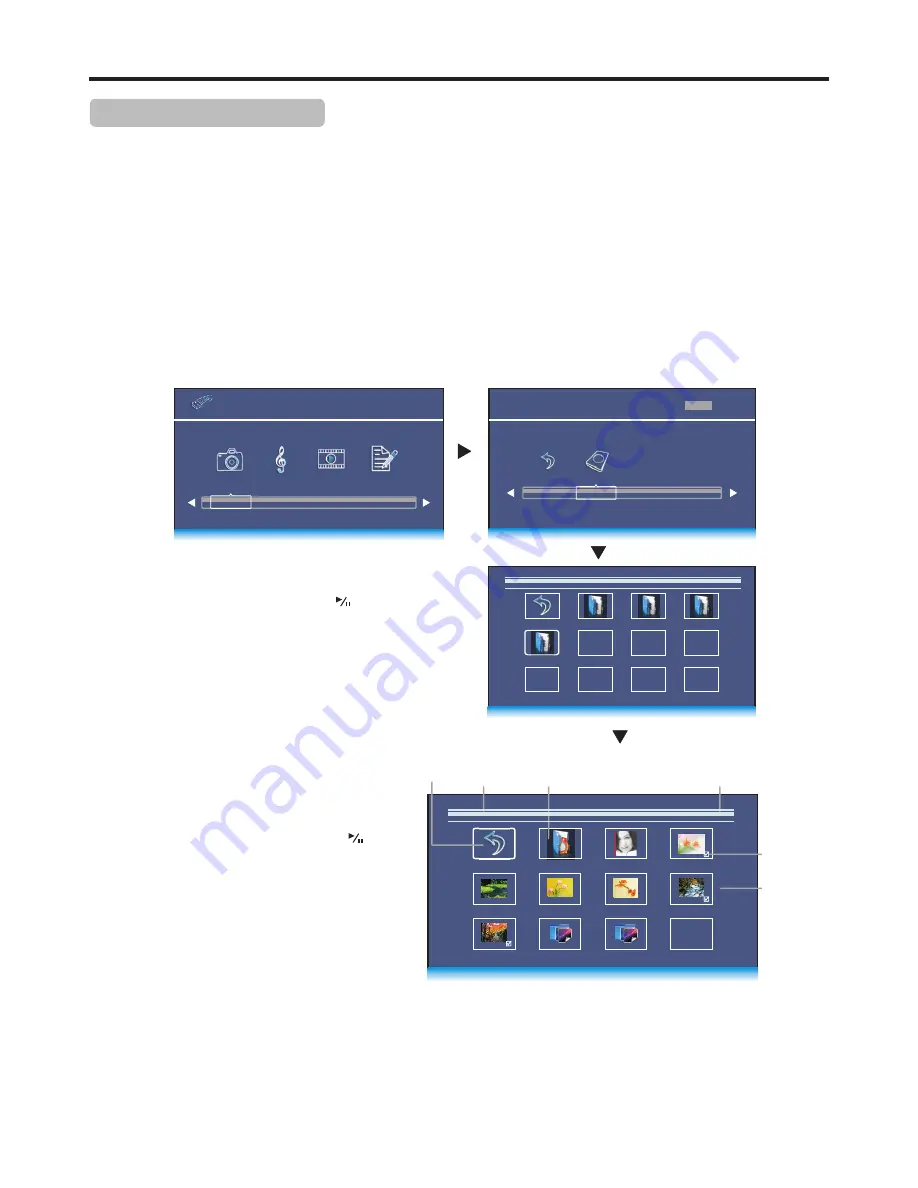
Using photo viewer index and Photo Menu Bar
USB
2.0
PHOTO MUSIC MOVIE TEXT
1
Connect your USB device that contains the photo files you want to view, switch to
USB
mode, the USB main menu will
appear automatically. Press
3
or
4
to select
PHOTO
, press
OK
to access.
Movie 1
Movie 2
Music
4.JPG
5.JPG
3.JPG
6.JPG
2.JPG
7.JP G
1.PNG
2.PNG
Return
Up Folder
1.JPG
Path
Thumbnails
of photos
With the photo viewer, you can:
•
View photos (in JPG, BMP or PNG format).
•
View photos with background music.
•
Pan, zoom, and rotate photos.
•
Mark photos so you can just slide show those marked photos.
Note:
The photo viewer supports JPG, BMP, PNG format images, but not all JPG, BMP, or PNG files are compatible with the TV due
to technical update.
Current page/total pages
Return to
root
Mark
Return to upper
level folder
Press
3
or
4
to highlight
C
disk, press
OK
to open the USB device; if you want to go back, highlight
Return
and press
OK
.
After you open the USB device, you can use
5
6
3
4
to
navigate and select folders or photo files, then press
OK
to
open the highlighted folder or press
to start slide show
from current photo file. Below we will take it as an example
that your desire photo files are contained in a folder. Just
highlight this folder and press
OK
and the Photo Viewer
Index appears, which displays thumbnail images of the files
stored inside this folder.
2
3
The following describes how to use the Photo Viewer Index:
4
Return
Photo
!
To return to root (C: disk),
highlight
Return
and press
OK
.
!
To go back to upper level folder
, highlight
Up Folder
and press
OK
.
!
To start slide show from your desired
photo,
highlight this photo then press .
!
To mark photos so you can just slide show
those photos
, use
5
6
3
4
to highlight the
specific photo then press
OK
. A check mark
appears on it (press
OK
again to cancel the
mark). Repeat this way to create your favorite
photo list, then slide show will go among these
photos.
During slide show, you can make use of
Photo Menu Bar
to perform many functions.
To call out and operate the Photo Menu Bar, just press
INFO
button during slide show. The Photo Menu Bar is displayed at the
bottom screen. Then use
3
4
to select your desired function icon, press
OK
to fulfill the function. If the function icon has
several options, repeatedly press
OK
to select it. To clear the Photo Menu Bar, press
INFO
again.
5
USB
2.0
PHOTO
MUSIC MOVIE TEXT
1/1
C:\
1/1
Photo
C:\
Media 1: Viewing Photos
C
Return
1/1


