PVR Recording
PVR File System Setup (DTV only)
17
This TV provides
PVR (personal video recorder) recording
function, which allows the viewer to pause and rewind any
DTV program (that is, time shifting function), as well as record and play back selected programs. The program content will be
recorded in a digital format onto an external memory device (such as USB device, memory card, or other mass storage
device).
Below all operations in this section require the external memory device be connected with the TV.
Otherwise the
operation can not be done.
Before proceeding, please
pay attention to
the following
notes
.
Checking file system of the external memory device
!
Before PVR recording, you need to check the external memory device’s File System successfully.
!
Do not disconnect
the memory device from the TV while recording, or the data will be lost.
!
During recording, a directory will be automatically created at the external memory device to temporarily save the data.
!
The recorded contents cannot be played on any other product or computer, it also can not be played on the TV through the
USB input source.
!
Important Copyright Information: Unauthorized use, copying, distribution, broadcasting, public performance,
lending or revision of the recorded TV programs are prohibited. Please refer to your local area copyright laws for
more details.
!
The recorder once in time shift mode will continue recording what you are watching and overwrite any information already on
the memory device.
!
If malfunction, then information already on the memory device may lose. So please back up your memory device data.
If
a
portable
hard
disk
with
large
capacity
is
used
,
then
it
is
suggested
to
use
NTFS
system
.
!
When Time Shifting, the external memory device need to write and read data simultaneously. So during the process it may
occur slight picture/sound pause or standstill depending on the memory device's speed and stability.
!
After recording, you can connect the memory device to your PC to delete temporary data or format a partition to
completely clear those unnecessary data.
!
Certain types of memory device (such as some USB devices) may not be compatible with this TV.
!
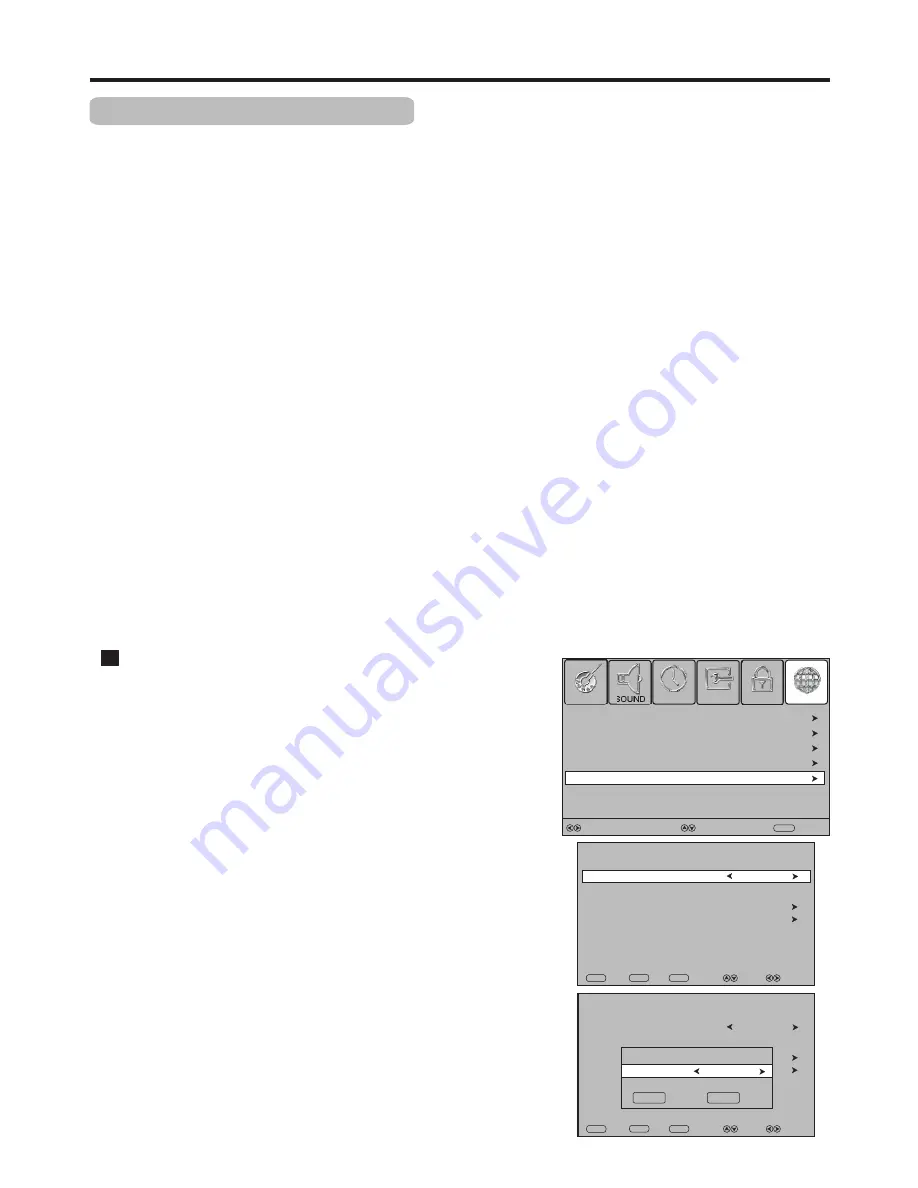
1
Connect your USB device or portable hard disk to the USB port on TV
side firstly.
2
Press
MENU
, then use
3
or
4
to select
CHANNEL
menu, press
6
or
OK
to access.
Press
5
or
6
to highlight
File System
, then press
4
to
access. Now do the following to check file system.
B. Select Disk:
From
File System
menu, highlight
Select Disk
, press
4
to access.
Use
3
or
4
to select a disk, then move the highlight to
OK
box and press
OK
to confirm. (To cancel, select
EXIT
to exit).
A. Set Free Record Limit
From
File System
menu, highlight
Free
Record Limit
, press
3
or
4
to
set the recording length of time (
1Hr ~ 6Hr
can be selected).
(
Note:
The record time also depends on your timer setting through the
EPG and your disk space. If the recording timer setting is shorter, then
the timer setting has priority over the
Free
Record Limit
setting at the
File System
menu. If no disk space left, then the recording stops )
Select
DTV Manual Tuning
PICTURE
Auto Tuning
Move
MENU
Return
SOUND
CHANNEL
LOCK
TIME
OPTION
ATV Manual Tuning
Programme Edit
File System
Format
USB Disk
Speed
Select Disk
C:
File System
Free Record Limit
6 Hr.
Check File System
Time Shift Size
EXIT
EXIT
Return
MENU
Select
Move
OK
OK
Format
USB Disk
Speed
Select Disk
C:
File System
Free Record Limit
6 Hr.
Check File System
Time Shift Size
EXIT
EXIT
Return
MENU
Select
Move
OK
OK
Select Disk
OK
EXIT
Disk C:


