background image

76

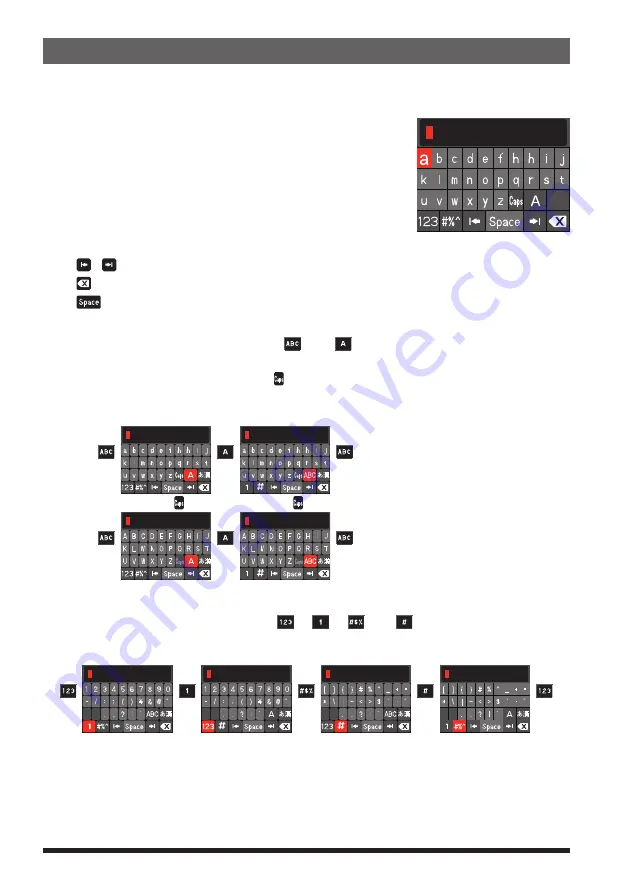
Text input screen

The keyboard screen is displayed when entering the station call sign or memory channel tag.


z

Character input method

1.  Rotate the 

DIAL

 knob to select a character, then press 

the 

DIAL

 knob.

•  enter the selected character
•  Repeat step 1 to enter additional characters.

When input is complete, press and hold the 

DIAL

 knob to 

save the characters and return to normal operation.

Delete characters and operate the cursor

• 

 /    : Move the cursor to left/right in the text input area.

• 


: Erase the character at the left of the cursor position.

• 


: Enter a space at the cursor position.


z

Alphabet Input

•  Rotate the 

DIAL

 knob to select [

] or [

], and each time the 

DIAL

 knob is 

pressed, the input screen changes as follows:

•  Rotate the 

DIAL

 knob to select [ ], and each time the 

DIAL

 knob is pressed, the 

input switches between small and capital letters.

1 byte letters

2 byte letters


z

AlphaNumbers and Symbols Input

•  Rotate the 

DIAL

 knob to select [

], [

], [

] or [

] and each time the 

DIAL


knob is pressed, the input screen changes as follows:

1 byte numbers

2 byte numbers

1 byte symbols

2 byte symbols

Summary of Contents for FTM-200DE

Page 1: ......

Page 2: ... same frequency band using the memory auto grouping MAG function 40 Edit memory 41 Recalling the Home Channels 42 Changing the Home Channel Frequency 43 Split Memory 43 PMG SR Single Receiver Primary Memory Group Activity Monitor 45 Register the frequency to PMG 45 Call up the PMG screen 45 Switch between Auto Mode and Manual Mode 46 Auto Mode 46 Operation of Auto Mode 46 Manual Mode 47 Operation ...

Page 3: ... recalled m The DG ID Digital Group ID feature and the Group Monitor GM feature enable automatically locating and communicating with other stations that are within contact range and have the matching DG ID number 00 to 99 m Two inch QVGA full color TFT display with high brightness and wide viewing angle m Wide band reception 108 MHz to 999 99 MHz USA Cellular Blocked m Built in GPS unit permits di...

Page 4: ...BAND GRP key Tune the frequency Rotate the DIAL knob Adjust the volume Rotate the VOL knob to adjust the volume to a comfortable level Adjust the squelch setting The squelch level may be adjusted to mute the background noise when no signal is re ceived 1 Press the SQL BACK key 2 Rotate the DIAL knob to adjust the squelch to a level at which the background noise is muted When the squelch level is i...

Page 5: ...ver Available Options Microphone with Snapshot Camera MH 85A11U DTMF Microphone SSM 85D Microphone MH 42C6J Bluetooth Headset SSM BT10 Bluetooth Unit BU 4 High Power External Speaker MLS 100 Voice Guide Unit FVS 2 Vacuum Cup Mount Bracket for Front Panel Controller MMB 98 Mic Extension Cable10ft 3m for MH 85A11U SCU 23 Mic Extension Kit 10ft 3m for SSM 85D and MH 42C6J MEK 5 Control Cable 20ft 6m ...

Page 6: ...y the frequency screen The input call sign may be changed from the Setup Menu 118 CALLSIGN 3 Rotate the DIAL knob then press it to select each character Please enter Your CALLSIGN Max 10 letters Press the Dial knob to move the cursor to the right to move the cursor to the left change to the numeric and symbol input delete the character left of the cursor Up to 10 characters letters numbers and a h...

Page 7: ...h level is increased the noise is more likely to be silenced but it may become more difficult to receive weak signals Selecting a Frequency Band Press the BAND GRP key to select the desired frequency band AIR Band 108MHz 137MHz 144MHz Band 137MHz 174MHz VHF Band 174MHz 400MHz 430MHz Band 400MHz 480MHz UHF Band 480MHz 999 99MHz With the band skip function specific bands may be selected to be used E...

Page 8: ... input screen appears Press 3 Rotate the DIAL knob to select a digit and press the DIAL knob 4 Repeat step 3 to input the remaining frequency digits Press and hold the DIAL knob while inputting the frequency to conclude the input and confirm the frequency Pressing the F MENU key BACK key or PTT while inputting the frequency cancels the input and returns to the operation screen z z The numeric keys...

Page 9: ... In FM mode the upper and lower green lights flash when receiving a signal containing a tone or DCS different from the squelch setting of this station If the PTT switch is pressed when a frequency other than the amateur ham radio band is selected an alarm tone beep will be emitted TX PROHIBIT appears on the display and transmit is disabled If transmission is continued for a long period the transce...

Page 10: ...ld the F MENU key The KEYPAD and HOME displayed at the top of the screen cannot be changed z z Registration to the Custom Function List Press and hold the F menu key to display the setup menu select the item to be registered with the DIAL knob then press and hold the F menu key Select the list position to register the setup item with the DIAL knob and then press the DIAL knob to register it in the...

Page 11: ...frequency of the VFO or memory channel then press and hold the PMG PW key The frequency is registered in PMG and the PMG screen is displayed z z Display the PMG screen Press the PMG PW key to display the PMG screen Press the DIAL knob to switch between Auto Mode and Manual Mode Auto Mode Scans and automatically stops at the channel with a signal and outputs the received audio During output the bar...

Page 12: ...ss Select the band to display in memory mode All memory channels AIR Band 108MHz 137MHz memory channel 137MHz 174MHz memory channel 400MHz 480MHz memory channel 174MHz 400MHz 480 MHz 999 995MHz memory channel VFO Band skip function page 30 Bands that are not normally used can be skipped when the BAND GRP key is pressed In VFO mode press and hold the BAND GRP key select the band you want to set wit...

Page 13: ...7 DATA BAND 68 DATA SPEED 69 DATA SQL APRS 70 APRS DESTINATION 71 APRS FILTER 72 APRS MSG TXT 73 APRS 74 APRS MUTE 75 APRS POPUP 76 APRS RINGER 77 APRS RINGER CS 78 APRS TX DELAY 79 APRS UNITS 80 BEACON INFO 81 BEACON STATUS TXT 82 BEACON TX SET 83 DIGI PATH 84 DIGI PATH 1 85 DIGI PATH 2 86 DIGI PATH 3 87 DIGI PATH 4 88 DIGI PATH FULL 1 89 DIGI PATH FULL 2 90 CALLSIGN APRS 91 MESSAGE GROUP 92 MESS...

Page 14: ...tting screen is displayed 1 Rotate the DIAL knob to select DG ID TX transmit DG ID number or DG ID RX receive DG ID number and press the DIAL knob 2 Rotate the DIAL knob to select the DG ID number 00 to 99 and press the DIAL knob Press and hold the DIAL knob to reset both the send and receive DG ID numbers to 00 at once D X key z z Press Each time this key is pressed the communication mode changes...

Page 15: ... z z Press and hold Displays the backtrack screen that shows the distance and direction of the partner station and permits navigation to a registered point SQL BACK key z z Press Press this key and then rotate the DIAL knob to adjust the squelch level Annoying noises can be muted when a signal cannot be detected Normally use the factory settings but adjust the squelch if noise is harsh On the Func...

Page 16: ...onnect MH 85A11U optional microphone with snapshot camera It is not possible to output the receive audio to the MH 85A11U speaker Connect to a PC with the included USB cable when updating the firmware Sub Panel rear CONTROL jack Plug the control cable into this jack to connect with the main body Screw hole for bracket Attach the supplied panel bracket or the optional adjustable angle suction type ...

Page 17: ...ot be connected to this jack Firmware Update switch This switch is used when updating the Main firmware Usually set to the NORMAL position Please refer to YAESU website for firmware updates Main body rear ANT terminal Connect the co axial cable for the antenna Cooling fan 13 8V DC Connect the provided DC power supply cable with fuse attached DATA Jack Connect a cable for remote operation or the ca...

Page 18: ... DTMF sequence The following operations can be performed during receive 0 9 Enter the frequency or memory channel number A In the VFO mode switches the operation to A band Press and hold this button to increase or decrease the frequency at 1MHz In memory mode fast forward the memory channels by 10 channels B In the VFO mode switches the operation to B band Press and hold to increase or decrease th...

Page 19: ...nob to select a function see the table below then press the DIAL knob Function Description OFF Disable the P key REC STOP Voice recording function REC STOP SCAN Starts or stops the scanning function HOME Recalls the HOME channel RPT SHIFT Sets the repeater shift direction REVERSE Reverses the transmit and receive frequencies in repeater mode or split memory TX POWER Selects the transmit power outp...

Page 20: ...ency Displays operation mode S meter transmit power level Displays mode Displays mode A band icon B band icon Mode Status indicator z z Status Bar Appears when the lock function is enabled Appears when the APO Automatic Power Off function is enabled Appears when the DTMF Autodialer function is activated Appears when the GPS Satellites are acquired Appears when the GPS Log function is enabled Appea...

Page 21: ... be skipped during scanning Bell function is activated Displays the DG ID number for transmission and reception in C4FM digital mode TX DG ID is displayed Only during transmission RX DG ID is displayed Squelch type for analog FM mode is displayed For additional details refer to the Advanced Manual TN Tone Encoder tone frequency is displayed TSQ Tone Squelch tone frequency is displayed RTN Reverse ...

Page 22: ... output in 3 levels when transmitting Volume level SQL level Descriptions of Main Screens z z Normal screen VFO screen A band and B band are shown at the top and bottom of the display The band displayed on the top of the screen is operat ing band Press and hold the A B key to turn the Sub Band display off NOTE The A band and B band cannot be received at the same time z z Band Scope screen Press th...

Page 23: ...SS FREQUENCY COLOR BAND SCOPE 1 FREQUENCY INPUT DISPLAY To return to the normal operation screen from the Setup Menu press a key other than the power switch or PTT z z BACKTRACK screen Press and hold the DISP key to display the Backtrack screen Real time navigation function Displays the position and direction of the contact station in real time during communication in C4FM digital DN mode The tran...

Page 24: ...itude versus the moving distance is displayed in a graph using the GPS signal z z TIMER CLOCK screen Press and hold F MENU 7 DISPLAY MODE TIMER CLOCK CLOCK LAP timer and Countdown timer functions are available About this manual The following notation is also used in this manual This icon indicates cautions and information that should be read This icon indicates notes tips and information that shou...

Page 25: ...plug and connector etc with wet hands Also do not plug and unplug the power plug with wet hands This may result in injury liquid leak electric shock and equipment failure When smoke or strange odors are emitted from the radio turn Off the power and disconnect the power cord from the socket This may result in fire liquid leak overheating dam age ignition and equipment failure Please contact our com...

Page 26: ...re is a lot of dust and humidity Doing so may result in fire and equipment failure Stay as far away from the antenna as possible during transmission Long term exposure to electromagnetic radiation may have a negative effect on the human body Do not wipe the case using thinner and benzene etc Please use a soft and dry piece of cloth to wipe away the stains on the case Keep out of the reach of small...

Page 27: ...e VSWR Voltage Standing Wave Ratio until it is 1 5 or less for an antenna with an adjusted impedance of 50Ω Keep the coaxial cable routing length as short as possible Connection of Antenna and Power Cables Please follow the outline in the illustration regarding the proper connection of antenna coaxial cables and Power Supply Cautions Do not use a DC power supply cable other than the one that is pr...

Page 28: ... bracket is to be mounted matching the positions of the bolting holes of the bracket 3 Insert the grooves on both sides of the main body into the bracket until they click and lock Tighten the screw against the lever to lock the transceiver in the bracket 4 To remove the main body from the bracket loosen the locking screw and then pull the transceiver out while pressing the lever indicated by the a...

Page 29: ...back of the controller push it in gently until it clicks 3 Turn the transceiver ON When the memory card is properly detected lights on the display Contact surface z z Removing the microSD memory card To remove the microSD memory card inserted in step 2 above push the memory card in until a clicking sound is heard then remove the memory card Formatting a Micro SD Memory Card Format a new microSD me...

Page 30: ...eiver to the mode of the received signal but the transmit mode may be fixed regardless of the received mode 1 Press and hold the F MENU key 2 Rotate the DIAL knob to select 9 AMS TX MODE then press the DIAL knob 3 Press the DIAL knob to select the desired transmit mode as follows When set to TX FM FIXED or TX DN FIXED and the AMS transmission mode is fixed the bar at the top of the communication m...

Page 31: ...Mode 14 DIGITAL VW is set to ON factory default is OFF the Voice FR mode VW may be selected 2 When the Setup Menu Mode 16 RX MODE is set to AM factory default is AUTO the AM mode is selected in bands other than the AIR band 108 136 995 MHz The transceiver automatically switches to the Data FR mode DW mode during image transmission Changing the Transmit Power Level The transmit power output can be ...

Page 32: ...f AUTO 1 Press and hold the F MENU key 2 Rotate the DIAL knob to select 31 STEP then press the DIAL knob 3 Rotate the DIAL knob to set the frequency step 4 To return to the normal operation screen from the Function List press a key other than the power switch or PTT Press and hold The default setting of the frequency step is set to AUTO which automatically provides a suitable frequency step accord...

Page 33: ...HIGH AUTO ARS TONE 100 0 Displays the frequency or memory channel number input screen Recall HOME channel The function works for the items displayed in orange Grayed out items are currently unavailable Change the settings for items displayed in white Displays the current setting value Function List display example factory default setting 1 FREQUENCY INPUT FIXED 23 HOME FIXED 49 SCAN 8 TX POWER 42 ...

Page 34: ...NESS KEYAPD SQL 100 0 5 Press the DIAL knob The function is registered in the selected location and the Function List is changed If a location that has already been registered is selected that item will be overwritten RPT R OFF HOME TXPWR HIGH AUTO ARS TONE 100 0 APRS OFF KEYAPD SQL BRIGHTNESS Cancel registration in the Function List 1 Press and hold the F MENU key The Function List screen is disp...

Page 35: ...eived signals that do not have the same DG ID number may not be heard When accessing a C4FM digital repeater controlled by a DG ID number set the transmit DG ID number of the FTM 200DR DE to that of the repeater input Even in that case if the receive DG ID number of the FTM 200DR DE is set to 00 all the downlink signals from the repeater may be received Communicating with the DG ID feature Digital...

Page 36: ...and receive DG ID default number is set to 00 Communicate only with the specific members by setting the DG ID number to other than 00 Example Set the DG ID number to 50 1 Press and hold the GM key The DG ID number setting screen will be displayed While setting the DG ID number pressing and holding the DIAL knob will set the transmit and the receive DG ID numbers to 00 2 Press the DIAL knob and the...

Page 37: ...function turned ON and that are within the communication range may be checked For details on how to set each item refer to FTM 200DR DE GM Function Instruction Manual which is available on the Yaesu website Only group members set to the same DG ID number may communicate DG ID TX 50 transmit RX 50 receive DG ID TX 50 transmit RX 50 receive DG ID TX 00 transmit RX 00 receive DG ID TX 90 transmit RX ...

Page 38: ...inks on the display 3 To release the reverse state repeat the above steps again Press The repeater settings may be changed from the Setup Menu Press F MENU ARS The ARS function may be set to OFF Press F MENU TONE CTCSS Tone frequency Press and hold F MENU 24 RPT SHIFT Allows setting the repeater shift direction Press and hold F MENU 25 RPT SHIFT FREQ Allows changing the repeater shift offset z z T...

Page 39: ... information NOTE Back up the stored contents to a microSD memory card See the Advanced Manual for details on backing up to a microSD card Writing to memory 1 Set the VFO frequency to write to memory 2 Press and hold the V M MW key The memory channel list appears The lowest available channel number is selected To select another channel rotate the DIAL knob to select the memory channel number to be...

Page 40: ...on List 1 Press the F MENU key 2 Press the DIAL knob Or press and hold the F MENU key 1 FRERUENCY INPUT 3 Rotate the DIAL knob to select MEMORY CH LIST then press the DIAL knob The memory channel list appears The memory channel list can also be displayed by the following operations 1 Press and hold F MENU 18 MEMORY LIST 2 Press the DIAL knob 3 Rotate the DIAL knob to select MEMORY CH then press th...

Page 41: ...ct 1 Press the DIAL knob Rotate the DIAL knob to select 6 Press the DIAL knob Press and hold the DIAL knob KEYPAD SQL RPT R DTMF SCAN OFF HOME TXPWR HIGH AUTO ARS TONE 100 0 APRS OFF z z Recallamemorybydirectlyinputtingchannelsusingthenumerickeysonthemicrophone Press the numeric keys 0 to 9 in the memory mode to enter the memory channel Example When recalling memory channel 123 Press the 1 key Pre...

Page 42: ...e the memory channel list is automatically displayed Press the BAND GRP key to switch to the display for each frequency band by the memory auto grouping MAG function see below 2 Rotate the DIAL knob to select the desired memory channel and press the DIAL knob 3 The memory channel is recalled Recall only memories in the same frequency band Band using the memory auto grouping MAG function With the m...

Page 43: ... DIAL knob The last used memory channel is selected 041 DIGITAL 433 100 433 200 433 300 JA1YOE 022 433 620 FTM 200D 021 433 300 YAESU 033 MEMORY CH LIST 2 Rotate the DIAL knob to select the memory channel to edit the memory tag then press the DIAL knob 3 A popup will appear Rotate the DIAL knob to select EDIT then press the DIAL knob The memory information appears 041 DIGITAL 433 100 433 200 433 3...

Page 44: ...L knob Confirmation screen DELETE is displayed 4 Rotate the DIAL knob to select OK then press the DIAL knob 041 DIGITAL 433 100 433 200 433 300 JA1YOE 022 433 620 FTM 200D 021 433 300 YAESU 033 MEMORY CH LIST Memory channel 001 and home channel cannot be deleted Recalling the Home Channels z z Recall from the Function List 1 Press the F MENU key 2 Rotate the DIAL knob select HOME then press the DI...

Page 45: ...ency to a memory channel first For additional details on registering to a memory channel refer to Writing to memory page 37 To edit a memory channel that has already been written go to step 2 2 Press and hold the V M MW key The memory channel list appears YAESU MUSEN The memory channel list can also be displayed by the following operations Press the F menu key Select KEYPAD Press the DIAL knob Sel...

Page 46: ... appears on the display YAESU MUSEN On the memory channel list screen the receive frequency is displayed on the upper area and the transmit frequency is displayed on the lower part of the split memory channel 041 DIGITAL 433 100 433 200 433 300 JA1YOE 022 433 620 FTM 200D 021 433 300 YAESU 033 MEMORY CH LIST While operating the split memory to reverse the transmit and receive frequencies temporari...

Page 47: ...io is not played even if there is a signal on the other channel On the PMG SR screen the real time reception status of other channels is not displayed while the received audio of the manually selected channel is playing YAESU MUSEN PMG icon Currently selected channel displayed in orange PMG channel number The selected channel is displayed in orange PMG channel number currently selected Memory chan...

Page 48: ...ignal and outputs the received audio When a channel is active the bar graphs of other channels pause and display the last reception state When there is no signal scanning will resume after about 1 second When operating on the received channel press the PTT or DIAL knob to switch to manual mode which is fixed to the selected channel for communication YAESU MUSEN Receives signal with PMG 1CH and sel...

Page 49: ...ed by the selected PMG 2CH the bar graph display is paused and the received sound is output Operation of Manual Mode In manual mode the channel is fixed Rotate the DIAL knob to select the desired channel Press PTT to communicate with other stations on the selected PMG channel Each time the DIAL knob is pressed the auto mode and manual mode are toggled Unregister the channel frequency registered in...

Page 50: ...e DIAL knob Or press PTT or the UP DWN keys on microphone KEYPAD SQL RPT R DTMF SCAN OFF HOME TXPWR HIGH AUTO ARS TONE 100 0 APRS OFF If the scan has paused on a signal rotating the DIAL knob will cause scanning to resume instantly If the transceiver is turned OFF while scanning when the transceiver is turned ON scanning will resume If you call the Function List or Setup Menu during scanning the S...

Page 51: ...nt to scan and press the DIAL knob 3 Rotate the DIAL knob to select EDIT then press the DIAL knob 4 Rotate the DIAL knob to select SCAN 5 Press the DIAL knob to select NO 6 Rotate the DIAL knob to select OK then press the DIAL knob 7 When the confirmation screen is displayed press the DIAL knob When the memory channel set as the skip memory is called the icon is displayed To cancel the skip memory...

Page 52: ...ble Bluetooth headsets cannot be guaranteed Installing the Bluetooth unit BU 4 Avoid touching the electronic components with your hands as the semiconductors may be damaged by static electricity 1 Turn the transceiver OFF 2 Unplug the control cable from the front panel 3 Remove the eight screws from the front panel and then carefully lift the back case of the front panel 4 Align the BU 4 connector...

Page 53: ...VOICE MEMORY 108 Bluetooth 107 109 110 FVS REC TRACK SELECT 4 Press the DIAL knob and set Bluetooth to ON The setting items are displayed 5 Press the DIAL knob 6 Rotate the DIAL knob to select DEVICE then press the DIAL knob OPTION 107 Bluetooth ON Bluetooth DEVICE Connected STATUS OFF SAVE Disconnected STATUS 7 Press the DIAL knob The search starts and the model name of the found Bluetooth device...

Page 54: ...the Bluetooth headset cannot be found the icon blinks on the screen If the power of the same Bluetooth headset is turned ON in this state it will connect automatically If not turn the FTM 200DR DE and Bluetooth headset OFF and then ON again To connect to other Bluetooth headsets refer to Connect with another Bluetooth headset on page 55 Activate Transmit by pressing the button on the Bluetooth hea...

Page 55: ...nob to select LOW or HIGH OFF VOX function OFF LOW VOX function ON VOX Gain Level LOW HIGH VOX function ON VOX Gain Level HIGH Factory default value OFF When set to LOW or HIGH the audio is automatically transmitted from the connected Bluetooth headset When Bluetooth function Off the audio from the microphone is transmitted TX 11 VOX LOW VOX 0 5s DELAY 5 Press any key except Power Switch or PTT sw...

Page 56: ... to complete the setting Press and hold AUDIO 11 VOX LOW VOX 0 5s DELAY Bluetooth battery save function Turning ON the Bluetooth Battery Saver feature extends the standby battery life of the Bluetooth headset 1 Press and hold the F menu key 2 Rotate the DIAL knob to select Bluetooth then press the DIAL knob Press and hold 3 Rotate the DIAL knob to select SAVE then press the DIAL knob to select ON ...

Page 57: ...Bluetooth devices white letters 2 Searched and found new Bluetooth devices white letters 3 Already registered but not found by search Bluetooth devices gray letters To interrupt the search press the SQL back key 7 When the headset to be connected is displayed press the SQL back key to stop searching 8 Rotate the DIAL knob to select the desired Bluetooth device 9 Press the F menu key 10 Rotate the ...

Page 58: ...h the headset and the transceiver speaker 1 Press and hold the F menu key 2 Rotate the DIAL knob to select Bluetooth then press the DIAL knob Press and hold 3 Rotate the DIAL knob to select AUDIO then press the DIAL knob 4 Rotate the DIAL knob to select AUTO or FIX AUTO The received audio comes from only the Bluetooth headset FIX The received audio comes from both the Bluetooth headset and the spe...

Page 59: ...ory mode The status strengths of the signals in the upper and lower memory channels 21CH or 11CH centered on the current memory channel are displayed in the graph Memory channels that have not been registered are not displayed The bar graph for the central memory channel is displayed in orange z z Change frequency or Memory Channels Rotate the DIAL knob to change the receive frequency or memory ch...

Page 60: ... When the transceiver receives a signal on the frequency registered to the priority memory channel dual reception stops and signal receiver switches to priority memory channel z z Activating Priority Scan 1 Press and hold the F menu key 2 Rotate the DIAL knob to select 50 DUAL RCV MODE then press the DIAL knob 3 Rotate the DIAL knob to select PRIOITY SCAN then press the DIAL knob 4 Press any key e...

Page 61: ...The file is a Wave sound format extension wav The file name is YYYYMMDDmmhhss wav YYYY year MM month DD day hh hour mm minute ss second depending on the date and time when the recording started When using the MicroSD memory card for the first time please refer to Formatting a MicroSD Memory Card on page 27 Since the date and time are used for the file name and time stamp it is recommended to recei...

Page 62: ... during recording so set them before stopping recording 1 Press and hold the F menu key 2 Rotate the DIAL knob to select 38 RECORDING then press the DIAL knob 3 Press the DIAL knob again Press and hold 4 Rotate the DIAL knob to select the band to record A Record the A band received audio B Record the B band received audio A B Record both A band and B band received audio To record the received audi...

Page 63: ... 05 20211108132407 13 24 20211014183042 10 14 20211008151222 10 08 20210922120112 09 22 20210922102430 09 22 LOG VOICE 20211108140518 14 05 20211108132407 13 24 20211014183042 10 14 20211008151222 10 08 20191224102430 12 24 LOG VOICE 20210922120112 09 22 5 Press the DIAL knob Playback will begin The receiver audio will not be heard during playback Play back while recording is not possible VOICE PL...

Page 64: ...Speak into this part with a normal voice Connector Connect to the DATA terminal of the Front Panel Make sure to insert the connector in the right direction Connecting the microphone to the front panel forcibly may cause damage Make sure to keep at least 20 inches 50cm distance between the lens and the object If the object is too close the picture will be out of focus resulting in a blurred picture...

Page 65: ...e canceled Viewing the Saved Image 1 Press and hold the F menu key 2 Rotate the DIAL knob to select 60 LOG LIST then press the DIAL knob 3 Rotate the DIAL knob to select PICT then press the DIAL knob Displays the saved image data list Press the F menu key then rotate the DIAL knob to select and press the DIAL knob to display the oldest file Press the F menu key then rotate the DIAL knob to select ...

Page 66: ...system which expands the range of amateur radio communications by connecting with a local WIRES X Node station The FTM 200DR DE can communicate and exchange data via the internet with WIRES X nodes worldwide Use the News Station function to write upload and read download digital data text images and audio When connected to a WIRES X node station or room the node name room name call sign of the oth...

Page 67: ...cified CTCSS tone is received By matching the CTCSS tone frequency with the partner stations quiet standby monitoring is possible Digital Code squelch DCS feature The DCS Digital Coded Squelch function allows audio to be heard only when signals containing the same DCS code are received New PAGER EPCS feature This new feature allows calling specified stations only by using a pager code that combine...

Page 68: ... the UP DWN key on the microphone to jump to the 17 categories in the Setup Menu below DISPLAY TX RX MEMORY CONFIG AUDIO SIGNALING SCAN DIGITAL GM WIRES X DATA APRS SD CARD OPTION CLONE RESET 2 3 4 1 DISPLAY LCD BRIGHTNESS FREQUENCY COLOR BAND SCOPE FREQUENCY INPUT 3 When there is no deeper level of menu items go to step 4 When there is a deeper level of menu items rotate the DIAL knob to select t...

Page 69: ...CK GPS INFORMATION TX 8 TX POWER Set the transmit power level LOW MID HIGH 9 AMS TX MODE Set the AMS transmission mode AUTO TX FM FIXED TX DN FIXED 10 MIC GAIN Microphone sensitivity setting MIN LOW NORMAL HIGH MAX 11 VOX VOX function settings VOX OFF LOW HIGH DELAY 0 5s 1 0s 1 5s 2 0s 2 5s 3 0s 12 AUTO DIALER DTMF code automatic transmit setting ON OFF 13 TOT TX time out setting OFF 1min 2min 3mi...

Page 70: ...yyyy mmm dd dd mmm yyyy yyyy dd mmm Time 24hours 12hours 30 TIME ZONE Time zone setting UTC 14 00 to 0 00 to 14 00 31 STEP Frequency tuning step AUTO 5 00 kHz 6 25 kHz 8 33 kHz 10 00 kHz 12 50 kHz 15 00kHz 20 00kHz 25 00 kHz 50 00 kHz 100 kHz 32 CLOCK TYPE Clock shift setting A B 33 UNIT Display unit setting METRIC INCH Depends on the transceiver version 34 APO Automatic power OFF time setting OFF...

Page 71: ... reception interval setting Only enabled when 34 Dual Receive Mode is set to PRIORITY SCAN 0 5sec 1sec 2sec 3sec 5sec 7sec 10sec 52 PRIORITY REVERT The transmission operation during dual receive always transmits on the home channel OFF ON 53 SCAN RESUME Set the resume operation after scanning stops on a signal BUSY HOLD 1sec 3sec 5sec Depends on the transceiver version DIGITAL 54 DIGITAL POPUP Inf...

Page 72: ...PEED 4800bps 9600bps 19200bps 38400bps 57600bps OUTPUT OFF GPS OUT PACKET WAYPOINT WP FORMAT NMEA 6 NMEA 7 NMEA 8 NMEA 9 WP FILTER ALL MOBILE FREQUENCY OBJECT ITEM DIGIPEATER VoIP WEATHER YAESU CALL RINGER RANGE RINGER 67 DATA BAND APRS DATA band selection settings APRS MAIN BAND SUB BAND A BAND FIX B BAND FIX DATA MAIN BAND SUB BAND A BAND FIX B BAND FIX 68 DATA SPEED APRS DATA communication baud...

Page 73: ... 400ms 500ms 750ms 1000ms 79 APRS UNITS APRS display unit settings POSITION dd mm mm dd mm ss DISTANCE km mile SPEED km h mph knot ALTITUDE m ft BARO hPa mb mmHg inHg TEMP C F RAIN mm inch WIND m s mph knot 80 BEACON INFO Transmit beacon information settings AMBIGUITY OFF 1 digit 2 digits 3 digits 4 digits SPEED COURSE ON OFF ALTITUDE ON OFF 81 BEACON STATUSTXT Status text input settings SELECT OF...

Page 74: ...LAT N 0 00 00 00 LON E 0 00 00 00 95 MY SYMBOL My symbol setting ICON 1 Car ICON 2 R REC Vehicle ICON 3 House QTH VHF USER YY Yaesu Radios 96 POSITION COMMENT Set position comment Off Duty En Route In Service Returning Committed Special Priority Custom 0 to Custom 6 EMERGENCY 97 SmartBeaconing Smart beaconing settings STATUS OFF TYPE1 TYPE2 TYPE3 For details on the following setting items for each...

Page 75: ...e micro SD card OPTION 107 Bluetooth Requires optional Bluetooth Unit BU 4 Bluetooth Bluetooth headset setting OFF ON DEVICE Bluetooth device list SAVE Turn the Bluetooth save function ON or OFF OFF ON AUDIO Set whether received audio is heard from both the Bluetooth headset and the transceiver speaker or only from the connected Bluetooth device AUTO FIX 108 VOICE MEMORY Requires optional Voice Gu...

Page 76: ...all settings from other FTM 200D RESET 118 CALLSIGN My call sign setting 10 characters 119 MEMORY CH RESET Erase registered memory channels 120 APRS RESET Return APRS settings to default 121 CONFIG SET Save configuration 122 CONFIG RECALL Recall configuration 123 SOFTWARE VERSION Display the software version Main Ver Sub Ver DSP Ver 124 FACTORY RESET Return all settings to factory default ...

Page 77: ... cancel the resetting select CANCEL then press the DIAL knob 4 Press the DIAL knob to reset all After resetting all defaults the call sign input message appears on the LCD Set the call sign page page 4 Memory Channels Reset To erase only the registered all memory channels 1 Press and hold the F menu key 119 MEMORY CH RESET MEMORY CH RESET appears on the LCD 2 Rotate the DIAL knob to select OK To c...

Page 78: ... Move the cursor to left right in the text input area Erase the character at the left of the cursor position Enter a space at the cursor position z z Alphabet Input Rotate the DIAL knob to select or and each time the DIAL knob is pressed the input screen changes as follows Rotate the DIAL knob to select and each time the DIAL knob is pressed the input switches between small and capital letters 1 b...

Page 79: ...o 60 C Antenna Impedance 50Ω Supply Voltage Nominal 13 8V DC negative ground Current Consumption approx 0 5 A Receive 11 A 50W TX 144MHz 11 A 50W TX 430MHz Operating Temperature Range 4 F to 140 F 20 C to 60 C Case Size W x H x D Radio unit 5 47 x 1 66 x 5 2 139 x 42 x 132 mm w o Fan Controller 5 47 x 2 09 x 0 7 139 x 53 x 18mm w o Knob Weight approx 2 43lbs 1 1kg with Radio Unit Controller Contro...

Page 80: ...D10 13 8V Internal Speaker 3W 8Ω THD10 13 8V External Speaker AF Output Impedance 8Ω Strength of secondary radio waves 4 nW and below z z Bluetooth Optional BU 4 Version Version 4 2 Class Class 2 Output Power 2dBm Specifications are subject to change without notice and are guaranteed within the 144 430MHz amateur bands only The Bluetooth wordmark and logo are registered trademarks owned by Bluetoo...

Page 81: ......

Page 82: ...roduced without the permission of YAESU MUSEN CO LTD YAESU MUSEN CO LTD Tennozu Parkside Building 2 5 8 Higashi Shinagawa Shinagawa ku Tokyo 140 0002 Japan YAESU USA 6125 Phyllis Drive Cypress CA 90630 U S A YAESU UK Unit 12 Sun Valley Business Park Winnall Close Winchester Hampshire SO23 0LB U K 2202D AS 1 ...

Reviews: