background image

22

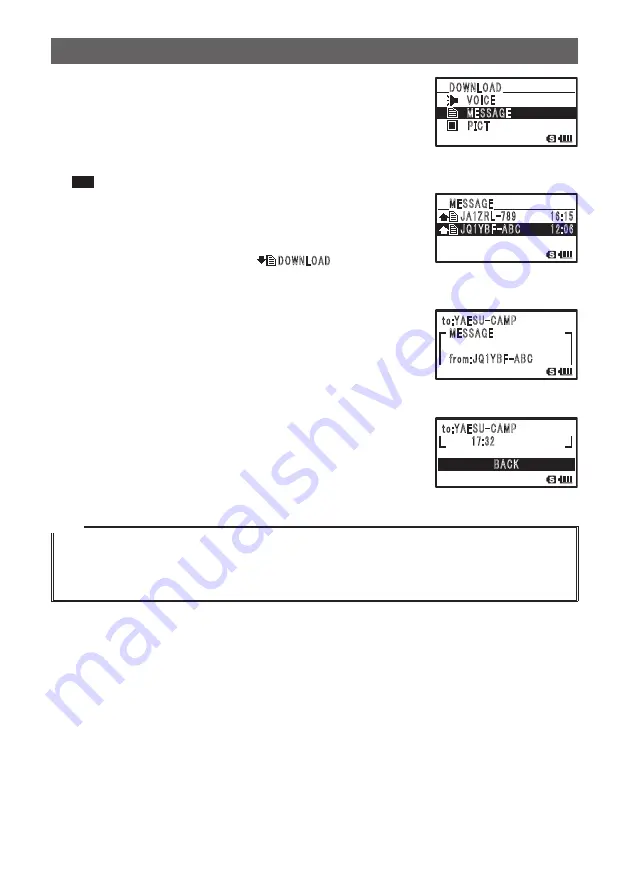
Connecting to a Faraway Station Using WIRES-X

8

 Rotate 

O

 to select 

[MESSAGE]

9

 Press 

H

  [Waiting] will be displayed.
  If data reception is successful, a list of available data 

messages will appear.

 Tip 

  The list will show data in reverse chronological order.

䢢䢢䣆䣑䣙䣐䣎䣑䣃䣆

䢢䢢䢢䢢䢢䢢䢢䣘䣑䣋䣅䣇

䢢䢢䢢䢢䢢䢢䢢䣏䣇䣕䣕䣃䣉䣇

䢢䢢䢢䢢䢢䢢䢢䣒䣋䣅䣖

10

 Rotate 

O

 to select a message

11

 Press 

H

  [Waiting] will be displayed.
  If data reception is successful, 

䢢䢢䢢䢢䢢䣆䣑䣙䣐䣎䣑䣃䣆

 will be 

displayed. Data will be imported, and then the content of 
the message will appear.

䢢䢢䣏䣇䣕䣕䣃䣉䣇

䢢䢢䢢䢢䢢䣌䣃䢳䣜䣔䣎䢯䢹䢺䢻䢢䢢 䢢䢢䢢䢢䢢䢢䢢䢳䢸䢼䢳䢷

䢢䢢䢢䢢䢢䣌䣓䢳䣛䣄䣈䢯䣃䣄䣅 䢢䢢䢢䢢䢢䢢䢢 䢳䢴䢼䢲䢸

12

 Rotate 

O

 to select 

[BACK]

13

 Press 

H

  The data list will appear again.

䣶䣱䢼䣛䣃䣇䣕䣗䢯䣅䣃䣏䣒

䢢䢢䣏䣇䣕䣕䣃䣉䣇

䢢䢢䣨䣴䣱䣯䢼䣌䣓䢳䣛䣄䣈䢯䣃䣄䣅

O

䣶䣱䢼䣛䣃䣇䣕䣗䢯䣅䣃䣏䣒

䢢䢢䢢䢢䢢䢢䢢䢢䢳䢹䢼䢵䢴

䣄䣃䣅䣍

Tips

• On the data content display screen, press 

M

 to display the sender’s location information when the 

data was imported.

• On each screen, rotate 

O

 to the end to display 

[BACK]

. Select 

[BACK]

 and press 

H

 to return to 

the previous screen.

Summary of Contents for FT1DR

Page 1: ...ing our product This instruction manual explains information related to the WIRES X Function For information on basic operation of the transceiver refer to the operating manual enclosed in the product...

Page 2: ...l node 26 Importing images from the WIRES X server 27 Importing data from a node or room on the Internet 27 Viewing imported data later 28 Deleting imported data 29 Listening to audio messages 30 List...

Page 3: ...es Local node Local node Station Station Internet In addition to the WIRES features WIRES X also supports digital communications Using WIRES X you can transmit and receive digitalized data such as tex...

Page 4: ...ssions receptions Digital node Node which is a transceiver or repeater compatible with digital communications in C4FM Continuous 4 level FM format With this type of node you can not only relay voice c...

Page 5: ...some may not be published due to the wishes of owners Room Round QSO Room WIRES system community space to which multiple nodes can connect simultaneously As well as voice communications you can also...

Page 6: ...al news Audio messages emergency News Station Audio files Text data Images INT news Audio messages emergency News Station Audio files Text data Images Connecting to a node allows you to access data in...

Page 7: ...ist to search for a nearby local node and nodes on the Internet used by people you want to communicate with write down the node names and frequencies Since the connection procedure differs between dig...

Page 8: ...erical keypad After entering press H 2 Press and hold for 1 second or more X will flash on the left side of the frequency indication When a local node is found X will be lit solid and the node name an...

Page 9: ...the detected local node is a repeater station R will appear below X Caution WIRES X can be used only on band A When using band B shown on the bottom part of the screen as the operation band after pres...

Page 10: ...ll flash When connection is successfully established Connected will appear followed by the menu list of the connection destination Tip If connection is unsuccessful an error message will appear and th...

Page 11: ...d hold H for 1 second or more SEARCH will become selected 6 Press H Connection destination search will start and Waiting will flash If connection destinations with a name partially matching the name y...

Page 12: ...es or access history from 7 WIRES X 3 SEARCH SETUP in setting mode Connecting to the node or room you have most recently connected If you have previously connected to a node or room it will be display...

Page 13: ...destination by pressing p even when viewing data in a node or room on the Internet using the NEWS function in digital mode Page 21 Useful functions in digital mode Using a preset channel Programming p...

Page 14: ...980 for band B 9 Press M 4 times The frequency will be set and then the screen will return to the frequency display screen Connecting to a preset channel 1 Follow the procedure in Presetting a channel...

Page 15: ...ng to a registered node or room You can register names of nodes and rooms on the Internet and sort them into 5 categories Up to a total of 20 nodes and rooms can be registered in each category Registe...

Page 16: ...numeric characters and Japanese katakana by selecting 7 WIRES X 1 LANGUAGE 9 Press and hold H for 1 second or more The screen will return to the category name setting screen The category name you ente...

Page 17: ...right side 4 Rotate O to select the connection destination 5 Press H Connection will begin and Waiting will flash Tip Instead of pressing H press p to establish connection while continuing to transmi...

Page 18: ...nual Connecting to a node or room on the Internet 1 Set the main band frequency to the local node frequency 2 Press to switch to analog FM mode Tip For details refer to Switching the communication mod...

Page 19: ...to contains GPS location information you can display the location data on the screen While viewing the connection destination screen press F and while F is displayed on the destination screen press M...

Page 20: ...al band screen V Single band screen V When viewing text data of the local node V Dual band V Mono band Returning to the initial screen While on the WIRES X screen press and hold A for 1 second or more...

Page 21: ...r details refer to Using a microSD memory card in the basic operating manual Viewing text data in a local node 1 Press and hold H for 1 second or more The menu list of the local node will appear 2 Rot...

Page 22: ...ct a message 11 Press H Waiting will be displayed If data reception is successful will be displayed Data will be imported and then the content of the message will appear 12 Rotate O to select BACK 13...

Page 23: ...lays the previous list Not available on the first list Displays the next list Not available on the last list Viewing text data on the WIRES X server INT NEWS You can read text information provided by...

Page 24: ...The data list will appear again O Viewing text data in a node or room on the Internet 1 When the connection destination is displayed press H The menu list of the node or room on the Internet will app...

Page 25: ...ntent of the message will appear 10 Rotate O to select BACK 11 Press H The data list will appear again O Tip On the content display screen press M to display the sender s location information when the...

Page 26: ...Viewing text data in a local node to display the data type select screen 2 Rotate O to select PICT 3 Press H The data list will appear Tip The list will show data in reverse chronological order 4 Rota...

Page 27: ...rt and DOWNLOAD will flash O After data import completes Completed will appear and then the data list will appear again Tips Data in unsupported formats cannot be imported In such a case Not Completed...

Page 28: ...later You can also view the imported data later 1 Press and hold H for 1 second or more The menu list of the local node will appear 2 Rotate O to select LOG 3 Press H The data type select screen will...

Page 29: ...a information 2 Rotate O to select DELETE 3 Press H 4 Rotate O to select OK 5 Press H The file will be deleted and then the data list will appear again Deleting all files 1 Follow steps 1 to 5 Viewing...

Page 30: ...from the node or room Caution You can play and listen to audio files on the FT1DR DE transceiver but you cannot save audio files to the FT1DR DE Listening to the information in the local node Listenin...

Page 31: ...isplay the sender s location information when the audio file was recorded Listening to the WIRES X server INT NEWS information You can play and listen to the audio data provided by Yaesu on the WIRES...

Page 32: ...rmation on a node or room on the Internet Listening to emergency information 1 Follow step 1 in Viewing text data in a node or room on the Internet to display the menu list of the connection destinati...

Page 33: ...n transmit data such as messages text data and images saved on the microSD card inserted into the FT1DR DE to a local node or a node or room on the Internet You can also create a new message and trans...

Page 34: ...4 ghi4GHI 5 jkl5JKL 6 mno6MNO 7 pqrs7PQRS 8 tuv8TUV 9 wxyz9WXYZ 0 0_ GV U IQ VQ VJG ECOR VQOQTTQY To modify characters press F Pressing F will move the cursor to the left and erase a character Pressi...

Page 35: ...ransmitting a message to display the data type select screen 2 Rotate O to select MESSAGE or PICT 3 Press H The data list will appear 4 Rotate O to select a message or image 5 Press H The data content...

Page 36: ...s data to a local node or node or room on the Internet Audio files are categorized into the following 2 types EMERGENCY Emergency information Depending on the node or room settings mandatory updates w...

Page 37: ...lay the upload or download select screen 2 Rotate O to select UPLOAD 3 Press H The data type select screen will appear 4 Rotate O to select VOICE 5 Speak into MIC while pressing p Tip The maximum reco...

Page 38: ...a routine message 1 Display the menu list of the node or room on the Internet 2 Press H The upload download select screen will appear 3 Follow steps 3 to 6 in Transmitting a routine message under Tran...

Page 39: ...using the GM functions press to set communication mode of band A shown on the top part of the screen to any mode other than FM For details refer to Selecting Communication Mode in the basic operating...

Page 40: ...lect a node on the group list that lies within communication range 2 Press and hold H for 1 second or more Menu options for the node will be displayed 3 Follow steps outlined in Using the News Functio...

Page 41: ...TY 4 EDIT CATEGORY TAG Editing category names C1 to C5 5 REMOVE ROOM NODE Deleting registered nodes rooms C1 to C5 1 to 20 in total in each category Using the WIRES X Setting Mode Setting the language...

Page 42: ...select MANUAL or PRESET Rotating O switches between MANUAL and PRESET MANUAL Set the frequency every time you look for a local node PRESET Use the preset frequency every time you look for a local nod...

Page 43: ...r 6 Rotate O to select HISTORY or ACTIVITY Rotating O switches between HISTORY and ACTIVITY HISTORY Displays the list sorted in order of the connection destination that your station most recently conn...

Page 44: ...OM NODE 5 Press H The category list will appear 6 Rotate O to select a category 7 Press H The connection destination list will appear 8 Rotate O to select a connection destination 9 Press H The delete...

Page 45: ...ion was lost between the local node and the connection destination node While another transceiver was attempting to establish connection to a node via the local node the node was already connected to...

Page 46: ...2014 YAESU MUSEN CO LTD 1410 B0 All rights reserved No portion of this manual may be reproduced without the permission of YAESU MUSEN CO LTD...

Reviews: