background image

 4  Getting Started

 4.1  Insert or Bus 

Like any other Chorus unit effect, 

Chor'X

 can be inserted in the instrument channel of your mixer or DAW,

or be used on an auxiliary bus. Let’s take a look at the pros and cons of each method.

 4.1.1 

Chor'X as insert 

When inserted on the instrument channel, you can adjust the dry/wet signal between the incoming dry 
signal and the delay signal (wet) using the DRY/WET knob located at the bottom right of the unit.

This can result in a loss of global volume; therefore you should use the Global Output Gain knob to 

compensate for this.

The main advantage of this method is that you can use the 

Chor'X

 advanced stereo processing to put your

track in the stereo field in a real, easy and intuitive way.

 4.1.2 

Chor'X on a Bus

When placed in an auxiliary bus, 

Chor'X 

provides you total control of the processed signal: You can EQ it, 

compress it, choose to add reverb on it, or a different reverb than on the dry signal… in short you can 
perform all the processing you want. You can also render the signal of 

Chor'X

 on an audio track then 

cut/paste/slice/edit it.

In an auxiliary track, 

Chor'X

 can also receive data from SEVERAL separate audio channels.

You can experiment with this and create stunning effects that would be different if 

Chor'X

 received only a 

single channel signal.

In that method, you must turn the Dry/wet parameter in the Advanced panel fully to the right to remove 

the dry signal. To mix between dry and wet, you will use the global level of each of the individual tracks, 
and/or the global level of the 

Chor'X

.

 4.2  Toolbar

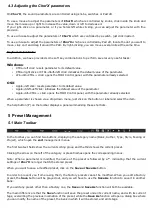
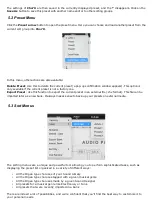
Note: The toolbar at the top of the interface allows you to load or save presets, make a comparison between
settings A and B, or modify the options. These functions are described in detail later in this manual.

Click on the

PRESET menu

 to show the available presets in the current sorted group. Please note that selecting

a new preset without saving your current settings will erase any changes you have made to those settings.  

Click on the

sort arrow

 button to display the current sorted group and to choose the preset within it.

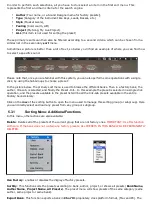
You can sort presets by:

Author, Feeling, Type, Style, Bank or Projects

.

Please note that

Chor'X

 will display presets by Author categories by default.

Click on the sorting label over the sorted group name, to sort your presets according to your preferences.
Please note that

Chor'X’s

 powerful Preset management is fully explained in chapter 5 of this manual.

Summary of Contents for Chor'X 2.0

Page 1: ...Chor X 2 0 User Manual www xils lab com...

Page 2: ...US 9 5 3 1 Sorting Menu Additional Functions 10 5 4 ADVANCED PRESET MANAGER 11 5 5 A B COMPARISON 12 6 THE MAIN PANEL 12 6 1 THE LEGACY SETTINGS 12 6 2 THE ADVANCED SETTINGS 13 6 3 THE BUCKET BRIGADE...

Page 3: ...rom the Dimension D effect When opening the Advanced panel the internal parameters for the legacy chorus can be tweaked You will also have access to the Xils lab True Stereo Dynamic Engine which allow...

Page 4: ...Dynamic Engine Impulse follower Envelope follower All parameters are MIDI controllable Chor X is available in the following formats Mac OSX 10 9 and later 64 bits Intel M1 VST Audio Unit AAX 64 bits n...

Page 5: ...file chorx_win_setup_xxx exe Please download the latest version from the XILS lab website Once you have accepted the license agreement you will be asked to select the installation directory and be pro...

Page 6: ...stem password If your version of OSX doesn t want to run the installer open the System preferences select Security Privacy and click on Launch anyway at the right of the Chor X installer name The vari...

Page 7: ...so receive data from SEVERAL separate audio channels You can experiment with this and create stunning effects that would be different if Chor X received only a single channel signal In that method you...

Page 8: ...l with the parameter already selected When a parameter is chosen via a drop down menu just click on the button or label and select the item The help button on the toolbar displays a panel summarizing...

Page 9: ...s function to export the current preset in an external file chx format This file can be imported later as a new bank It always makes sense to back up your presets on external media 5 3 Sort Menus The...

Page 10: ...bank the author Xils Lab is selected and finally the Preset Init In this example the preset is selected in a single click operation and the presets available in the preset list will be all the Xils L...

Page 11: ...criteria and submit the new name in the edit box Click on the preset name to change it When done click on SAVE CURRENT to replace your preset or SAVE AS CURRENT to duplicate it Notice When creating a...

Page 12: ...ttings These two settings are stored in the A and B memories When you launch Chor X the default activated memory is A When you load or modify a preset this memory A is also modified in real time accor...

Page 13: ...en if this panel is closed you are aware that something has been done under the roof Furthermore the padlock at the left of the global level is locked helping you to avoid erasing settings you might h...

Page 14: ...re four bucket brigade emulations two for the left channel and two for the right channel Each delay is modulated in frequency and range according to the position of the lights The mix between the two...

Page 15: ...e wet signal the blurred lights or by clicking on the DRY button also process the dry signal You can also process a stereo input signal as a mono source by engaging the DRY MONO switch Important As in...

Page 16: ...attacks of the signal For the special dry feature you first need to set the threshold Clicking on the green light and moving it around the 2 D area you will easily find the right threshold position D...

Page 17: ...ption allows the output level to follow the presets That means that the output level is programmed with the value saved in the preset Otherwise it keeps its value GUI follows presets When checked this...

Page 18: ...g concept and coding were done by Xavier Oudin Digital Signal Processing and plug in coding was done by Xavier Oudin The graphical user interface was created by Xavier Oudin The graphics created by Ya...

Reviews: