background image

Installation

Xerox® Smart Card
Installation Guide

16

f.

Enter the 

Smart Card Timeout 

required between 

1

 and 

120


minutes.

The default setting is 

5

 minutes.

g.

If the machine is inactive for the 
period of time specified, it will 
end the session automatically.

Note:

When the 

Smart Card

 is removed, the user session will timeout.

Xerox WorkCentre 5632/5638/5655/5665/5675/5687, Xerox WorkCentre 5135/5150 and 
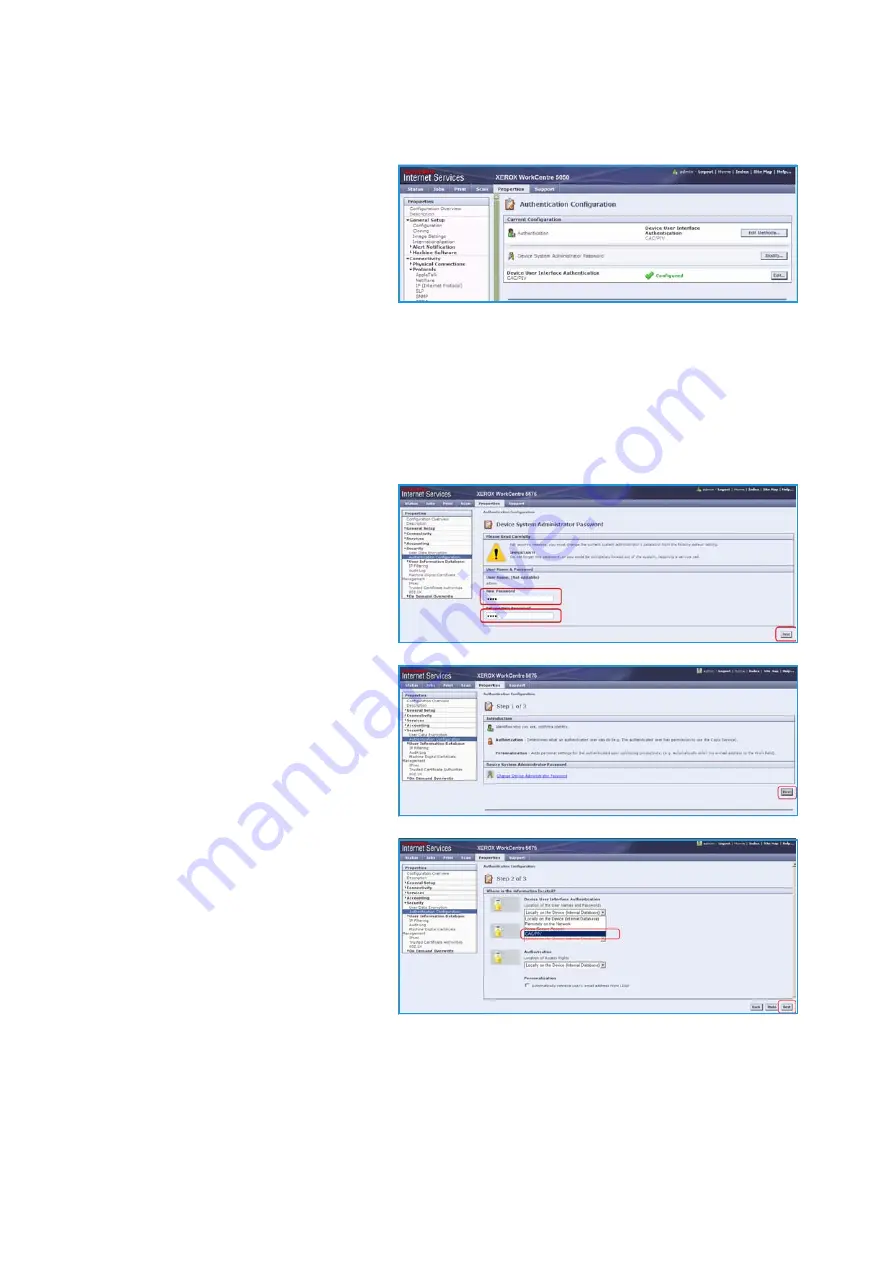
Xerox WorkCentre 5735/5740/5755/5765/5775/5790 (System Software 06x.130.xxx.xxxxx):

a.

Select 

Security

 and select 

Authentication Configuration

.

Note:

If this is the first time you are entering the authentication wizard, you may be prompted to 

enter a new password that is different from the default password.

b.

Enter new password and select 

Next

.

c.

Select 

Next

.

d.

Select the 

Device User Interface 

Authentication

 option 

CAC/PIV


and select 

Next

.

Note:

This screen is dependent on the 

selection made on the previous 
screen.

Summary of Contents for WorkCentre 5632

Page 1: ...ox Smart Card Installation Guide Xerox WorkCentre 5632 5638 5645 5655 5665 5675 5687 Xerox WorkCentre 5735 5740 5745 5755 5765 5775 5790 Xerox WorkCentre 5135 5150 Xerox WorkCentre 5030 5050 software...

Page 2: ...t be reproduced in any form without permission of Xerox Corporation XEROX and XEROX and Design are trademarks of Xerox Corporation in the United States and or other countries Changes are periodically...

Page 3: ...fications 10 Electrical Requirements 10 3 Installation Software Enablement 12 Configuring the Smart Card 13 Hardware Installation 26 Using the Smart Card 34 4 Troubleshooting Fault Clearance 36 Locati...

Page 4: ...Xerox Smart Card Installation Guide 4...

Page 5: ...n Number PIN at the device This provides added security in the event that a card is lost or stolen Once validated a user is logged into the Xerox device for all walk up features The system allows for...

Page 6: ...a If your machine has software level 05 003 xx xxx the Smart Card software can not be installed without first upgrad ing the machine software Please contact your Xerox Representative for details 05 00...

Page 7: ...V5 2D 64K Oberthur OCS Galactic V1 32K V1 Applets Oberthur Cosmo V4 32K V1 Applets Schlumberger Axalto Cyberflex V2 32K V1 Applets Other card types may function with the solution but have not been val...

Page 8: ...our device to the network and installing optional features This guide is intended for System Machine Administrators User Guide provides detailed information about all the features and functions on the...

Page 9: ...C after validation of the user Item Supplier Compatible Card Reader refer to Supported Card Types on page 7 Customer Compatible Access Card refer to Supported Card Types on page 7 Customer Smart Card...

Page 10: ...events rogue DCs masquerading as the real DC Note Certificates are often obtained from the Information Technology professionals that support your organization If you are unable to obtain the required...

Page 11: ...ollow in sequence Software Enablement Use the Feature Enable Key to enable the Smart Card to be configured Configuring Smart Card Enabling the Smart Card function and customizing the settings Hardware...

Page 12: ...tion c Select Smart Card If necessary use More to navigate to the option d When prompted select the Option Kit Number entry box and enter the unique Feature Enable Key provided on the inside cover of...

Page 13: ...e to update automatically a Select Connectivity b Select Protocols and then NTP Note A pop up window may appear requiring you to login c Ensure the NTP Enabled box is checked for the Network Time Prot...

Page 14: ...55 5765 5775 5790 a At the WorkCentre press the Machine Status button on the control panel b Select the Tools tab c Enter the appropriate User ID and Password to access Tools Note The default user nam...

Page 15: ...687 Xerox WorkCentre 5135 5150 and Xerox WorkCentre 5735 5740 5755 5765 5775 5790 refer to page 16 Xerox WorkCentre 5030 5050 a Select Security and select Authentication Configuration Note If this is...

Page 16: ...65 5675 5687 Xerox WorkCentre 5135 5150 and Xerox WorkCentre 5735 5740 5755 5765 5775 5790 System Software 06x 130 xxx xxxxx a Select Security and select Authentication Configuration Note If this is t...

Page 17: ...h OCSP a Uncheck all three Domain Controller OCSP Certificate Validation boxes and add the required Domain Controller b Select Save Go back and add other Domain Controllers as required If you wish to...

Page 18: ...on environment f Enter the IP Address or enter the Domain Controller Host Name this must be the fully qualified Host Name g Ensure Port 88 is selected unless your Kerberos Port is different h Enter th...

Page 19: ...the Domain Controller search order select the controller and use the up and down arrows on the right side of the screen to promote or demote the controller order 7 Upload certificates Note These steps...

Page 20: ...nfigured You are now ready to install the Smart Card hardware using the instructions starting on page 26 Xerox WorkCentre 5735 5740 5755 5765 5775 5790 System Software 06x 131 xxx xxxxx 1 At the WorkC...

Page 21: ...erox Machine or Remotely on the Network 8 Click Save 9 A list of configuration settings appears at the bottom of the Authentication Setup page 10 Click Edit to configure any settings that are marked i...

Page 22: ...Next 3 On the Required Settings page type the URL of the OCSP server 4 To ensure that the printer can communicate with the OCSP server and the domain controller configure your proxy server settings i...

Page 23: ...t e mail address to populate the field If required the System Administrator can change the setting to obtain the user s e mail address from the Smart Card only or from the Network Address Book LDAP on...

Page 24: ...2 To enable E mail Encryption under E mail Encryption Enablement select an option Always On Not editable by user Restrict users from turning E mail Encryption on or off at the control panel Editable b...

Page 25: ...control panel Editable by user Allow users to turn E mail Signing on or off at the control panel 6 If you select Editable by user specify the default setting for users at the control panel Under E ma...

Page 26: ...owing instructions 1 Unpack the Smart Card Enablement Kit The kit contains the following items Xerox Smart Card Enablement Guide 1 Four Dual Lock Fastener pads Velcro 2 Three Cable Ties 3 One Ferrite...

Page 27: ...eing installed There are four types of card reader available one upright model or three slimline models Locate the device being installed and ensure it has been configured Note The System Administrato...

Page 28: ...Installation Xerox Smart Card Installation Guide 28 3 Attach the ferrite bead to the reader cable Note The ferrite bead should be clipped onto the cable directly behind the connector...

Page 29: ...the fasteners to the card reader device Fasteners have been provided to secure the card reader to the Xerox device Peel back the fastener backing strip Position the fastener on the under side of the c...

Page 30: ...Installation Xerox Smart Card Installation Guide 30 5 Remove the fastener backing strips When all the fasteners have been attached to the card reader remove the backing strips on each of the fasteners...

Page 31: ...vice do not fix in place at this point Position the card reader in a suitable location ensure it does not obstruct the opening of the document handler side cover Check the cable has sufficient length...

Page 32: ...e 32 7 Connect the card reader to the Xerox device Insert the USB connection into the slot provided on the rear of the network controller Use the cable ties provided to ensure the cabling is neat and...

Page 33: ...card reader and the software has been installed and configured the Card Reader Detected screen displays on the Xerox WorkCentre local user interface Select OK Smart Card is now ready for use Note If t...

Page 34: ...session automatically after a specified period of inactivity Follow the instructions below to use the Smart Card 1 The Authentication Required window may display on the touch screen depending on your...

Page 35: ...der is only compatible with network connected products Ensure the Card Reader is plugged into the Network Controller Refer to Connect the card reader to the Xerox device on page 32 for instructions Do...

Page 36: ...r assistance For problems relating to the Xerox device contact the Xerox Welcome and Support Center The Welcome and Support Center will want to know the nature of the problem the Machine Serial number...

Page 37: ...Card reader is installed but no message displays on the User Interface Card reader is faulty Try a different card reader Contact the System Administrator Card reader connection is faulty Check the cab...

Page 38: ...Failed Authentication Failed System Administrator has not selected All Features or Scanning Service Only Contact the System Administrator Time for date mismatch error There is a mismatch between the t...

Page 39: ...f the Domain Controller 636 For example https 111 222 33 44 636 where 111 222 33 44 is the IP address of the appropriate server A Security Alert warning window is displayed similar to the one shown 2...

Page 40: ...the Details tab Record the name of the Certificate Authority CA that issued this certificate the Issuer A certificate from this CA will be required during Smart Card setup 4 Select the Copy to File b...

Page 41: ...name for the Certificate and select Save 10 Select Next 11 Select Finish The Certificate is retrieved from the server and saved in the selected directory A pop up message will confirm that the Certifi...

Page 42: ...Retrieving the Certificate from a Domain Controller or OCSP Server Xerox Smart Card Installation Guide 42...

Page 43: ...rop down list select Properties When the System Properties window opens click on the Computer Name tab Beneath the Full Computer name is the Domain Name 3 Copy and paste the Domain Name directly into...

Reviews: