background image

9

.3   

<Troubleshooting>

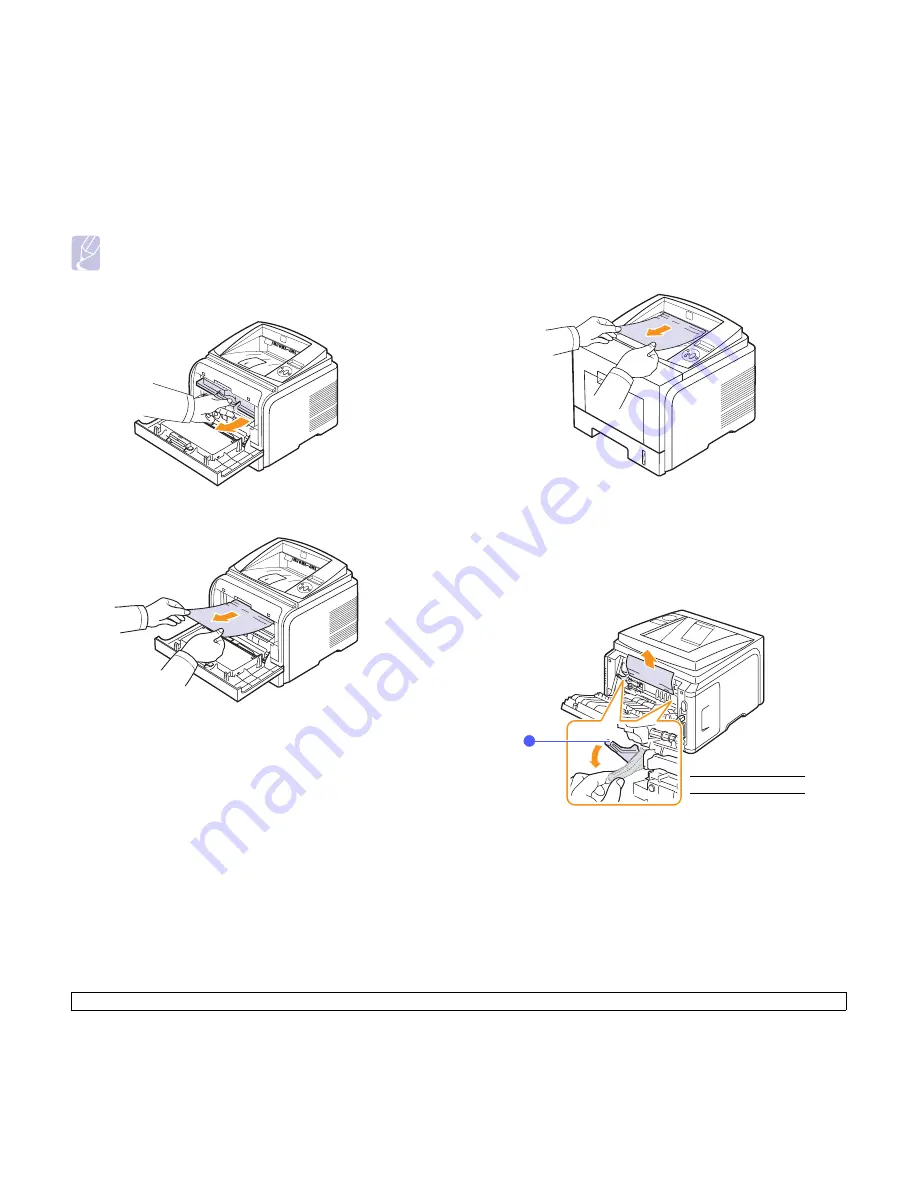
Around the print cartridge

Note

The fuser area is hot. Take care when removing paper from the 
printer.

1

Open the front cover and pull the print cartridge out.

2

Remove the jammed paper by gently pulling it straight out.

3

Replace the print cartridge and close the front cover. Printing 
automatically resumes.

In the paper exit area

1

Open and close the front cover. The jammed paper is automatically 
ejected from the printer. 

2

Gently pull the paper out of the output tray.

If you do not see the jammed paper or if there is any resistance 
when you pull, stop and go to the next step.

3

Open the rear cover.

4

If you see the jammed paper, push the pressure lever on each side 
down and remove the paper. Return the pressure lever to its 
original position and skip the step 10.

If you still do not see the paper, go to the next step.

1

pressure lever

1

Summary of Contents for PHASER 3435

Page 1: ......

Page 2: ...ntronics is a trademark of Centronics Data Computer Corporation IBM and IBM PC are trademarks of International Business Machines Corporation PCL and PCL 6 are trademarks of Hewlett Packard company Mic...

Page 3: ...3 2 System requirements 3 2 4 Network setup Introduction 4 1 Supported operating systems 4 1 Configuring TCP IP 4 2 Configuring EtherTalk 4 2 Setting Ethernet speed 4 2 Restoring the network configura...

Page 4: ...9 6 Understanding display messages 9 6 Print cartridge related messages 9 8 Solving general printing problems 9 9 Solving print quality problems 9 11 Common Windows problems 9 13 Common PostScript pro...

Page 5: ...tened with screws There are no parts behind these covers that you can maintain or service Operational Safety Information Your Xerox equipment and supplies have been designed and tested to meet strict...

Page 6: ...lectrical or mechanical interlock devices 9 Do not push objects into slots or openings on the machine Electrical shock or fire may result 10 Do not obstruct ventilation openings These openings are use...

Page 7: ...equipment December 15 2004 Council Directive 2004 108 EC as amended Approximation of the laws of the member states related to electromagnetic compatibility March 9 1999 Council Directive 99 5 EC on r...

Page 8: ...THE USE OF THIS SOFTWARE EVEN IF ADVISED OF THE POSSIBILITY OF SUCH DAMAGE This product includes cryptographic software written by Eric Young eay cryptsoft com This product includes software written b...

Page 9: ...and put under another distribution licence including the GNU Public Licence Environmental Compliance USA Energy Star As an ENERGY STAR partner Xerox Corporation has determined that the basic configur...

Page 10: ...com environment or for recycling and disposal information contact your local authorities In the United States you may also refer to the Electronic Industries Alliance web site www eiae org Xerox oper...

Page 11: ...bles you to easily print a document to create a book Once printed all you have to do is fold and staple the pages See the Software section Print Posters The text and pictures of each page of your docu...

Page 12: ...rface Ethernet 10 100 Base TX I PostScript Emulation I Duplex printinga a Printing on both sides of paper I Printer overview Front view 1 output tray 7 multi purpose tray 2 control panel 8 front cover...

Page 13: ...l panel overview 1 Start Stop Cancels an operation at any time resumes printing 2 Back Sends you back to the upper menu level 3 Status Shows the status of your printer See page 1 4 4 Menu Enters Menu...

Page 14: ...ge is low Order a new print cartridge You can temporarily improve print quality by redistributing the toner See page 8 3 Finding more information You can find information for setting up and using your...

Page 15: ...ay from direct sunlight or sources of heat cold and humidity Do not set the printer close to the edge of your desk or table Clearance space Front 500 mm enough space so that trays can be opened or rem...

Page 16: ...o save your selection An asterisk appears next to the selection on the display indicating that it is now the default 6 Press Start Stop to return to Standby mode After 30 seconds of inactivity no key...

Page 17: ...Item Explanation Orientation Choose the default orientation of the print image on the page Simplex Margin Set the margin of print materials for one sided printing You can increase or decrease the valu...

Page 18: ...size currently loaded in tray Custom Paper You can configure the size for your own custom paper Set the width from 98 mm to 216 mm and the height from 148 mm to 356 mm Paper Type Select the paper typ...

Page 19: ...the text that appears on the control panel display and information printing Power Save When the printer does not receive data for an extended period of time power consumption is automatically lowered...

Page 20: ...nfiguration You can set the font type symbol type lines per page and point size Item Explanation Typeface You can select the standard font to be used in PCL emulation PCL 1 PCL 7 s interval between le...

Page 21: ...8 Values Off On Network menu This menu lets you configure the network interface installed in your printer You can reset the network interface and print a configuration page Item Explanation TCP IP Thi...

Page 22: ...mode Using toner save mode Toner save mode allows the printer to use less toner on each page Activating this mode extends the life of your print cartridge and reduces your cost per page beyond what o...

Page 23: ...tware CD Contents Printer software CD Windows Printer driver Use this driver to take full advantage of your printer s features Status Monitor Appears when printing errors occur Printer Settings Utilit...

Page 24: ...tem meets the following requirements Windows Note Users who have administrator rights can install the software Mac OS Item Requirements Recommended Operating system Windows 2000 XP Vista 2003 CPU Wind...

Page 25: ...er CentreWare IS A web server embedded in your network printer which allows you to remotely configure the printer settings and network parameters necessary for the printer to be connected to various n...

Page 26: ...address assigned automatically by the server take the following step 1 Press Menu until Network appears on the bottom line of the display 2 Press OK when TCP IP appears 3 Press the Up down arrow butto...

Page 27: ...p down arrow buttons until On appears and press OK 4 Press the Up down arrow buttons until the desired authentication method appears EAP MD5 EAP MD5 Extensible Authentication Protocol Message Digest a...

Page 28: ...choose should be appropriate for your project Size You can use any size media that fits easily within the paper adjusters of the paper tray Weight Your printer supports print media weights as follows...

Page 29: ...5 x 210 mm 5 85 x 8 27 inches A6 105 x 148 5 mm 4 13 x 5 85 inches Envelope Envelope Monarch 98 4 x 190 5 mm 3 88 x 7 5 inches 75 to 90 g m2 20 to 24 lb 5 sheets of 75 g m2 20 lb in the multi purpose...

Page 30: ...eet at a time through the multi purpose tray to avoid paper jams To prevent print media such as transparencies and label sheets from sticking together remove them as they print out Guidelines for spec...

Page 31: ...not run a sheet of labels through the printer more than once The adhesive backing is designed for only a single pass through the printer Do not use labels that are separating from the backing sheet o...

Page 32: ...the multi purpose tray You can load previously printed paper The printed side should be facing up with an uncurled edge at the front If you experience problems with paper feed turn the paper around No...

Page 33: ...print quality problems 3 Load the paper with the side to be printed on facing up Depending on the media type you are using keep the following loading guidelines Envelopes Flap side down and with the s...

Page 34: ...t paper path to avoid paper jams Make sure to open the rear cover when you print on transparencies If not they may tear while exiting the printer Using manual feed mode You can manually load a sheet o...

Page 35: ...r is printing Printing to the output tray Face down The output tray collects paper face down in the order in which the sheets were printed The tray should be used for most print jobs 1 1 rear cover 2...

Page 36: ...queue or print spooler such as the printer group in Windows delete the job as follows 1 Click the Windows Start button 2 For Windows 2000 select Settings and then Printers For Windows XP 2003 select P...

Page 37: ...yield value in accordance with ISO IEC 19752 Part number Standard yield 4 000 pages 106R01414 High yield 10 000 pages 106R01415 Accessory Description Part number Optional tray If you are experiencing...

Page 38: ...f your machine or its surrounding is contaminated with toner we recommend you to use a cloth or tissue dampened with water to clean it Toner blown into the air by a vacuum cleaner maybe harmful Cautio...

Page 39: ...nt cartridge in the same environment as the printer To prevent damage to the print cartridge do not expose it to light for more than a few minute Expected cartridge life The print cartridge yield depe...

Page 40: ...idge Use the handle on the cartridge to avoid touching this area 3 Thoroughly roll the cartridge 5 or 6 times to distribute the toner evenly inside the cartridge Note If toner gets on your clothing wi...

Page 41: ...ing the Toner Low Replace Toner message When the Toner Low Replace Toner message appears you can configure not to see this message again not to disturb you 1 Press Menu until System Setup appears on t...

Page 42: ...erk the paper If the paper tears ensure that all fragments of paper are removed otherwise a jam will occur again When a paper jam occurs the Status LED lights red Open and close the front cover The ja...

Page 43: ...naps into place Printing automatically resumes In the optional tray 2 1 Pull the optional tray 2 open 2 Remove the jammed paper from the printer If the paper does not move when you pull or if you do n...

Page 44: ...the paper exit area 1 Open and close the front cover The jammed paper is automatically ejected from the printer 2 Gently pull the paper out of the output tray If you do not see the jammed paper or if...

Page 45: ...jammed paper out If the jammed paper does not move when you pull push the pressure lever on each side down to loose the paper and then remove it 9 Return the lever door stopper and guide to their orig...

Page 46: ...ctly Do not overload the tray Ensure that the paper level is below the paper capacity mark on the inside wall of the tray Do not remove paper from the tray while your printer is printing Flex fan and...

Page 47: ...6 Solving general printing problems on page 9 9 Common Windows problems on page 9 13 Common Macintosh problems on page 9 14 Common PostScript problems on page 9 13 Common Linux problems on page 9 14 U...

Page 48: ...lose Door Paper has jammed in the fuser area Clear the jam See page 9 3 Paper Jam 2 Check Inside Paper has jammed in the paper exit area Clear the jam See page 9 3 Printing The printer is printing job...

Page 49: ...lection turn the printer off and on to have this message appear again and then re select Stop or Continue NonGenuine Toner Replace Toner1 The print cartridge installed is not a Xerox genuine cartridge...

Page 50: ...printer properties to ensure that all of the print settings are correct The printer driver may be incorrectly installed Reinstall the printer driver See the Software Section Try printing a test page T...

Page 51: ...le and printer to another computer and try a print job that you know works Finally try a new printer cable Condition Possible cause Suggested solutions The printer prints but the text is wrong garbled...

Page 52: ...ective See Vertical repetitive defects on the next page If these steps do not correct the problems contact a service representative Aa AaBb BbCc Cc Aa AaBb BbCc Cc Aa AaBb BbCc Cc Aa AaBb BbCc Cc Aa A...

Page 53: ...or creases Ensure that the paper is loaded properly Check the paper type and quality See page 5 2 Open the rear cover and try printing to the rear cover face up Turn over the stack of paper in the tra...

Page 54: ...essages appear These messages may appear during printing Just keep waiting until the printer finishes printing If the message appears in standby mode or after printing has been completed check the con...

Page 55: ...whenever print options are changed and then try to restart the job from the beginning Since Unified Linux Driver locks port while printing the abrupt termination of the driver keeps the port locked an...

Page 56: ...internal accessories network interface card and memory DIMM are sensitive to static electricity Before installing or removing an internal accessories discharge static electricity from your body by to...

Page 57: ...ript printer driver so that you can use it 1 Make sure that the PostScript printer driver is installed in your computer To installing the PostScript printer driver you need to select Custom and put a...

Page 58: ...ht Paper 1 8 Kg Plastic 0 52 Kg External dimensions W x D x H 400 x 435 x 314 mm 15 7 x 17 1 x 12 4 inches Operating environment Temperature 10 32 C 50 90 F Humidity 20 80 RH Printer language PCL 6d P...

Page 59: ...aper guidelines 5 3 paper jam clear around the print cartridge 9 3 duplex area 9 4 multi purpose tray 9 2 optional tray 2 9 2 paper exit area 9 3 tray 1 9 1 paper level indicator 5 4 paper load multi...

Page 60: ...2 Windows 3 2 T toner save mode use 2 7 W Windows problems 9 13...

Page 61: ...Software section Software section...

Page 62: ...nter Software 10 Chapter 2 USING SETIP Installing SetIP 11 Using SetIP 11 Chapter 3 BASIC PRINTING Printing a Document 12 Printing to a file PRN 13 Printer Settings 13 Layout Tab 14 Paper Tab 14 Graph...

Page 63: ...What is an Overlay 22 Creating a New Page Overlay 22 Using a Page Overlay 22 Deleting a Page Overlay 22 Chapter 5 USING WINDOWS POSTSCRIPT DRIVER Printer Settings 23 Advanced 23 Using Help 23 Chapter...

Page 64: ...onfiguration 29 Configuring Printer Properties 29 Printing a Document 30 Printing from Applications 30 Printing Files 30 Chapter 9 USING YOUR PRINTER WITH A MACINTOSH Installing printer driver for Mac...

Page 65: ...his step and go to Installing Software for Network Printing on page 7 You can install the printer software using the typical or custom method NOTE If the New Hardware Wizard window appears during the...

Page 66: ...click Yes If not click No to reprint it 7 Click Finish NOTE After setup is complete if your printer driver doesn t work properly reinstall the printer driver See Reinstalling Printer Software on page...

Page 67: ...nted at the end of the installation The installation window that appears in this User s Guide may differ depending on the printer and interface in use 6 Select the components to be installed and click...

Page 68: ...rogram field and click Continue in the User Account Control window 3 Click Install Software 4 Select Typical installation for a network printer Click Next 5 The list of printers available on the netwo...

Page 69: ...ows Vista click Run Setup exe in Install or run program field and click Continue in the User Account Control window 3 Click Install Software 4 Select Custom installation Click Next 5 The list of print...

Page 70: ...change the printer name set the printer to be shared on the network set the printer as the default printer and change the port name of each printer Click Next To install this software on a server sel...

Page 71: ...nt to connect the printer at this time click Next and No on the following screen Then the installation will start and a test page will not be printed at the end of the installation The reinstallation...

Page 72: ...ck Finish Using SetIP 1 From the Windows Start menu select Programs or All Programs your printer driver name SetIP SetIP The program automatically detects and displays new and configured print servers...

Page 73: ...rinting from various Windows applications The exact steps for printing a document may vary depending on the application program you are using Refer to the User s Guide of your software application for...

Page 74: ...epending on the printer in use If you access printer properties through the Printers folder you can view additional Windows based tabs refer to your Windows User s Guide and the Printer tab see Printe...

Page 75: ...Paper N Up Printing on page 18 For details see Printing Posters on page 19 Double sided Printing Double sided Printing allows you to print on both sides of paper If this option does not appear your p...

Page 76: ...ting Scaling Printing allows you to automatically or manually scale your print job on a page You can choose from None Reduce Enlarge and Fit to Page For details see Printing a Reduced or Enlarged Docu...

Page 77: ...ect output options for your document See Printing a Document on page 12 for more information about accessing the printer properties Click the Extras tab to access the following feature Watermark You c...

Page 78: ...n and select Properties 5 Click the Printer tab and set the options 1 2 3 1 2 3 Using a Favorite Setting The Favorites option which is visible on each properties tab allows you to save the current pro...

Page 79: ...Printing Multiple Pages on One Sheet of Paper N Up Printing You can select the number of pages to print on a single sheet of paper To print more than one page per sheet the pages will be reduced in si...

Page 80: ...it easier to pasting the sheets together 4 Click the Paper tab select the paper source size and type 5 Click OK and print the document You can complete the poster by pasting the sheets together 0 15...

Page 81: ...he Paper tab and select the paper source size and type 5 Click OK and print the document Long Edge s Short Edge s 2 5 3 2 5 3 2 5 3 2 5 3 Printing a Reduced or Enlarged Document You can change the siz...

Page 82: ...message displays in the preview window When the First Page Only box is checked the watermark prints on the first page only 4 Select watermark options You can select the font name style size or graysca...

Page 83: ...T Dear ABC Regards WORLD BEST Using a Page Overlay After an overlay has been created it is ready to be printed with your document To print an overlay with a document 1 Create or open the document you...

Page 84: ...ows applications will override settings you specify in the printer driver Change all print settings available in the software application first and change any remaining settings using the printer driv...

Page 85: ...ettings Utility click Opening the Troubleshooting Guide Using the troubleshooting guide you can view solutions for error status problems Double click the Status Monitor icon on the Windows task bar Or...

Page 86: ...ROM Setting Up a Host Computer 1 Start Windows 2 From the Start menu select Printers and Faxes 3 Double click your printer driver icon 4 From the Printer menu select Sharing 5 Check the Share this pr...

Page 87: ...es Installing the Unified Linux Driver Installing the Unified Linux Driver 1 Make sure that you connect your machine to your computer Turn both the computer and the machine on 2 When the Administrator...

Page 88: ...to uninstall the driver follow the installation instruction above but type root localhost Linux uninstall sh on the terminal screen Uninstalling the Unified Linux Driver 1 When the Administrator Logi...

Page 89: ...igurator Printers Configuration button Scanners Configuration button Ports Configuration button Printers Configuration Printers configuration has the two tabs Printers and Classes Printers Tab You can...

Page 90: ...en the Unified Driver Configurator If necessary switch to Printers configuration 2 Select your machine on the available printers list and click Properties 3 The Printer Properties window opens The fol...

Page 91: ...es files such as color options image size or image position Device allows you to set the print resolution paper source and destination 5 Click Apply to apply the changes and close the Properties windo...

Page 92: ...with your machine into the CD ROM drive 4 Double click CD ROM icon that appears on your Macintosh desktop 5 Double click the MAC_Installer folder 6 Double click the MAC_Printer folder 7 For Mac OS 10...

Page 93: ...ter Model and your printer name in Model Name For MAC OS 10 4 if Auto Select does not work properly select Xerox in Print Using and your printer name in Model For MAC OS 10 5 if Auto Select does not w...

Page 94: ...nfigure the size of memory 6 Select Apply Change Printing NOTES The Macintosh printer s properties window that appears in this User s Guide may differ depending on the printer in use However the compo...

Page 95: ...on UI Mac OS 10 4 Printer Features This tab provides options for selecting the paper type and adjusting print quality Select Printer Features from the drop down list to access the following features...

Page 96: ...ng your finished document The binding options are Long Edge Binding Which is the conventional layout used in book binding Short Edge Binding Which is the type often used with calendars 1 From your Mac...

Page 97: ...te 22 delete 22 print 22 P Paper properties set 14 paper size set 14 print 30 paper source set 30 Windows 15 paper type set Macintosh 34 print 30 poster print 19 PostScript driver installing 23 print...

Page 98: ...1 Windows 4 11 reinstall Windows 10 system requirements Macintosh 31 uninstall Macintosh 31 Windows 10 status monitor use 24 T toner save set 15 34 U uninstall software Linux 27 Macintosh 31 Windows 1...

Reviews: