background image

CLEARING PAPER MISFEEDS AND JAMS

2-6

XEROX DOCUPRINT 92C IPS TROUBLESHOOTING GUIDE

Clearing paper jams

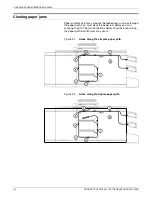
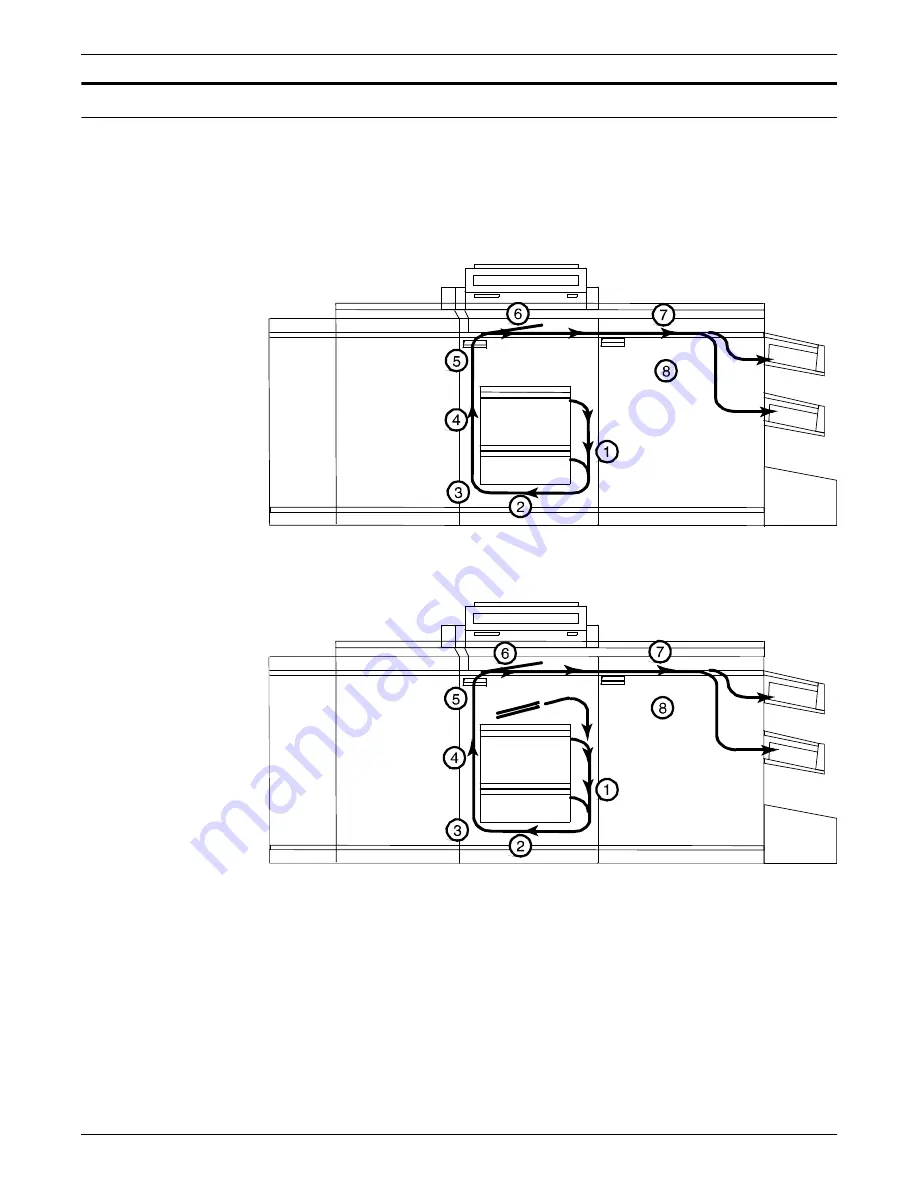
Paper sometimes jams as it leaves the feeder trays or moves through 
the paper path. You must clear the paper jam before you can 
continue to print. The two illustrations below show the areas along 
the paper path in which jams may occur.

Figure 2-1.

Areas along the simplex paper path

Figure 2-2.

Areas along the duplex paper path

Summary of Contents for DocuPrint 92C IPS

Page 1: ...Xerox DocuPrint 92C IPS Troubleshooting Guide Version 7 1 August 2000 721P89160 ...

Page 2: ...after granted including without limitation material generated from the software programs which are displayed on the screen such as icons screen displays looks etc Printed in the United States of America Publication number 721P89160 Xerox and all Xerox products mentioned in this publication are trademarks of Xerox Corporation Products and trademarks of other companies are also acknowledged Changes ...

Page 3: ...y enclosed during all modes of customer operation The laser danger labels on the system are for Xerox service representatives and are on or near panels or shields that must be removed with a tool DO NOT REMOVE LABELED PANELS OR PANELS NEAR LABELS ONLY XEROX SERVICE REPRESENTATIVES HAVE ACCESS TO THESE PANELS Ozone information This product produces ozone during normal operation The amount of ozone ...

Page 4: ...nt Use of unsuitable materials may result in poor performance and may create a hazardous situation Never move either the printer or the Printer Controller without first contacting Xerox for approval Never attempt any maintenance that is not specifically described in this documentation Never remove any covers or guards that are fastened with screws There are no operator serviceable areas within the...

Page 5: ...feeder tray fault 2 2 Frequent misfeeds 2 4 Clearing paper jams 2 6 Job recovery 2 9 Printer jam clearance areas 2 9 Clearing paper jams from areas 1 and 1A 2 10 Clearing paper jams from areas 2 and 2A 2 12 Clearing paper jams from area 3 2 14 Clearing paper jams from area 4 2 15 Clearing paper jams from area 5 2 17 Clearing paper jams from areas 6 and 6A 2 19 Clearing paper jams from area 7 2 20 ...

Page 6: ...TABLE OF CONTENTS vi XEROX DOCUPRINT 92C IPS TROUBLESHOOTING GUIDE 4 System unresponsive 4 1 Index INDEX 1 ...

Page 7: ...his guide become familiar with its contents and conventions Contents This section lists the contents of this guide Chapter 1 Calling for service describes the information to have on hand when calling for support service and provides information on using the Sixth Sense Technology Chapter 2 Clearing paper misfeeds and jams illustrates how to clear paper misfeeds and jams from various parts of the p...

Page 8: ... data and pressing ENTER for example enter y Italics Document and library names are shown in italics for example the Xerox DocuPrint 92C IPS Troubleshooting Guide Capitalization of graphical user interface GUI window titles matches the titles as they appear on the screen In cases where a window does not have a title it is referenced using all lower case For example At the graphical user interface ...

Page 9: ...bout Paper Installation Planning Guide Master Index Messages Guide Solutions Guide System Overview Guide Troubleshooting Guide Xerox Standard Font Library Font User Guide The documentation set also includes an electronic version the DocuPrint IPS Interactive Customer Documentation CD IBM documents Following are related IBM documents Contact your local IBM representative for ordering instructions f...

Page 10: ...INTRODUCTION x XEROX DOCUPRINT 92C IPS TROUBLESHOOTING GUIDE ...

Page 11: ...on the controller screen and the printer console Indicator lights that are lit Name of your printer DocuPrint 92C IPS Serial number for your printing system a 9 digit alphanumeric code located on the frame inside the printer behind the narrow door to the far left on the front of the printer Problems you are having with the system Additional information you may wish to note prior to calling include...

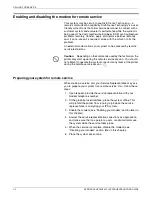
Page 12: ...uring the remote service session You should not attempt to operate the system or perform any tasks at the printer during the remote service session Preparing your system for remote service When making a service call your Service Representative may ask you to prepare your system for a remote service If so follow these steps 1 Upon request provide the service representative with your modem telephone...

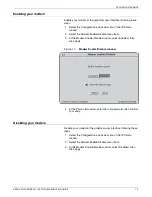
Page 13: ...menu item 3 At the Modem Enable Disable window select Enabled then click Apply Figure 1 1 Modem Enable Disable window 4 At the Password window enter the root password then confirm your entry Disabling your modem Disable your modem at the graphical user interface following these steps 1 Select the Configuration pull down menu of the IPS main window 2 Select the Modem Enable Disable menu item 3 At t...

Page 14: ...CALLING FOR SERVICE 1 4 XEROX DOCUPRINT 92C IPS TROUBLESHOOTING GUIDE ...

Page 15: ...E 2 1 2 2Clearing paper misfeeds and jams Paper jams and misfeeds can be greatly reduced or eliminated if you use the correct type of paper under the right conditions Refer to Helpful Facts About Paper for information on paper selection and care ...

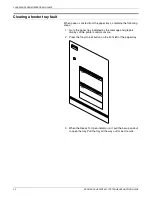
Page 16: ...he paper trays complete the following steps 1 Go to the paper tray indicated by the message and graphic displays of the printer control console 2 Press the Tray Unlock button on the front left of the paper tray 3 When the Ready To Open indicator is lit pull the bar up and out to open the tray Pull the tray all the way out for best results ...

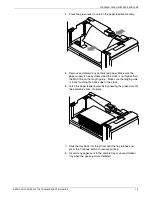
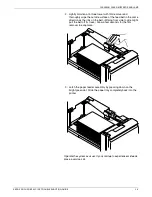
Page 17: ...he stack is not higher than the MAX line on the length guide Make sure the length guide is firmly touching the back edge of the stack 6 Latch the paper feeder assembly by pressing the green dot until the assembly clicks into place 7 Slide the tray back into the printer until the tray latches and press the Continue button to resume printing 8 Discard any pages sent to the sample tray or unused stac...

Page 18: ...ound on most papers If you suspect that the belt is glazed try cleaning it with film remover obtained from your service representative Caution Clean the feed belt only to correct misfeeds not as routine maintenance Because the belt is rubber frequent cleaning dries it out and makes it fail prematurely 1 Clear any misfeeds that have occurred but do not latch the paper feeder assembly If necessary u...

Page 19: ...feed belt in the same direction as the ribs on the belt Wiping from side to side might pull the belt off its track Allow a few seconds for the film remover to evaporate 3 Latch the paper feeder assembly by pressing down on the bright green dot Slide the paper tray completely back into the printer Operate the system as usual If you continue to experience misfeeds place a service call ...

Page 20: ...etimes jams as it leaves the feeder trays or moves through the paper path You must clear the paper jam before you can continue to print The two illustrations below show the areas along the paper path in which jams may occur Figure 2 1 Areas along the simplex paper path Figure 2 2 Areas along the duplex paper path ...

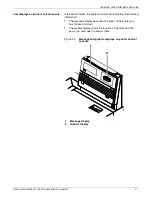
Page 21: ...the printer control console displays the following information The message display describes the areas of the printer you must check and clear The graphic display shows the location of the jams and the doors you must open to access them Figure 2 3 Message and graphic displays on printer control console 1 Message display 2 Graphic display 1 2 1 2 ...

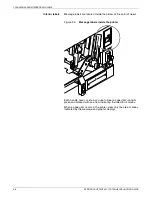
Page 22: ...inside the printer at the point of need Figure 2 4 Message labels inside the printer Each handle lever or knob you use to clear a paper jam is bright green and marked with an arrow indicating the direction it moves When a paper jam occurs in the printer clear only the area or areas indicated by the message and graphic displays ...

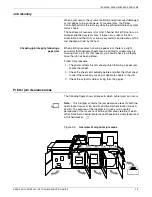
Page 23: ...g from a job For that reason you should check job integrity once the job has been printed Follow this procedure 1 The printer offsets the first sheet printed following a paper jam Locate that sheet 2 Check the sheets immediately before and after the offset sheet to see if there are any missing or duplicate sheets in the job 3 Check the output for data missing from the pages Printer jam clearance a...

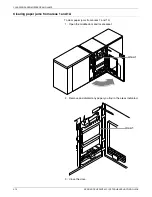
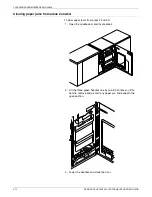
Page 24: ...PRINT 92C IPS TROUBLESHOOTING GUIDE Clearing paper jams from areas 1 and 1A To clear paper jams from areas 1 and 1A 1 Open the middle door and locate area 1 2 Remove and discard any paper you find in the areas indicated 3 Close the door Area 1 Area 1 ...

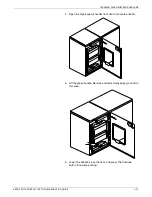
Page 25: ...S XEROX DOCUPRINT 92C IPS TROUBLESHOOTING GUIDE 2 11 4 Open the high capacity feeder front door and locate area 1A 5 Remove and discard any paper you find in the area 1A 6 Close the door and press Continue to resume printing Area 1A ...

Page 26: ...aring paper jams from areas 2 and 2A To clear paper jams from areas 2 and 2A 1 Open the middle door and locate area 2 2 Lift the three green handles one by one Each time you lift a handle remove and discard any paper you find beneath the open section 3 Lower the handles and close the door ...

Page 27: ...C IPS TROUBLESHOOTING GUIDE 2 13 4 Open the high capacity feeder front door and locate area 2A 5 Lift the green handle Remove and discard any paper you find in this area 6 Lower the handle close the door and press the Continue button to resume printing ...

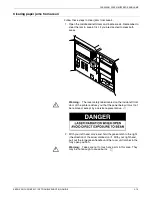
Page 28: ...le to the right in the direction of the arrow marked on it 3 Remove and discard any paper you find in this area 4 Release the handle close the door and press the Continue button to resume printing Note When paper jams occur in areas 3 through 5 three extra blank sheets are sent through the printer to ensure that the fuser is clean These sheets are sent to the top tray and should be discarded You a...

Page 29: ...h areas Warning The laser safety label located on the inside left front door of the printer advises you that the panel below it must not be removed except by a service representative 2 With your left hand move and hold the green latch to the right the direction of the arrow marked on it With your right hand pull out the large green handle until the fuser unit latches in the fully open position War...

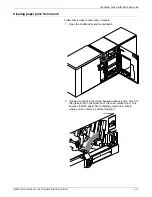
Page 30: ... They may be hot enough to cause burns Caution Do not use a sharp object to remove paper wrapped around the fuser rolls Attempting to do so could damage the roller and require its replacement 5 Return the small green handle to its original position 6 Push down on the green release latch and slide the fuser unit back into the printer until it latches into the closed position 7 Close the doors left ...

Page 31: ...5 Follow these steps to clear jams in area 5 1 Open the middle door and locate area 5 2 If paper is caught in the rollers between areas 4 and 5 first turn the green knob in the direction of the arrow marked on it This ensures that the paper has completely moved into area 5 where you can remove it without tearing it ...

Page 32: ... 92C IPS TROUBLESHOOTING GUIDE 3 Push and hold the green handle to the left in the direction of the arrow marked on it Remove and discard any paper you find there 4 Release the green handle 5 Close the door and press the Continue button to resume printing ...

Page 33: ...ea 2 Close the top cover 3 Open the top cover of the high capacity feeder Open the top cover of the stacker too if the printer control console message display indicates it needs to be opened 4 Remove and discard any sheets under the high capacity feeder cover If the printer control console message display also indicates a problem in the output module remove and discard those sheets as well 5 Close...

Page 34: ... path is used only during two sided duplex printing 1 Open the middle door and locate area 7 2 Pull the block shaped set separator toward you and hold it in that position 3 Remove and discard any paper in the duplex tray 4 Return the set separator to its upright position 5 Close the door and press the Continue button to resume printing ...

Page 35: ...8 Note If your printer has a stitcher stacker see the Correcting stacker problems chapter 1 Open the top cover of the output module as indicated on the graphic display of the printer control console 2 Remove and discard any paper you find in this area 3 Lower the lid and press the Continue button to resume printing ...

Page 36: ...ms chapter in this guide 1 Open the right door and locate the green handle on the upper right side of area 9 2 Pull the green handle down and to the left in the direction of the arrow marked on it to hold the assembly open while you remove and discard any paper you find in this area 3 Return the handle to its original position and close the door 4 Press the Continue button to resume printing ...

Page 37: ...cate the side cover of area B on the right 4 Push the cover to the right in the direction of the large green arrow at the front of the cover to open it 5 Remove only the set of pages leaving the stitcher stacker at the right and place it on the output in the stacker tray Do not remove any other pages from this area Note The pages were compiled by the stitcher stacker into a set stapled or not but ...

Page 38: ...he bypass transport by lifting upward on the recessed handle 3 Remove and discard any paper you now see in the bypass transport 4 Grasp the handle again and slide the top cover to the right This exposes the remainder of the bypass transport paper path 5 Remove and discard any paper you see 6 Push the cover back to the left and close it tightly The cover snaps shut 7 Press the Continue button on th...

Page 39: ... 1 Slide the weight right or left along its track under the scuffer arm If the paper is driven too far up the outside edge of the tray move the weight toward the machine If the paper is not driven far enough into the tray move the weight away from the machine Note For lightweight paper move the weight toward the machine for heavyweight paper move the weight away from the machine Figure 2 6 Adjusti...

Page 40: ...CLEARING PAPER MISFEEDS AND JAMS 2 26 XEROX DOCUPRINT 92C IPS TROUBLESHOOTING GUIDE ...
Page 41: ...the paper size is correct press the Continue button to resume printing The number displayed in the Wire Percentage indicator of the printer console begins to flash and the message STITCHER LOW ON WIRE appears when you start a new print job Stitching wire has decreased to the percentage that was preset by the service representative If you have completed Advanced Customer Training ACT follow the rec...

Page 42: ...CORRECTING STACKER PROBLEMS 3 2 XEROX DOCUPRINT 92C IPS TROUBLESHOOTING GUIDE ...
Page 43: ...s displayed Output is stopped See message at the System Display There is an uncleared output fault Follow the instructions in the output message and press the Continue button Printer main window does not respond lockout Someone accessed the System Meter Readings display from the System Options menu while the printer cable was disconnected Call for service Tell the representative if the printer cab...

Page 44: ...rays 1 Click OK on the message window to close it 2 Wait until the printer control console displays READY TO PRINT 3 Click Quit on the Input Configuration window The IPS main window should appear 4 If the Input Configuration window does not close check the printer trays against the displayed configuration for a possible mismatch 5 If there is a feeder tray mismatch either change the input configur...

Page 45: ...nment cancel the FSS Functional Subsystem which automatically drains the printer 3 Reboot the Printer Controller using the following procedure a Move the pointer to the background on the IPS screen ensuring that it is not on any window or icon b Hold down the right mouse button to display the workspace pull down menu c Select Restart A confirmation prompt window appears d Select Restart again from...

Page 46: ...SYSTEM UNRESPONSIVE 4 4 XEROX DOCUPRINT 92C IPS TROUBLESHOOTING GUIDE ...
Page 47: ...4 2 15 2 16 area 5 2 17 2 18 area 7 2 20 area 8 2 21 area 9 2 22 areas 1 and 1A 2 10 2 11 areas 2 and 2A 2 12 2 13 areas 6 and 6A 2 19 stacker tray paper jams 2 25 stitcher stacker tray paper jams areas A and B 2 23 Continue button no response 4 1 D danger labels iii documentation other ix E error condition restarting printer 4 3 F feed belt cleaning 2 4 2 5 feeder trays clearing faults 2 2 2 3 G ...

Page 48: ...procedures feed belt cleaning 2 4 2 5 paper trays clearing misfeeds 2 2 2 3 printers restarting 4 3 publications related ix R Ready To Open indicator 2 2 remote service 1 2 S safety hotline iv laser iii precautions iv standards iii scuffer arms adjusting 2 25 service call required information 1 1 Sixth Sense Technology 1 2 disabling a modem 1 3 enabling a modem 1 3 remote service 1 2 stacker tray ...

Page 49: ...7A CGM 2 12 IPS LPS Graphics DPC0098A CGM 2 13 IPS LPS Graphics DPC0099A CGM 2 13 IPS LPS Graphics DPC0100A EPS 2 14 IPS LPS Graphics DPC0086A CGM 2 14 IPS LPS Graphics DPC0101A CGM 2 15 IPS LPS Graphics DPC0010A CGM 2 15 IPS LPS Graphics DPC0103A CGM 2 16 IPS LPS Graphics DPC0104B cgm 2 16 IPS LPS Graphics DPC0105A CGM 2 17 IPS LPS Graphics DPC0106A CGM 2 17 IPS LPS Graphics DPC0107A CGM 2 18 IPS...

Reviews: