background image

DocuColor 240/250 

DocuColor 240/250 Training and Information Guide 

115 

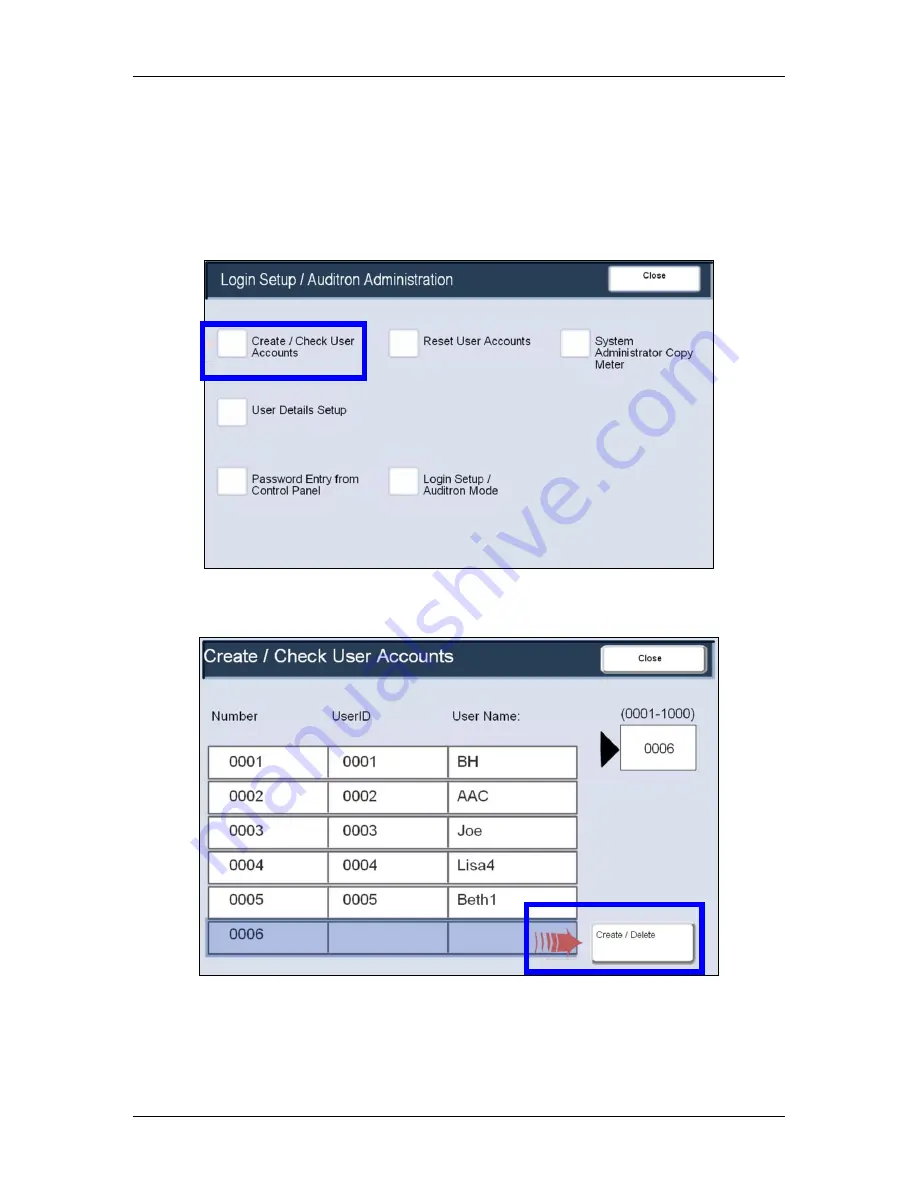
Create Accounts 

Setting up user accounts involves creating a user account, user numeric 
passwords, and limits. You must login using the Log In/Out button.  On the 
System Settings screen, select  Login Setup/Auditron Administration

To create an account, select Create/Check User Account


Select the Number for which you want to register a user, and select 
Create/Delete.  The Number is a user control number. 


Summary of Contents for DocuColor 240

Page 1: ...DocuColor 240 250 Training and Information Guide...

Page 2: ...it 10 Auxiliary Interface Device 10 Consumables 10 Drum Cartridges 10 Toner Cartridges 10 Fuser 10 Charge Corotron 10 Control Panel 10 Power On 11 Power Off 11 Power Save Modes 11 Low Power Mode 11 Sl...

Page 3: ...m Paper Tray 1 21 First Print Out Time 21 Warm up Time 22 Document Handler 22 Capacity 22 Document sizes 22 Paper Weights 22 Mixed Sizes 22 Size Sensing 22 Paper Supply 22 Trays 1 and 2 22 Bypass Tray...

Page 4: ...Handler 42 Loading Mixed Size Originals 42 Using the Document Glass 43 Scanning Bound Originals 44 2 Sided Copying 46 Reduction Enlargement 48 Image Quality 50 Original Type 50 Lighten Darken 51 Image...

Page 5: ...sher with Booklet Maker 95 Paper and Media 97 Trays 1 and 2 97 Trays 3 and 4 98 Tray 5 Bypass Tray 99 Tray 6 High Capacity Feeder 100 Stock Types 101 Colored Paper Non tearing Papers 101 Pre printed L...

Page 6: ...2 Faults 133 Consumables 134 Using Color 135 Output Color 135 Color Shift 137 Color Balance 138 Color Sharpness Saturation 139 Maintenance 140 Locating the Serial Number 140 Billing Meters 141 Orderin...

Page 7: ...2 Transfer Module Paper Jams 172 Document Feeder Paper Jams 173 Output Tray Paper Jams 173 Bottom Right Cover Paper Jams 174 Paper Tray Paper Jams 174 Finisher Area 1 Paper Jams 175 Finisher Area 2 Pa...

Page 8: ...er the Document Handler and is used for scanning and copying documents Documents should be placed face down on the glass and aligned with the tip of the registration arrow in the top left corner The d...

Page 9: ...for offset and or stapled output and can hold up to 1500 sheets Both trays can be used for hole punched output optional Professional Finisher with Booklet Maker This output device provides a wide ran...

Page 10: ...er cartridges will provide approximately 15 000 prints at 6 area coverage Supplied with the toner cartridge is the waste toner container Fuser The fuser will provide approximately 100 000 prints or co...

Page 11: ...Power Save option is selected the machine will immediately enter low power mode If there are any jobs in the queue a second pop up screen is displayed NOTE To re activate the machine when in this mode...

Page 12: ...ax or print job arrives in the print queue The machine responds within one second and all the features are available within 30 seconds from Low Power Mode or 120 seconds from Power Save Mode NOTE The...

Page 13: ...can features whose settings have changed from the defaults Log In Out provides password protected access to the System Administration menu used to adjust the defaults of the machine Clear All if press...

Page 14: ...tes Certain functions of the machine e g copying will be available before other functions e g printing Press the power switch to turn your machine off The machine will begin a controlled power down se...

Page 15: ...2 are fully adjustable trays and can hold a variety of paper sizes Trays 3 and 4 are high capacity feeders holding 8 5 x 11 or A4 paper sizes only When a paper tray is opened your machine assumes that...

Page 16: ...of the document glass Lower the document handler 2 Press the Copy button Pressing the Clear All AC button once will cancel any previous screen programming selections Press the Copy button and select...

Page 17: ...tions provided in your optional Network Controller Documentation 7 Access your job Access the electronic version of the document at your workstation The electronic file is accessed from the file desti...

Page 18: ...Set Date and Time Set the date format either M D Y or D M Y or Y M D and enter the correct date Set the correct time using either the 12 or 24 hour clock The current date and time are displayed on con...

Page 19: ...ray The user interface on the control panel notifies you when consumables need ordering and replacing Easy to follow instructions graphics and safety procedures are also provided on the user interface...

Page 20: ...p and maintenance is simple and easy with industry standard connections Easy management of queues such as print and scan jobs Easy to replace consumables Variety of offset outputs to help users find t...

Page 21: ...itional Finishing options are available Machine Space Requirements Width 73 inches Depth 67 inches Height 53 inches Additional Space Requirements are needed for additional finishers Machine Weight Wit...

Page 22: ...lb bond 110lb index Paper Sizes 8 5 x5 5 LEF to 11 x17 SEF Auto Size Sensing 5 5 x8 5 SEF B5 SEF A4 SEF A4 LEF 8 5 x11 SEF 8 5 x11 LEF 8 5 x13 SEF 8 5 x14 SEF B4 SEF A3 SEF 11 x17 SEF 7 25 x10 5 LEF 8...

Page 23: ...Labels 2 Coated 1 Coated 2 Custom Optional High Capacity Feeder Capacity 2000 sheets of 20lb bond Paper Sizes A4 LEF 8 5 x 11 LEF 7 25 x 10 5 LEF Paper Weights 17lb bond 110lb index Media Type Bond Pu...

Page 24: ...0lb index Stapling 50 sheets of 24lb bond Staples 5000 per cartridge Hole Punch 2 4 hole or 2 3 hole punch option Booklet Making Bi folded booklets 5 sheets maximum or Saddle stitched and Center folde...

Page 25: ...cal dealer for more information Warnings Follow all warnings and instructions marked on or supplied with the product This WARNING Mark alerts users to areas of the product where there is the possibili...

Page 26: ...onditions occur switch off the power to the machine immediately and disconnect the power cord from the electrical outlet Call an authorized local service representative to correct the problem The equi...

Page 27: ...authorized local dealer or unless a procedure is specifically described in the user documentation Cleaning your Product Before cleaning this product unplug the product from the electrical outlet Alway...

Page 28: ...nce to radio communications Operation of this equipment in a residential area is likely to cause harmful interference in which case the user will be required to correct the interferences at their own...

Page 29: ...ocument on which there is a cancelled revenue stamp this may be done provided the reproduction of the document is performed for lawful purposes Postage Stamps canceled or uncanceled For philatelic pur...

Page 30: ...r certain circumstances Penalties of fine or imprisonment may be imposed on those guilty of making such reproductions 1 Current bank notes or current paper money 2 Obligations or securities of a gover...

Page 31: ...label on the machine indicates compliance with CDRH regulations and must be attached to laser products marketed in the United States This product does not emit hazardous laser radiation CAUTION Use of...

Page 32: ...forms to all applicable Environmental Choice EcoLogo requirements for minimized impact to the environment As a participant in the Environmental Choice program Xerox Corporation has determined that thi...

Page 33: ...er 1 2 3 with page 1 face up on top 4 Slide the document guide against the edges of the documents Touch the Network Scanning button on the touch screen You may need to touch the All Services button on...

Page 34: ...are unsure ask your System Administrator 2 Select the Properties button to open the printer properties dialogue box NOTE The printer properties dialogue window will vary according to the driver you a...

Page 35: ...n allows you to select the paper type Heavyweight Transparency Tabs Hole Punched etc from a list of available paper types If enabled by your System Administrator the Paper Type screen may also allow y...

Page 36: ...per Tray settings screen may be displayed on the touch screen Alternatively you can change the Paper Size and Paper Type by touching the All Services button on the control panel then selecting Setup M...

Page 37: ...edges of the stack Whenever media is loaded into the bypass tray the machine may ask if you have changed the size or the type of media The Paper Type screen allows you to select the paper type Heavyw...

Page 38: ...the Paper Size and Paper Type by touching the All Services button on the control panel then selecting Setup Menu and Paper Tray Attributes on the touch screen The Paper Type screen allows you to sele...

Page 39: ...uColor 240 250 DocuColor 240 250 Training and Information Guide 39 How to Perform Maintenance Instructions for performing maintenance procedures are available in the Maintenance section of this docume...

Page 40: ...he document face down align with the top of the registration arrow near the upper left hand corner of the document glass Lower the document handler 2 Press the Copy button Press the Copy button and se...

Page 41: ...d Information Guide 41 6 Identify your job in the Queue Press the Job Status button on the control panel to display the print queue Your job will be displayed in the queue If there are no jobs in the...

Page 42: ...ected paper or 2 Select a specific Reduce Enlarge ratio and Auto Paper Supply The machine will select the same size of paper When you press the START button the document will be scanned once only and...

Page 43: ...on The machine can detect the size of the document if it is a standard size If the document is not a standard size the machine will not know what size it is This does not matter if you select a specif...

Page 44: ...und originals To access these options select the Scan Options tab and then the Book Copying button The Book Copying screen allows you to copy the left page then right the right page then left or the t...

Page 45: ...nd original The 2 Sided Book Copy options are similar to the Book Copying options Right page Left page Both pages Once you select a 2 Sided Book Copying option other than Off you can access the Start...

Page 46: ...ne provides options to make one or two sided copies from one or two sided originals using either the Document Handler or the document glass The two sided option enables you to select your output in bo...

Page 47: ...on if your originals are printed on one side and you want single sided copies Use the 1 2 option if your originals are printed on one side and you want two sided copies Use the 2 2 option if you want...

Page 48: ...ts while a custom setting enables you to select the ratio that suits your requirements The most common selections are displayed in the Reduce Enlarge area on the Basic Copying tab The 100 selection pr...

Page 49: ...ller but the proportions remain the same Selecting the Copy All button causes the document to be copied at a slightly reduced size to prevent image loss at the edge of the original The Variable featur...

Page 50: ...to sets the output color of the Basic Copying tab according to the document type preset in the System Administration mode Text and Photo is for use if your original is from a magazine or other source...

Page 51: ...u to lighten or darken the image on your copy Press the left arrow button to darken the copy for example from light originals such as pencil images Press the right arrow button to lighten the copy for...

Page 52: ...uto Exposure Lighten Darken Contrast Sharpness Color Saturation Color Shift and Color Balance levels to return to their default settings The Lively setting raises the color saturation to produce fresh...

Page 53: ...t has too much or too little contrast on the image The Contrast feature is accessed by selecting the Lighten Darken Contrast button on the Image Quality tab The Contrast options are highlighted below...

Page 54: ...feature is accessed from the Image Quality tab The Auto Exposure screen is shown below Selecting the On button will cause the background of documents such as newspapers and colored paper documents to...

Page 55: ...loss Level The Gloss Level feature is accessed from the Image Quality tab Selecting the Normal button enables the default settings for output quality Selecting the Enhanced button will add a glossy to...

Page 56: ...on button on the Output Format tab You can choose left top or right binding options and you can specify no covers blank covers or printed covers for your booklet When you have made your selection you...

Page 57: ...to use for the main body of the copies The Covers feature is not available if the Auto paper supply option is selected Then load the cover stock into another paper tray As a rule load your cover stock...

Page 58: ...on one page based on the paper supply selected Multiple up is not available if the Auto paper supply option is selected The Multiple up options are accessed from the button on the Output Format tab Th...

Page 59: ...rency When you select the Blank Separators option your transparencies will be delivered to the output destination with a blank sheet of paper separating each transparency The Blank Separators and Dist...

Page 60: ...so that they can be pasted together You can access the Poster button on the Output Format tab The Poster screen is shown below The Output Size button allows you to choose from a list of preset output...

Page 61: ...rovides you with the following two output options Auto Repeat When you select Auto Repeat the machine automatically sets the number of images per page according to the document size and paper size and...

Page 62: ...tion option allows you to add stamp date and page number information to your copied output You can access the Annotation feature by selecting the Output Format tab and the Annotation button The Annota...

Page 63: ...ide 63 The Stamp Screen You can select one of eight existing stamped messages to be printed on the first page or all pages of your copied sets You can also change the position and appearance of the st...

Page 64: ...make copies with a Date printed on the first page of the copied set or you can choose to have the date printed on all of the pages in the copied set The printed date is the date that the copies are ma...

Page 65: ...Screen You can add an independent Page Number to one or many copied pages You can also change the position style and appearance of the page number using the Position Style and Size buttons After maki...

Page 66: ...feature can be used to help track confidential documents For example you can use sequential numbering to associate distribution copies with specific recipients You can access the Watermark feature by...

Page 67: ...be printed on the second set and so on You can select one of three existing text messages to be printed on one page or many pages You can choose from the following text messages Copy Prohibited Copy D...

Page 68: ...onto the tabbed stock or you can choose to copy only the edge of the original document onto the tabbed stock The Tab Margin Shift screen shown above allows you to access two image shifting options Th...

Page 69: ...uto button automatically determines whether the copies should be output face up or face down Selecting the Face Up button causes all output to be delivered face up with the first page on top of the ou...

Page 70: ...ding options for your copied output The None button disables all folding options The Bi fold button allows you to fold your copies in half The Print Inside button folds the output so the image is prin...

Page 71: ...on To begin programming your job select the Save button Program the job requirements for the first segment of the job Load only the first segment into the document handler or place the segment on the...

Page 72: ...et on and press the Save button Load the documents in the document handler and program the job requirements Enter the quantity required and press the Start button One copy set of the job the sample se...

Page 73: ...one time You can select the Large Volume Document button on the Job Assembly tab If you select the Off button the Last Original option will be highlighted on the copy screen when scanning is in proce...

Page 74: ...original document from your copied output You can access the Delete Outside Delete Inside feature from the Job Assembly tab The Delete Outside Delete Inside screen is shown below Use the Area Settings...

Page 75: ...ch of the areas you want to use as targets for deletion To define an area enter the two coordinates x y within a range of 0 0 17 0 inches measuring from the top right corner of the document You can na...

Page 76: ...ound originals To access these options select the Scan Options tab and then the Book Copying button The Book Copying screen allows you to copy the left page then right the right page then left or the...

Page 77: ...as the bound original The 2 Sided Book Copy options are similar to the Book Copying options Right page Left page Both pages Once you select a 2 Sided Book Copying option other than Off you can access...

Page 78: ...cument if you want to use the Auto features To input the size of the document select the Scan Options tab and the Original Size button The Original Size screen is shown below On this screen you can ei...

Page 79: ...hed on by selecting the Scan Options tab touching the Mixed Size Originals button then touching the On button The Mixed Size Originals screen is shown below The machine will detect the size of the doc...

Page 80: ...ges of the output image This amount can be preset by the System Administrator Edge Erase This option allows you to specify the amount to be erased from the top bottom edges left right edges and the ce...

Page 81: ...paper To work effectively the original should be smaller than the selected output stock or the image should be reduced Image Shift Variable Shift allows you to independently set the shift for each si...

Page 82: ...ns tab The Image Rotation screen is shown below Off This option causes copies to be made as they are loaded even if they are oriented differently from the paper in the selected paper tray Always On Th...

Page 83: ...ror of the original This feature can be used when you want to change the apparent direction of an image or where the original is inked on the reverse of the paper e g engineering drawings The Negative...

Page 84: ...cessed on the Scan Options tab The Original Orientation screen shown below displays both of the options available on this machine Select the Head to Top option when the top edge of your document is cl...

Page 85: ...ne provides options to make one or two sided copies from one or two sided originals using either the Document Handler or the document glass The two sided option enables you to select your output in bo...

Page 86: ...on if your originals are printed on one side and you want single sided copies Use the 1 2 option if your originals are printed on one side and you want two sided copies Use the 2 2 option if you want...

Page 87: ...or your scan job from the template list Contact your system administrator if none of the templates have been setup 4 If you need to change the scan settings follow the instructions provided in your op...

Page 88: ...transparencies with dividers ready for a presentation and many more features that will take the strain out of printing You access the printer from your PC application in the normal way through a print...

Page 89: ...ion However the print files are large and take longer to process PostScript drivers also provide font substitution options Once you have decided upon the most appropriate print driver install it on yo...

Page 90: ...e displayed 2 Select the Xerox DocuColor 240 250 print driver from the Printer Name drop down menu If you do not know which one to choose ask your System Administrator It may have been renamed 3 Click...

Page 91: ...mple Catch Tray Your copies will be delivered to the Simple Catch Tray face down collated or uncollated If COLLATED is selected your output will be stacked in the output tray in sets 123 123 123 If UN...

Page 92: ...g Catch Tray face down collated or uncollated Each set or stack will be offset from the previous set or stack to enable you to separate them more easily If COLLATED is selected your output will be sta...

Page 93: ...punched output optional The machine can finish your copies with one or two staples Up to 50 sheets of paper from 8 x 10 to 11 x 17 paper can be stapled in a set although if covers inserts or heavier...

Page 94: ...machine will vary depending on your specific machine configuration Touching the Auto button automatically selects collated or uncollated according to other settings For example collated will be autom...

Page 95: ...or hole punched output optional The Bottom Finisher Tray is used for receiving saddle stapled booklets The machine can finish your copies with one or two staples Up to 50 sheets of paper from 8 x 10 t...

Page 96: ...machine will vary depending on your specific machine configuration Touching the Auto button automatically selects collated or uncollated according to other settings For example collated will be autom...

Page 97: ...es in the range 5 5 x8 5 to 11 x17 These trays cannot be used for envelopes or tabbed stock Stock can be loaded either long or short edge feed portrait or landscape Load pre formatted paper letterhead...

Page 98: ...u when the trays are empty open or if the stock supply is low The trays are pulled out for operator loading Opening a tray automatically lowers an elevator in the base of the tray Load pre formatted p...

Page 99: ...all types of stock in a range of sizes between 4 0 x6 0 and 13 x19 and has a capacity of approximately 100 sheets of 20lb paper or a maximum stack height of 0 4 The Bypass Tray detects the position of...

Page 100: ...aded into the High Capacity Feeder a pop up window may appear asking you to change or confirm the type and size of the stock The tray may not be ready for use until you change or confirm the size and...

Page 101: ...equently Pre printed Letterhead Pre printed paper such as letterheads and forms should be loaded in Tray 1 Tray 2 and the High Capacity Feeder trays face down with the top to the front of the machine...

Page 102: ...Load transparencies on top of a small stack of same size paper If a coating of fuser oil remains on the transparency after printing remove it with a lint free cloth If a jam occurs while a transparen...

Page 103: ...Color 240 250 Training and Information Guide 103 Envelopes Envelopes can only be loaded into the Bypass Tray Place the envelopes into the Bypass tray face up The flaps should ALWAYS be closed and on t...

Page 104: ...moisture Store on a flat surface to prevent the paper stock from folding or curling Stack reams of paper carefully on top of one another to avoid crushing the edges Do not stack more than five reams o...

Page 105: ...of the document and any directly selected magnification ratios The Paper Supply screen shows all the trays and the confirmed size and type of stock loaded in each tray A user can select which tray to...

Page 106: ...Settings button 3 Access the System Administration menu Touch System Settings System Settings Common Settings Touch the Paper Tray Settings button then touch the Paper Tray Attributes button Select th...

Page 107: ...05 176gsm Heavyweight 1A 105 128gsm Heavyweight 1B 129 176gsm Heavyweight 1 S1 special 1 can be set by a Xerox Service Representative Heavyweight 1 S2 special 2 can be set by a Xerox Service Represent...

Page 108: ...80gsm Plain B 81 104gsm Plain C lightweight coated Plain S1 special 1 can be set by a Xerox Service Representative Plain S2 special 2 can be set by a Xerox Service Representative Recycled A 64 104gsm...

Page 109: ...Xerox Service Representative Plain S2 special 2 can be set by a Xerox Service Representative Recycled A 64 104gsm Recycled B 81 104gsm Custom 5 64 105gsm Plain A 64 80gsm Plain B 81 104gsm Plain C li...

Page 110: ...Settings button For this section we will highlight the steps required to change the Paper Tray Settings by using the Setup Menu option on the All Services screen 1 Select the Setup Menu button 2 Sele...

Page 111: ...ole punched paper in the Bypass Tray face up with the holes on the leading edge right Be sure to select Hole Punched as the paper type on the touch screen Tabbed Stock Load tabbed stock only into the...

Page 112: ...count Check the number of copies made per user account Print account information Reset account meters To setup Auditron you must create user accounts Users will then be required to enter the password...

Page 113: ...nctions You can create up to 1000 accounts All user accounts must have the following defined Password Account Name Color Access Account Limit Once accounts are defined and created enable the desired a...

Page 114: ...can create up to 1000 accounts The following information is contained within each account Password Set any password between 4 12 digits long Account Name Set any account name up to 31 characters long...

Page 115: ...ser account user numeric passwords and limits You must login using the Log In Out button On the System Settings screen select Login Setup Auditron Administration To create an account select Create Che...

Page 116: ...ngly recommended for security You can set the password to from 4 to 12 digits You can set restrictions on the use of output color and limits on the number of pages for copying scanning and printing To...

Page 117: ...is to be deleted or reset and select Create Delete The Create Delete screen is displayed as shown below When Reset User Account is selected account data and the settings of registered account data are...

Page 118: ...d to start using the machine After logging in and selecting the System Settings screen select Login Setup Auditron Mode The following options can be selected Off To operate the machine requires no use...

Page 119: ...f asterisks Account ID Characters If required you can change the indication that appears as AccountID on the System Administrator Login screen when the Log In Out button on the control panel is presse...

Page 120: ...is data Display Account Data When the Login Setup Auditron Administration feature is enabled each user of the machine must enter a UserID and password thus providing administrative control and account...

Page 121: ...mation Guide 121 Delete and Reset Account Data You can delete all registered information for all registered users in a single operation or reset the auditron You can access the Reset User Accounts but...

Page 122: ...deletes all data including the maximum number of pages cumulative number of pages output color restrictions or printer auditron All Color Access Settings Resets the Color Access settings for all users...

Page 123: ...structure is shown below System Settings System Settings Setup Menu System Administrator Settings Login Setup Auditron Administrations The following paragraphs will address the four submenus listed a...

Page 124: ...e System Administration Login window is shown here Use the keypad to enter a 5 digit System Administrator Login ID and then press the Confirm button The factory preset password is 11111 It is strongly...

Page 125: ...mark Other Settings Copy Mode Settings Preset Buttons Copy Defaults Copy Control Original Size Defaults Reduce Enlarge Presets Custom Colors Scan Mode Settings Scan Defaults Scan Size Defaults Output...

Page 126: ...e waiting to be processed Each job is identified with the following information Document Number Job Type Status Remote Terminal Contents The most recently submitted job is displayed at the bottom of t...

Page 127: ...ting the Job Status button the Current and Pending Jobs list is automatically displayed To view the Completed jobs on the machine select the Completed Jobs tab The completed jobs are shown on the scre...

Page 128: ...th the telephone number used to contact your local Xerox representative You can also view the Machine Serial Number on this screen The Machine Configuration screen allows you to check the status and a...

Page 129: ...t when loading the trays The Status column relates to the current status of the paper tray The different paper tray status are In Use Stock for the current job is being fed from the tray Ready The tra...

Page 130: ...Meters feature provides access to machine usage and billing information The meters vary depending on your machine configuration and setup To access the Billing Meters 1 Select the Machine Status butto...

Page 131: ...he Machine Status button on the Control Panel 2 Touch the Billing Meter Print Report tab on the touch screen 3 Touch the Print Report List button An example of a typical Print Report List screen is sh...

Page 132: ...rd disk from being illegally retrieved The number of overwrites is set by the System Administrator Access to this feature is via the Machine Status button on the control panel Overwriting is performed...

Page 133: ...Error History Report which displays a list of errors that have or are currently occurring on your machine Access to the Faults tab is via the Machine Status button on the control panel To print the r...

Page 134: ...ine consumables to gain an indication of when the customer replaceable units need to be replaced Access to Consumable information is via the Machine Status button on the control panel The consumables...

Page 135: ...uide 135 Using Color The following sections describe the color features available on the DocuColor 240 250 Output Color You can select one of several Output Color options from the Basic Copying tab or...

Page 136: ...Full Color option When using Auto some very dark colors may be sensed as black In these cases you should select the Full Color option NOTE With Auto selected the machine runs at the speed for color co...

Page 137: ...rd the yellow hue the green colors shift toward the cyan hue and the blue colors shift toward the magenta hue All colors between these original colors also shift in the same direction If you select on...

Page 138: ...e Color Balance button on the Image Quality tab The Color Balance feature allows you to adjust the balance between colors and the overall amount of color on the output copies You can adjust the levels...

Page 139: ...n access the Sharpness Color Saturation button on the Image Quality tab The Sharpness feature allows you to adjust the amount of edge definition on the copies The Color Saturation feature allows you t...

Page 140: ...upplies or contacting Xerox for assistance you will be asked to supply your machine serial number The serial number can be located from the touch screen as follows 1 Select the Machine Status button o...

Page 141: ...nd billing information The meters vary depending on your machine configuration and setup To access the Billing Meters 4 Select the Machine Status button on the Control Panel 5 Touch the Billing Meter...

Page 142: ...4 Waste Toner Container and the Fuser Customers who purchase supplies and have a Xerox Maintenance Agreement NOT Cost Per Copy US Customers should call the Xerox Supplies Teleweb Center at 1 800 822 2...

Page 143: ...explosion and fire CAUTION DO NOT remove the covers or guards that are fastened with screws You cannot maintain or service any of the parts that are behind these covers and guards DO NOT attempt any...

Page 144: ...mixtures and are not suitable for use in electrical applications Use of such cleaners can result in a risk of explosion and fire CAUTION DO NOT remove the covers or guards that are fastened with screw...

Page 145: ...d move the guides to just touch the edges of the paper stack 2 Having adjusted the paper tray you need to change the paper tray setting 3 To adjust the paper tray settings touch the All Services butto...

Page 146: ...Color 240 250 DocuColor 240 250 Training and Information Guide 146 Loading Paper and Media Instructions for loading paper and media can be found in the How To Load Paper and Media section of this docu...

Page 147: ...replace the staple cartridge with a new one 1 To gain access to the staple cartridge make sure the machine has stopped and open the Finisher Front Door 2 Hold the R1 lever of the staple cartridge Hol...

Page 148: ...aker and replace it with a new staple cartridge 1 To gain access to the staple cartridge make sure the machine has stopped and open the Finisher Front Door 2 Press the levers R2 and R3 to the right an...

Page 149: ...button 5 Touch the Target button to set an area for applying the gradation adjustment then select the Close button 6 Press the Start button The Gradation Adjustment Chart will be printed 7 Align the m...

Page 150: ...he machine has stopped and open the Front door 3 Pull down the R1 R4 handle 4 Raise the Release Handle 5 Open a bag including a new drum cartridge Place the new drum cartridge near the machine CAUTION...

Page 151: ...unlight or strong light from indoor fluorescent lighting Do not touch or scratch the surface of the drum Doing so may result in unsatisfactory printing 12 Return the Release Handle to its original pos...

Page 152: ...will allow any excess toner to fall on the paper Hold the handle of the color indicated in the message and gently pull it out 3 Remove the toner cartridge by holding the handle on the top of the cartr...

Page 153: ...ndle 2 and turn it to the unlocked position Warning To avoid burns wait at least 5 10 minutes after powering off the printer to allow the fuser to cool down and observe warning labels inside 3 Careful...

Page 154: ...in light shock to the drums 7 Grasp both of the Amber Gold colored casings on the old Charge Corotron and push towards the back of the machine You will hear a clicking noise indicating that it is bein...

Page 155: ...toner container cover located to the right of the Area 2 lever 3 Grip the handle of the waste toner container and pull out about half of it 4 Hold the center part on the top of the container and then...

Page 156: ...ur Customer Web Site at www xerox com or contact the Xerox Welcome and Support Center quoting the machine serial number The customer support number and machine serial number can be viewed by 1 Touchin...

Page 157: ...machine Power the machine OFF and ON using the ON OFF switch at the front of your machine CAUTION Wait approximately 20 seconds before turning the machine back ON Be aware that any incomplete jobs in...

Page 158: ...0 Cause Unable to store any documents with 2 Sided Book Copy feature Remedy Check the 2 Sided Book Copy settings 003 751 Cause The machine is unable to process size because the specified document area...

Page 159: ...rly on the document glass 003 795 Cause When enlarging reducing a scanned document to the specified paper size the reduction enlargement ratio value exceeds the allowed range Remedy Take one of the fo...

Page 160: ...Contact your Xerox Customer Support Center 016 454 Cause Unable to retrieve IP address from DNS Remedy Check the DNS configurations and IP address retrieve method 016 704 Cause Documents stored in th...

Page 161: ...ob template Remedy Retry printing after waiting for a period 016 748 Cause Printing is not possible due to insufficient hard disk space Remedy Reduce the number of pages of print data for example by d...

Page 162: ...016 769 Cause The SMTP server does not support confirmation of mail distribution DSN Remedy Send mail without setting confirmation of mail distribution DSN 016 773 Cause The IP address for the machine...

Page 163: ...t for writing to a file Remedy Either remove unnecessary data from the hard disk to increase free disk space or initialize the hard disk 016 788 Cause Failed to load a file from the Web browser Remedy...

Page 164: ...tacted Remedy Check that the phone lines are connected and try sending an inspection or maintenance request again after a short time If the error persists contact your Xerox Customer Support Center 02...

Page 165: ...ace destination CentreWare Flow Service fails Remedy Check a user name and password that is used when creating a job flow 027 725 Cause A job operation failed using an application interface Remedy Che...

Page 166: ...il body or header information as well change settings in the Properties screen of CentreWare Internet Services 027 797 Cause Invalid received mail output destination Remedy Specify a correct output de...

Page 167: ...r Support Center 065 215 Cause An error occurred in the document feeder Remedy Power cycle the machine If the machine is not improved by performing the relevant remedy contact your Xerox Customer Supp...

Page 168: ...wer cycle the machine If the machine is not improved by performing the relevant remedy contact your Xerox Customer Support Center 078 250 Cause The high capacity tray the Tray 6 malfunctioned Remedy P...

Page 169: ...y to print again 123 400 Cause A malfunction occurred in the machine Remedy Power cycle the machine If the machine is not improved by performing the relevant remedy contact your Xerox Customer Support...

Page 170: ...y wait for the touch screen to go dark and contact your Xerox Customer Support Center switch02 Completed with an error Cause An error occurred Remedy Retry the same procedure after waiting for a perio...

Page 171: ...eces of paper inside the machine 4 Gently close the Bottom Left Cover 5 If Tray 6 is installed gently move Tray 6 back into position Tray 6 Paper Jams This section describes how to clear paper jams th...

Page 172: ...ntil its lead edge lightly touches the paper feed entrance Transfer Module Paper Jams This section describes how to clear paper jams that occur in the Transfer Module area 1 Make sure that the machine...

Page 173: ...until it clicks into place 8 If the document cannot be found raise the Document Feeder slowly 9 Pull the handle and remove the document The return the handle to its original position and close the Do...

Page 174: ...ine 5 Check whether paper is jammed at the lower part of the machine If there is jammed paper remove it NOTE If paper is torn check for any torn pieces of paper inside the machine 6 Close the Bottom R...

Page 175: ...ndle 1B and Handle 1A to their original positions 9 Close the Finisher Front Door Finisher Area 2 Paper Jams This section describes how to clear paper jams that occur in Area 2 of the Finisher 1 Open...

Page 176: ...se the Area 4 Module 6 Close Area 4b 7 Close the Finisher Front Door Finisher Area 5 Paper Jams This section describes how to clear paper jams that occur in Area 5 of the Finisher 1 Lift the Area 5 Co...

Page 177: ...ange lever until you hear it click into place Hole Punch Jams If the Hole Punch feature jams remove and empty the Waste Hole Punch Tray as well as removing the paper jam Document Feeder Jams If a Docu...

Page 178: ...Ensure that the Bypass Tray guides are against the edges of the loaded paper Check that the Bypass Tray paper attributes are set correctly Check that the paper is within specification 8 5 x11 to 12 x...

Page 179: ...jams again follow the steps below 1 Check that the attributes of the paper tray are set correctly Envelopes can only be fed from the Bypass Tray 2 Ensure that the guides are against the edges of the...

Page 180: ...paper can tolerate more heat than transparencies Inserts have images printed on them Insert blank sheets of paper with the documents to mark each location for an insert Output does not reflect the se...

Page 181: ...ving voltage Connect another appliance to the outlet to verify voltage A print document will not print Check the required resource is available You might need to ask the key operator to change the set...

Page 182: ...of copyrighted material and information now allowed by statutory or judicial law or hereinafter granted including without limitations material generated from the software programs which are displayed...

Page 183: ...anted background variations resulting from originals that have either a colored background or that are printed on very thin stock on which the images on the second side tend to bleed through Book Form...

Page 184: ...ween the gray tones on a document page Copy Activity Report if enabled a report that contains information about each copy job Copy Sets groups of copies of a multi page set of documents If you have a...

Page 185: ...ed features e g stapling special paper fonts Ethernet a network transport technology commonly used to send data from one node to another External Accounting Server EAS a network server used to access...

Page 186: ...e Punch Waste Container tray within the finisher that collects the hole punch waste paper HVPS High Voltage Power Supply Image Rotation this feature enables completion of a job regardless of the orien...

Page 187: ...image on the long edge of a sheet of paper LDAP an acronym for Lightweight Directory Access Protocol A protocol that allows sharing of corporate phone book information Long Edge Feed LEF the long edge...

Page 188: ...n used to enhance copies of photographs See Continuous Tone Platen this is also known as the Document Glass Portrait an image orientation which has the top of the image on the short edge of a sheet of...

Page 189: ...n an original and creating an electronic image of the document Scan Once Print Many the single scanning of a document regardless of the number of copies requested After the document is scanned once it...

Page 190: ...ignated user who sets and maintains the network settings on the machine TCP IP Transmission Control Protocol Internet Protocol TIFF Tagged Image File Format Toner a customer replaceable unit also know...

Page 191: ...Copying 29 Jam Clearance 171 Laser Safety 31 Legal and Safety 25 Loading Paper 15 Loading Staples 147 Locating the Serial Number 140 Machine Administration 123 Machine Configurations 21 Machine Setup...

Reviews: