background image

14

getting started guide

Fax Setup

The WorkCentre 4150 and 4150s can have Fax installed as a optional feature. The Fax Kit 
will require both installation and setup. Fax on the WorkCentre 4150x and 4150xf is a 
standard feature but will require setup when the WorkCentre is installed.

Installing the Fax Kit (4150 and 4150s only)

1

Install the Fax Kit using the instructions in the Kit.
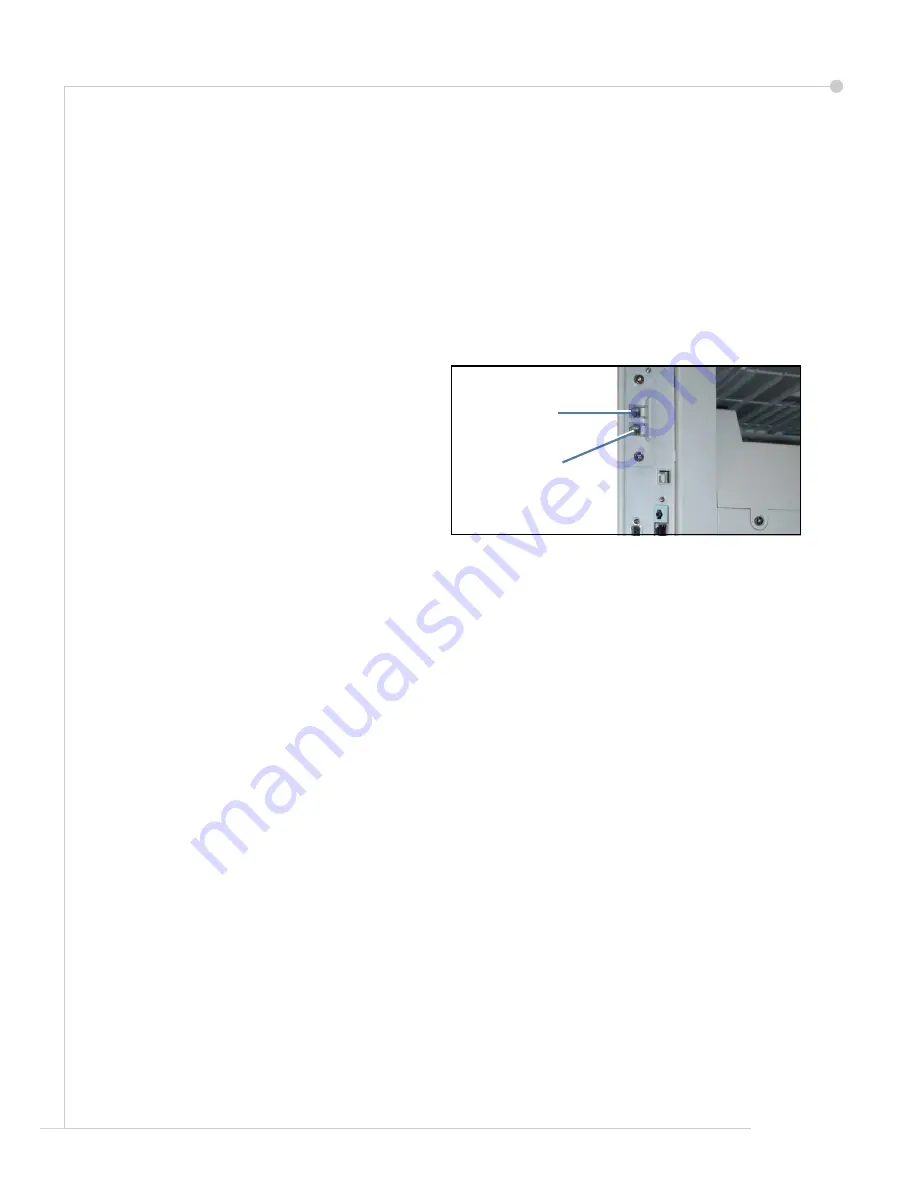
Connecting

2

Connect the telephone line to the 

Line


connector on the WorkCentre.

3

If you wish to attach a handset to the 
WorkCentre, connect the handset to the 

Ext.

 connector.

Setting up

4

Press the 

Access

 button to enter the 

Tools pathway.

5

On the numeric keypad enter

 [1111]

 or the current passcode and touch 

Enter

.

6

Select 

Go to Tools

 > 

More

 > 

Optional Services

 > 

Embedded Fax

. The Fax Install 

Screen will appear.

7

Select the required (or nearest) country location by touching the entry in the 

Country Setup


list and select 

Next

.

8

Select the required dialing method. For a tone line select 

Tone

. For a 10 pulse per second 

line select 

Pulse

. If in doubt, select 

Tone

.

9

Touch the keypad symbol for 

Fax Number

 and enter the fax telephone number for the 

WorkCentre.

10

Touch the keypad symbol for 

Machine Name

 and enter the friendly name for the 

WorkCentre.

11

Select 

Save

 and 

Close

 and 

Exit Tools

. The WorkCentre will now send and receive fax 

transmissions using default settings. If you wish to change the Fax Setup enter the Tools 
Pathway as described in steps 4 and 5 and select 

Go to Tools

 > 

More

 > 

More

 > 

Fax 

Setup

. The various Fax options can be selected and changed.

Handset

(Ext.)

connector

Line

connector

Summary of Contents for 4150 - WorkCentre B/W Laser

Page 1: ...WorkCentre 4150 Getting Started Guide...

Page 2: ......

Page 3: ...WorkCentre 4150 Getting Started Guide...

Page 4: ......

Page 5: ...Set up the WorkCentre Install optional features Operate the WorkCentre Contents Install the WorkCentre 3 Switch On the WorkCentre 4 Your WorkCentre 6 Connecting to the Network 9 Install Print Drivers...

Page 6: ...by Xerox Corporation All rights reserved Copyright protection claimed includes all forms and matters of copyrighted material and information now allowed by statutory or judicial law or hereinafter gra...

Page 7: ...Centre 4150xf Standard Features Copy Tray 1 and Bypass Tray Copy Print and E mail Tray 1 and Bypass Tray Copy Print E mail and Fax Trays 1 and 2 and Bypass Tray Copy Print E mail Fax Trays 1 2 3 4 and...

Page 8: ...blement Key into the Card Reader Slot on the left side of the machine 3 Connect the Power Cord to the machine and a suitable power supply outlet 4 Switch on the machine 5 The Language Default screen w...

Page 9: ...on each screen 12 The Set Greenwich Meantime Offset screen will be displayed Greenwich Mean Time GMT is World Time and is the basis for every world time zone A table of GMT Offset is included at the...

Page 10: ...ing the Machine Status button 1 4 2 3 Control Panel Touch Screen and Numeric Keypad Finisher Optional Finisher collates and staples output Paper Trays Tray 1 is standard Trays 2 3 and 4 are optional A...

Page 11: ...uage shown on the display Access Provides access to machine setups for the Administrator Numeric Keypad Use to enter alphanumeric characters Cancel entry Cancels the entry made on the Numeric Keypad E...

Page 12: ...ed and press Confirm Loading Documents Documents can be loaded either into the Document Feeder or onto the Document Glass 1 Load documents to be copied face up in the input tray of the Document Feeder...

Page 13: ...ddress Use this method to manually assign an IP address provided by the network administrator When the WorkCentre is powered on it automatically uses DHCP to obtain its network configuration To use a...

Page 14: ...nter 2 On the screen select Go to Tools Connectivity and Network Setup Network Setup TCP IP Options 3 Select HTTP and Enable Select Save 4 Select TCP IP Settings 5 Touch the Dynamic Addressing button...

Page 15: ...CD into the CD drive 2 If the CD does not start automatically go to the Start menu select Run and browse to the CD drive Select Setup and click OK Click OK to start the installation procedure 3 Select...

Page 16: ...est the E mail account by sending an E mail to the Xerox device account This task should be completed at a mail client on your network that supports SMTP Simple Mail Transfer Protocol and POP3 Post Of...

Page 17: ...etup 13 On the E mail Setup screen you can select the following options Scan Resolution Attachment Type Output color Date Time stamp on Pdf documents From and To Security Options Auto send to self Spe...

Page 18: ...ouch Enter 6 Select Go to Tools More Optional Services Embedded Fax The Fax Install Screen will appear 7 Select the required or nearest country location by touching the entry in the Country Setup list...

Page 19: ...x and 4150xf and can be purchased from your Xerox Sales Representative Network Scanning enables you to convert your hard copy documents to electronic files and retrieve them from a server or workstati...

Page 20: ...Security Kit is an option kit available for purchase from your Xerox Sales Representative for all connected WorkCentres When a job is processed it is stored on the hard drive For security you can del...

Page 21: ...ss the Job Status button on the Control Panel to display the Job Status screen The queued copy job will be displayed in the queue Basic Copying Image Adjustment Output Format Reduce Enlarge reduce or...

Page 22: ...nd resulting from copying colored paper or newspaper originals Creating booklets A sequential set of either 1 sided or 2 sided originals can be copied to create handy booklets The WorkCentre produces...

Page 23: ...The print driver has various tabs that contain options and properties The Advanced tab contains various font and printing options Use the Paper Output tab to choose the type of media size and color a...

Page 24: ...ave to save current settings Click on Load to load previously saved settings Toner Saver If you are printing draft documents you can reduce the toner dry ink used by selecting the Toner Saver feature...

Page 25: ...ipients to the Send List to send the same fax to several recipients This button provides access to the dial directory for individuals and groups 4 Select the required features for your fax job They ar...

Page 26: ...Resolution You can select Standard for most text documents Fine for line art and photos and SuperFine for photos and halftones or images that have gray tones Set up a dial directory Use this feature t...

Page 27: ...Basic and Advanced Settings tabs NOTE The Option tab enables Document Management options The Refresh Destinations tab will refresh the Template Destinations list if new templates have been created 5...

Page 28: ...ates list on the left hand side Name Format 4 To select the name and the format of the scanned document select Edit Enter a name for the scanned document and choose the format from PDF Multi Page TIFF...

Page 29: ...recipients can be added to the Address List in this way 5 Touch CC and or BCC to copy the E mail to other recipients 6 Select Edit Subject and enter the Subject of the E mail 7 Select any setting app...

Page 30: ...a JPEG JIF format which is a better compression format for color bitmaps To enable Color scan to E mail select the Basic Settings tab and choose the Color option Select Color NOTE When color scanning...

Page 31: ...for the WorkCentre 4150 print driver select Configuration Installable Options and set LAN fax to Installed 3 To send a LAN Fax simply select Print from your application Select the WorkCentre 4150 as...

Page 32: ...ized notes can be sent with your fax Use Send Speed to select a specific rate at which to send your fax and use Fax Resolution to adjust the quality A Send Time can be entered to send the fax at a spe...

Page 33: ...he Screen Defaults and System Settings The Address Book comes in handy when you have built up a list of frequent fax or mail recipients Use this feature to program the Address Book with recipients det...

Page 34: ...r staples and customer replaceable units Units like the SMart Kit Drum Cartridge Toner Cartridge and Staple Cartridge are customer replaceable meaning you can replace the consumable without having to...

Page 35: ...wer cord is correctly installed Press the ON OFF button to ON I Documents will not feed through the Document Feeder Ensure that all staples or paper clips have been removed from the originals Ensure t...

Page 36: ...and configuration Document jams The display will indicate when a document jam has occurred Follow the instructions on the display and remove all the documents from the document feeder and document gla...

Page 37: ...on CDs with the WorkCentre Alternatively you can access the documents from www xerox com support User Guide contains instructions and information about all the features on the WorkCentre System Admin...

Page 38: ...key 2 0 Jakarta 7 0 Quito 5 0 Bulgaria 2 0 Krasnoyarsk 7 0 Eastern Time US Canada 5 0 Egypt 2 0 Beijing 8 0 Atlantic Time Canada 4 0 Isreal 2 0 Chongqing 8 0 Caracas 4 0 South Africa 2 0 Hong Kong 8 0...

Reviews: