Chapter 12 - Accessories • 203
3.
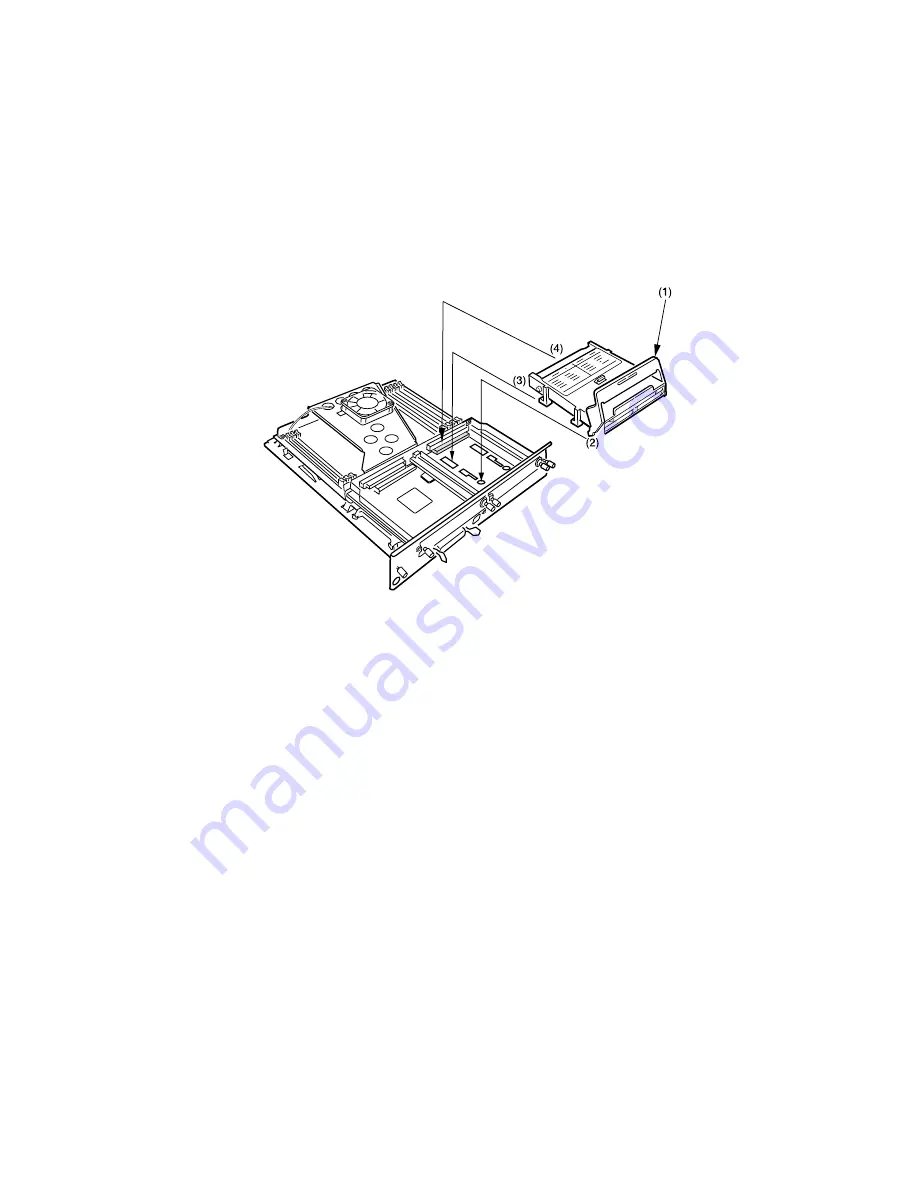
Hold the hard disk drive by the locking handle (1), then insert the
handle locating lugs (2) and four locating feet (3) into the holes in
the main board making sure the hard disk connector (4) starts to
engage with the socket on the control board.
4.
Gently
push down on the locking handle (1) making sure the hard
disk moves forward and fully engages with the socket.
5.
Replace the main board and secure it with the two screws.
6.
Connect the printer interface cable and power cable, then switch
on the printer.
7.
Print a MenuMap and check that the HDD appears at the top of
the MenuMap. If it doesn’t, pull the main board back out and
reseat the HDD.
The printer will automatically configure to include this option.
However, you can also set the menu manually as follows:
1.
Press the MENU button until
DISK MAINTENANCE
is displayed,
then press the SELECT button.
2.
When
HDD INITIALIZE
is displayed, press the SELECT button.
3.
Press the ITEM button to shut down the printer.
Summary of Contents for CL30
Page 1: ......
Page 21: ...Chapter 2 Getting Started 12...
Page 61: ...Chapter 3 Setting Up 52...
Page 62: ...Chapter 3 Setting Up 53 Item Value...
Page 63: ...Chapter 3 Setting Up 54 Item...
Page 64: ...Chapter 3 Setting Up 55...
Page 83: ...Chapter 3 Setting Up 74...
Page 85: ...Chapter 4 Mac OS 8 6 9 2 2 Printer Driver 76 4 Click Select to activate the Description file...
Page 89: ...Chapter 4 Mac OS 8 6 9 2 2 Printer Driver 80...
Page 91: ...Chapter 4 Mac OS 8 6 9 2 2 Printer Driver 82...
Page 121: ...Chapter 5 Mac OS 8 6 9 2 2 Operation 112...
Page 123: ...Chapter 6 Mac OS 10 1 5 Printer Drivers 114...
Page 204: ...Chapter 11 Troubleshooting 196...


