background image

52

53

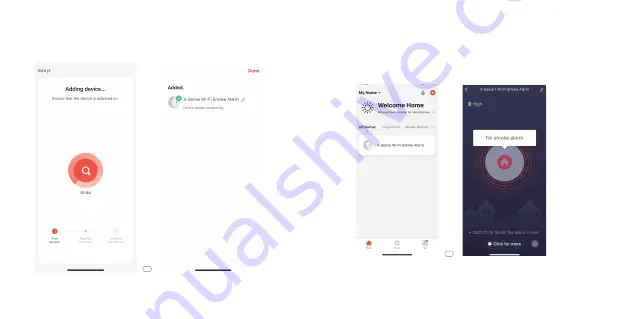
13. After successful connection, the LED indicator will stop fl ashing blue and 

the added device will be displayed in the app. Then, end this mode by 
clicking "

Done

".

14. After the installation is complete, you will see the start screen (left image) 

for the app displayed for a short period, then the app will jump to the 
device's home screen (right image).


Here you are informed about the battery level and status of the device 
"(

No smoke alarm

)".

Note! 

If the newly added device shows that it has smoke in the sensor (

Notice, 

smoke detected

) remove and insert the battery again, and the device will enter 

monitoring mode and show the normal surveillance text (

No smoke alarm

).

13

14

Summary of Contents for XS01-WT

Page 1: ...3 X Sense Innovations Co Ltd Email support x sense com Conforms to EN 14604 2005 AC 2008 User Manual SE EN XS01 WT Wi Fi Smoke Alarm ...

Page 2: ...örbättras och produktportföljen utvidgas ständigt Besök gärna vår hemsida för att ta del av våra nyheter OBS Innan vi börjar vill vi förtydliga skillnaden mellan en sammankopplad rökvarnare och en Wi Fi ansluten enhet med App stöd En sammankopplad rökvarnare av typen XS01 W bygger på att enheterna själv skapar en grupp som är lokal och inte behöver stöd av Wi Fi Appar eller molntjänster Det innebä...

Page 3: ...sning Högt Piezo Elektriskt larm på 85dBA För att skydda din hörsel använd hörselskydd när du provar enheterna Larmet återställs automatiskt när detekteringen av rök upphör Om rummet är rökfyllt och det inte föreligger någon brandrisk ventilera ut röken för att få enheterna att återgå till normalt bevakningsläge Paketets innehåll 1 Rökvarnare 1 Pinn 1 Monteringsfäste 1 Bruksanvisning 2 Skruvar 1 G...

Page 4: ...er Google Play eller skanna helt enkelt QR koden nedan för att installera TuyaSmart Appen i din Smartphone Du måste registrera ett konto på Tuya för att gå vidare När du öppnar TuyaSmart för första gången kan du se en informationsruta som visar hur det går till när man lägger till enheter och att man måste använda 2 4Ghz nätverk Klicka dig igenom informationen Och avsluta på x et längst ned 2 Ta b...

Page 5: ...r gruppen Larm och i Larmgruppen väljer ni Larm Wi Fi om ni föredrar detta 5 Välj det Nätverk du vill använda som skall vara på 2 4Ghz bandet Ange nu Lösenordet till din Wi Fi router och välj Nästa 6 För att aktivera röklarmet och ansluta till Wi Fi håll in test pausknappen i 3 sekunder Röklarmet piper en gång och LED indikatorn blinkar snabbt blått 7 Välj Confirm indicator rapidly blink i Appen f...

Page 6: ...yckas under den tiden måste rökvarnaren anslutas på nytt Ta ur batteriet en kort stund och börja från punkt 2 igen Vanligt problem kan vara att du är utom räckhåll från ditt nätverk eller har skrivit in fel lösenord av misstag för Wi Fi nätverket 9 När installationen är klar kan du se startskärmen vänster bild för Appen en kort stund sedan hoppar Appen vidare till enhetens startskärm höger bild Hä...

Page 7: ... XS01 WT enheten EZ läge Betyder att Tuya Appen skickar ett UDP paket eller ett Multi Cast paket som innehåller WiFi användarnamnet och WiFi lösenordet till Rökvarnaren XS01 WT utan att behöva några extra inställningar AP läge Appen konfigurerar mobiltelefonen för att ansluta till den intelligenta hårdvaran AP för WiFi chip i Rökvarnaren detta läge är för lite mer erfarna användare AP Access Point ...

Page 8: ... Wi Fi inställningssidan i er Smartphone och välj sedan Rökvarnarens AP med standardnamnet SmartLife XXXX eller SL XXXX Efter att ha anslutit till någon av dessa två välj och avsluta med Anslut nu återgå till TuyaSmart Appen och fortsätt med konfigurationen 13 Efter lyckad anslutning slutar LED indikatorn att blinka blått och den tillagda enheten kommer att visas i Appen Välj då att avsluta inlärni...

Page 9: ...den har rök i sensorn Larm Rök detekterad tar du ur och sätter i batteriet igen så försvinner detta av sig själv och enheten går över till övervakningsläge och visar den normala övervakningstexten Normal drift 15 Om man får ett larm in till TuyaSmart Appen så kommer er Smartphone larma med hjälp av ljud och bild om ni tillåter aviseringar vill säga kan ställas in under Notiser i er Smartphone inst...

Page 10: ...a informationen vidare via Wi Fi det gör att intervallen för batteribyte kan bli kortare än 1 år samt likvärdigt bli längre åt andra hållet om man minskar antalet aviseringarna 16 Larm kommer även visuellt genom en pop up skärm och en bestående indikering i hemskärmens läge för enheten så länge den är i larmläge Larm Rök detekterad Samtidigt läggs en händelse till i loggen som kan hittas under kna...

Page 11: ...m Historiskdata logg För att komma till Historisk data eller loggen trycker man på knappen Click for more som återfinns längst ned på Hemskärmen för enheten blå bakgrund Under Historiskdata kan man klicka sig vidare för att kontrollera eventuella larm eller liknande information som enheten har sparat Om man vill ta bort historiska data klickar man bara på clear historical data längst ned på sidan o...

Page 12: ...Fi router eller byta internetleverantör Alternativt om man undrar varför XS01 WT tappar kontakten med Wi Fi routern eller moln servern och står och blinkar blått från en tid till en annan Slå på Offline Notification då kommer det upp en text som beskriver att om enheten är batteridriven så sker det endast uppdateringar var 8 e timma Denna information kommer då skickas från moln servern beroende på at...

Page 13: ... man installera OBS Om man skall montera rökvarnare i kök bör den ha pausfunktion samt monteras så långt ifrån spis och diskbänk som möjligt för att undvika falsklarm Rökvarnare Rök CO Varnare CO Varnare Brandsläckare ...

Page 14: ...är möjligt Se till att rökvarnaren är installerad på ett minimumavstånd om 50cm från alla hörn Tänk på att inte montera i närheten av ventilationsdon 4 Om en rökvarnare inte kan installeras mitt i taket skall du installera det på ett minavstånd av 50cm från hörn eller väggar i rummet 5 Om en rökvarnare installeras på en vägg bör du hålla ett avstånd på 10 30cm under taket 6 Om ett rum eller en hal...

Page 15: ...us kan orsaka störande larm BS Innan installation rekommenderar vi att ni testar de Wi Fi baserade rökvarnarna i olika rum där ni tänker installera dessa enheter för att säkerställa att de ligger inom Wi Fi routerns räckvidd och att inget stör kommunikationen på något vis Installationsmetod 1 Använd monteringsplattan för att markera skruvhålen i taket eller på väggen 2 Tänk på att det kan dölja si...

Page 16: ... testet lyckades inte anslutningen till Wi Fi routern och rökvarnaren måste anslutas om på nytt upprepa stegen i avsnittet Ställ in och anslut rökvarnaren till Wi Fi alternativt kan det kanske vara något fel på er Wi Fi anläggning kontrollera gärna detta först Till exempel har ni bytt lösenord router eller gjort liknande justeringar i er anläggning Även om er enhet inte har kontakt med routern så ...

Page 17: ...n för att underlätta borttagning av batteriet och sätt sedan i ett nytt batteri av god kvalitet glöm inte att matcha polaritetsmarkeringarna rätt och 3 Montera sedan tillbaka enheten på monteringsfästet genom att vrida medurs för att låsa fast rökvarnaren på plats och avsluta med att testa rökvarnaren Tänk på att använda hörselskydd ...

Page 18: ...Kommentar Normalt Den röda lysdioden blinkar var 60 e sekund Inget Wi Fi Upp koppling LED indikatorn blinkar blått fyra gånger varje sekund 1 tut EZ läge LED indikatorn blinkar blått en gång per sekund 1 tut AP läge Test Knappen lyser rött och piper samtidigt tre gånger 3 tut Alarm Den röda lysdioden blinkar varje sekund Pulserande Alarm Tut Appen kommer omedelbart att meddela dig om att det finns ...

Page 19: ...llanden ändras till ett larmtillstånd minskar batteriets livslängd därefter Om enheten har varit i larmläge länge och eller är kraftigt rökskadad anses enheten ha sparat liv och då kan inte garantin åberopas Garantin täcker inte batterier Underhåll Följ dessa enkla steg för att hålla din rökvarnare i gott skick 1 Kontrollera att enhetens ljud och ljus indikator fungerar korrekt genom att testa enh...

Page 20: ...2 gånger var 40 e sekund ihop med 2 klick Rökvarnaren fungerar inte som den skall Rengör din rökvarnare eller byt ut den omedelbart Blå lysdiod blinkar kontinuerligt under ett test Appen visar att larmet är frånkopplat Rökvarnaren kopplas bort från routern Kontrollera att enheten har installerats inom routerns täckningsområde se avsnittet Hur man ansluter via EZ läge standardläge Nätverkskonfigurat...

Page 21: ...European standard EN 14604 2005 AC 2008 and is designed to detect smoke and alert personnel in the vicinity X Sense products are being improved and the product portfolio is constantly expanding Feel free to visit our website to keep up with the latest from X Sense NOTE Before we begin we want to clarify the difference between an interconnected smoke alarm and a Wi Fi connected device with app supp...

Page 22: ... 85 dB at 3 m To protect your hearing use hearing protection when testing these devices This alarm is automatically reset when the smoke ceases If the room is full of smoke and there is no risk of fire ventilate the smoke to let the unit return to its normal monitoring mode as quickly as possible Package Contents 1 Smoke Sensor 1 Pin 1 Mounting Bracket 1 User Manual 2 Screws 1 Warranty Card 2 Ancho...

Page 23: ...rch for TuyaSmart in the App Store or Google Play or simply scan the QR code below to install the TuyaSmart App on your smartphone You must register an account on Tuya to proceed When you open TuyaSmart for the first time you may see an information box showing you how to add devices and that you will need to use 2 4 GHz Wi Fi networks Follow the information provided and when finished remove the pop ...

Page 24: ...en the connection page for the device You may also choose to add a device under the Alarm group In the Alarm group select Alarm Wi Fi if you so prefer 3 Open the TuyaSmart App and tap the icon at the top right of the Home screen if you already have units installed or click on the Add Device button in the middle of the screen to add your first device 03 04 ...

Page 25: ...t again from step two Common problems include being out of range or that you have typed in the wrong Wi Fi password by mistake 5 Select the Network you want to use it should be on the 2 4 GHz band Then enter the Password of your Wi Fi network and select Next 6 To activate the smoke alarm and connect to Wi Fi hold down the test pause button for three seconds The smoke alarm will beep once and the L...

Page 26: ...our device and can continue to step 15 in these instructions At step 15 you set the choice of notifications and how to make different settings for the app and the unit However if you have not yet found your device read the next section Some smartphones are not compatible with EZ mode and you will need to switch to AP mode to send information about your network to the XS01 WT device EZ mode Smart con...

Page 27: ...to activate the built in access point The device will beep and the LED indicator will light up blue briefly 11 Select Confirm the indicator is blinking slowly in the app and press Next After a while the unit will start flashing blue in one second intervals indicating that the smoke alarm is now in AP mode 12 Tap Connect now to jump to the Wi Fi settings page of your smartphone then select the smoke ...

Page 28: ...en left image for the app displayed for a short period then the app will jump to the device s home screen right image Here you are informed about the battery level and status of the device No smoke alarm Note If the newly added device shows that it has smoke in the sensor Notice smoke detected remove and insert the battery again and the device will enter monitoring mode and show the normal surveil...

Page 29: ...r smartphone s settings menu select TuyaSmart and adjust to your preference 16 Alarms are also displayed on the app via a pop up screen and a permanent indication on the Home screen for the device displayed as Notice smoke detected At the same time an event is entered in the log that can be found under the Click for more button 15 that can be found under the 16 ...

Page 30: ...ery eight hours which can be perceived as somewhat annoying The more information you activate the more power the device will consume as it creates more need for the device to transmit information which means that the intervals for battery replacement will become shorter than the advertised one year Historical Data Log To access historical data or the log click the Click for more button located at ...

Page 31: ...re thorough troubleshooting of your system Rename the Unit Icon or Location You can change the settings on the device you work with if you have several in a system and would like to identify them individually In the picture above you will see an image of a smoke device followed by the name X Sense Wi Fi Smoke to the right there is a pen symbol Click on it and change the Icon Name and Location ...

Page 32: ...ver and flashes blue from time to time Turn on Offline Notification and a text will appear describing that if the device is battery powered updates are made every eight hours This information will then be sent from the cloud server due to the device not having made contact within a specified time span This does not mean that the device or your Wi Fi router does not work properly but for some reason ...

Page 33: ...aircase and on each floor of the house 3 Smoke and heat spread horizontally after it has risen to the ceiling so install the smoke alarm in the middle of the ceiling where possible Make sure that the smoke alarm is installed at a minimum distance of 50 cm from all corners Remember not to mount near ventilation devices 4 If a smoke alarm cannot be installed in the middle of the ceiling install it at...

Page 34: ...entilation and associated flue gas systems i e take care of your combustion system so it is safe to use Locations to avoid 1 Near large metal surfaces and or where there are a lot of cables and the like that can interfere 2 In the vicinity of fluorescent lamps amateur radio units electrical equipment or other units that may transmit an RF signals as electronic noise may cause disturbing false alarms...

Page 35: ...ou hold down the button for more than three seconds the smoke alarm will enter a reconnecting mode in the app and could clear previous settings 3 The unit will beep three times while the button is lit in red 4 If your device is connected properly to your Wi Fi router the LED indicator will flash blue 8 10 times indicating that it is connected and testing the connection 5 After a short time the blue...

Page 36: ...h mode Press the test hush button again to return to normal monitoring or wait for nine minutes until the smoke alarm automatically exits the hush mode The app will notify you when the unit has left the hush mode and you can also hush the device from the app if you want However this assumes that you are on site and know why the alarm has gone off and that there is no risk to others if the unit is s...

Page 37: ...acket by turning it clockwise to lock the smoke alarm in place and finish by testing the smoke alarm Remember to use hearing protection How to Remove Your Device Open the settings page and press the highlighted button Remove the device There are two choices Disconnect the device is disconnected from the app and all settings and i nformation that the user has set for this device are saved Disconnect...

Page 38: ...testing the connection 3 short beeps Alarm Red LED flashes once every second 3 loud beeps The app will immediately notify you that there is dangerous smoke in the smoke alarm Hush Mode Red LED flashes once every 5 seconds None Low Battery Red LED flashes once every 60 seconds 1 beep every 60 seconds The app sends a message about low battery level Malfunction Red LED flashes twice every 40 seconds 2 be...

Page 39: ...und and indicator are working properly by testing the unit once a week 2 As a minimum your smoke alarm should be cleaned once every three months Remove the unit from the ceiling and clean the alarm cover and vents with your vacuum cleaner fitted with the soft brush attachment to remove dust and dirt 3 Never use detergents or other solvents to clean the unit 4 Avoid spraying air fresheners hair spra...

Page 40: ...ake sure that the alarm has been installed within the router s coverage area see the How to connect via EZ mode Default mode section The network configuration failed in EZ mode Your mobile phone may be incompatible with the EZ Mode Please connect again or switch to AP mode see the How to connect via AP mode section Environmental Protection Electrical waste products must never be disposed of with ho...

Page 41: ...78 79 Distributor and Service Deltronic Security AB EA Rosengrens gata 4 421 31 Västra Frölunda Sweden 46 31 140800 info deltronic se www deltronic se Version 2021 01 11 ...

Reviews: